-
Contributing Member


I rasped/filed/sanded down the square part of the stock that was left. I started with a bench plane, and got a bowl full of nice wide chips. I need to make a shim with these under the rear band, as there wasn't enough material there after fitting the band to the barrel. I was going to try soaking them in water to get them pliable, then laminate them together with wood glue, cut to shape, and wrap around the underside of where the band goes. Hold it in place with a rubber band and let it dry, then blend it all in with a file. Won't see it under the bottom of the band.
Another tough decision...grasping grooves. The maker left an index mark where they start/stop. I can sand those out and leave it without, or I can lay it out using the index mark, then either a spoon chisel and do it by hand, or I think a 5/8 box cove bit would get it close enough as long as I could keep it straight. I'm leaning doing it them by hand. but need to build a cradle first.
-
-
10-08-2021 11:33 PM
# ADS
Friends and Sponsors

-
Contributing Member
I finally got back to this one. Too bad all the pictures were gone.
I bought a second stock from Jesse at https://www.prestigiouswoodstocks.com. The wood was certainly beautiful - walnut is lightly marbled on the butt, swooping up through the wrist, then straight down the forend - as if the tree grew that way because it knew it would go on a krag someday. However, there was no tolerance under the receiver, under or around the tang, to balance the action. Out of the box, I had to make a shim of 0.100 to go under the tang. The area around the forward screw is also to low. Out of the box, I'll have to file a couple threads off my front screw as it bottoms out in the receiver. I emailed Jesse, and he was kind enough to correspond with me, and seemed interested in improving his pattern. I think he uses a CNC setup, instead of a manual duplicator like others. I did my best to level out under the receiver without messing with the area around the front screw. This was a few months ago. I got frustrated I wasn't getting a perfect fit, and wouldn't be able to no matter what. Two stocks now, same problem. Not enough material around the action to get even bedding under the tang, under receiver, and at the muzzle. So I quit and moved on to other things to let my confidence build up again.
This brings us to this long weekend. I decided I would finish it - regardless of the fit. Jesse's stock was too beautiful to give up. And his handgaurd is finished - except for rivets and bands. I accomplished the following:
1) The recoil area was a bit chewed up with tool marks, but I evened that out easy enough without setting the action back too much. The bolt recess was similar, so I chiseled it smooth.
2) I had no choice. With the front screw tight, the muzzle is off the forend by over 1/2". If I shimmed under the tang or receiver to fix it, the top of the tang would sit proud of the wood by over 1/4". And as I said, I have no wood under the receiver or tang to balance it. So, I fit the front band to the stock. I had almost 1/4" of material to remove. This allowed me to get measurements for where the lower band would sit. This has to be fit to the stock AND barrel.
3) The lower band only slid on maybe an inch from the muzzle before it stopped. The forend of this stock was not tapered to the muzzle like my original. It was spot on with no tolerance where the band sits, but fatter at the muzzle area. And, the top of the sides are not curved slightly inward like they should be. So, I spent all day Sunday re-profiling the forend to get the lower band to slide down.
4) Without removing any material from the underside where the lower band sits, or the top wall, I slid the band down to it's shoulder. Before fixing the forend, I measured and calculated that I would have 5 thous. gap above the barrel. Well, I was close. the gap was 10 thous. Easy enough. I sanded a few dozen long, even strokes across the top and all is good.
5) I next fit the butt plate. Not much to do. to get it to sit flat. It was spot on -- too perfect. There is NO room for sanding around the edges, especially around the toe.
6) I tightened the barrel on all the way (some parts of krag stock fitting are way easier with the barrel off) - double checked headspace and extractor cut. I think I mentioned before that the criterion barrel's extractor cut is slightly off. Tightened until the sights are level with the top of the receiver, the witness marks line up PERFECT, but the extractor cut is slightly off. It's not too far off, but just enough to make the extractor stick when opening the bolt. Lapping the side of the extractor claw made it work. Any worse and I would have had to take the barrel off to file the extractor groove wider.
7) Today, I made a shim to go under the tang, glued it in, chased the rear screw hole after it dried, then used chisels to hide it. I tested my wife and asked her to look it over and find where I glued in a repair piece. She couldn't find it.
8) Then, starting at the forend, I began my final sanding. Last place to sand was underside of the butt. That's when I noticed that there was no inletting for the rear swivel! Well, I traced it out and did it by hand with an exacto knife and hand chisels. First time doing anything like that from scratch! looks perfect and sharp.
9) doing the rear swivel reminded me I need to drill for the lower band retaining pin. Need to make a pin out of a nail. I have brass or steel. I think steel is correct. This will have to wait till next end, along with inletting the handguard for the sight.
I'm debating on how to finish the wood. It's so nice, I think I will do a red-oil and sand it in to close the grain. I'll try to get some progress pictures out this week.
-
-
-
Contributing Member
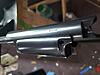
Since all the pictures were lost, I went digging to recover some of them. here is were it all started last spring - just an old sewer pipe and a paper weight (receiver)
I collected all the missing parts, including a beautiful NOS bolt with fine NOS case hardened, peacock blue extractor. While I sourced a stock, I learned to slow rust blue for the first time, practicing first on some old parts I had lying around then refininishing all my parts. The rear sight came out especially nice. I think it was butlersrangers who said somewhere on this forum that the ladders originally came in the white. Very sharp.
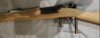
Stock fitting woes then commenced. I bought a pretty nice replacement stock. I was able to fit the receiver very well, but there was not enough meat on the forend and the lower band left a large gap underneath. I set it aside for a couple months to chew on my next move, considering gluing in more wood under the band and blending it best I could. Then heard here on milsurps that https://www.prestigiouswoodstocks.com started making full length krag stocks. I bought one. See my last post about fitting it last weekend. I finished the details tonight. The handgaurd required little work to fit. It's much thinner than the one on my original krag. It didn't have the opening for my rear sight, so I did that - came out nice and tight. I measured fore and aft, marked a centerline by putting a dab of black on the top of my calipers, and gently touched them to the handgaurd, then removed the build of the material with a 5/8 forester bit. I then set the sight on it, and outlined with pencil and rough cut with my dremmel. I lastly carefully filed the corners square, and worked it open till the sight dropped in on the barrel through the wood. All that is left now is the clips and rivets.
I did have another handgaurd I bought from https://www.shop.macongunstocks.com/...-Handguard.htm. It came looking like a block of wood that someone dug out with a spoon. I finished carving it last night. It already had a rough opening for the rear sight, which was too long by over 1/4". I'll use it to practice riveting clips.
So here is where we are now. I'm pleased.
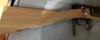
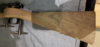
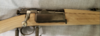
As you can see, not much meet on the hand guard - windage lever is no where near close to the top of the wood. Look at how the grain turns and flows up through the wrist, then curves again to flow down the forend!
EDIT: Inspected my original. Handgaurd rivets are blued steel, 1/4" flat heads, 1/4" long. I found these https://www.ebay.com/itm/35333891076...gAAOSw8RZaYnZ0. Hard part will be peening the inside. Now I need to locate appropriate steel for the clip. I know it is spring steel, which I can't seem to find. I've read of folks using steel pallet banding. Seems though this is only available in big rolls. Anyone have a small piece they might send me?
Last edited by ssgross; 01-21-2022 at 09:14 PM.
-
-
Contributing Member

A small Jerry Fisher scraper or barrel bedding tool, the type with interchangeable discs will make short work out of the grasping grooves.
Start from the other end and as you get towards the end of the groove let up pressure and they'll come right up to a nice taper where they end.
Then turn it around and scrape the other way. Depth and width is determined by how hard you press initially.
Go easy at first to avoid a run off/establish initial cut. You'll not need sandpaper in groove bottom and transition to the stock wall will be sharp as a tack.
Project is coming along nicely-Looks great!
-
Thank You to Doco overboard For This Useful Post:
-
Contributing Member

Originally Posted by
Doco overboard

A small Jerry Fisher scraper or barrel bedding tool, the type with interchangeable discs will make short work out of the grasping grooves.
The 2nd stock, pictured above from prestigiouswoodstocks.com already has grasping grooves. I just need to clean them up now the I have the rest of the stock sanded. The first stock I described has tiny dimples at the start and stop. One of these days I'll gut the grasping grooves in it. The rear band fit as I mentioned is unfixably sloppy. If I get another cheap action I may just fix up a shooter and sell it.
Doco, brownells finally got back to me after losing your gift card. I forwarded it to you the other week. Merry late Christmas, and thanks again for the use of your tools on this project.
-
-
Contributing Member
Played around with rivets today. Didn't I post a link to the ones I found? Guess not, here you go. https://www.ebay.com/itm/353338910765
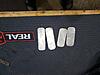
I had some scraps of walnut from testing stains to use for practice, they are about the same thickness as the area of handgaurd. I have some sections of 22 gauges steel to play with. I think it's a bit too thick at ~0.030. I need more like ~0.020-0.025 comparing the original (it's hard to get a good measurement on the curved surface). Easy to find 26 gauge galvanized on the web. should be perfect. Here is a chart for refefence. https://www.bestmaterials.com/PDF_Fi...auge-chart.pdf
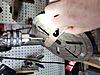
My rivets are perfect size compared to the originals. 1/4 heads, 1/8 body. I used my 1/4" forester bit to drill some counter sinks, and leave a center reference. My original has the heads just barely below flush. I then used a #31 drill to go through the center. This is too tight to fit the rivet through, but we want it very snug. I then chased the hole with a 1/8 bit on a hand tap. I could then tap the rivet through. Nice and snug. Cut a sliver of my sheet metal, and do the same. A roll pin starter worked well to tap over tail of the rivet.
I clamped a 1/4" punch in my vise, and tried to set the rivet. The soft steel rivet started to deform pretty easily with a flat punch and a few dozen light taps from my hammer. but after a few dozen ta. Then snap...the wood split. I investigated. My rivet is too long, and it started to smoosh the whole length, splitting the wood.
Next try...grind the rivet tail down till it protruded out only ~1/16 beyond the metal. This worked much better, but didn't really draw the rivet tight. I was worried it would split again.
I anticipated this from lots of reading. I needed a round surface to peen the rivet edges. easy enough on a flat piece of wood with a ball peen hammer, but would be impossible on the inside curved surface of the handgaurd.
https://www.amazon.com/gp/product/B00819DRNE/
These punches worked perfect but were a challenge to keep from slipping, even on the flat test piece.
Third time is the charm. I used a rounded tip stone on my dremmel to make a dimple in the tail of the rivet (after grinding it down to the length I needed). This made it easy to hold the ball-peen punch at any angle and tap until the tail was upset all around, drawing up the metal to the wood nice and tight. I think this technique will work well on the real deal.
Next up, get my 26 gauge sheet in the mail, measure twice and cut the right shape. Soak in 10% muriatic and sand/polish to remove the galvanized coating. Drill the handgaurd. Carefully measure for the holes in the metal, and drill them. Use my old barrel to form the clips (already practiced this with the 22 gauge), blue the rivets. Temper the clips, and blue. Then install. We are getting close! I'll make a how-to post with pics of all the steps above when I do it.
Last edited by ssgross; 02-13-2022 at 07:34 PM.
-
Thank You to ssgross For This Useful Post:
-
Contributing Member
How to fashion Krag handgaurd clips and rivets.
See above for a source of 1/4 head rivets with 1/8 shanks, soft steel, on eBay.
Here is step one..after fitting the handgaurd (sides flush with stock, sight cutout finalized, etc.
I laid out with pencil the centerline, and the center of the pre-milled grooves of the handgaurd. then measured the distance between rivets on my original on a piece of paper, and transferred to the new. I lightly dimpled with a center punch...lightly. the handgaurd at the grooves is < 1/4 thick..
Next, a 1/4 forstner bit on my drill press. I tilted the table until I had tangent to the curve of the handgaurd.
Handgaurd is tapered, so only one way to do it and that is holding it freehand. It was easier than it seems. Go just a little bit to trace the outline, check for even depth for-aft, side-side, and adjust. go a little more. I have no room for error on the depth. the new gaurd came a bit thin to begin with.
Next, use a 1/8 bit on a hand tap to drill the through hole. The advantage of the hand tap is it will not clean the hole out. You don't want it clean. This way, the loose fibers will keep the rivet really tight when you push it in.
Double check the depth of the countersink...cleaning out the bottom if needed. Be very careful. just a kiss of the forstner bit, twisted with your fingers not the drill press - and we are all done!
Now I can start on the finish while I wait on my sheet metal in the mail.
Last edited by ssgross; 02-15-2022 at 04:51 PM.
-
The Following 2 Members Say Thank You to ssgross For This Useful Post:
-
Contributing Member
Making hand guard clips
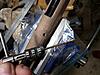
original clips are 24 gauge steel. All I could find was 24 gauge galvanized, which is a bit thicker.
1) measure the diameter of the handgaurd grooves. the originals seem to be about 2/3 the circumference, so that's what we did. I cut two sets just in case. Pound them back out flat on the anvil, then use a stone on the dremmel to round the corners, and make the cut side as straight as possible. Lastly a file to get all the burrs off. Don't want these to scratch the barrel.
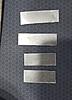
2) Next, I ground off the galvanized coating with the dremmel, and sanded to 240. Easier to do when it's flat.
3) I marked the old barrel where the bands would be. Then clamped it in the vise, and formed the clips, pressing it around while holding the top, then use a hammer to curl the ends around.
I started just below where they would go, so they would slide up tight, but this doesn't exactly matter. Slide the bands up to widen until they match the radius of the handgaurd. After we rivet them in, we will curl the ends slightly to make it clamp tight on the barrel.
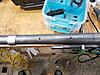
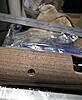
4) hold them in place in the handgaurd, and use a sharpie to mark them for 1/8 holes. Then put them back on the barrel and center-punched, then drilled out the holes and de-burred with a large bit.
5) put the rivets through the wood and clips, and use a sharp pencil to mark the inside. Then I ground down their tails on the grinder until just my mark showed.
6) Slow rust blued the clips, and the heads of the rivets, with mark lee's express. I started by just heat-bluing the heads to a nice peacock blue, but I could only get a nice even color if I polished the heads first. The originals aren't perfectly smooth, and have their bluing intact, so I decided to not get fancy, and match the original finish.
Next post, install everything and peen over the tails. Then, curl the ends of the clips to hold tight.
I toyed with the idea of case-hardening the clips. Read a DIY somewhere that suggested packing them in crushed charcoal in a tin can, dig a hole in the yard and drop it in, surrounded by charcoal, and bake it it for a few hours. Maybe the next one. I think my clips will hold fine.
Last edited by ssgross; 02-27-2022 at 08:05 PM.
Reason: added another picture
-
Thank You to ssgross For This Useful Post:
-
Contributing Member
Well poopiesticks.
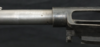
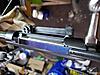
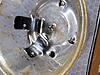
While my last coat of oil was drying on the stock, I went to put the action all together for the range later this week. I did a function and feed test. Wouldn't you know, the last round won't feed! Started troubleshooting part by part swapping with my original, perfect functioning, rifle. Started with the sideplate since it's common for the geometry to be off if bubba had been messing with it. Nope. Maybe the spring is worn? Nope. Now I'm worried. Did bubba mess with the receiver? Would be pretty sad after a years worth of work making all perfect. Nope.
So, the carrier/follower is sticky, and doesn't seem to pop across all the way and lift the round up. The original works fine in both rifles, this one which I bought on eBay for a deal fails in both. I ordered a new one. May try to play with this one. I'll get some pics of the good an bad one side by side. Maybe one of you can see what it is. The bad carrier is about 4 thousandths taller than the good one in the area right before the rear edge of the follower.
-
-
Contributing Member
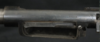
krag carrier
Wow. I couldn't find anything on the web about fitting a krag carrier. Well, I figured it all out and now my carrier works. A bit smoother opening the door than it was before, but still no where close to how smooth my original is. will need some more work
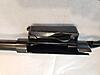
Here is a krag carrier
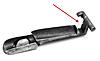
The arrow is pointing to the bottom surface. On mine, it was at least 10 thousandths too far down. There is a boss on the loading gate that mates against this area, pulling the follower back when the gate is rotated open. Well, the distance the follower can push into the magazine depends on the dimensions. With the gate closed, the bottom edge (red arrow) has to slip part way up the boss on the gate. So my carrier wasn't pushing all the way into the magazine.
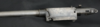
Fixing the above created another problem, the gate required waaaay too much force to open. Comparing to the working carrier, and playing with some layout fluid, we see the the inner surface where the red arrow is pointing is actually a curved cam. The curved boss on the gate slides along this part of the carrier. So, I tiny stone on my dremmel and tiny strips of sandpaper to make it curved again did the trick. Next thing to do would be to put bit of fine lapping compound there and make it even better.
You would think there would be a post or article somewhere on the web about how to lap smooth a krag loading gate? Nope. Nothing in my vintage smithing books either. Oh well. I have another carrier coming anyway. If it at least feeds, that's better than this one. I'm afraid I had to sand through the case hardening to get it to feed, and so lapping won't really work. the softer steel on the carrier will always feel sticky.
-


 PM
PM


