-
Advisory Panel


Refurbishing an Argentine RB - Part 2
Disassembly
Numbers refer to the diagram that you posted.
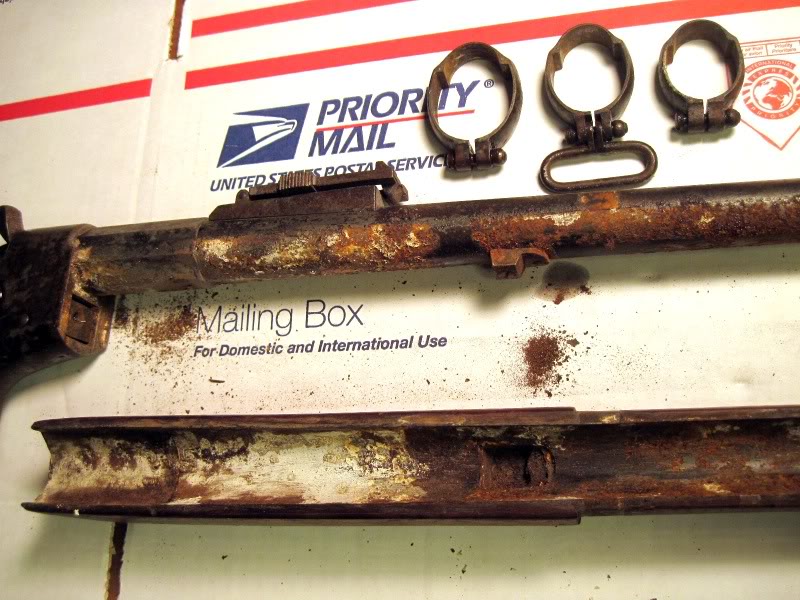
Note which way the barrel bands are facing before removing them. I am not sure which is the "right" way around, but I suspect that the U should face towards the muzzle - so that the U is upright if the rifle is standing in a rack. But whatever the theory, after so many years the bands will have "set" so that they fit best one way round, and you should preserve that orientation.
Loosen the screws (36, 39) and press in the band spring to release the barrel bands. Slide them carefully off the rifle, as any rough or rusty edges on the bands may scratch the woodwork!
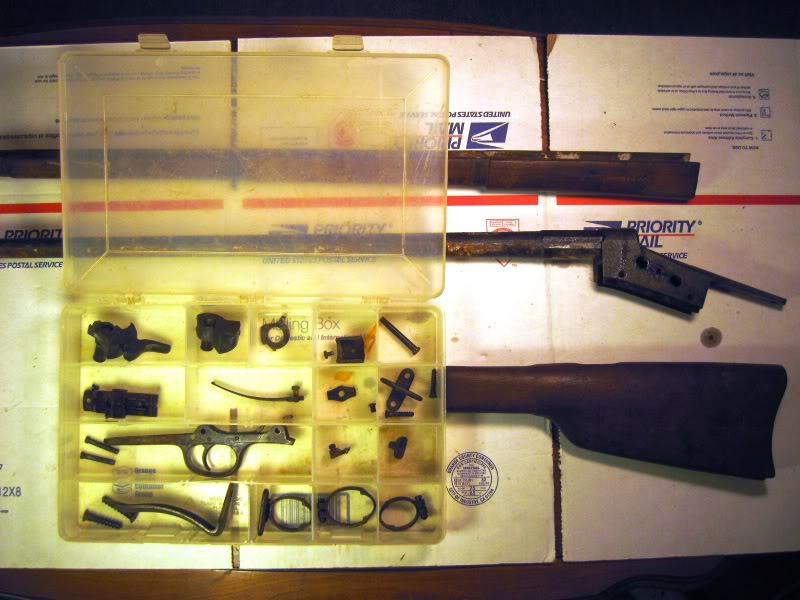
Place the bands in a compartment in the plastic box that you have acquired for holding the components. If you have not got such a box, get it now - before things start getting mixed up.
The fore-end wood is now loose, but should not fall off. The back end is shaped to form a short tenon that fits into the front of the action body, and there is a recoil boss (4) on the underside of the barrel. So pull down the wood slightly and pull it forwards to remove it from the system.
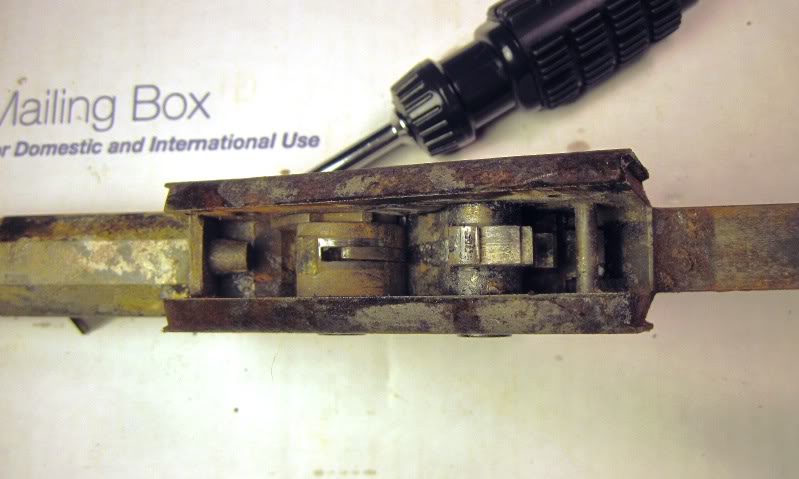
This is the point at which you may receive a slight shock. Many old service rifles are heavily rusted "below the waterline". Or full of nameless crud. Please post a picture of the underside of your barrel.
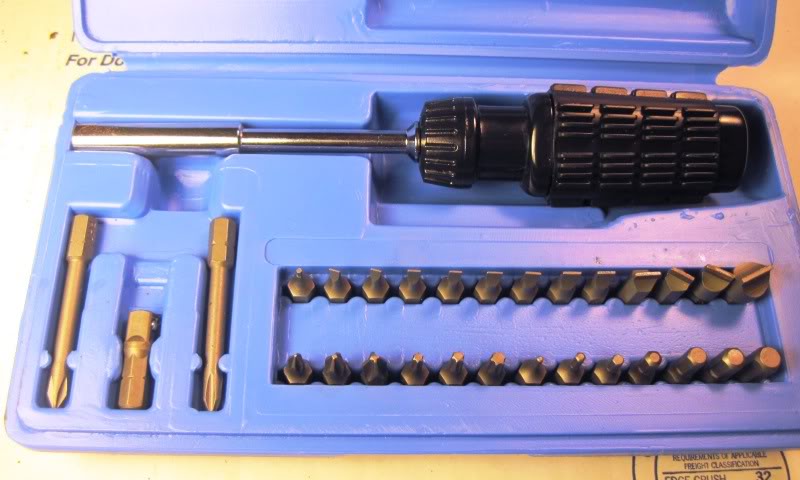
Place the wood in a safe place (not leaning against the table!) and proceed to remove the buttstock. This is where you start to use the good-quality hollow ground screwdrivers that you have either acquired or are going to just as soon as you can!
The tang screw (7) holding the butt may be difficult to remove. Clamp the rifle in a soft wrapping (folded cloth) in a bench vice, with the tang horizontal and make sure that the screwdriver is applied vertically. If this all seems a wee bit pedantic, there is nevertheless a good reason. If the screwdriver slips when you apply the torque to remove the screw, then you will achieve one or more of the following: a) ruin the screw slot b) gouge the butt c) gouge yourself, if you are holding the butt when the screwdriver slips. We want to avoid any of that happening, so please bear with me if I seem picky about such things. Use these techniques for all screws that show resistance.
If the tang screw (7) is stuck fast, do not use brute force. This increases the likelihood of an accident. Turn the rifle upside down, squirt a bit of penetrating oil onto the trigger guard plate where the screw is embedded, and go for a walk or make a cup of coffee. Then replace the rifle in the clamp or vice and remove the screw. If it still resists, try the old dodge of tightening the screw (even if it doesn't appear to move) and then loosening it. This often helps to break a rust bond. If the screw is still resistant, then you can apply the most torque by holding the screwdriver bit in a two-handled tap wrench (but this requires enormous care to avoid a slippage). This really will work - I have removed staked screws in this way - but you have to apply heavy downwards force to hold the bit in the slot, and you will really appreciate having the rifle firmly clamped as described above.
When the tang screw (7) has been removed, place it in a compartment in your plastic components box.
It should now be possible to pull off the butt. As it has been sitting there for over a century, do not expect it to just slide off smoothly. You may have to loosen the grip of the wood on the metal by tapping sharply on the back end of the trigger guard with a plastic hammer, and then pulling, or both at the same time.
By the way, there are two things that you will never need in this kind of work - steel hammers and sandpaper. Steel hammers and sandpaper mark wood and metal. They are taboo.
If the butt is still "welded" to the tang and trigger guard, remove the rear trigger guard plate screw (9) and loosen the front trigger guard screw (8). This will loosen things a bit more, helping you to remove the butt, and is anyway the next step in disassembly.
Once you have removed the butt, put it in a safe place.
You should now find that you can swing down the trigger guard some way, thus removing any pressure on the hammer from the trigger spring. Now remove the front trigger guard screw (8) completely.
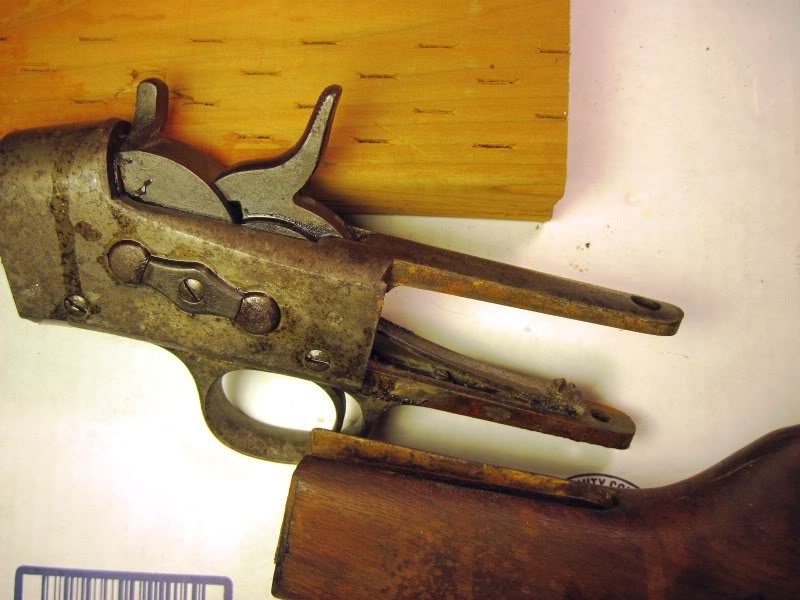
You should now be able to slide out the complete trigger assembly. You mentioned right at the start that the hammer action was very weak. So I expect you to find one or more of the following:
Rusted, broken, or partially detached mainspring.
General rusting of the inside of the action.
Action plugged by muck.
At this point, another picture would be a good idea.
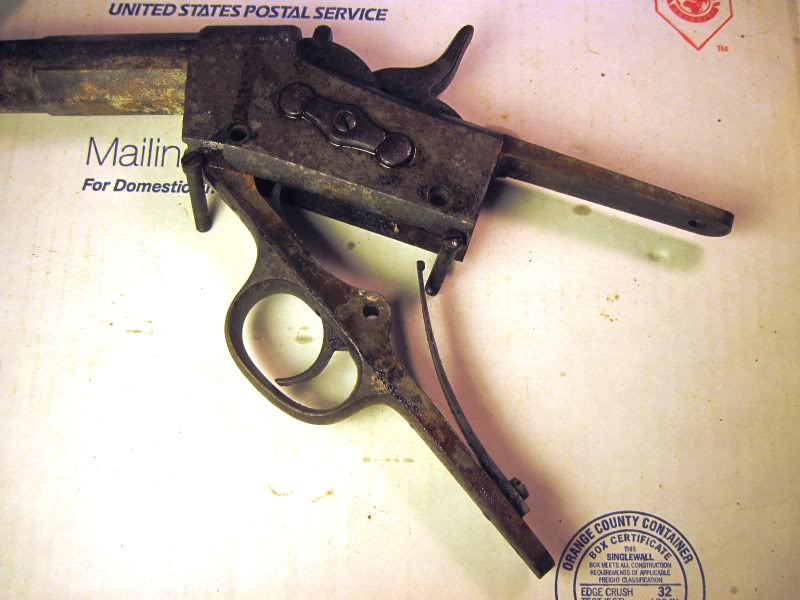
You are now ready to remove the rest of the action components.
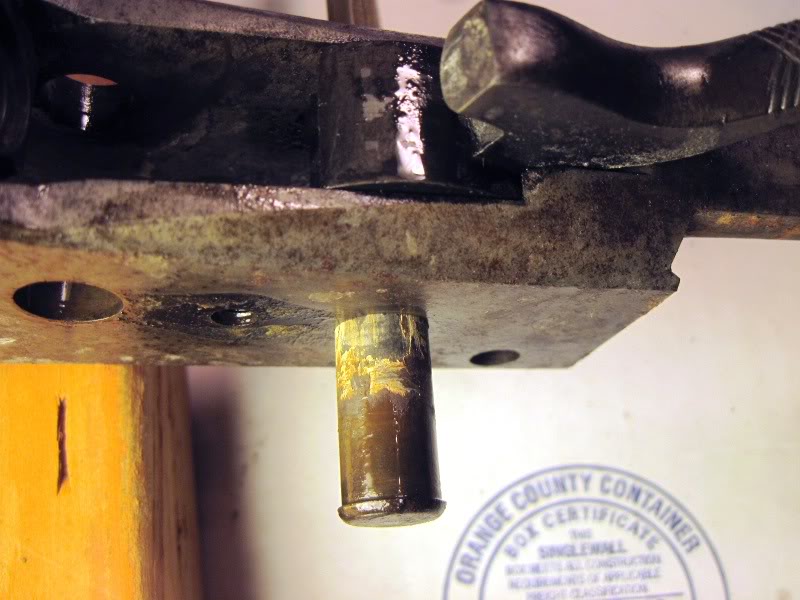
CAUTION: the two action pins are NOT quite the same. Maybe they were when new, but after a century they will have different wear patterns. Use a felt pen or stick on a label to mark which is which when you remove them. And to mark the 12 o'clock point on each
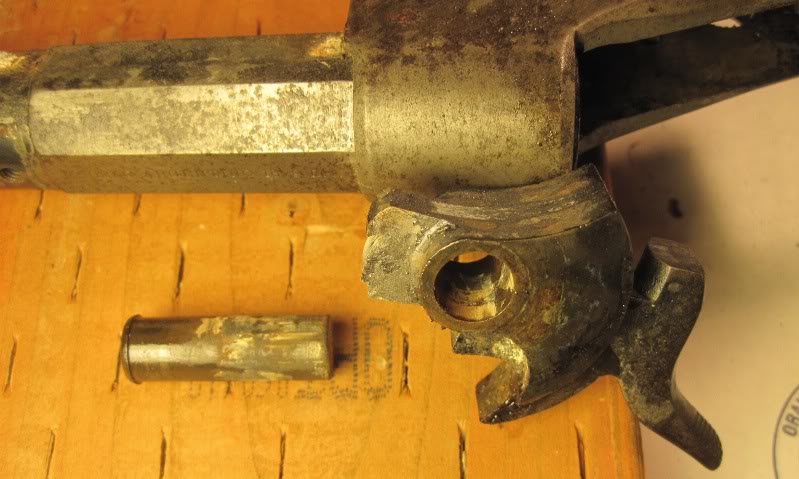
Use a felt pen to mark the front end of the elongated button (20). this is another component that is probably no longer quite symmetrical, regardless of its condition when new. Then remove the screw (21) that holds the button in place. Place the marked button in the component box.
The two pins - the breechblock pin (18) and the hammer pin (19) can be pushed out from the RIGHT sight of the action body. If everything is rusted or the pins have been peened over a bit, then use a BRASS drift (just a piece of rod) and the plastic hammer to drive them out. To do this, lay the action body on its LEFT side on wood blocks so that the pins can be driven out without flying all over the workshop. Remove one pin, mark it for identification, place it in the components box, remove the second, mark that and place it in the box.
The hammer (10) and block (11) sub-assemblies should now fall out, but may have to be eased out, because of whatever was holding the hammer back.
At this point it should become clear why the hammer was so sluggish. Muck? Rust? Metal fragments?
Now is the time to make pictures, post them here, and stop for today.
In Part 3 we will get to grips with the barrel.
End of Part 2
---------- Post added at 09:38 PM ---------- Previous post was at 09:37 PM ----------
Sorry, double posting!
Last edited by Patrick Chadwick; 11-16-2010 at 05:39 PM.
-
Thank You to Patrick Chadwick For This Useful Post:
-
11-16-2010 03:38 PM
# ADS
Friends and Sponsors

-
FREE MEMBER
NO Posting or PM's Allowed


Originally Posted by
Patrick Chadwick

Sorry, double posting!
That's ok, I needed to read it twice
I really appreciate your precise instructions.
More pictures coming tonight.
Thanks, Joel.
-
-
FREE MEMBER
NO Posting or PM's Allowed
-
Legacy Member

This is a really interesting exercise gents, & your photos are great Joel, i'm looking forward to following the project through to the end, well done so far !
-
-
Advisory Panel
The next shopping list
Very good progress Joel, and thanks for the photos - they are very helpful.
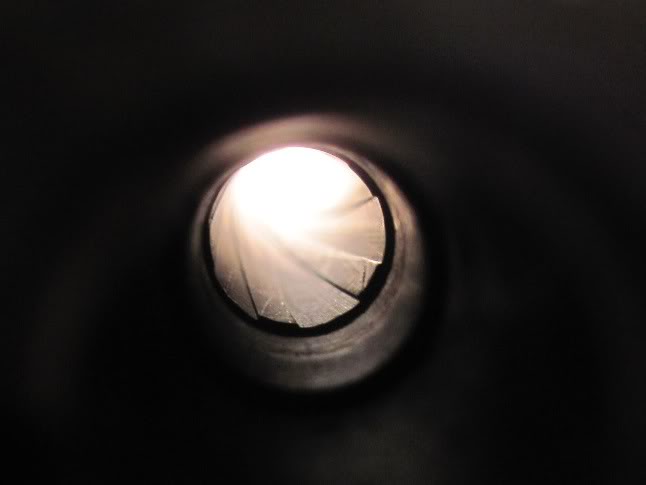
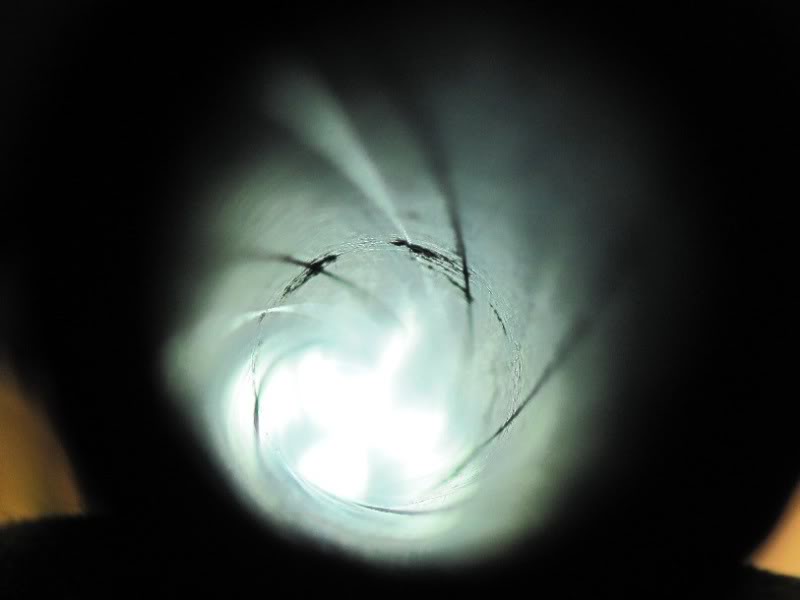
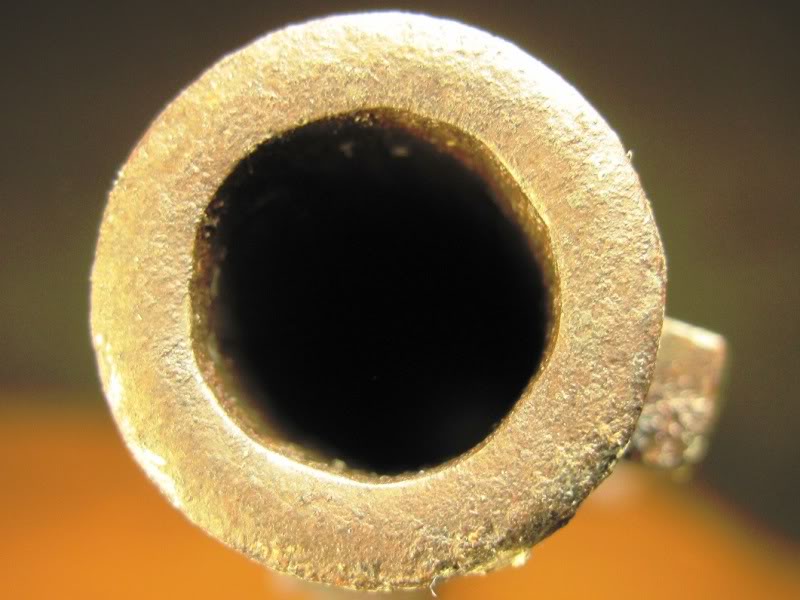
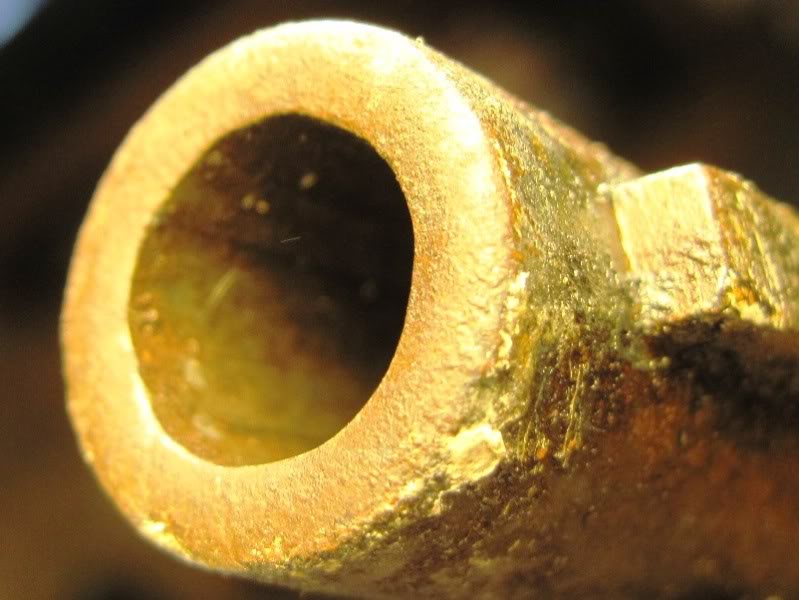
The good condition of the chamber/throat area means that it WILL be a shooter, but it is not possible to predict how good, because of the pitted area a few inches back from the muzzle. And, of course, the condition of the muzzle itself.
Inasmuch as the lands have a bit of a break caused by rust, this will not be the end of the world as long as the gap is shorter than the parallel section of the bullet, so that the bullet retains engagement with the rifling.
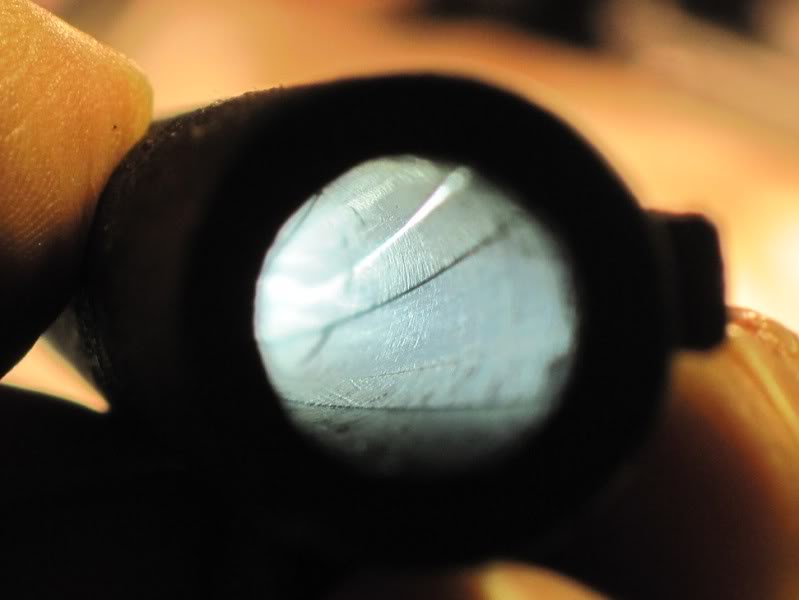
However, the rust pitting in the grooves will cause gas blowby, and would be a serious-to-KO defect for a nitro-fuelled rifle. However, as I think I have already mentioned elsewhere on the BP forum, when you fire an old rifle in military-rules competitions you are not allowed to clean between shots. Standard practice is to fire a fouling shot into the sand, and after that you are firing a string of - not bore riding - but "crud-riding" bullets. It seems that the bullets can slide over the muck-filled pits - if they are small, and not sharp-edged. One can sometimes get acceptable results with barrels that would be useless for nitro loads and jacketed bullets.
Please post a close-up of the the muzzle. That is quite possibly more important than the interior pitting. In part 3 I shall help you to evaluate it.
I see by the state of the action and the barrel that you need to soak all metal parts immediately with a good penetrating oil. Not to remove rust, but to stop it getting any worse while we deal with everything piece by piece.
Here is the next shopping list:
A) An ultrasonic cleaner - no need to spend hundreds of dollars - I bought a small one for cleaning glasses at a local stores for less than 30 euros. You will find it very helpful indeed for removing rust and muck from the action components.
B) An electrolytic cleaning bath. No need to spend a lot of money here either.
The components are
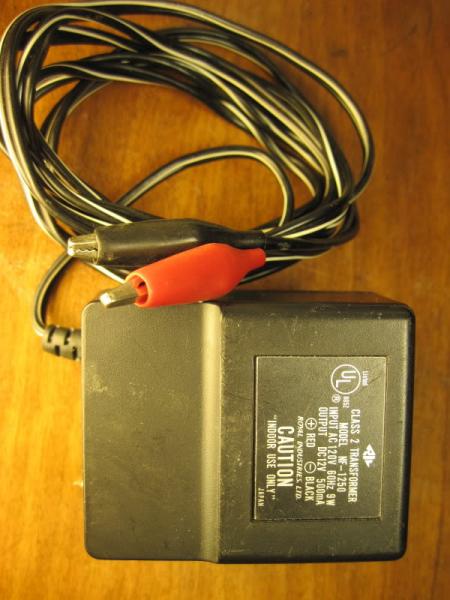
1) a 6-12v DC power supply (battery charger) which MUST have an adjustable current limit that covers roughly 100-500 mA.
2) A pack of washing soda. Not caustic soda.
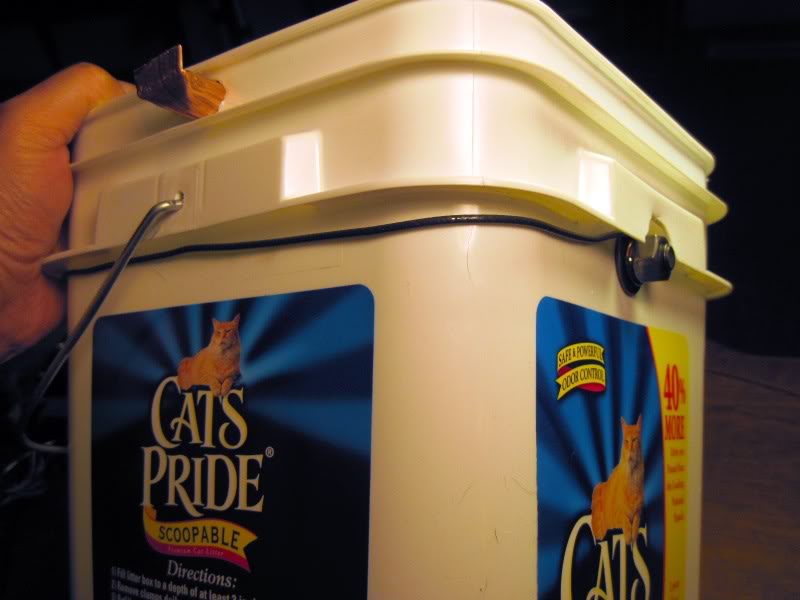
3) A stainless steel container (I picked up various sizes of pans from the local recycling center, a.k.a. rubbish dump) to be used as the "bath tub".
4) Frame to sit in the bath, on which to placce the piece being cleaned without it touching the metal of the pan.
5) Plain iron wire (NOT galvanized) for the electrical connection to the piece being cleaned. From garden suppliers.
(You must never have any other metal other than iron/steel in contact with the electrolyte)
6) Insulating sleeves,bits of plastic sheet - whatever it takes to stop the wire to the workpiece shorting to the pan.
And, for the bore:
Two fully-sized sample cartridge cases for the .43 Spanish Mauser cartridge.
Two sample bullets, preferably cast in soft lead, suitable for the .43 Spanish.
(I do hope you have made contact with other BP shooters - you may be able to buy/borrow these items, otherwise you will have to by a complete x20 pack from suppliers - and that is expensive for test measurements)
I will explain what to do with this stuff tomorrow, in part 3! 
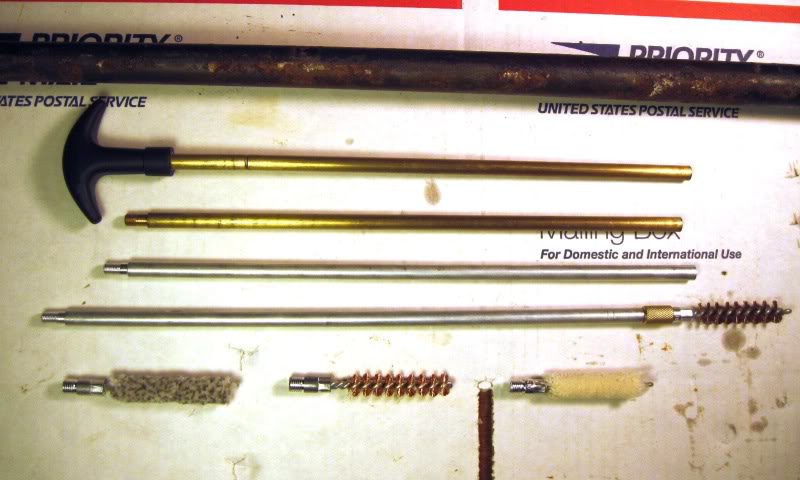
But in the meantime it would not hurt to brush off some of the crude rust on the barrel. Use the stiff bristle or brass brush BUT NOT A STEEL BRUSH.
Patrick
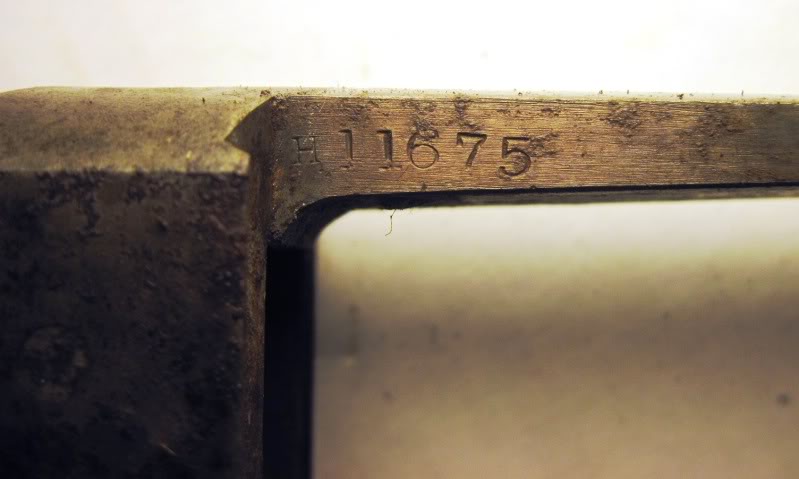
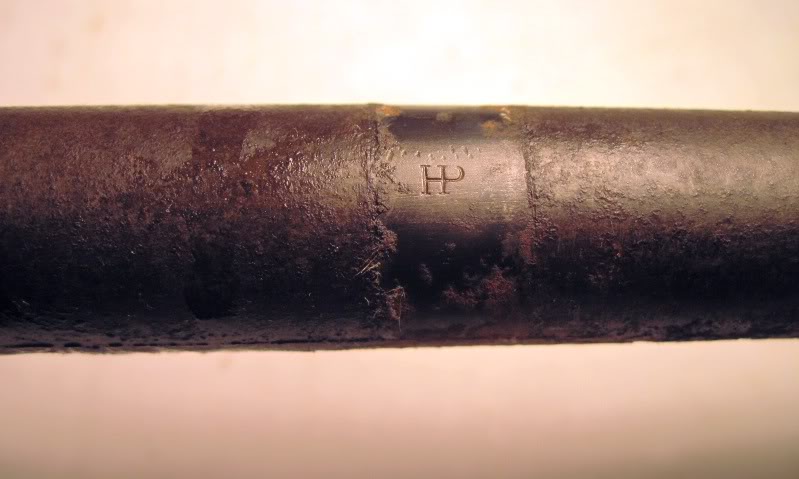
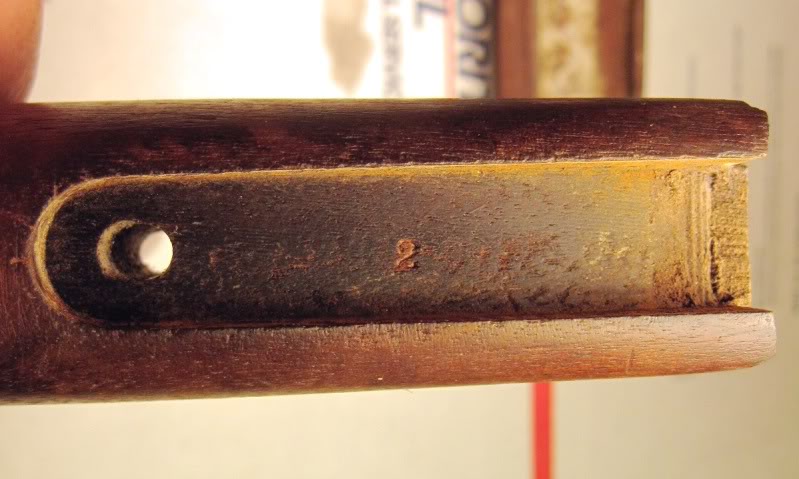
P.S: The number on the tang is the Remington factory number. The other stamps (H etc) are probably inspectors' marks. Get the Layman book - if it's not in there, I don't know where.
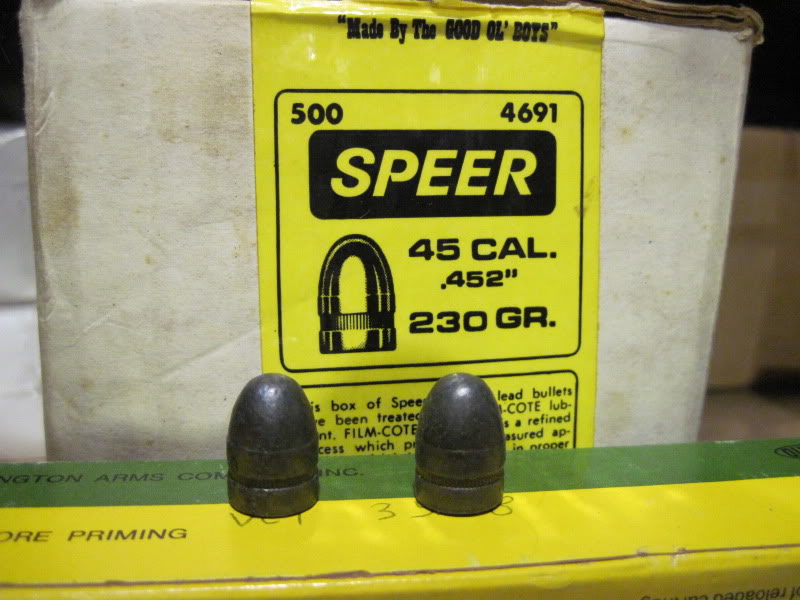
P.P.S: Get hold af a couple of cal.45 soft lead round bullets as well. Part 3 will explain why!
Last edited by Patrick Chadwick; 11-17-2010 at 10:28 AM.
-
Thank You to Patrick Chadwick For This Useful Post:
-
Advisory Panel
Refurbishing an Argentine RB - Part 3
The second shopping list
A) An ultrasonic cleaner - no need to spend hundreds of dollars - I bought a small one for cleaning glasses at a local stores for less than 30 euros. You will find it very helpful indeed for removing rust and muck from the action components.
B) An electrolytic cleaning bath. No need to spend a lot of money here either.
The components are
1) a 6-12v DC power supply (battery charger) which MUST have an adjustable current limit that covers roughly 100-500 mA.
2) A pack of washing soda. Not caustic soda.
3) A stainless steel container (I picked up various sizes of pans from the local recycling center, a.k.a. rubbish dump) to be used as the "bath tub".
4) Frame to sit in the bath, on which to place the piece being cleaned without it touching the metal of the pan.
5) Plain iron wire (NOT galvanized) for the electrical connection to the piece being cleaned. From garden suppliers.
(You must never have any other metal other than iron/steel in contact with the electrolyte)
6) Insulating sleeves,bits of plastic sheet - whatever it takes to stop the wire to the workpiece shorting to the pan.
And, for the bore:
C) Two cal.45 soft lead round bullets.
D) Two fully-sized sample cartridge cases for the .43 Spanish Mauser cartridge.
E) Two sample bullets, preferably cast in soft lead, suitable for the .43 Spanish.
Electrolytic cleaning
The electrolytic cleaning bath is set up as follows:
The stainless steel pan (ex-rubbish dump - now known as recycling center!) doubles as the bath container and the ANODE of the electrolytic bath.
BTW. If I write something in CAPITALS, that means, for heaven's sakes don't do anything different or listen to someone shooting the breeze in the bar, unless he can show you museum-class restorations that he has done himself. I bow to superior knowledge and ability, but not to Bubba, who has neither.
The POSITIVE lead of the power supply must be connected to the stainless steel pan that is being used as the ANODE.
A piece of IRON or STEEL wire is attached to the piece to be cleaned (the workpiece) for the electrical connection. No other material shold be used for the lead that goes into the electroyte. NO COPPER wires in the bath!
The workpiece is placed in the bath, on some kind of insulating grid. to stop it touching the bottom and shorting out the bath. For small pieces, the plastic frames used in 22 bullet boxes are ideal.
Before making the next connection, set the power supply / battery charger output to about 6V (if it is adjustable). Turn the current knob down to zero, short the terminals, and adjust the current limit to about 100 mA. This is enough to test that the bath works, and to clean small pieces, such as screws. And you now have a safe setting before you take the next step, which is...
Attach the NEGATIVE lead from the power supply to the workpiece, which functions as the CATHODE in the bath. You will need to use insulating sleeving or sheeting to make sure that the negative lead and/or iron wire do not contact the bath and thus short-circuit the supply.
You can now make up the electrolyte. The solution must be alkaline. If you are using washing soda (sodium carbonate) as I suggested, that is quite akaline enough for the bath, without being dangerous. If you get any on your skin, just wash it off immediately. Dissolve about a tablespoonful in a pint of warm water, and use that to fill the bath. Make up as much as you need in that sort of ratio to fill the bath so that it covers the workpiece
Here is a useful tip: basically (i.e. not guaranteed!), iron and steel will not be corroded by dry alkaline material. What causes comon salt to rust steel so savagely is the hygroscopic action of the salt in absorbing moisture from the air, which then rusts the iron. Acids, however, are death to iron.
So the workpiece is only safe in the electrolytic bath as long as the current is flowing to maintain the electrolytic action. If you turn off the current you must remove the workpiece immediately, dry it off, and oil it, as the electrolytic action has produced a nice new surface that will rust extremely fast (overnight, as I discovered the hard way).
You can now get started on cleaning any steel or iron parts that will fit into your bath, with two exceptions.
1) Do not attempt to electrolytically clean springs, hammers or firing pins. When the bath is running, hydrogen gas bubbles will be produced at the cathode. There is a chemical action known as "hydrogen embrittlement" that can weaken metal by deepening the micro-cracks that exist on the surface, and are encouraged by stress and strain (i.e. bending a spring, hammer blow).
2) Do not bother with the barrel. A bath long enough to take it will be expensive in stainless steel. You can use plastic guttering to make a bath, and then use stainless steel rods placed carefully in the bath as anodes, but the resulting surface will have to be removed anyway to make a good-looking barrel.
The current setting is a matter of taste. Although I have read of others claiming to have (at least partially) reduced the rust right back to metallic iron by using a low current over a long time, I doubt that the result has any lasting value for rifle parts. The electrolytic bath will reduce the red rust to black iron oxide (actually a mishmash, but mainly the magnetic form - magnetite - the black stuff used for tape recording).
This is by no means a hard. stable layer - at least not if you want to get the job done in my lifetime. And this rifle has no bluing worth preserving, so it is going to be simpler to get it all off and reblue anything that needs or deserves it.
If the bath is functioning, you will soon (10 sec.) see bubbles rising, and the current should be on the limit. If not, gradually in crease the voltage until the currentlimit is activated. You can now increase the speed of electrolytic cleaning by turning up the current. At high levels the workpiece will seem to fizz, and the rust will be blasted off by the gas bubble to form a brown sludge. Since the fizzing produces hydrogen gas, it is not a good idea to use a high rate in a closed room, and most certainly inadvisable to have naked flames anywhere near the bath. So open windows are advisable, and take it easy.
You will have to do a bit of experimentation to see what produces satisfactory results. For myself, I am rather impatient, and after about 10-20 minutes I remove the workpiece, swish it around in a bucket of water, and put it into the little ultrasonic cleaner (I have a second one for actually cleaning my glassses!).
Turn on the ultrasonic cleaner, and within seconds you will see more sludge forming as the ultrasonic vibrations shake off the loosened material. This step also indicates that the magnetite layer is mechanically not very stable, as if you now put the workpiece back into the electrolytic bath and give it another "fizz", you will find after a couple of cycles that you can get some pieces pretty well blank.
It appears that commercial ultrasonic cleaning fluid includes tensides and alkaline components (like the "conditioner" used for blackening. But you can get quite a satisfactory result by using the same weakly akaline solution that you use for the bath. In fact, you can take the workpiece from the ultrasonic, wash it in the bucket, and pop it straight into the cold-bluing bath (or use paint-on bluing).
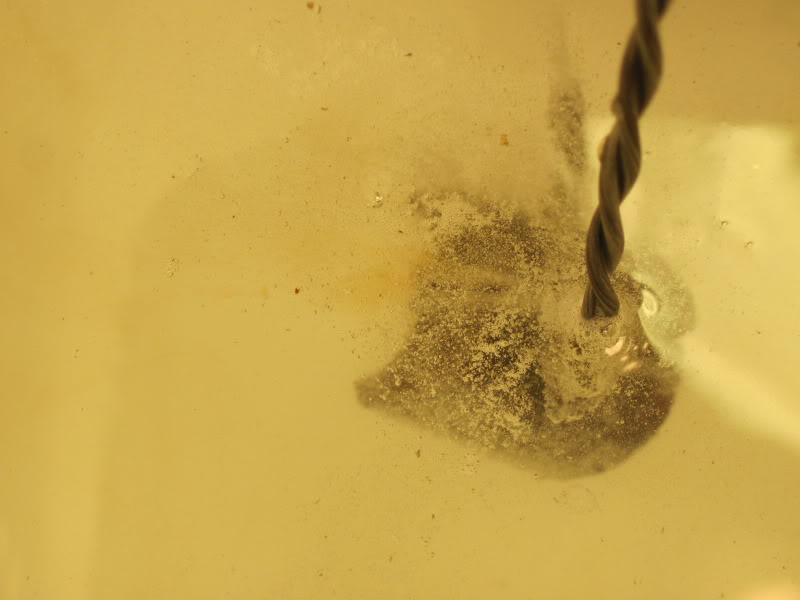
And just to demonstrate that this is not just theory, but really works.
"Here" as the television cooks say "is one I prepared earlier".
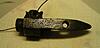
It is the barrel plug and tang from an Anschütz. No, not the modern 22 you all know, but a muzzle-loading percussion target rifle made by Veit Anschütz in Mehlis, Germany , about 1850 (the museum in Zella-Mehlis may be able to give me a more precise dating). When I got it, it looked worse than the RB. I was risking my money on something that was not even an acceptable wall-hanger. No drill that I know of could get through that S-shaped ignition hole, which was solid with hard corrosion. But after maybe 10 cycles, you can see what emerged - gold inlay bands and scrollwork that would have been destroyed by abrasive cleaning. And, of course, a clear ignition path.
It takes time. But I think it is worth it.
That was quite enough for today. We will attack the barrel in Part 4.
End of Part 3
Last edited by Patrick Chadwick; 12-27-2021 at 04:52 PM.
-
Thank You to Patrick Chadwick For This Useful Post:
-
Advisory Panel
Joel, if you follow Part 3 you WILL get the backsight to loosen up. I had to do it with the backsight on my Mauser 1871 ("The Monster out of the Bog").
BUT don't forget, as soon as the current or the ultrasonics is off, remove the workpiece, dry and oil it!
Keep up the good work - in a few sessions it will start to look like a rifle again!
-
Thank You to Patrick Chadwick For This Useful Post:
-
FREE MEMBER
NO Posting or PM's Allowed
-
Advisory Panel
Interim advice
Originally Posted by
killforfood
I have access to an ultrasonic cleaner at work so all of the small parts will get a follow up wash.
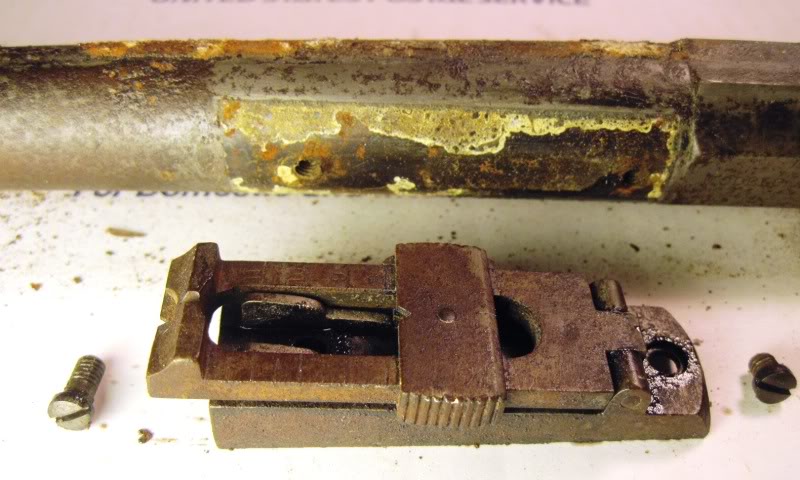
Great news! Do repeat electrolytic/ultrasonic runs on the backsight assembly until you get it free.
Originally Posted by
killforfood
Hmm, now what to use for a barrel tank?
Use PVC plastic guttering, with end pieces glued on. It won't break the bank, and you can store it out in the yard.
Originally Posted by
killforfood
Also you had asked for more pictures of the end of the barrel. I assume you wanted to see the condition of the crown. Let me know if these pictures don’t show what you wanted to see.
Thanks Joel, they are just what we need.
....Er, how shall I put this?....they DO show what I DIDN'T want to see: a blunderbuss muzzle. 
OK, I had that on The Mahdi as well. Worse, in fact. Can be improved, if not 100% fixed.
BTW, I do not like the look of the barrel channel. Whatever that white stuff is, you need to mechanically remove as much of it and the rust a.s.a.p. Hold it upright and give it a good scrubbing with an old toothbrush so that it falls out of the channel - maybe you can make a guess as to what it is.
Do NOT (it's those capitals again!) use any liquid on the wood at the moment! And especially NO water - that will carry the rust and white whatever so deeply into the wood that you will never get it out!
But in anticipation of what is to come, I think you need to get
1 pint can of acetone
1 of that jelly-like paint stripper that contains xylol, toluol, benzyl alcohol and heaven knows what. The stuff that, if you get it on your skin, feels pleasantly cool for a couple of seconds and then burns like hell!
1 methylated spirits.
2 rolls of paper towelling
You will need a natural-bristle brush to apply the paint stripper (plastic bristles will dissolve), fresh air,
and
A PAIR OF CHEMICALLY RESISTANT GLOVES
I don't think I can get Part 4 done today. So in the meantime, keep up the good cleaning work!
"And don't forget in, folks, tune in to the same channel for Part 4 of our series, when the true identity of The Mahdi will be revealed, telling how our intrepid adventurer dealt with the dastardly Oriental challenge!"
Last edited by Patrick Chadwick; 11-18-2010 at 11:18 AM.
-
Thank You to Patrick Chadwick For This Useful Post:
-
Advisory Panel
...Oh, I forgot ...get a few old 3.5" diskettes as well.
I am not kidding
-
Thank You to Patrick Chadwick For This Useful Post:


 PM
PM