-
Building a ZF41 fake/repro/shooter
This is a cross-post from another forum I frequent that you guys might find interesting. The goal was 2-part: 1) build a nice ZF41 range shooter while 2) at the same time educating people about K98 fakes, how the fakery/humping is done, and to a certain extent what to look for.
Note that I left lots of post-war markings intact below the wood line since I have no intention of ever passing this rifle off as original 
Original build posts follow.
______________________________________
So I was looking for a project to toy with when I dropped by my local gun shop in time to stop the smith from destroying this barrelled receiver to get it off his book. Supposedly it USED to be a vet bring back that was clearly improperly stored. It included the receiver, barrel, front sight assembly and rear sight assembly MINUS the sight ramp (!?!). No bolt, no bottom metal, no stock, etc. Evidently the smith sold the stock to someone and the owner that brought it in and gave it to the smith sold the rest on e-bay some time ago.
Everything (receiver included) looked like the barrel before I started cleaning it, but the barrel exterior is FAR worse pitted than the receiver which is mostly intact.
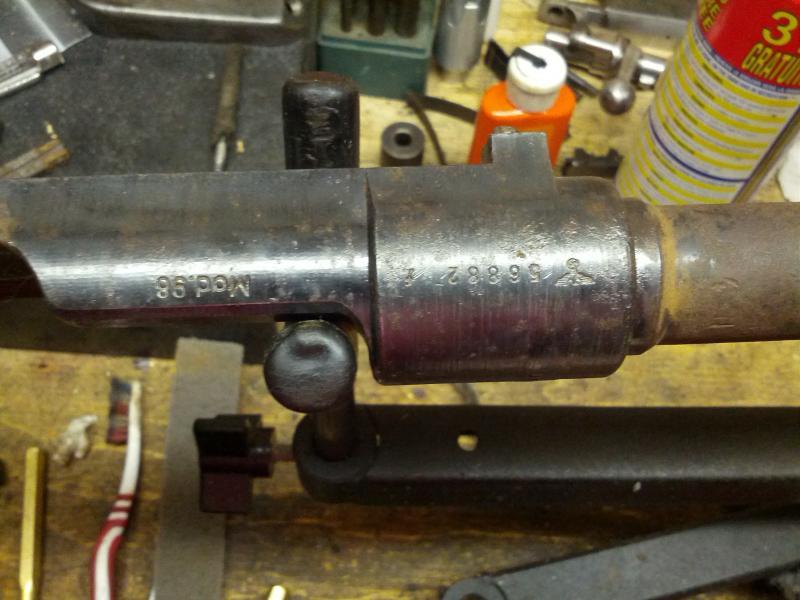
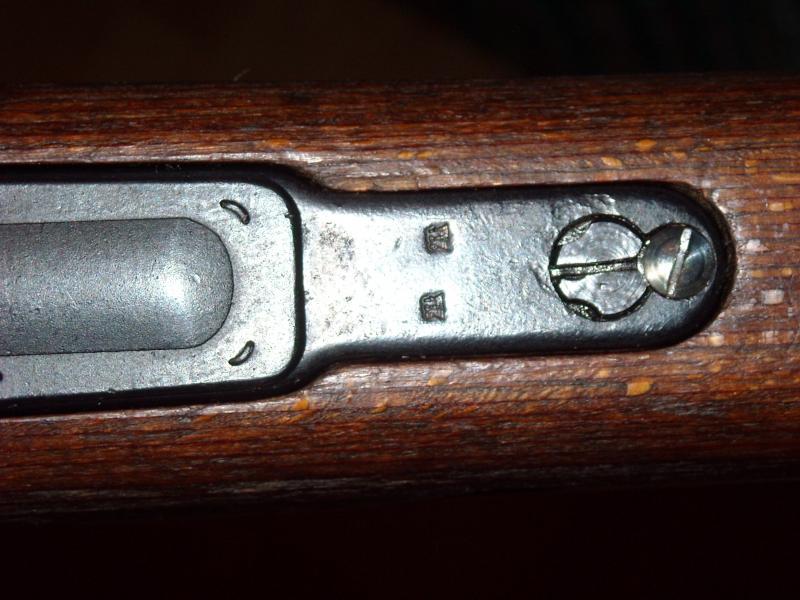
The barrel, believe it or not, had a bore that WAS like new before being stored with a clot of mud up near the muzzle, so 80% of it is perfect (despite outside looks) and the muzzle is fatally pitted with heavy corrosion rings for 1cm of the bore - in other words, the bbl is toast. The receiver only had minimal scattered light pitting and is a cool salvageable late-war byf44 receiver that hasn't been buffed, sanded, capture marked or anything.
An action screw was broken off in the receiver - I got it out, but DAMN. Not easy.
This is NOT economically a good idea, but it will be fun, so I'm going to save it and build a ZF41 from nothing. It's economically wiser to start with an RC, yugo capture or something like that - which is what Mitchell's Mausers would do. They also would not care about using period-correct parts, which makes a build mode expensive. I have SOME of the parts already. I have all the bits to build up the receiver, I have bottom metal, spring, follower. I also have a take off barrel from an East German refurb of another byf44 with an as-new bore.
I have a reproduction ZF41 mount base on the way (from e-bay France ) and repro scope and mount from Germany also en-route. Trying to reach mario for a stock (god he's hard to contact!!!). Still no luck finding a bolt. I really only need a stripped bolt, have virtually all the other parts. I'll post some pics as I progress.
Tonight I sweated the front and rear sight base off the "new" barrel while I wait for parts. The receiver is soaking in evapo-rust to clean out the remaining pits. The solder work on the bbl is going to necessitate a blue job for the barrelled action anyhow. It's going to get a caustic dip blue like originally used in late 1944 before going to the phosphate finish to match how this gun originally shipped.
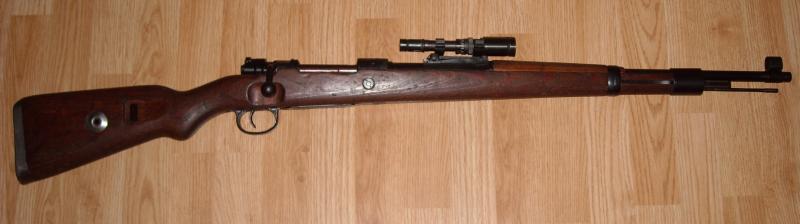
It's a "shooter" but I'm trying for period correct and maker correct parts for a byf44 zf41, where feasible 
_______________________________
Well here is the receiver after an overnight soak in evaporust. Not that bad. The tang will need a small bit of filing to clean up the tip. Undecided if I want to touch up any other pitting at the expense of some of the machien marks, or just blue it over as-is.
________________________________
ok, so I lightly filed the surface scale off the tang, nothing drastic and put the whole receiver back into the evaporust to soak some more - there's still active rust in the bottom of some of the pitting. I'm also chemically cleaning the original rear sight assembly and bolt stop. All that stuff will get reblued.
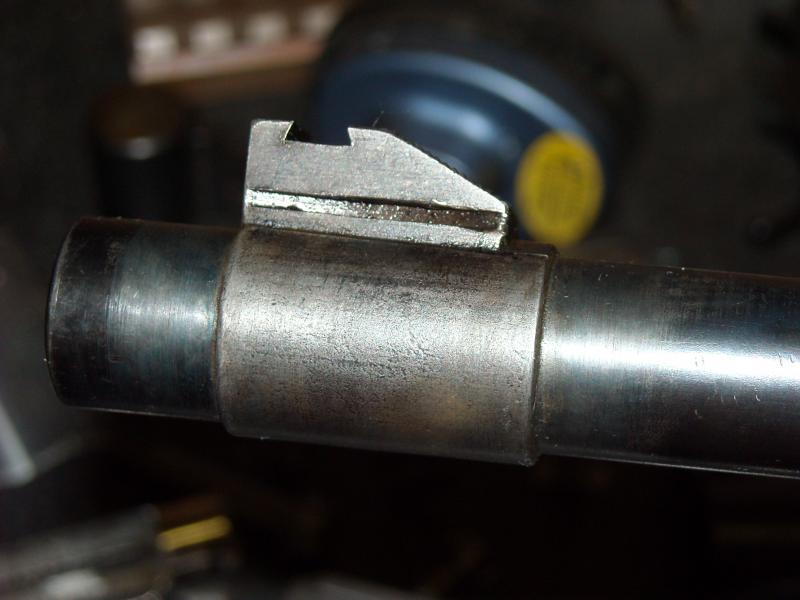
I got the original front and rear sight bases off my "new" east german barrel.
Sadly, this project will have to go on HOLD until I can source a WW2 nazi bolt. Anyone wishing to contact me by pm to sell a bolt and get this project moving again would be most welcome!
Without the bolt I can't index and headspace the barrel which prevents the next step, to re-attach sights once the bbl is indexed for headspace. K98k barrels typically don't interchange as a drop-in fit, so you have to re-index the sights once headspace is set.
________________________
I'm also waiting for parts I've already ordered. My repro ZF41 mount comes with one of those adaptors that replaces the rear sight ramp, but I won't be using that. Instead I have a proper ZF41 base coming from France that replaces the entire rear sight mount that is soldered to the barrel.
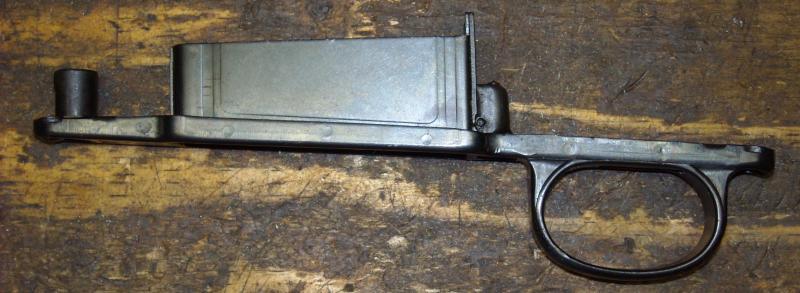
I also have period-correct byf stamped bottom trigger guard and floorplate inbound. I already have a mag spring and stamped follower to use with that. I have a selection of stock bands lying about, front sight, original sight hood, proper byf44 trigger set, etc.
The only parts I have not definitely secured are the stock (have several lines on stock sets) and a bolt - which is proving more difficult than I would have thought. K98k bolts are dirt-common, but murphy's law dictates that as soon as you actually need one, they all vanish.
____________________
Well I progressed a few little things on this project. Now before anyone freaks out, let me be clear:
1) YES, I am faking some of these parts. Some call it "humping". Essentially what we are talking about is taking a common K98k part and making it into a less common part and then re-serializing it to match the rifle where appropriate. No, this would not be ethical if I were doing it to improve the sale-ability of a rifle for monetary gain by representing it as original - DO NOT DO THAT!!! (it's fraud, really).
2) NO, I am not doing this to be unethical. My build will be clearly marked as a reproduction below the wood line and I am NOT going to hump any parts that aren't visible when the rifle is assembled, so a cursory disassembly will show the rifle to be NOT MATCHING. For example, I will probably leave the firing pin mis-matched. It does happen to be out of a byf44 though. Be careful though, serious fakesters are not so concerned about your well being as I am
3) Pay VERY close attention to what I am doing here in some of these posts. This should help newbies detect FAKES. As a machinist, I think I'm pretty decent at "counterfeiting" 1944 era MO parts. And no, I have not done / will not do this and sell an "improved" rifle as original. Others have and will. Hopefully you all learn something here.
4) I hope that my posting this stuff on the net, while informative and entertaining, will serve as proof that I'm clearly not hiding this rifle's lineage to any future prospective owner. Though honestly I don't plan to ever sell it - it's going to be my range rifle for when I get sick of wearing my glasses and trying to see fine iron sights - lol.
The goal of this project is, within reason and without making this clone too indiscernable from the real thing, to make the rifle resemble a real one. I am not using a WW2 barrel, so though it will outwardly look original, a close inspection will show the post-war proofs on the bbl. A serious faker would weld over those markings, surface-anneal the welds, and stamp new markings. I could do that, but I'm not a fraud artist
Now obviously I started with a bare receiver so a matching bolt would a miracle to find. I have a stripped, mismatched, late-war byf bolt on the way which will be "skillfully force matched" (I hate that term!) to show you guys how convincing fake markings can get. I already have all the small bits, most of them actual oberndorf production, with a real mix of serial numbers which will be made to appear matching.
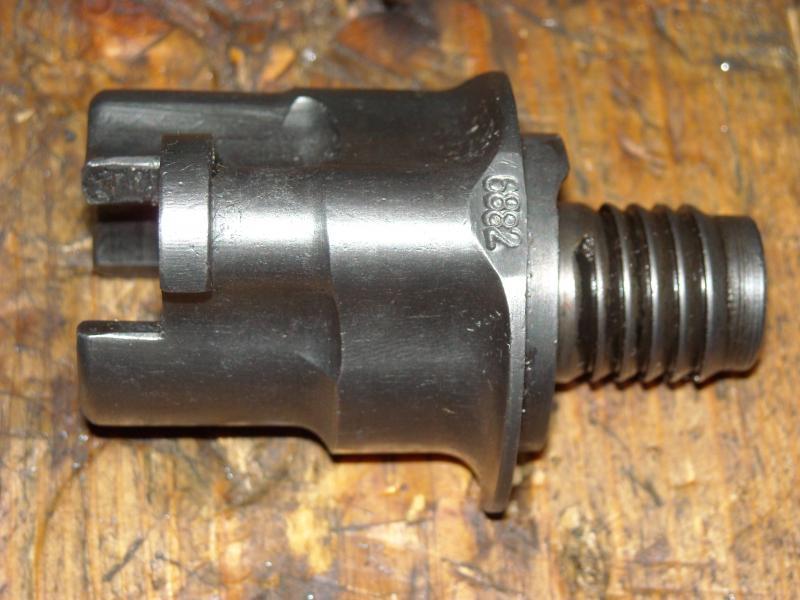
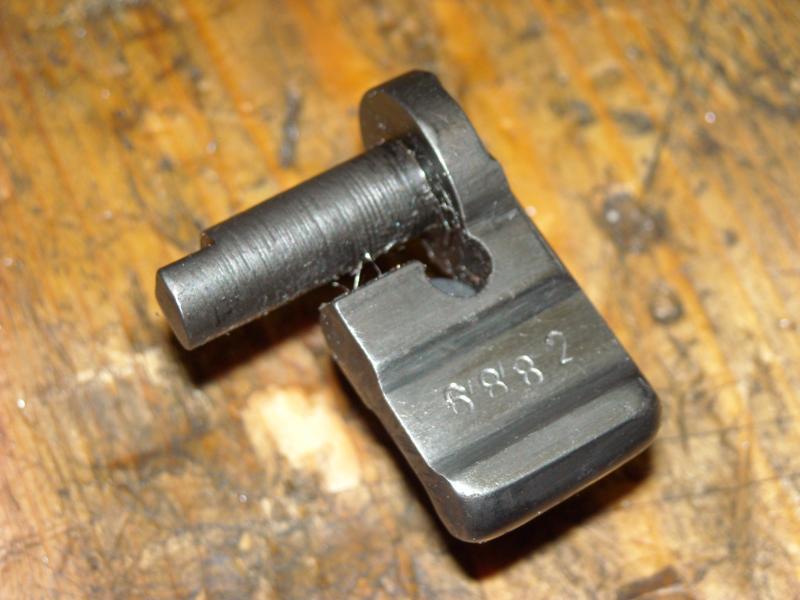
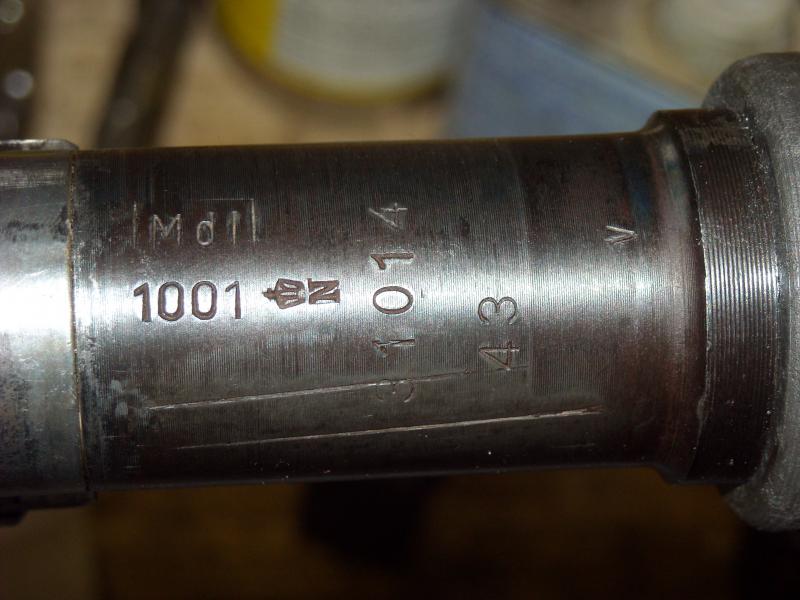
Let's start with the cocking piece. Late war Oberndorf cocking pieces are just like mid-war cocking pieces from any manufacturer except without a WaA. Somewhere in 1944 they started using a 5 digit serial number with a letter suffix. MO bolt parts only had the last 4 digits stamped on them. My receiver is an f block so all 4 digits were used on all bolt parts except the extractor which was either un-numbered or had only 2 digits by '44. Later (I think around h block?) MO changed to only putting 4 digits on the shroud and bolt, the rest of the parts getting only the last 2 digits.
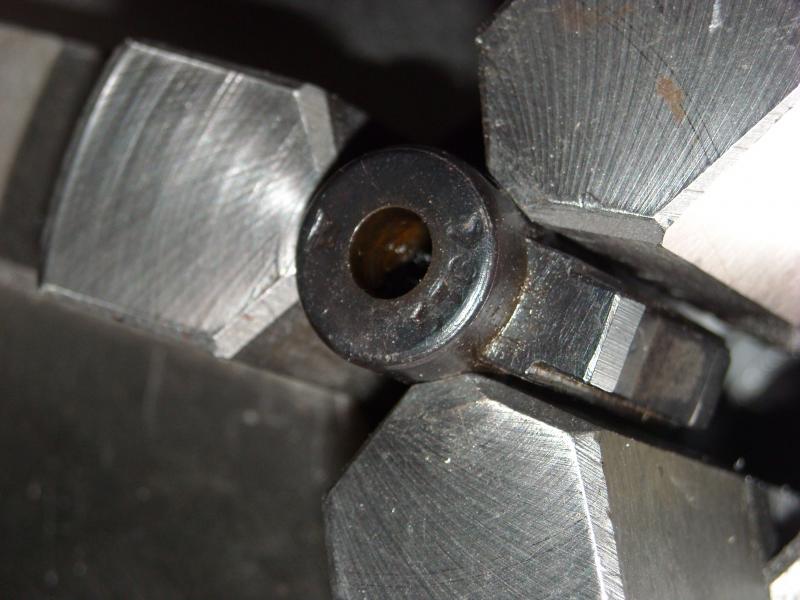
Here is a mid-war WaA37 cocking piece chucked into the lathe. These are pretty glass hard, so you need to use a carbide cutter to do a skim cut and turn it into a "fresh" part. Since we are trying to duplicate a late-war piece, I'll leave some machining marks on the back of the cocking piece, unlike the smooth surface on this earlier part. A poor fake would look smooth and irregular because the amateur would use a file and sandpaper to scrub the old markings. Better fakes use real manual lathes and mills to duplicate the original manufacturing process as we are doing here. Some basic polishing was done to radius the outer lip as per the K98k drawing for cocking pieces. I happen to have 2mm a number stamp set that is a dead ringer for 1944 era Oberndorf production. The sanitized part is mounted in a heavy vise and a heavy ball peen is used to apply new numbers. They should be deeply stamped. You then put the cocking piece BACK into the lathe and re-polish the rear surface with 120 grit. MO parts were always re-polished after being serialized to de-burr the stampings. Finally you ream the hole out to .216" to eliminate any distortion form the stamping process and ensure a smooth fit of the cocking piece.
When this part is blued, it will look real. How to detect it may be fake? Well, you cannot scrub a cocking piece without the rear of the firing pin standing a bit proud. This can be hidden by slightly trimming the FP tail. The cocking piece could be mounted on a known "good" firing pin and if the edge of the domed tail sticks above the cocking piece surface more than a few thou, it's a re-numbered part. Period.
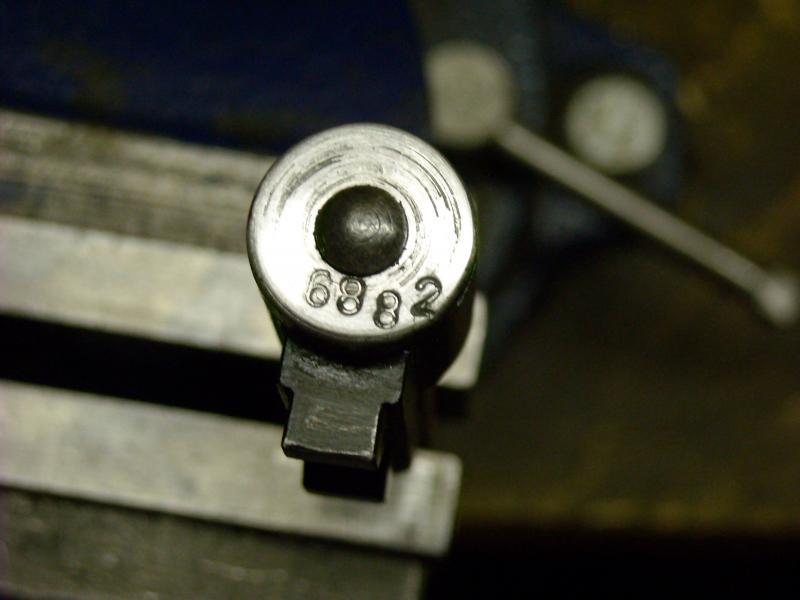
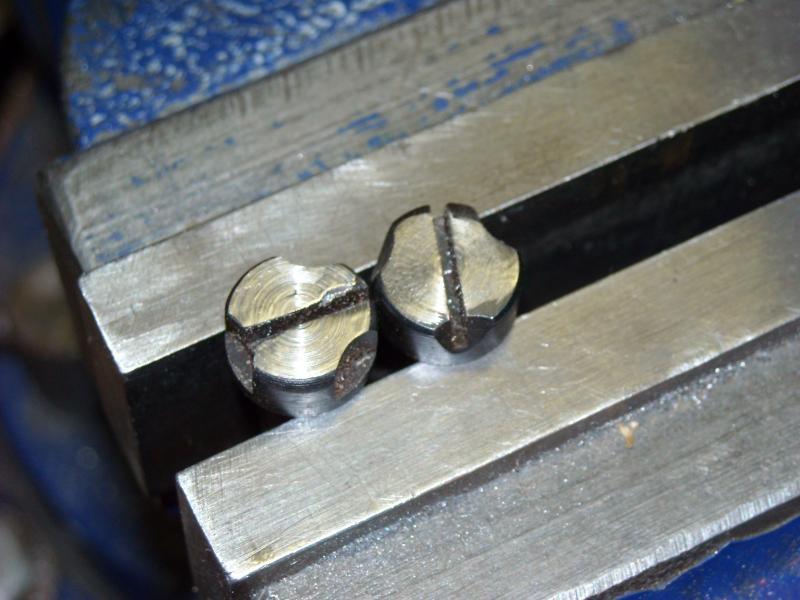
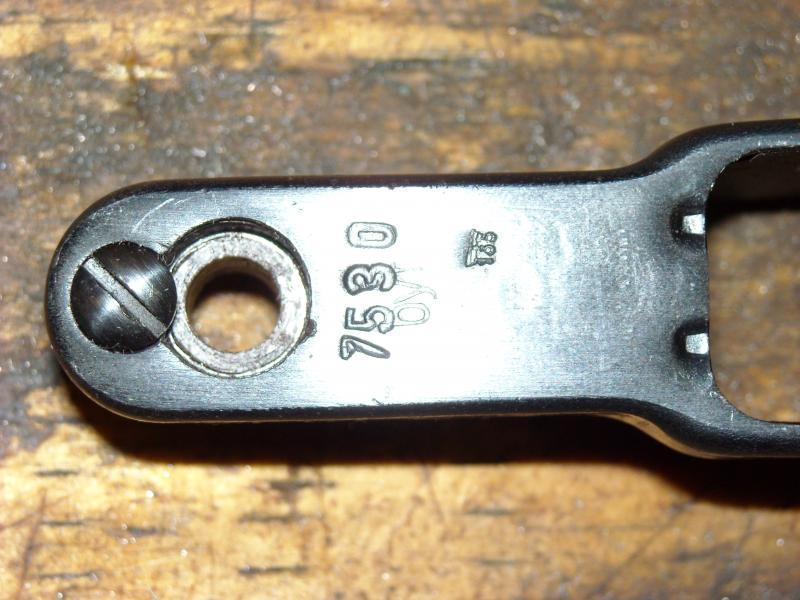
Next, I needed some late-war scews to use in my stamped trigger guard. Although lock screws were typically no longer in use, MO continued to use up scalloped screws. In this case, I had a post-war East German rear action screw and an early numbered front screw. these were mounted in the lathe and the serial number removed from the one and the dome turned flat on the other. These now look like typical rough and un-polished late-war screws. When making a replica gun, it's little details like this that make it look convincing.
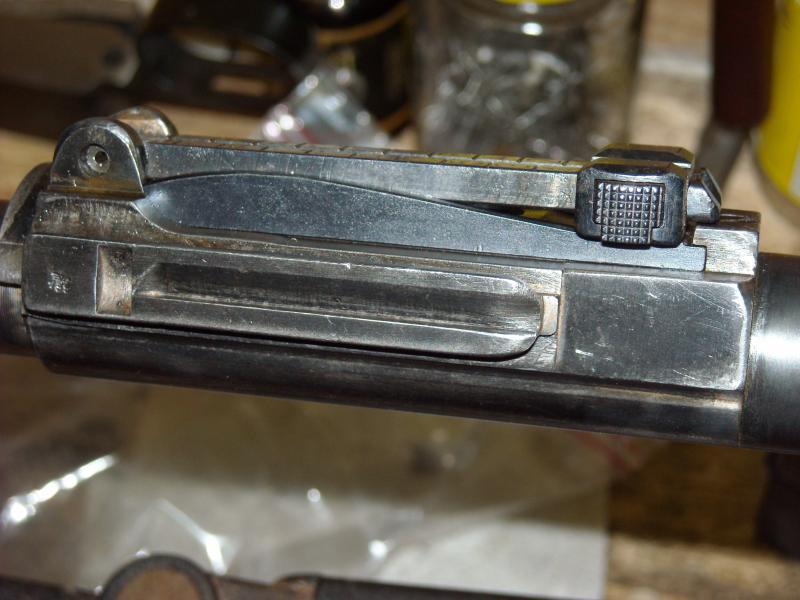
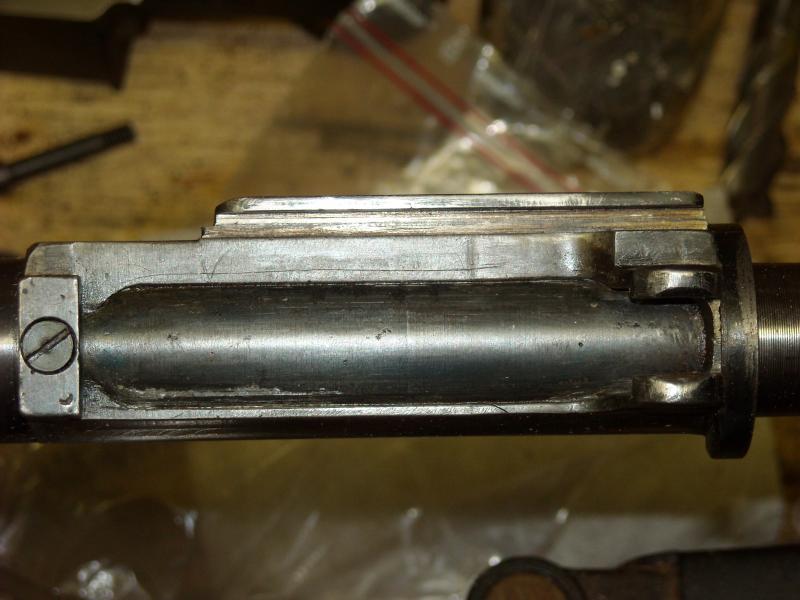
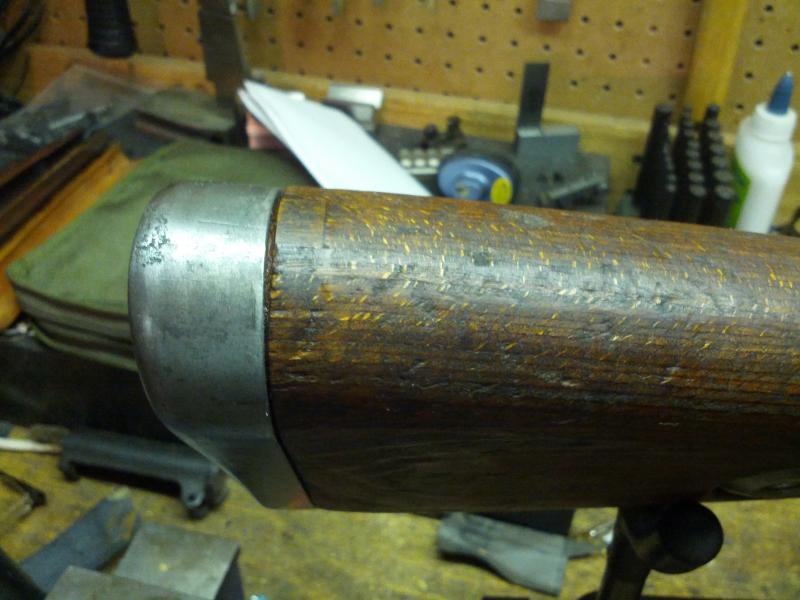
Here we see the original rear sight assembly (factory un-numbered, but "WM" proofed on the inside) that was still present on the original barrel, but badly rusted. In this case the pitting has largely been removed and the part filed to 180 grit to replicate the original late-war finish. After re-blueing it will look factory fresh.
More to come.
Information
 |
Warning: This is a relatively older thread
This discussion is older than 360 days. Some information contained in it may no longer be current. |
|
Союз нерушимый республик свободных Сплотила навеки Великая Русь. Да здравствует созданный волей народов Единый, могучий Советский Союз!
-
The Following 3 Members Say Thank You to Claven2 For This Useful Post:
-
07-25-2013 07:17 PM
# ADS
Friends and Sponsors

-
In truth, the metal bits are NOT the hard part. Everything hinges on the wood work. I have some irons in the fire and hopefully a good candidates shakes loose from the trees, as it were. Also, I think what I'm doing is actually going, to some extent, be less a "grey area" than some of the K98k's coming out of James River Armory, though I'll bet my work looks more convincing on those parts I do alter.
Here are another couple parts I worked on yesterday. I couldn't photograph them since I was letting them soak in evaporust to remove the bluing.
Both these parts are off 1944 or 1945 Mauser Oberndorf rifles, but were mismatched. For the shroud, all byf44 shrouds have a flat machined into the top where the serials are added. Not so for earlier shrouds. I assume the flat was added to make serializing easier (?). The safety is a sub-contracted part. In both cases, I left the faintest hint of hte previous number evident so they would not be mistaken as original bits. I could have removed them completely though. The safeties are glass-hard, so I used a diamond file to carefully remove material without changing the shape.
the safety was re-buffed with fine paper after it was stamped. Safety serial numbers never have displaced metal standing proud - they were pretty much always polished flat after being marked.
To detect a faked safety, you have to rely on measurement. The scallop will be deeper on one side if an old number was removed. It's a LOT harder to detect a renumbered shroud - sometimes it's impossible.
___________________________
Good news and bad.
Good: I found a stock set which should work wonderfully and it's en-route.
Bad: The bolt I got, it turns out, it likely 1945. Round gas holes, no guide rib, and no WaA so was probably out of a czech dot45. Now back on the hunt for a nazi era wartime stripped bolt body.
_____________________________
As an aside, I got some more parts in today.
I got a very nice condition (original blued finish) 1944 era byf stamped trigger guard with locking screw provision. Somewhere I have some late war non-scalloped lock screws I'll use with it. The down side is I had thought it was not serialized, but it does have a serial on it, which is unfortunate. An f-block 44 probably would not have a serial, so it's from likely a d or e block rifle IMHO. I can't really weld over the old number and re-stamp it without losing the byf marking, so I'll live with the mis-match it IS a nice TG.
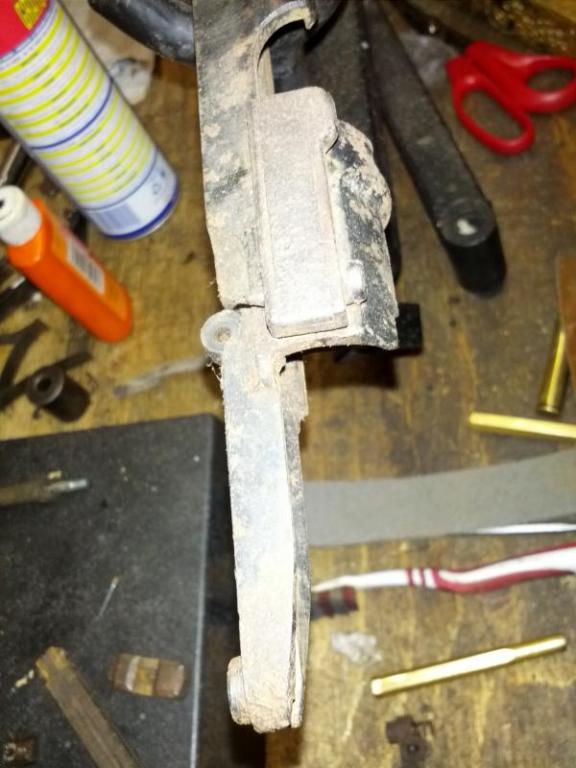
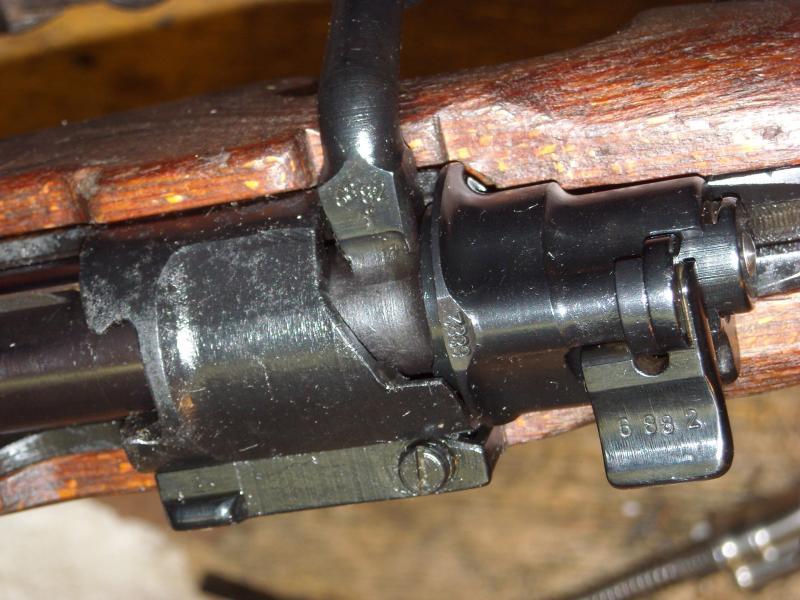
I also got in the ZF41 mount. The mount is better made than I expected. It does differ from a real one in a few ways. Firstly, the pin for the catch is a straight solid rod, on a real one, it's a hollow pin with a domed head on one side. Also, an original has a set screw on the underside of the front ring to prevent rotation of the scope in the rings. Not sure why, because scope rotation in a ring is not a common occurrence. The repro mount omitted this screw.
These reproductions are clearly made from castings and some surfaces are left as-cast. Originals were machined on every surface. It also has no markings (though supposedly some repros ARE marked). I bought my scope from another supplier and it has not arrived yet, so I can't comment on how it fits in the rings.
The mount also came with one of those ZF41 adaptors that replaces the rear sight ramp. Although it fit well on a trial barrel I have and would probably be solid, I don't plan to use it.
Will post pics when the scope gets here.
The hunt for an appropriate bolt body goes on...
____________________________
Update:
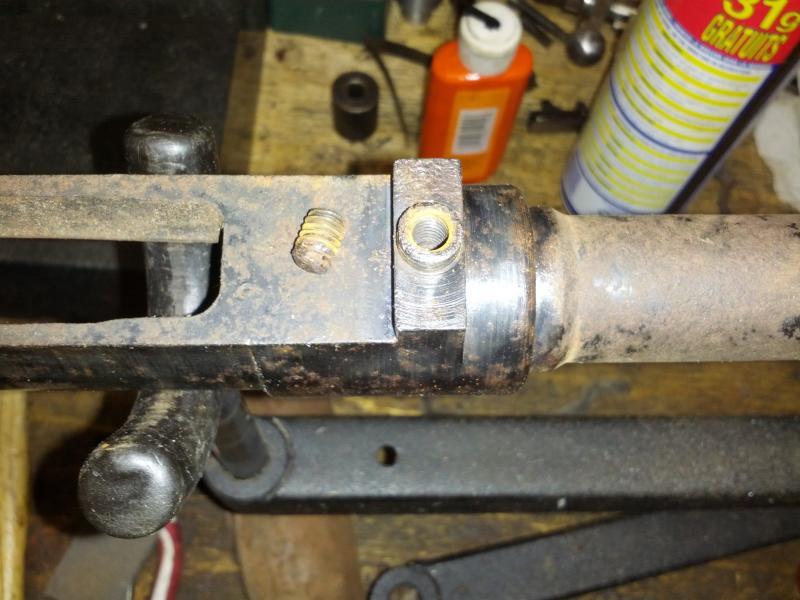
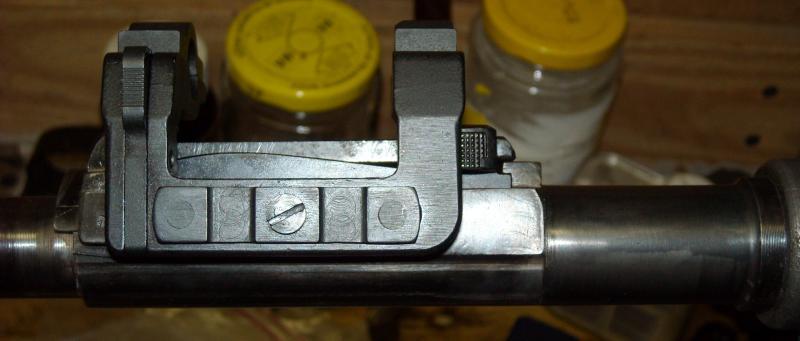
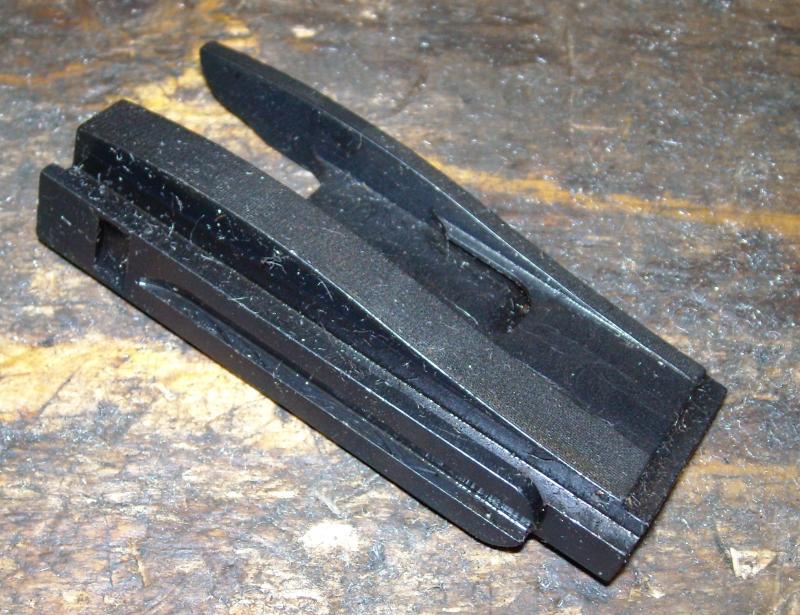
I got my ZF41 reproduction rear sight base in from France. This is the type that is a close copy of a real one which replaces the soldered-on sight base on a standard K98, not the cheap repro insert type that replaces the rear sight ramp and puts the ZF41/1 scope too high.
The good is that the maker improved the repro adding a correct half-moon dish cut (older ones had a straight cut that made fakes easier to spot), the bad is that this is NOT a drop-in installation.
For starters, the rail is too long. I borrowed a real mount and it did not fit, neither did my Accumount repro. The issue is that the rail is too long, so you have to file the nose down until the rail moves forward enough to latch in. I filed mine so that both mounts slid one and locked in. I hear the numrich mount requires more filing, but my accumount clicked in at the same spot as a real mount. The rail was also slightly too tall and had some burrs on it, a little draw filing fixed that.
Next, the mount, as I received it, would not accept a real sight ramp. It does now, after about 4 hours of machinist blue, fine files and wet/dry paper to get it to fit properly.
Finally, it would not accept a real sight. I had to do a little machining on the inside of it and a little needl-filing to get anough clearance to tightly mount a rear sight leaf.
The set screw at the back was countersunk to a slightly too large diameter for a real screw head, so I may make a replacement screw with a slightly larger head so that there are no perceptible gaps around the screw head.
In other words, if you are not comfortable working metal into final shape, this $250 base is not for you, or at the least may require gunsmith installation and fitting. It IS the best solution next to a real base though.
I'd post some photos, but the base is over at a friend's house waiting for him to get more OA gas so we can tin it onto the barrel. I also use his barrel vise, which is another story...
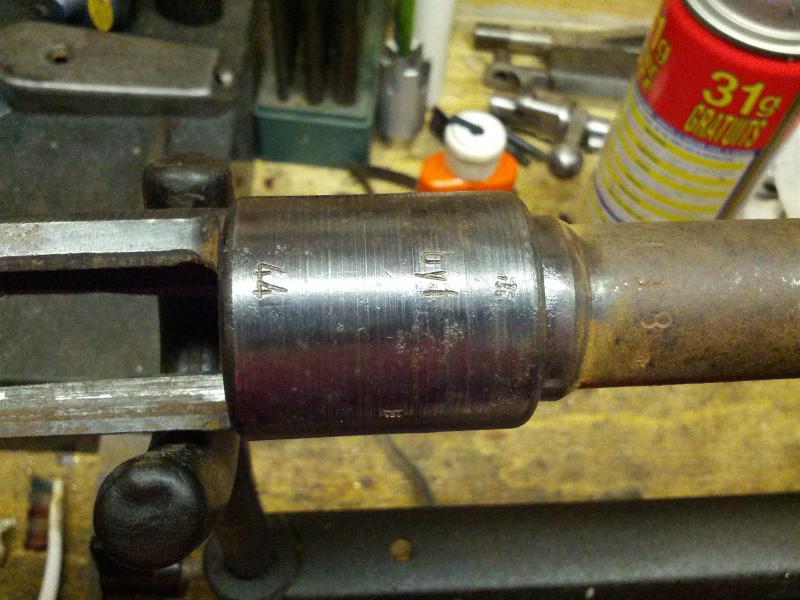
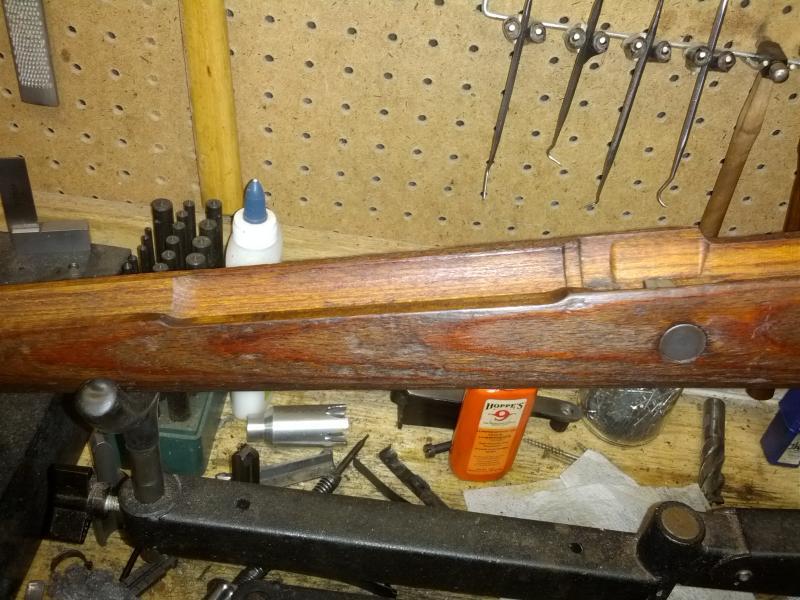
When I took the original barrel off, I needed a 4' breaker bar to unscrew it. Near the ned of the war, Mauser, it seems, tried to stretch their tooling to the max. Receivers were rough-threaded with a boring bar and finish threaded with a big tap before they were hardened. I surmise that when they made my receiver, it was one of the last receivers cut with that tap before they switched to a new one. This means the threading is pretty coarse and a hair undersized. I tried 4 scrap military barrel in the receiver and none of them would screw in easily. All of them threaded readily into a couple other pre-war receivers I have lying around.
When I tried to install the good barrel I'm using for the build, I got it half way on with a breaker bar before I stopped for fear I would crack the receiver. So I'm going to have to take a light skim cut off the barrel threads before it will install cleanly. No big deal, but worth mentioning in case anyone else decides to work with one of these late war receivers.
Final install of the barrel will have to wait until I get a bolt. Once I do, I can headspace the barrel, which might be fine, but may also need to be set back or chambered deeper - we shall see. A friend has the right reamer I can borrow if required. Once the barrel is indexed and headspaced, the sight bases will be located and tinned.
The floorplate I ordered came in from Numrich and got sent back. God those clowns are hit and miss. This time they sent me one so badly bent that it would never have been able to be made right again. It also had broken the front lip welds at some point and been crudely brazed together to the point it would not accept a magazine spring. Really disappointed a trained monkey at GPC thought this was OK to send out. Hopefully the replacement one will be better (?).
So parts yet to arrive:
- My stock set, which is inbound.
- My WaA 135 stamped band spring, inbound.
- A Bolt, I now have a line on one - will update if acquired.
- An un-numbered stamped front band (I have a rough one, but looking to upgrade it)
- Replacement stamped byf floorplate.
- My ZF-41 scope, should be somewhere between Germany and here.
Союз нерушимый республик свободных Сплотила навеки Великая Русь. Да здравствует созданный волей народов Единый, могучий Советский Союз!
-
-
-
The numrich scope is really the only one on the market, all suppliers are getting them from the same source in France (who had the tubes made in China and France-sourced optics assembled onto them in China). The Numrich mount is probably as good as the Accumount one. The difference is Accumount ships to Canada, Numrich will not ship military style optics up here. I ordered my scope from Zib in Germany, as they will ship it here.
None of the drop-in bases are very good. They may be functional in some rifles, but they don't look right to the trained eye. For a shooter, it would be OK if it fits your base decently.
_________________________
Another news, I appear to have purchased a WaA 140 bolt over the weekend, which is perfect as Mauser used these fn-supplied bolts in wartime production. It's rc, but no worries as I'm reblueing it anyhow. Just have to wait for it to get here, then the ball will get rolling.

___________________________
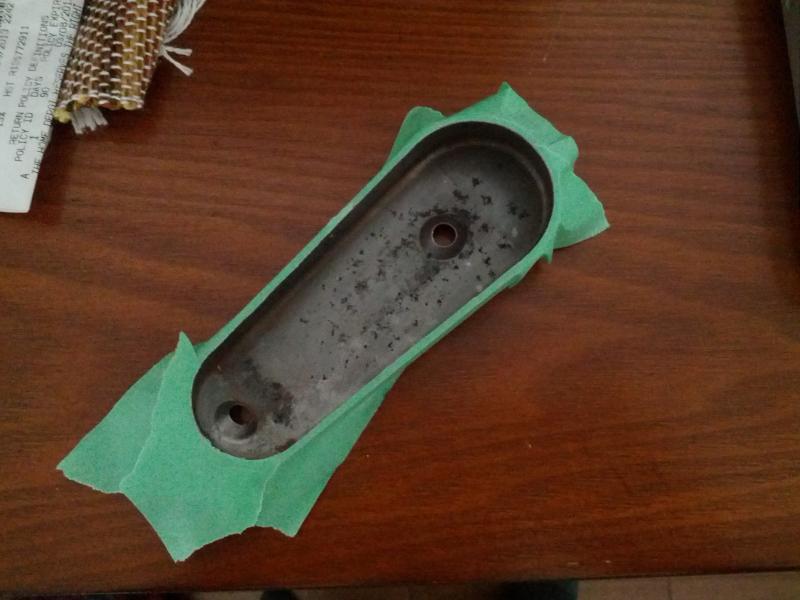
Still waiting for my bolt to get here, so in the meantime I did some additionaly minor work. I have an un-marked colt collar to replace the WaA63 collar on my inbound bolt. I removed the blueing off it in evaporust. I also had an un-marked cuppled buttplate I got off a sporterized red glue laminate stock that I believe was originally on a mid-war Oberndorf.
When I got it, the red anti-rust pain on the inside was maybe 50%, but there was some tenacious rust on the outside and some inside. I soaked it overnight in evaporust, which got rid of all rust issues, but also ate what remained of the anti-rust paint. This paint was originally applied by the Germans on all cupped buttplates to help deter rust when rainwater got under the cupped buttplates and might not have drained out. It's actually a good ideal to re-apply that paint if it's missing in case your rifle ever gets wet
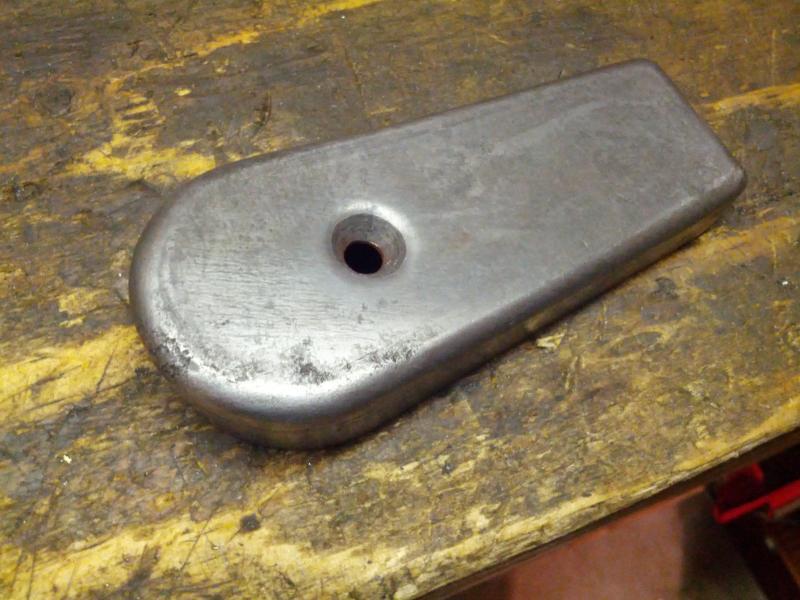
Here we can see the remaining pitting that was left inside the buttplate after the paint and rust was removed. It's taped and ready for paint.
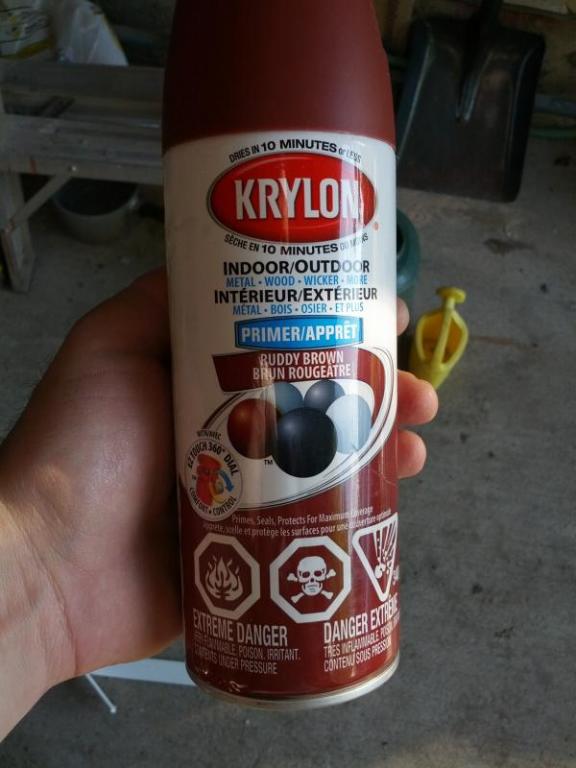
Krylon "Ruddy Brown" primer is an exact colour match for the original paint on these buttplates.
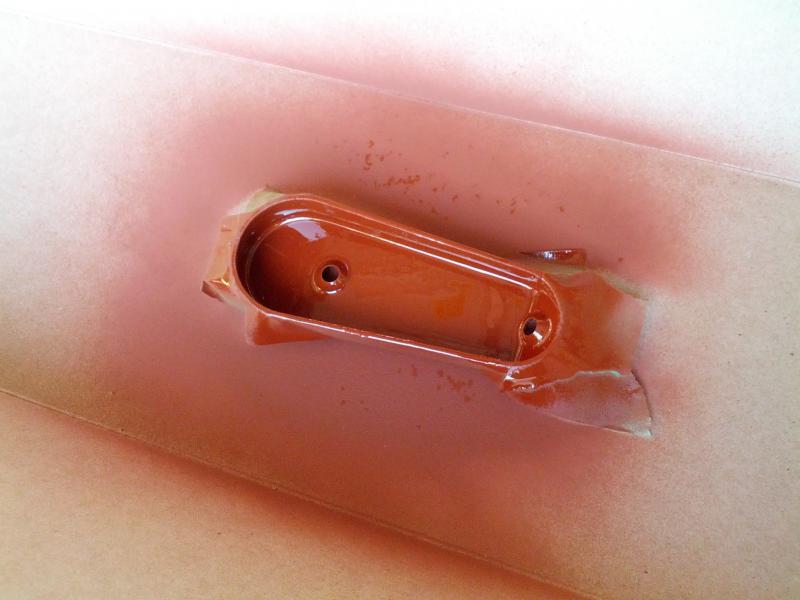
And voila! Looks pretty convincing huh? Many of the buttplates you see on e-bay that look "as new" have thusly been faked and people will pay more than double for one they think has intact nazi paint in it, just sayin'...
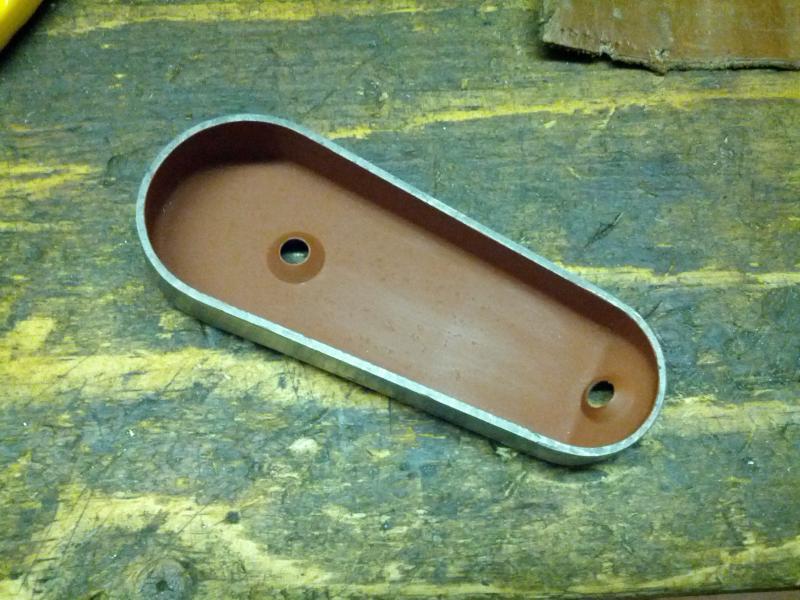
At the tip of the buttplate toe you can see where the stubborn pitting/rust was before being removed.
__________________________
Hooray! My bolt is here. So on Tuesday when my buddy's back from turkey hunting, I'll go index the barrel, set the headspace and tin on the sight bases. Should get going much faster now
__________________________
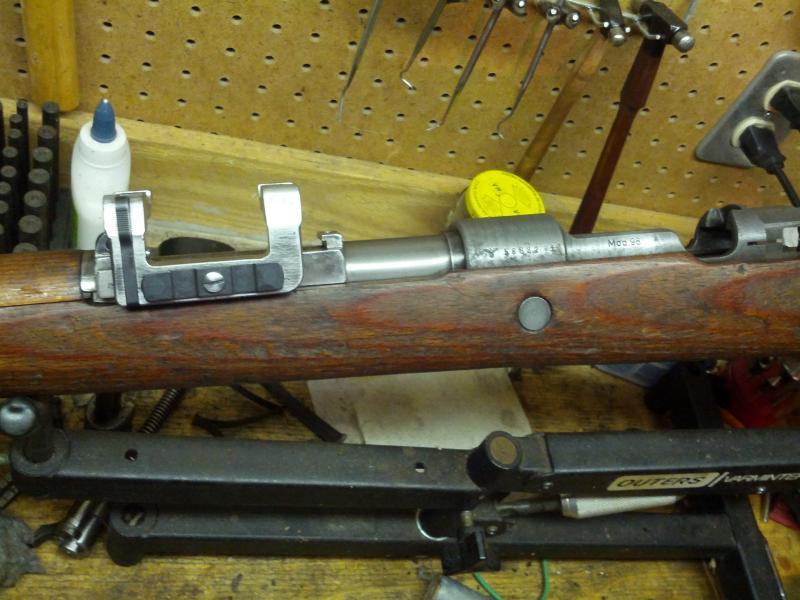
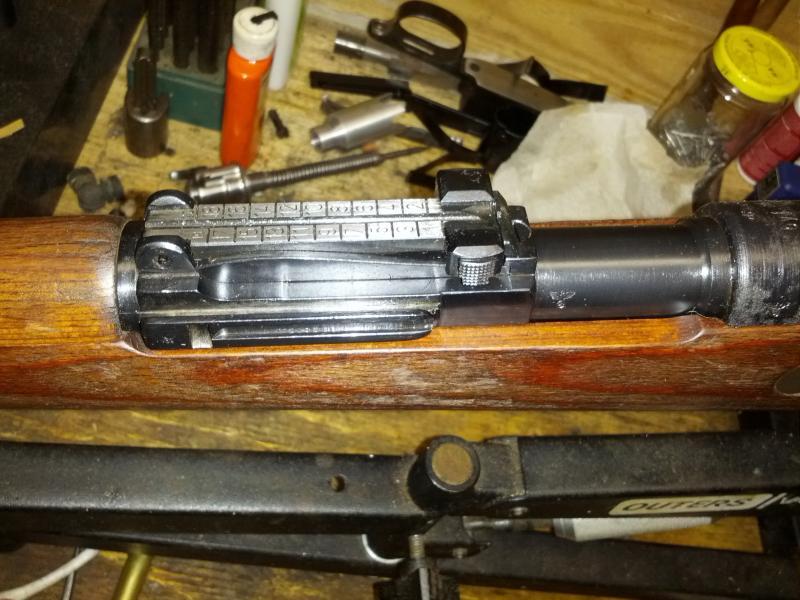
Progress!
The bolt worked out great, perfect headspace right from the get-go. The barrel, fully installed, was 5 degrees shy of the sights indexing, so new set-screw holes had ot be drilled in the barrel to retain the sights while soldering them in place. The rear sight base was assembled and indexed off an original sight leaf, the front was indexed t the rear base using parellels, and the whole thing was parellelled to the receiver flat on the underside behind the recoil lug. Worked out splendidly. (what a pile of work making the repro base work adequately though!)
Once the bases were soldered on, I checked alignment to make sure nothing had warped and the fitting of the sight ramp was still valid - it was, nothing had moved. Then the interface areas were cold blued to see if any solder was missed in cleanup. The bluing will be removed prior to hot bluing anyhow.
Now waiting for the stock to get here from Europe...
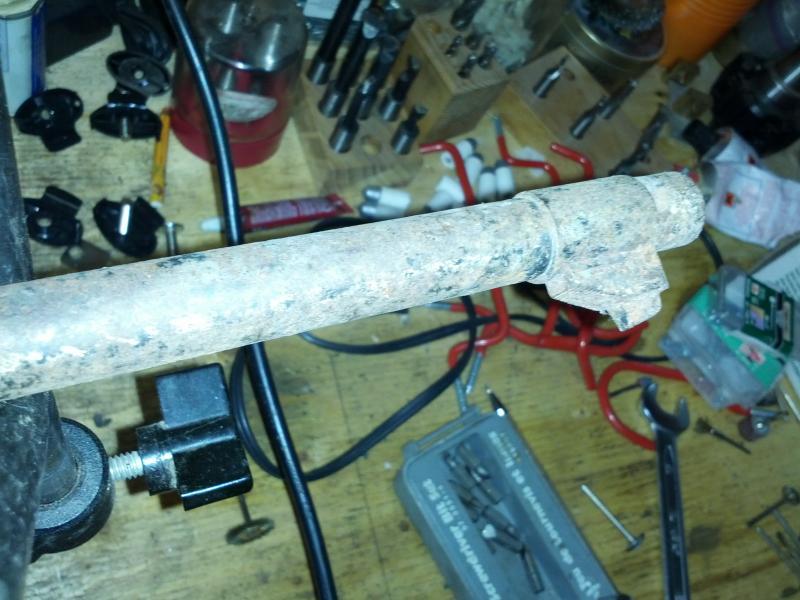
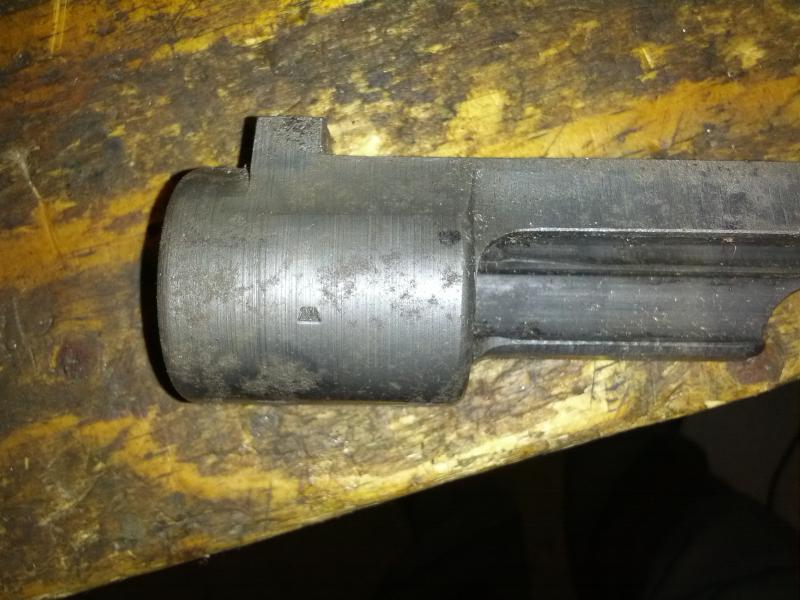
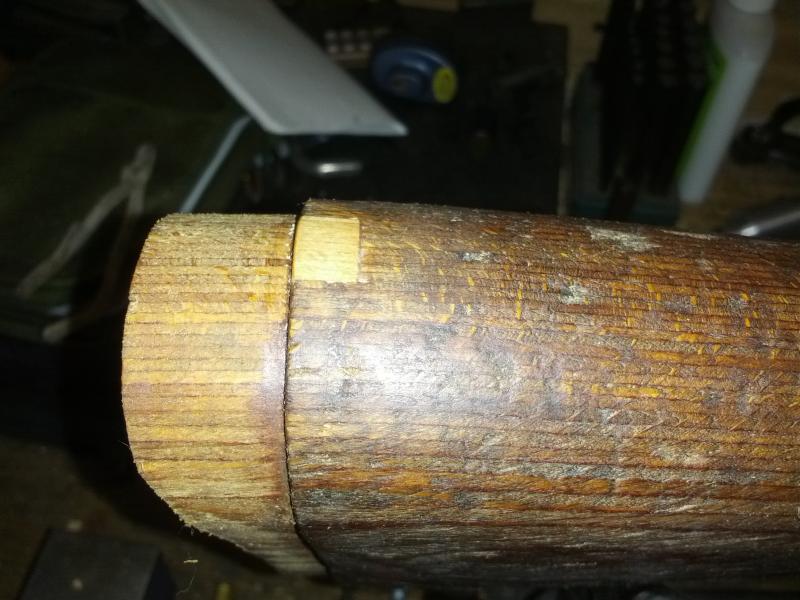
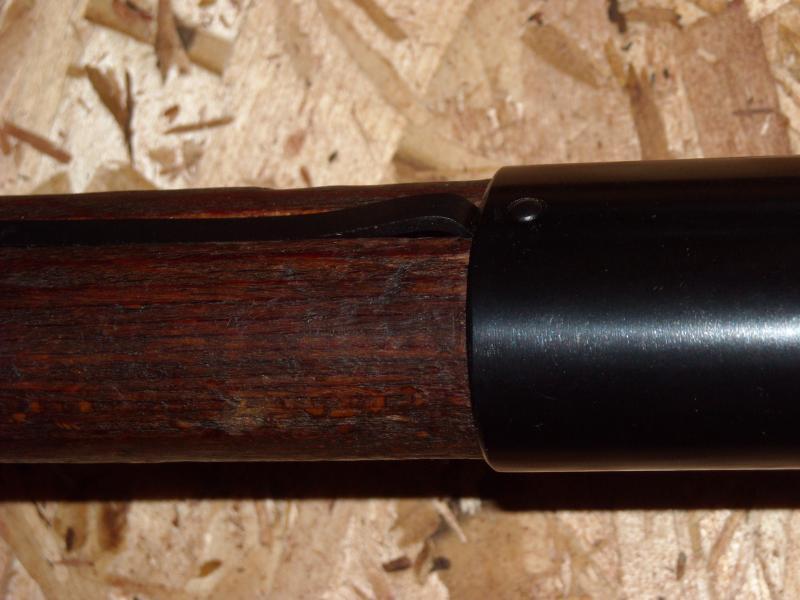
Here is the proof that I'm not going to totally pass tis off as an outright fake. The barrel came off an East German action, found it in a bin of orphan barrels at a local gun shop. Someone had removed it with a monkey wrench (I think). I left these marks in place as they indexed to the underside of the barrel and are covered when assembled. A disassembly will betray the linage of the barrel though There were wrench marks on the exposed areas too, but those have been filed out and re-contoured - you can't tell anything was ever there. Bore on this barrel is PERFECT. I suspect it was not shot after being imported, someone took it off an action they used to build a sporter. Should make a great shooter.
Here you can see what is (IMHO) the biggest giveaway that the repro base is fake. Look at the retainer screw, there is a small gap around it. On a real base, this gap is not perceptible and the fit is tighter. The screw is real, though I may yet make a replacement that eliminates the gap.
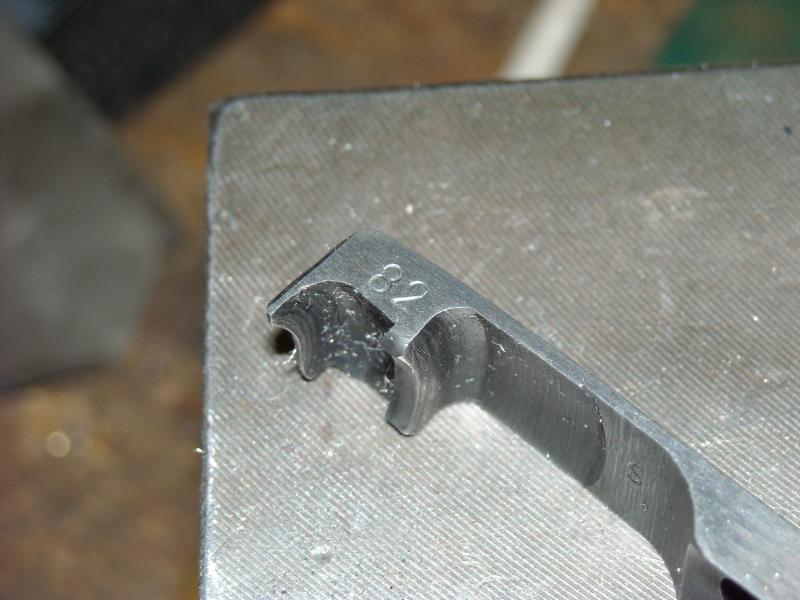
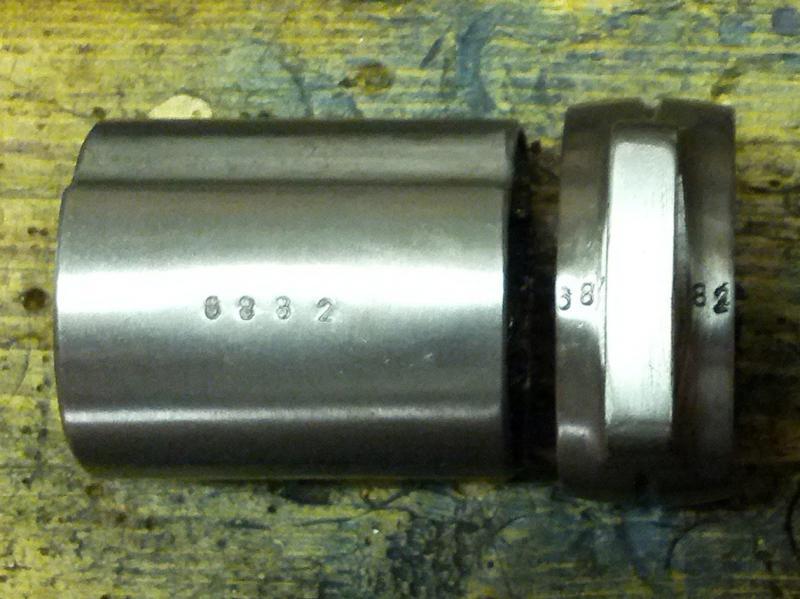
Now some progress on prepping parts for bluing. This was a 1943/44 era extractor with a mis-matched serial. I used emery paper to remove most of it, then over-stamped the serial with new numbers in such a way that the residual marks from the old serial were covered by the new numbers. Pretty convincing huh? I went over it with coarser paper afterward ot match the rough wartime finish.
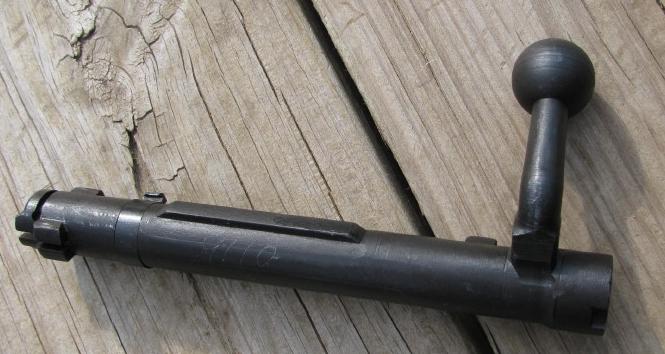
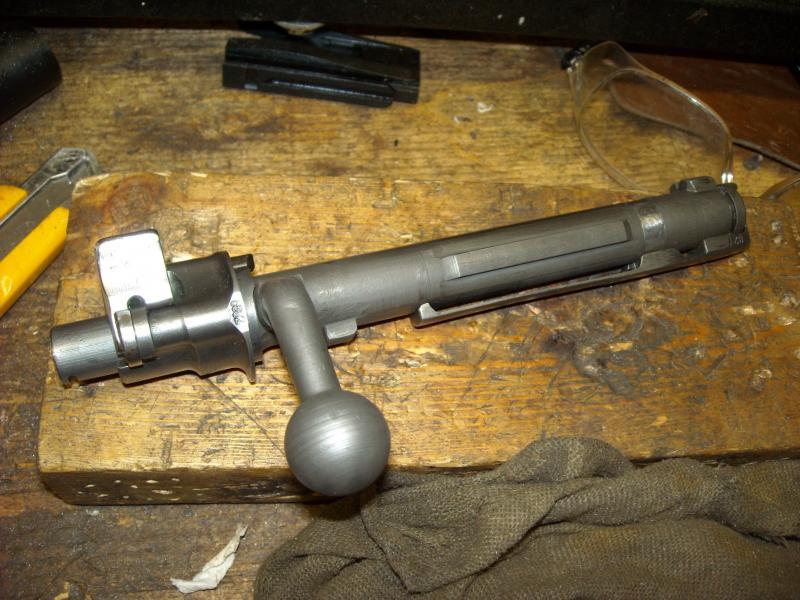
Bolt assembled for test fit.
Parts I scrounged that are correct for a byf44 awaiting bluing.

This is the TG I have on-hand. I have another on the way that is not serialized, we'll see whichever is nicer when it gets here. This one is REAL nice apart from the m/m serial number overstamped on the byf logo. Note the late war solid lock screws. These are real, not repro. I had them in my parts bin.
And finally, here is the drop-in rail I did not use, but my repro base came with it. Though maybe someone would like to see what they look like. The situate the scope too high - I'm not a fan. BBOTW surmises the Germans made a part like this. It's an error in the book - they are all fake/fantasy pieces.
__________________________
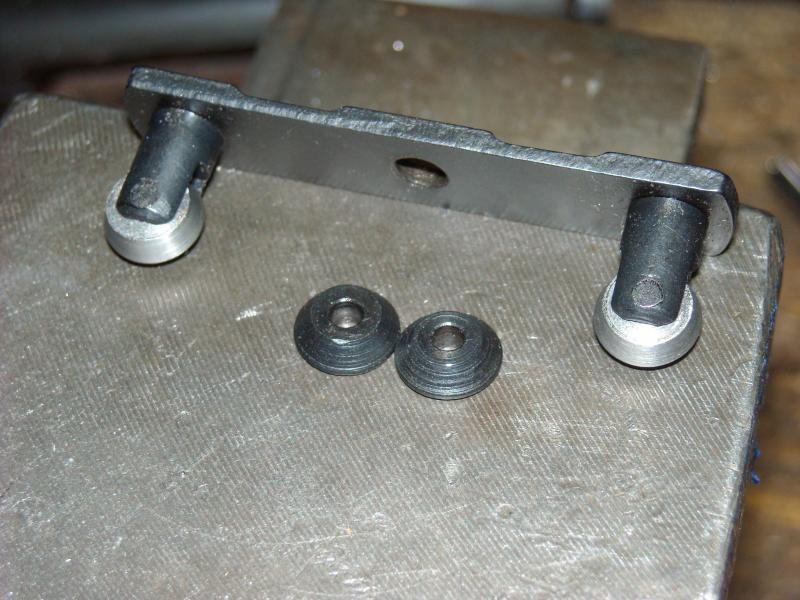
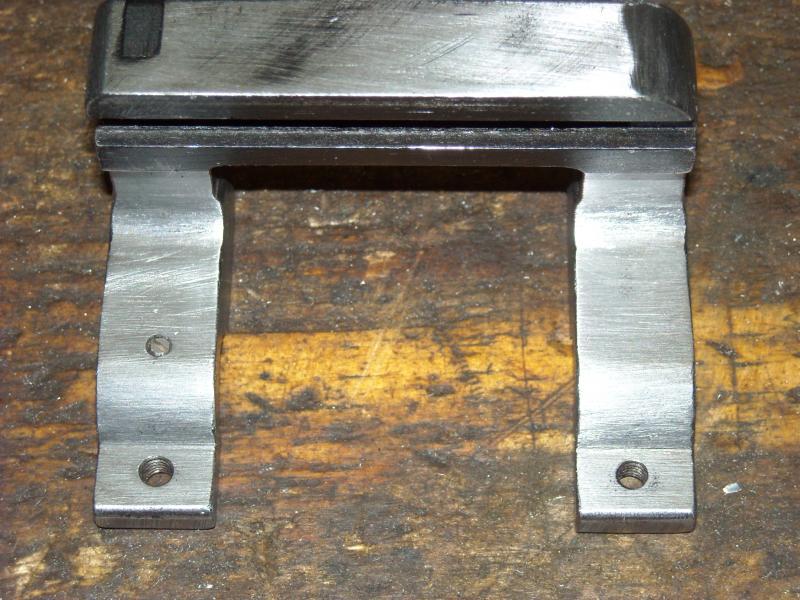
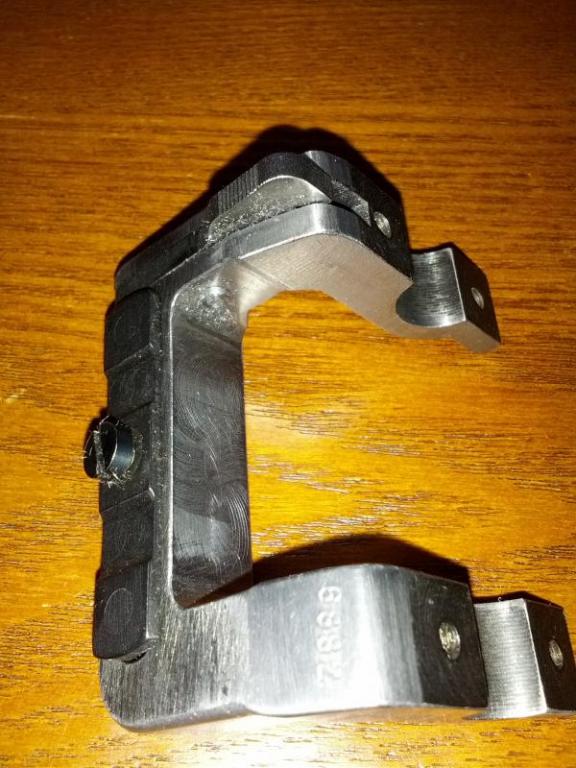
A little progress. My Accumount mount came with 45 degree set of rollers, which corresponds well to the drop-in mount they sell, but is NOT right for a real ZF41 base, which used rollers of about 70 degrees or so. There were lots of as-cast surfaces. The Accumount version (unlike hte Numrich version) also did not come with a set screw on the underside of the front ring. Finally, the Accumount copy had a piece of drill rod as the latch pin, while originals had a pan-head pin.
These inaccuracies would just not do. So I went over the entire mount with either and end mill or a file, follower by a light 120 grit sanding with a light 60 grit sand. Gives hte impression of a part that was tumbled after machining like the originals were. Then I machined a new set of 70 degree rollers from bar stock and installed them, locks up MUCH tigher now on my French repro base. After that I machined a new pan-head pin and installed it. Finally I added a 4-40NC set screw under the front ring.
Much better. After bluing, it will look like a post-war refurb of an original mount (nazi markings removed). I also serialized it in the original style.
This shows how a repro can be made to look original, though only crazy people like me would do so. Originals only sell for $75-100 more than the reproductions, so it's not worthwhile for most guys to fake these yet
___________________________
Making up for my camera battery dying last night...
Here you can see where I filed a bevel into the back of the mount, just behind the raceway where it fits onto the base. On the repros, this area is square with no bevel. I'm talking aboutthe surface that is bright white from the flash in this photo.
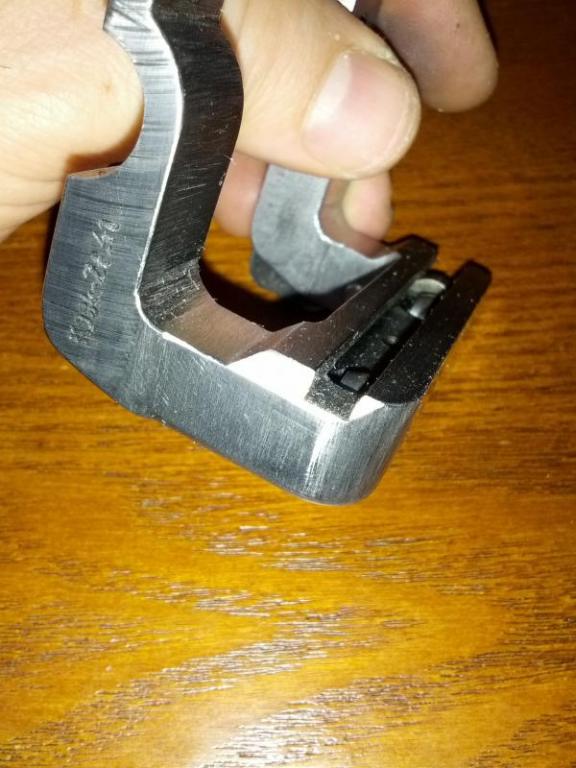
I wasn't going to fake up any more markings, but could not resist trying to duplicate the engraved K98k-Zf.41 pantograph found on the originals. Not even the best repros seem to have duplicated these markings as far as I can tell. I did the best I could to free-hand it with a 0.75 mm diamond burr in a handheld dremel tool. First I machinist's blued the area, then I hand sketched it using a scribe, then I deepened it with the burr. Not perfect, but very close - or as much as I can make it so freehand.
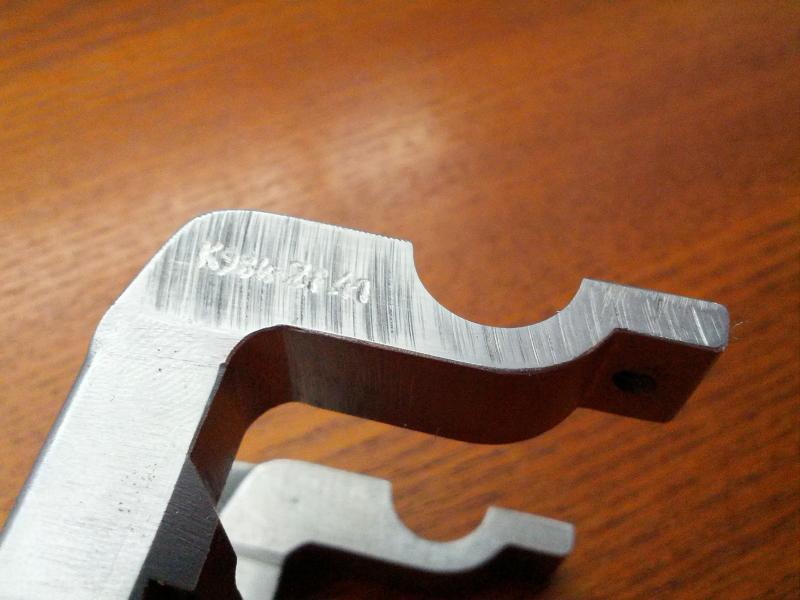
For comparison, here's a real one:

Here's a shot of all the surfaces now either milled or filed and sanded to hide that this was a casting vs, a machined forging.
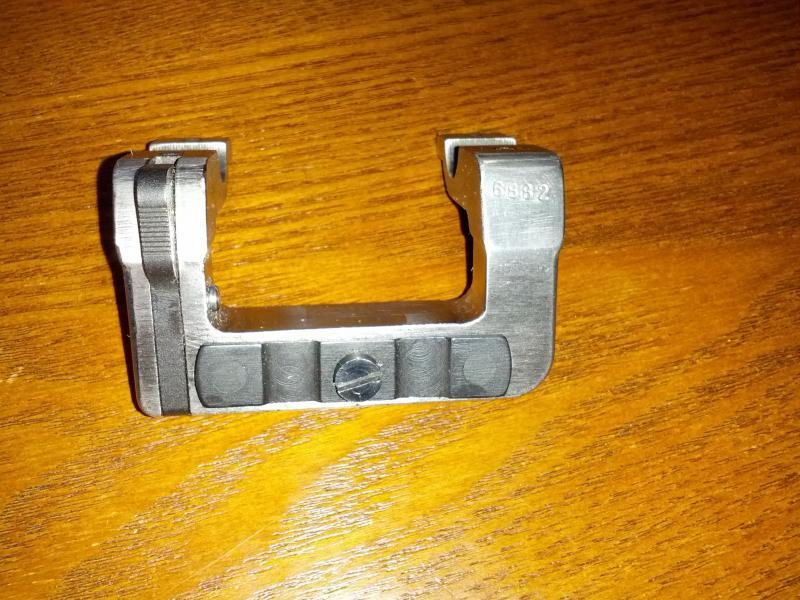
In this pic, you can see the panhead pin I made and added to replace the incorrect drill rod pin.
I still have to dome the screw used to tighten the rollers onto the mount. Real ones are no cheese-head screws, but are slightly domed. That's a 2 minute job in the lathe.
When blued, this thing will definitely look the part.
______________________________
An original would be WAY more cost effective, no doubt, but if I bought an original, I would not be able to show you guys this stuff! It IS a hobby, afterall
In other news, I've somehow ended up with three stocks either here or en-route.
One, Mario's LAST cupped laminate, is in my basement. I'm not going to use it. It's a steyr stock, with the unique steyr bolt handle cutout, and while pretty would not look right on a byf44. It's got other mostly fixable minor issues, for example, it came with a walnut hg instead of blode red glue laminate, but may serve on some future project.
Next I picked a white glue laminuate that came of a byf43 (I think) with a WaA655 recoil lug. This one has nice original finish, but has some delamination issues in the butt that I will try to repair be gluing and clamping - we'll see what it looks like when it gets here.
And lastly a decent looking red glue laminate I kinda won on e-bay my accident. RC stock with a one-digit serial stamped on the left side (a "2") that looks to have come off a mid-war Mauser Borgiswald rifle.
When I get all three here, I'll pick one to use for the build. If I can get the delamination cracks dealt with, I'm leaning toward the white glue byf stock.
_________________________________
At this stage, I have all the metal sorted out and ready for bluing. Everything is either re-serialized or unserialized with the exception of the trigger guard which as a m/m serial number on it. What is holding me back is waiting for the last two wood sets to arrive so I can choose which to use in the build, then I'll inlet the stock properly and then send off the metal for bluing.
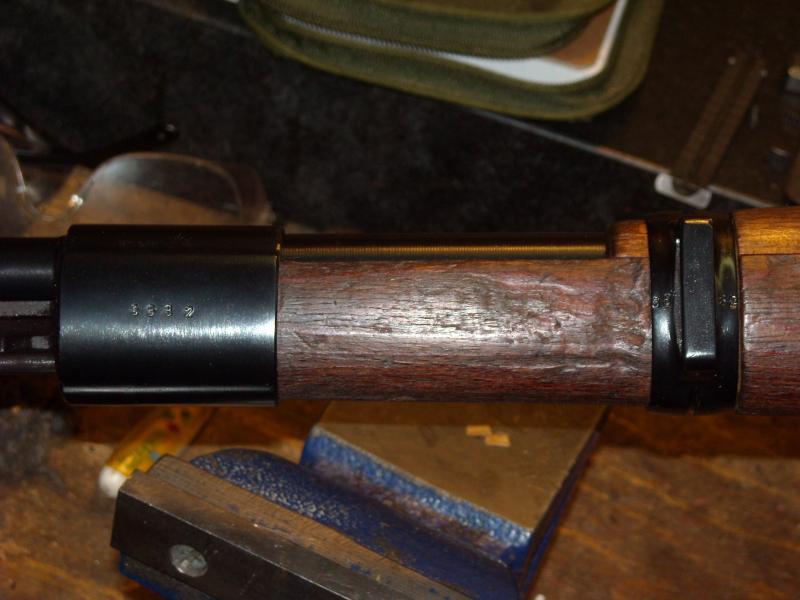
If you guys would like, I can post pics of the bands I am using. I went with a late war milled rear band and a 1944 era thin-walled speed milled band. The front band was REALLY badly coroded when I got it, but cleaned up nice with some careful file work and then coarse sanding to duplicate a late war finish.
Союз нерушимый республик свободных Сплотила навеки Великая Русь. Да здравствует созданный волей народов Единый, могучий Советский Союз!
-
-
Here you go. Unfortunately, I accidentally double-struck the "2" on the rear band, but it's not too bad and frankly, a lot of original bands were double-struck. Both bands were originally numbered with other numbers, but were only lightly struck so I was able to scrub them without and evidence remaining. In the case of the front band, I filed the entire circumference of the band thinner (it started out as an over-average thick band) - a necessity because it was pretty corroded. I did get it cheap though - lol. The rear band had no WaA's on it and came off an RC. It is a bit more crudely made than most milled bands and I believe likely came off a 1944 rifle to begin with.
I think they both look good now.
_____________________________
Well, I got tired of waiting for the third stock to arrive. It's been in US Customs since June 6th - maybe they don't like something about it? Who knows.
I've converted the red glue laminate byf stock I had on-hand. If I ever want to use another stock, I could always sell this one. I've seen a good many guns with ZF41 inlet stocks that don't have the mount, I'm sure someone would want it - lol.
Here are the "almost done" pics. I have to put it back in the mill and take another 1.5mm cut because it got too tight after I installed a TG and tightened the action screws.
Definitely, you need a mill to make this cut and have it look original. A little "chocolate" fiebings oil-based leather dye makes the inlet look 70 years old...
_____________________________
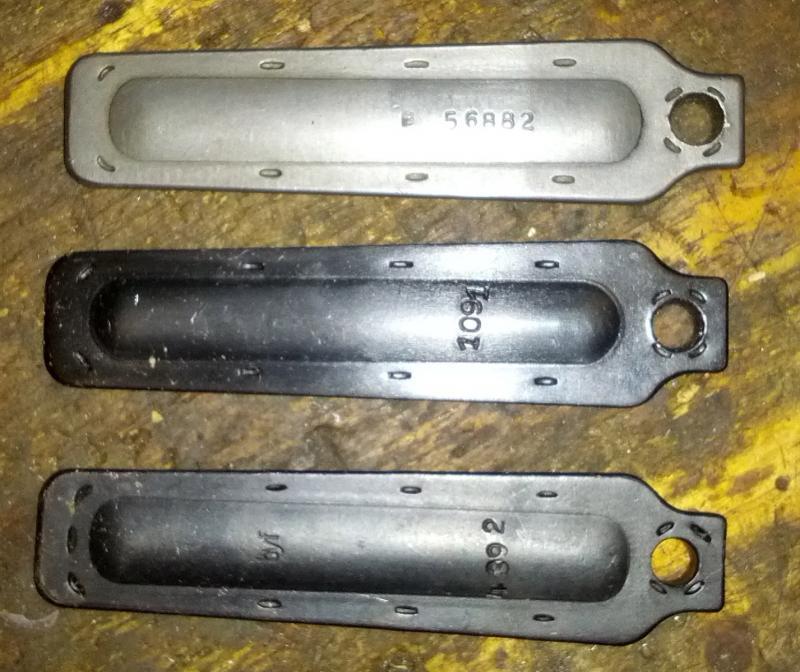
A couple more progress pics. First, let's talk floorplate. I REALLY agonized over this one. I had three stamped and welded floor plates available, one a serialized bye FP a local friend provided for potential use, the second an unknown maker serialized WW2 FP (could also be post-war east german, but not Yugo) and a WaA135 unserialized FP with a worn phosphate finish.
The first two are probably $30 items each or so. The latter is worth over $100 since it's not serialized and correct for most 44 or 45 rifles. Serializing it makes it worth less, but would dramatically improve the look of my rifle. In the end, despite it being a tragedy, I steel wooled off the remaining phosphate and serialized my sterile floorplate. It looks AWESOME. I even had the right size and pattern font available. This is exactly how "good" fakes are made. When you weld over S/Ns on the more common floorplates, it ALWAYS shows after being re-phosphated or blued because welding rod steel is different in composition than the 1018, 1020 or 12L14 style steels the Germans would originally have used for these stampings.
I'm using the tope one in this photos, it's bare and ready for blueing.
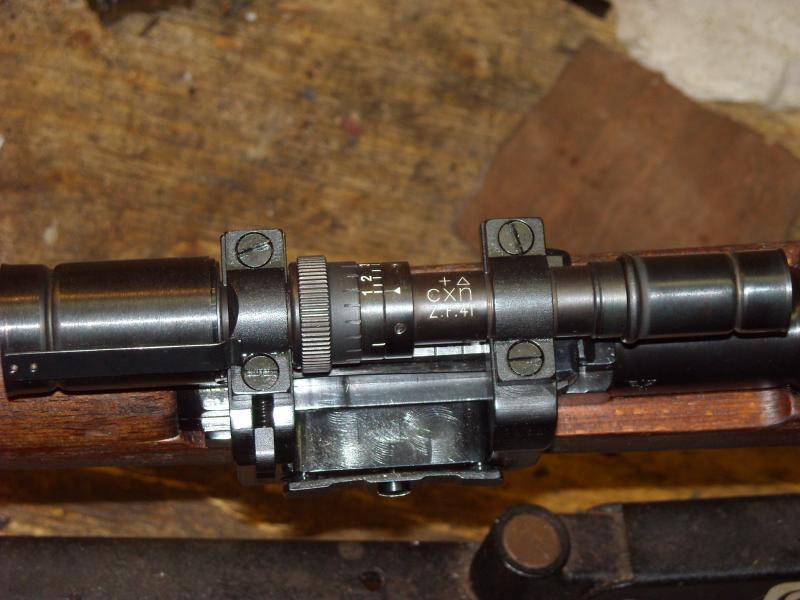
Here the scope is mocked up to check clearances. The ZF41 clone is pretty nice - the more I toy with it, the more I realize how good a job was done o nth repros, unlike the crappy scopes made for the turret repro market.
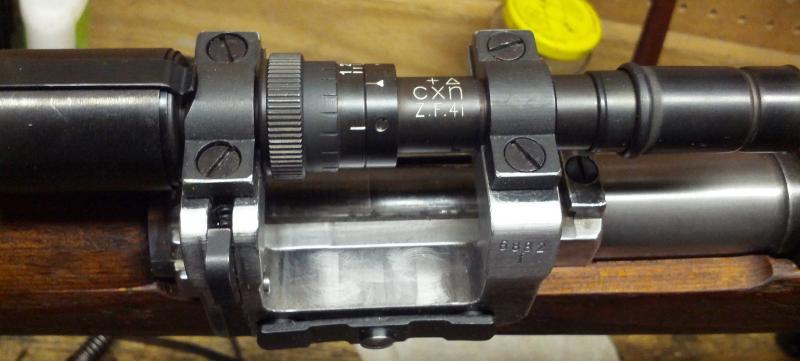
Here you can see it mocked up "quick & dirty" while I was testing function and scope mount clearance for the inleting.
Next step, blueing. I'm still casually looking for another trigger guard that is byf or WaA135 with locking screws and no serial number, but that can always be swapped out later.
_____________________________
Here's the one repair I had to do to the stock I inletted for the mount. There was a small chip missing at the toe. I have a garbage laminate K98 stock I use to cut patch material when I need to. Here it is, inletting and glued in place.
stained and oiled:
______________________________
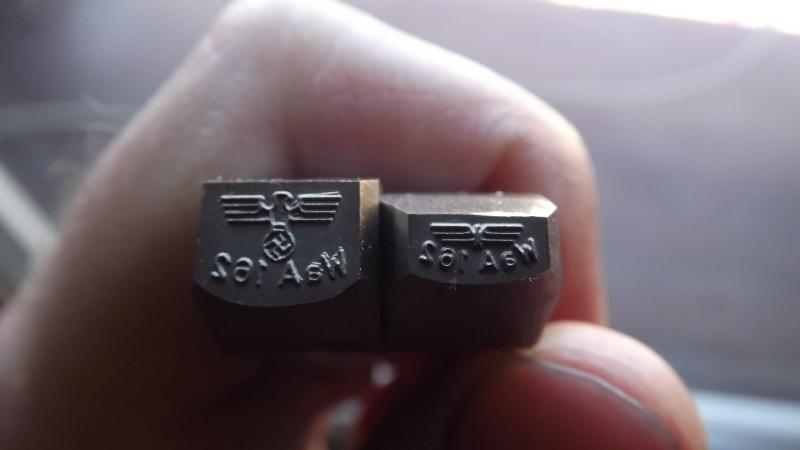
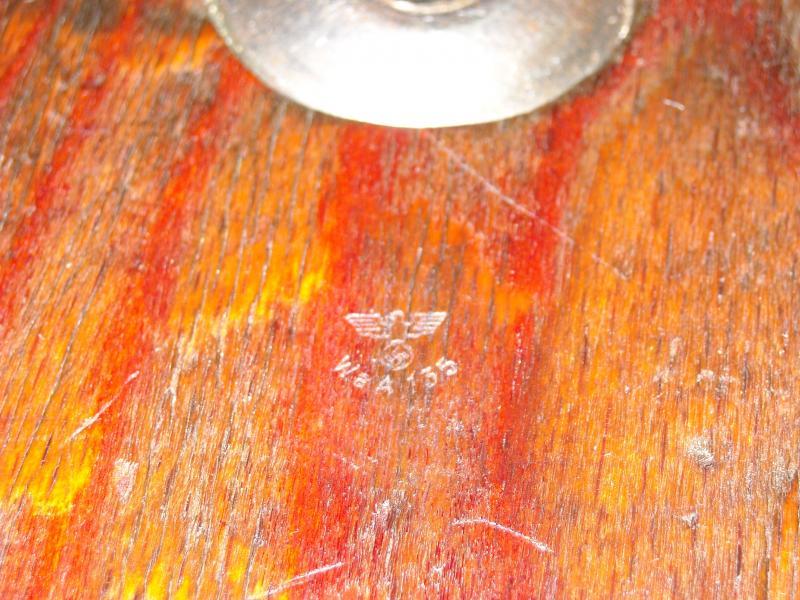
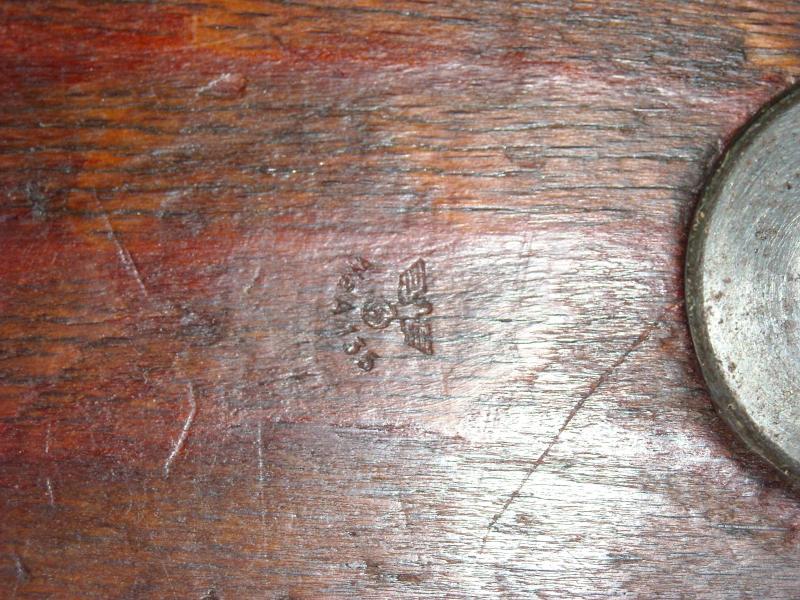
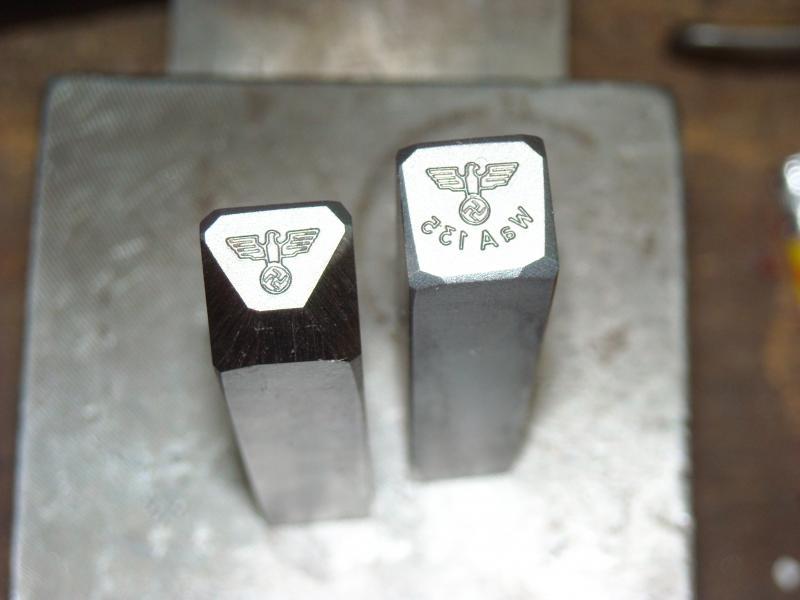
Since I'm simultaneously trying to help you guys detect fakes, I thought I would share some photos. There are many sellers, mostly in Europe, who make some pretty convincing reproduction Nazi-era firearm and accoutrement stamps. I've collected a few photos from sellers and here are some examples. I even ordered a couple of these stamps myself and am debating whether to use them on my ZF41 repro to mprove the looks and show what can be done with a decent stamping die. (Note that I left the East German markings on the bbl intact to show it's not a WW2 original gun. The stamps I bought are the WaA135 stock stamp and a barrel firing proof eagle.)
Some of these are pretty scary good.


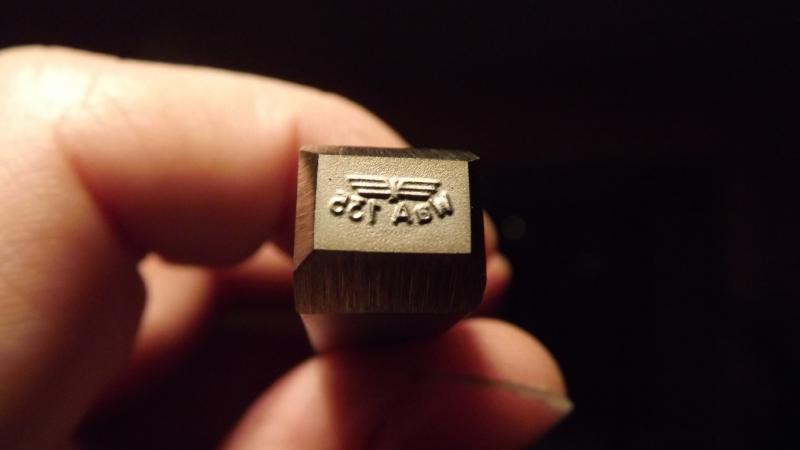
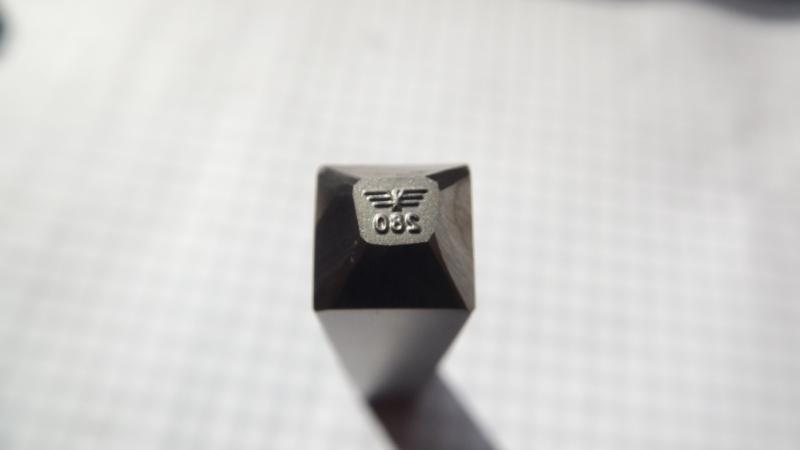
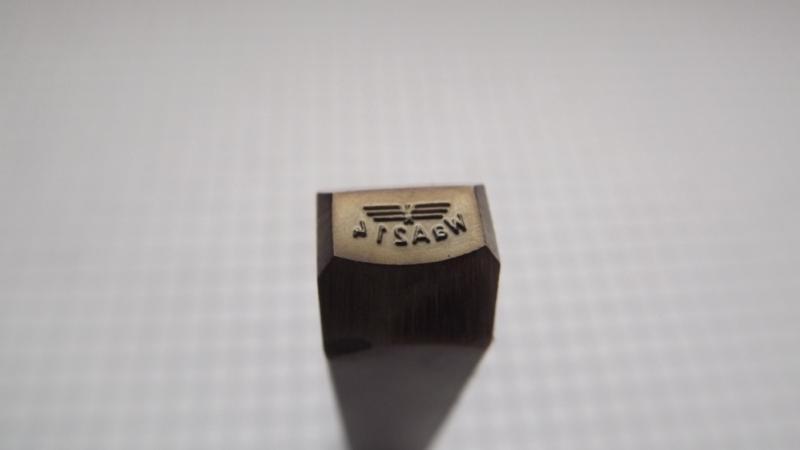
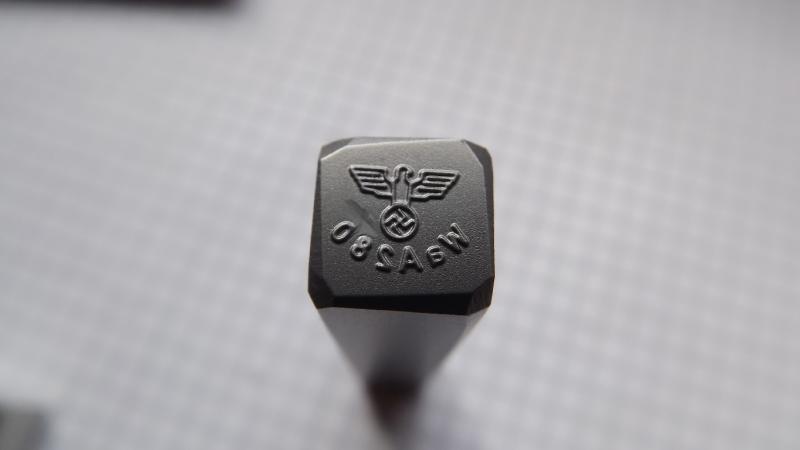
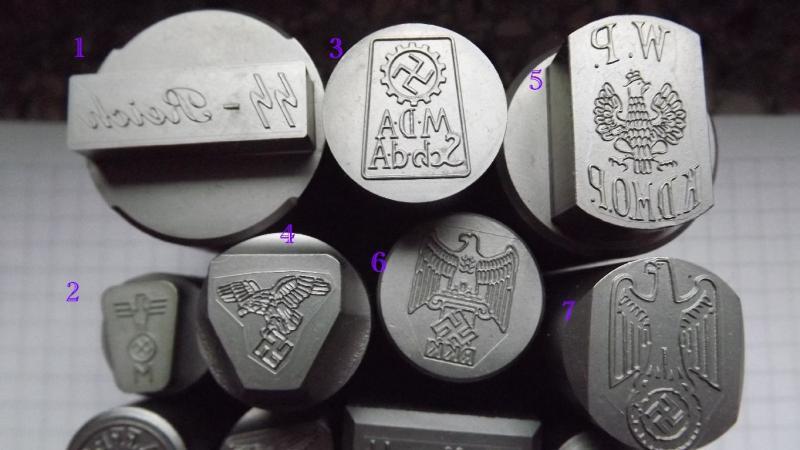
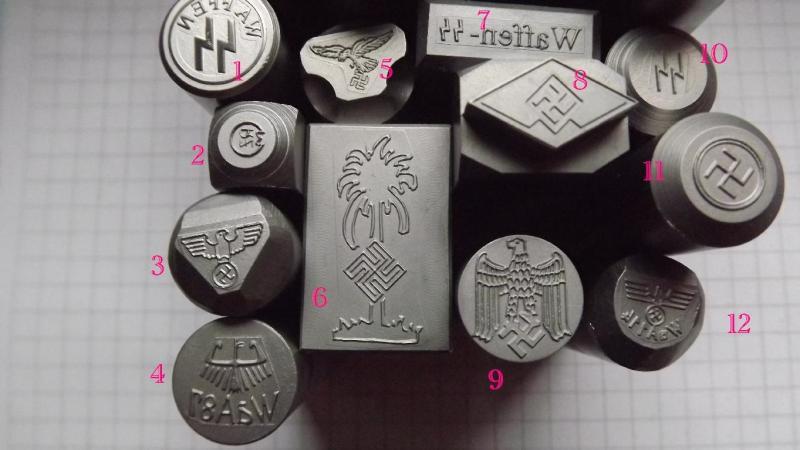
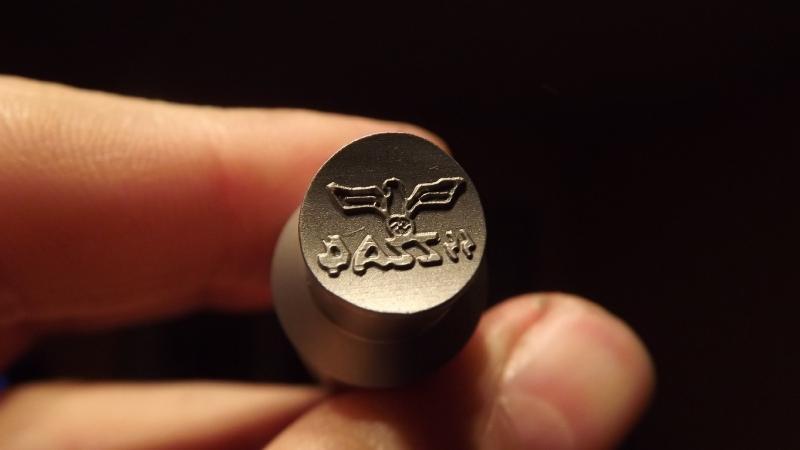
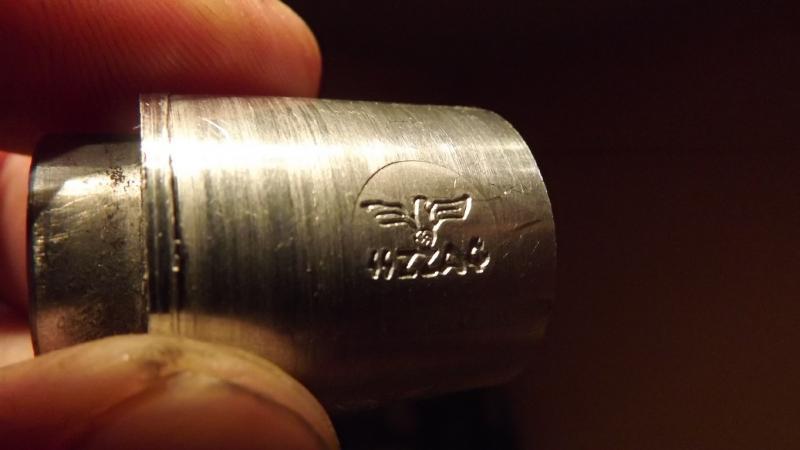
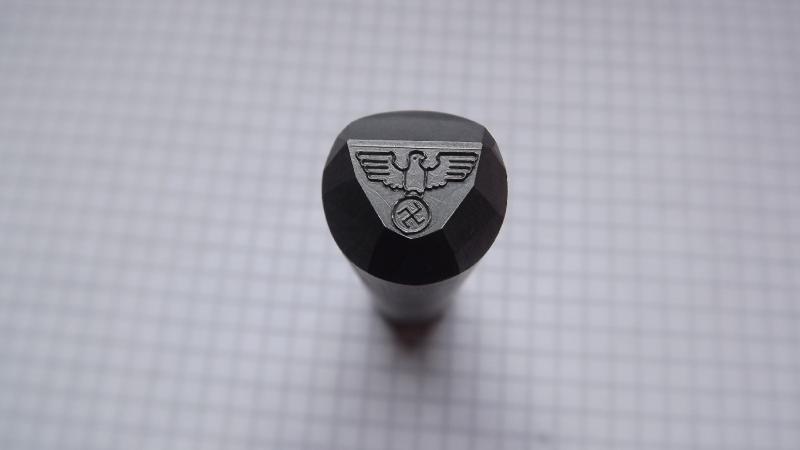
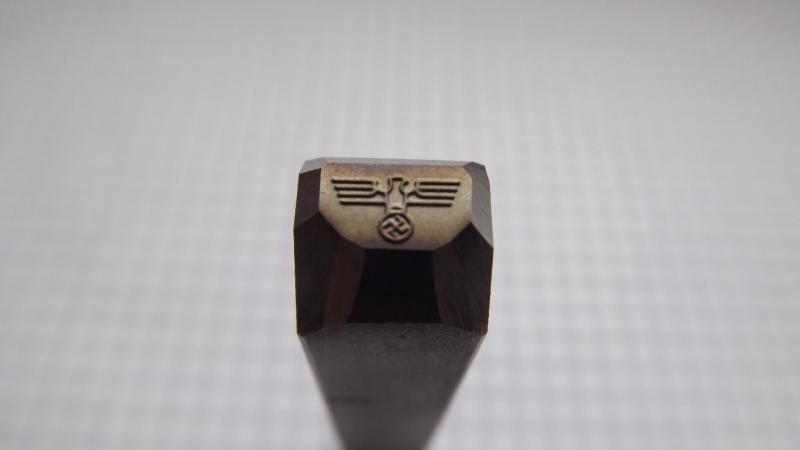
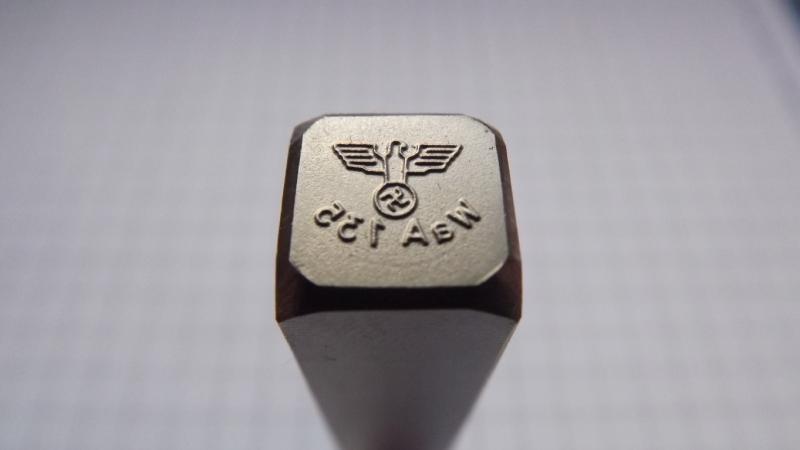

these are only a few, I have many many more pics of examples. Anyway, the moral of the story is that there is BIG money in "all original" collectible nazi stuff and the ability to fake markings is ever-improving. A piece may no longer look obviously like a fake and needs to be evaluated as a whole. More and more the nazi gun collecting hobby is getting to the point good reference books and lots of in-hand experience with original guns will be VERY important in not getting taken to the cleaners.
Союз нерушимый республик свободных Сплотила навеки Великая Русь. Да здравствует созданный волей народов Единый, могучий Советский Союз!
-
The Following 2 Members Say Thank You to Claven2 For This Useful Post:
-
Well I had to pay dearly for it, but I now have a better WaA 135 TG on the way, which is properly unserialized. It will need a reblue though. (pic from e-bay)
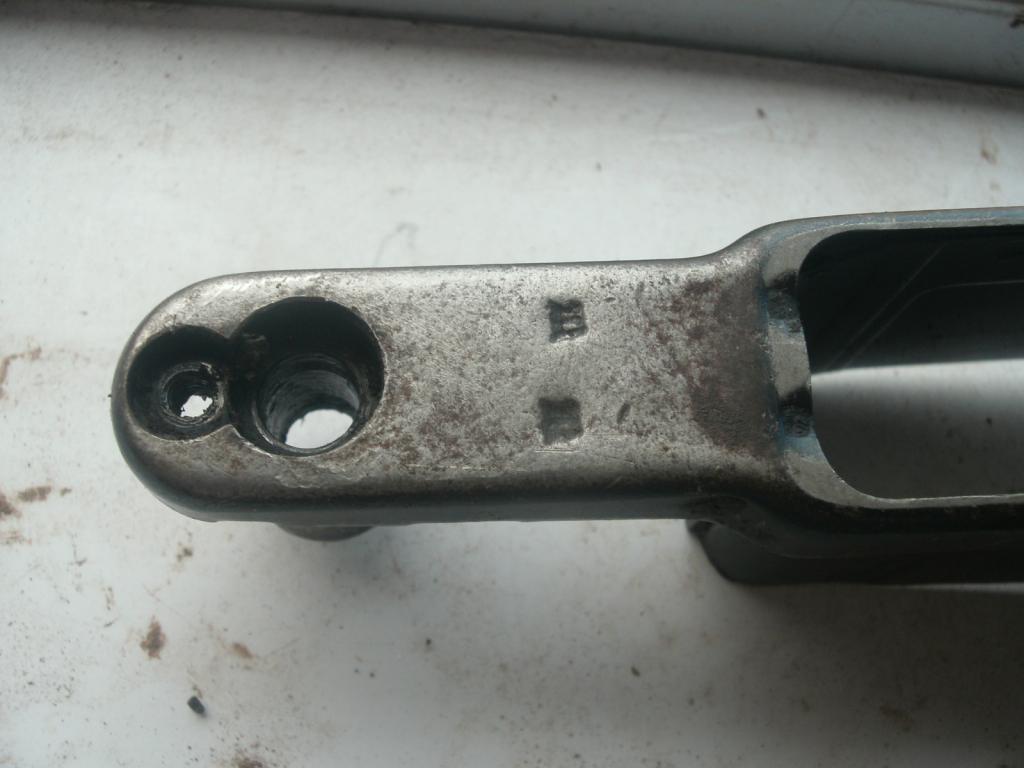
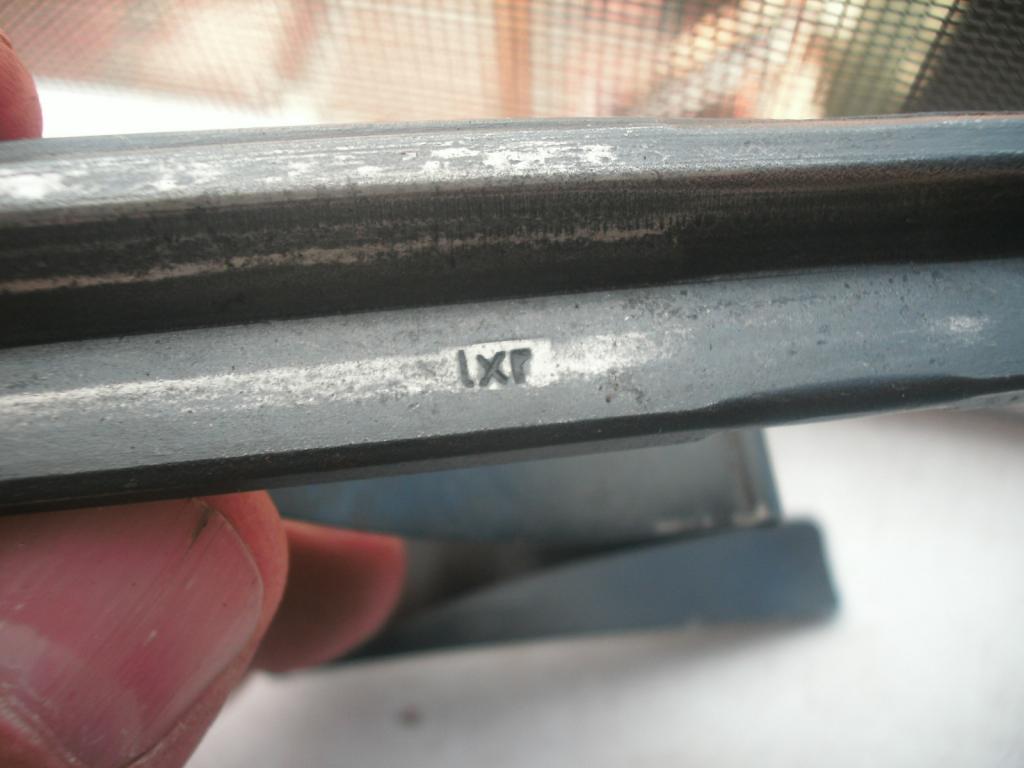
I have to decide also which follower to use. I have two WW2 German followers, not sure which is better for byf44 - one is totally unmarked and is an as-new armorer replacement part, the other isa slightly used "lxr" follower, shown here.
______________________________
A little more fakery... I know I said I would not, but I decided to weld over the serial numbers on the firing pin and re-number it. These parts are in the white on a byf44, and it's amazing how hard it is to detect the weld and renumber. I used coarse paper on a file to replicate the original late-war rough finishing on the flats, re-stamped it, then cold blued the whole area and pickled it back of again to make the metal look aged. Scary, huh?
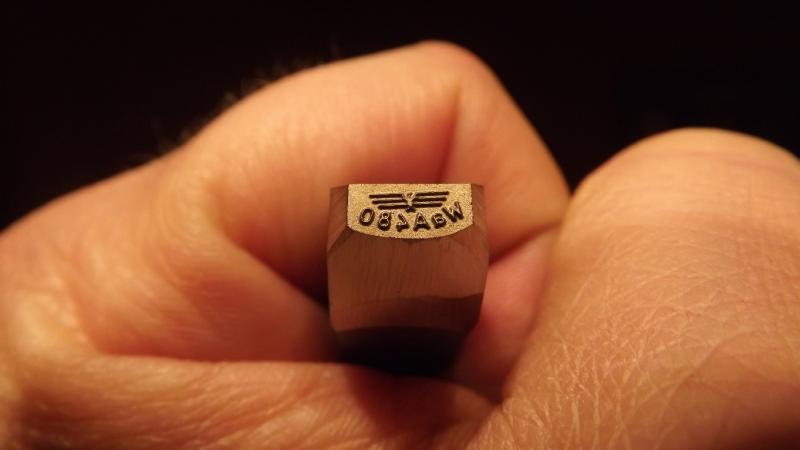
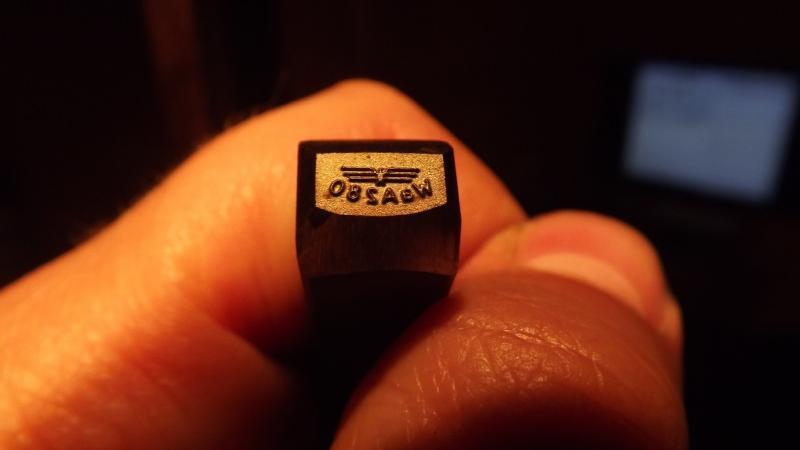
Next, here is what a decent fake stock stamp looks like. Stamped into the wood, then lightly boned to remove the proud crispness. Finally, some dark brown dye rubbed into the bottom of the stamp to make it look older.
Freshly stamped:
Aged:
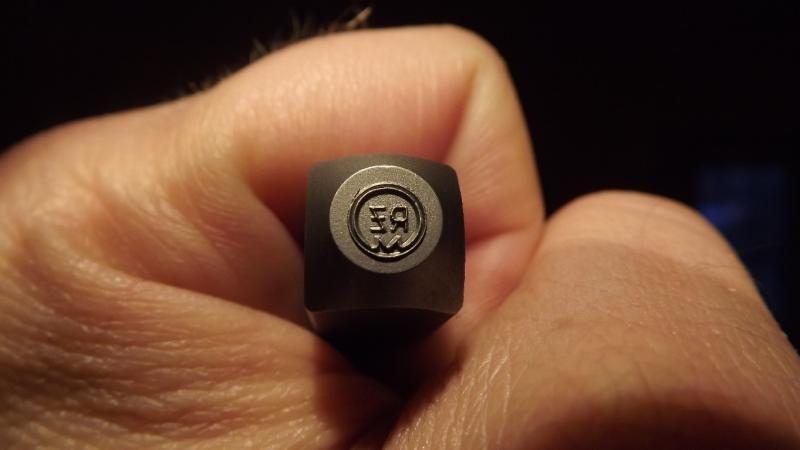
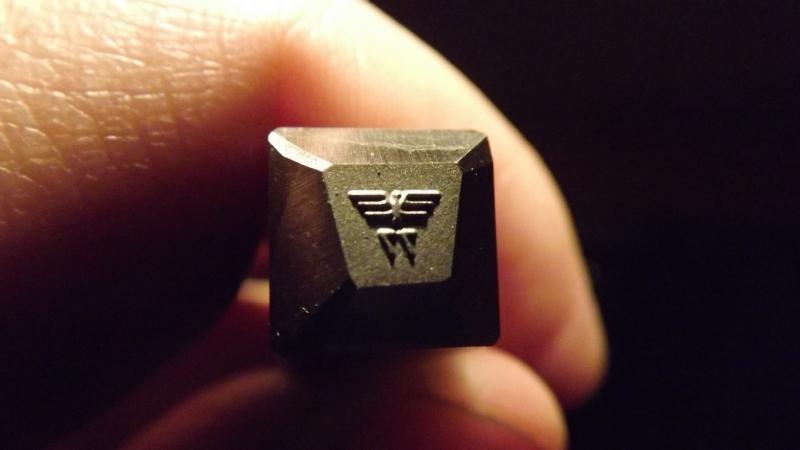
The evil repro stamps. MO firing proof on left, WaA135 stock stamp on right.
______________________________
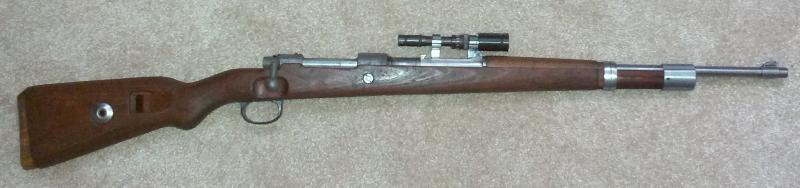
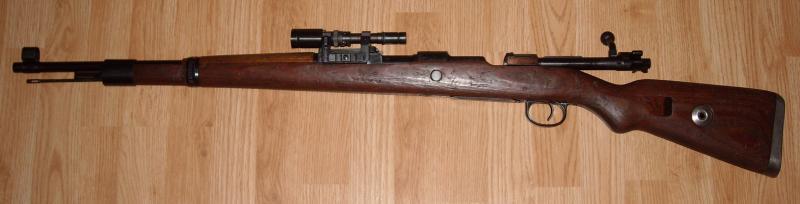
Back from bluing! Yay! It's all together with a temporary rear action screw as my gunsmith seems ot have misplaced it - I'll call tomorrow to track it down.
The receiver, as I knew, is a good bit rougher than the rest of the gun, but still I like it and it reminds me of the rusted tomato stake I started with!
Here are a few detail pics and overall shots. Sorry for the poor lighting and detail, I shot these well after dark in poor light.
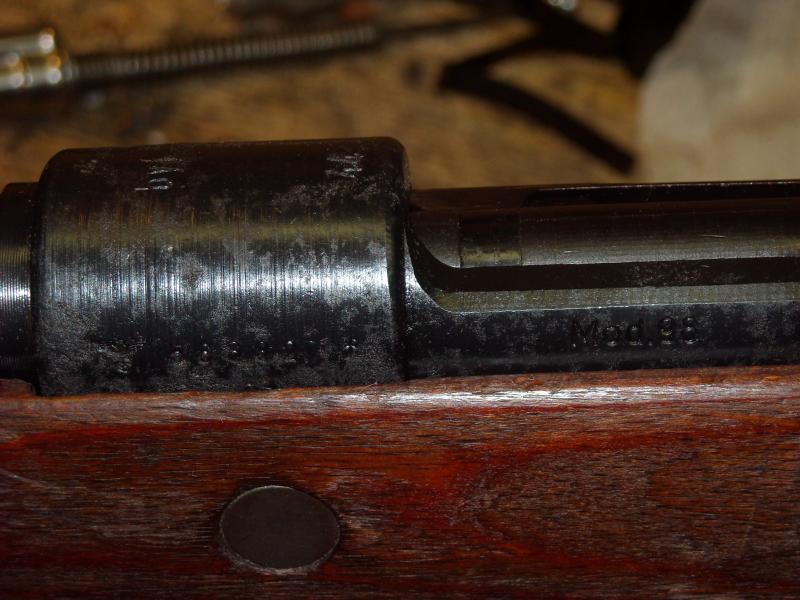
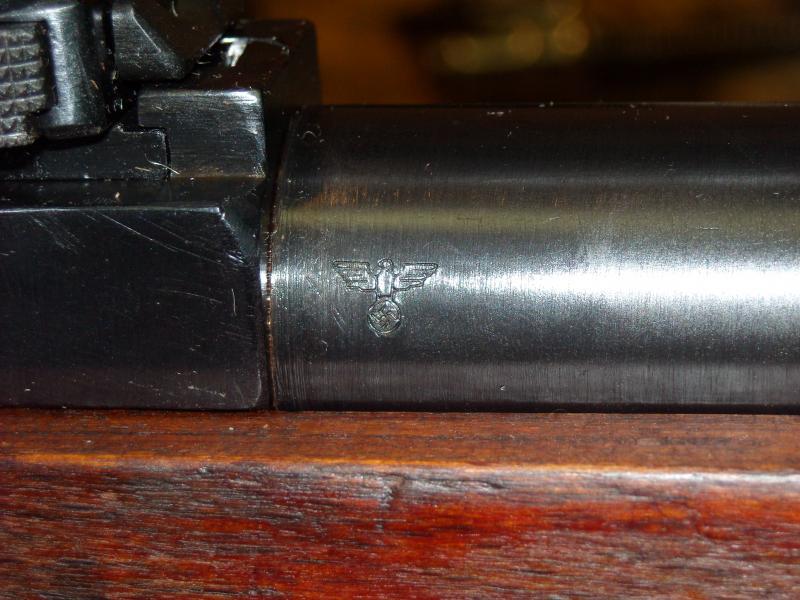
Yes, I applied a fake firing proof the the barrel. Exact size and style as the one on the receiver, although not struck as deep due ot the type of die I had.
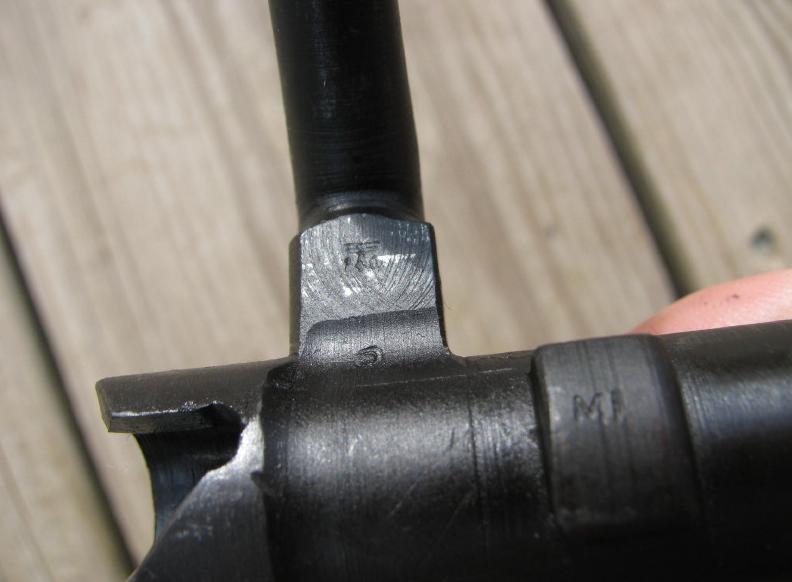
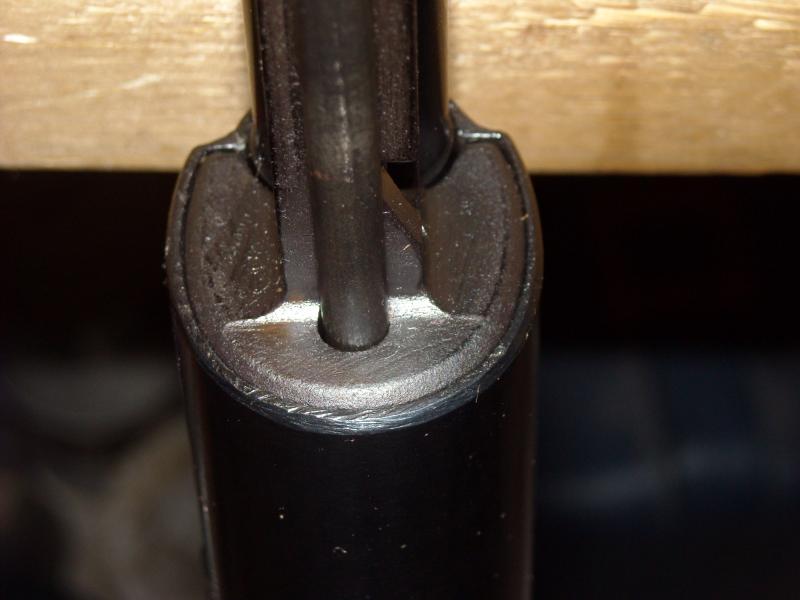
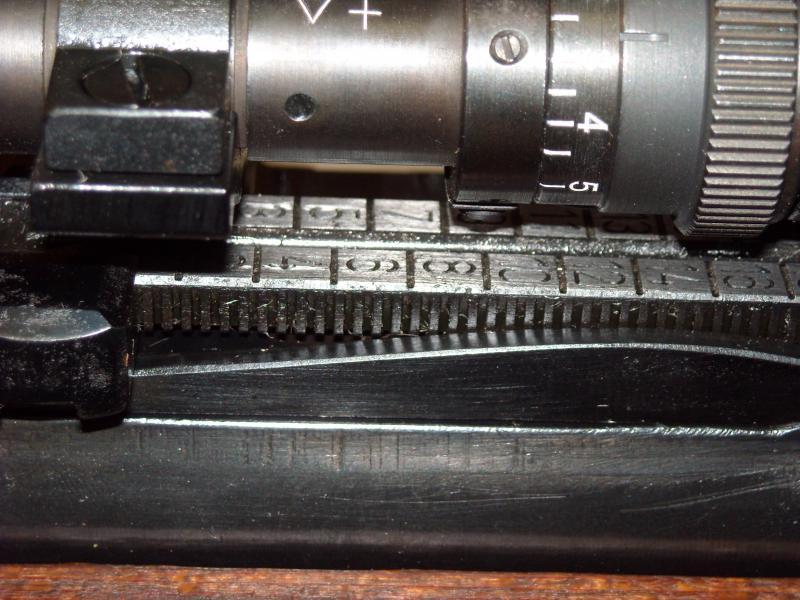
Top of the sight leaf in the white, as is proper.
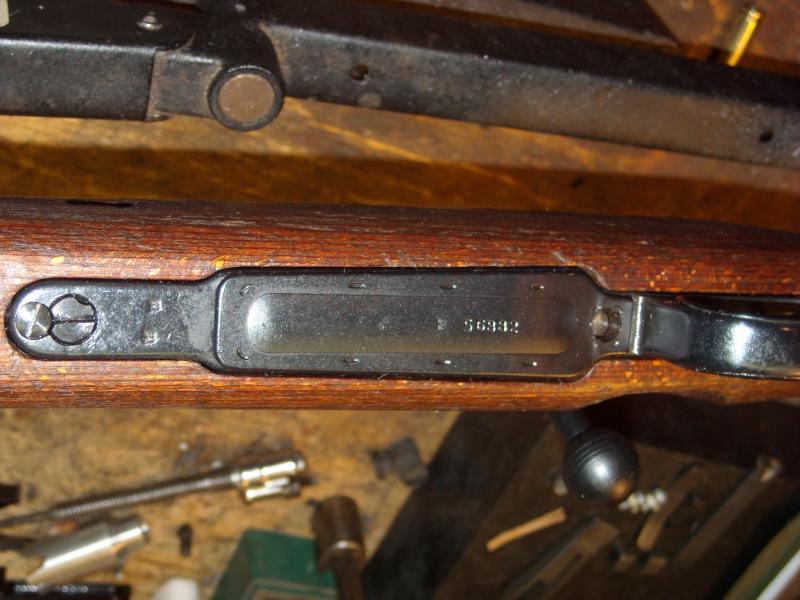
Stamped band spring:
Oberndorf double-135 proofed trigger guard with no serial numbers... now that was a chore to find. Paid dearly for it too - yikes!
And overall:
Forgot to post a photo of the French-made repro base. Turned out OF after lots of fitting.
I'm happy with the result. A very fun project that hopefully you guys learned a bit from! The bore is perfect, as-new, so I hope it will make a fine shooter.
_________________________
Prices include any shipping, etc. and parts marked free, I already had:
Repro scope - approx. $350
Repro mount - approx. $200
Repro base - approx. $250
Stock set with buttplate - approx. $250
Barelled receiver. free
Bolt and bolt parts (bought separately) - approx. $150
Trigger guard - $80
Floorplate - $100
Cleaning rod - $60
Bands - $50
Bans Spring - $35
Front sight assembly - free
Bayoney lug off a byf44 - free
Sights - free
Bolt Stop - free
Trigger - free
Gunsmithing (bluing and assistance with bbl install) - $100
What does that add up to? Call it $1625 or so. So more than Mitchell's wants for one, though theirs do not come with a scope. Still, it cost a good bit less than a real one - hence why people are faking these.
Союз нерушимый республик свободных Сплотила навеки Великая Русь. Да здравствует созданный волей народов Единый, могучий Советский Союз!
-
-
Союз нерушимый республик свободных Сплотила навеки Великая Русь. Да здравствует созданный волей народов Единый, могучий Советский Союз!
-
The Following 5 Members Say Thank You to Claven2 For This Useful Post:
-
Cool. How does she shoot? Any idea of how many hours you have in it?
Last edited by tbonesmith; 07-26-2013 at 07:09 AM.
-
-
I haven't shot it yet, but have bore sighted it and luckily the reticle is perfectly centered. I think I probably have 20 or so hours of fab into it, and maybe that again in tracking down "correct" parts. The industrious fakers buy enough RC's to mine for parts that they don't have to spend any time at all tracking stuff down though
Союз нерушимый республик свободных Сплотила навеки Великая Русь. Да здравствует созданный волей народов Единый, могучий Советский Союз!
-


 PM
PM


