+ Reply to Thread
Page 10 of 13 FirstFirst ... 8 9 10 11 12 ... LastLast
Results 91 to 100 of 127

Thread: Restoring a sporterized P13... My turn to play

Click here to increase the font size Click here to reduce the font size
  1. #91
    Advisory Panel browningautorifle's Avatar
    Join Date
    Jul 2008
    Last On
    Today @ 09:55 AM
    Location
    Victoria BC
    Posts
    29,904
    Real Name
    Jim
    Local Date
    04-19-2024
    Local Time
    04:20 PM
    I've used Febing's leather die to turn wood the color I wanted without effort...then oil.
    Regards, Jim

  2. Thank You to browningautorifle For This Useful Post:


  3. # ADS
    Friends and Sponsors
    Join Date
    October 2006
    Location
    Milsurps.Com
    Posts
    All Threads
    A Collector's View - The SMLE Short Magazine Lee Enfield 1903-1989. It is 300 8.5x11 inch pages with 1,000+ photo’s, most in color, and each book is serial-numbered.  Covering the SMLE from 1903 to the end of production in India in 1989 it looks at how each model differs and manufacturer differences from a collecting point of view along with the major accessories that could be attached to the rifle. For the record this is not a moneymaker, I hope just to break even, eventually, at $80/book plus shipping.  In the USA shipping is $5.00 for media mail.  I will accept PayPal, Zelle, MO and good old checks (and cash if you want to stop by for a tour!).  CLICK BANNER to send me a PM for International pricing and shipping. Manufacturer of various vintage rifle scopes for the 1903 such as our M73G4 (reproduction of the Weaver 330C) and Malcolm 8X Gen II (Unertl reproduction). Several of our scopes are used in the CMP Vintage Sniper competition on top of 1903 rifles. Brian Dick ... BDL Ltd. - Specializing in British and Commonwealth weapons Specializing in premium ammunition and reloading components. Your source for the finest in High Power Competition Gear. Here at T-bones Shipwrighting we specialise in vintage service rifle: re-barrelling, bedding, repairs, modifications and accurizing. We also provide importation services for firearms, parts and weapons, for both private or commercial businesses.
     

  4. #92
    Legacy Member tatou's Avatar
    Join Date
    Sep 2008
    Last On
    11-12-2023 @ 04:55 PM
    Posts
    281
    Local Date
    04-19-2024
    Local Time
    06:20 PM
    Thread Starter
    Quote Originally Posted by browningautorifleicon View Post
    I've used Febing's leather die to turn wood the color I wanted without effort...then oil.
    Yes. Awesome stuff, I've used it on several of my restorations too.
    It gives the wood that red-ish color i see a lot of those P13's seem to have.
    It also matches different types of wood very nicely.
    The technique i use was given to me by Englishman_Ca and gives a great result.
    Saturate the wood as much as possible with the die, as many coats as it will take, then oil with very fine steel wool.
    The steel wool removes the die that has not penetrated in the pores and you can adjust the tones by rubbing more on dark areas and rubbing less on lighter areas.
    You complete the process with what he called ''boning'' ... basically rubbing a bone or somekind of tool to sorta ''polish'' the surface, giving it a ''handled'' for years look.
    I'm not as good as he was but i had good results doing things that way.
    I'm not at that point in the restoration yet but i will make tests on the scrap fore end tip and new wood pieces i saved, to see how it goes.

  5. The Following 3 Members Say Thank You to tatou For This Useful Post:


  6. Avoid Ads - Become a Contributing Member - Click HERE
  7. #93
    Legacy Member baltimoreed's Avatar
    Join Date
    Jun 2021
    Last On
    03-16-2024 @ 10:31 PM
    Location
    Aurora, NC
    Posts
    114
    Real Name
    Ed Evans
    Local Date
    04-19-2024
    Local Time
    07:20 PM
    I’ve also used leather dye to match repair patches on stocks. Works good.
    “Give’em hell, Pike.”

  8. Thank You to baltimoreed For This Useful Post:


  9. #94
    Legacy Member tatou's Avatar
    Join Date
    Sep 2008
    Last On
    11-12-2023 @ 04:55 PM
    Posts
    281
    Local Date
    04-19-2024
    Local Time
    06:20 PM
    Thread Starter
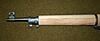
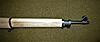
    Nose cap finally done and screwed on.
    I hate drilling for those screw holes ... i've fitted probably at least a dozen nose caps and only ever got one drilled without having to fiddle with the hole to get it right.
    For some reason that is something i just cannot get a hang to it.


  10. #95
    Legacy Member Salt Flat's Avatar
    Join Date
    Nov 2011
    Last On
    Today @ 01:00 PM
    Location
    USA
    Posts
    760
    Local Date
    04-19-2024
    Local Time
    04:20 PM
    Nice- The fun part is standing back at each step and feeling good about a project. Thanks for letting us share that. Salt Flat

  11. Thank You to Salt Flat For This Useful Post:


  12. #96
    Advisory Panel browningautorifle's Avatar
    Join Date
    Jul 2008
    Last On
    Today @ 09:55 AM
    Location
    Victoria BC
    Posts
    29,904
    Real Name
    Jim
    Local Date
    04-19-2024
    Local Time
    04:20 PM
    Looks nice and square, looks good.
    Regards, Jim

  13. Thank You to browningautorifle For This Useful Post:


  14. #97
    Contributing Member Promo's Avatar
    Join Date
    Oct 2009
    Last On
    @
    Location
    Europe
    Posts
    1,844
    Local Date
    04-20-2024
    Local Time
    01:20 AM
    Your front end restoration looks so excellent that if you had not posted the pictures showing the process, most would otherwise would consider it just a weird duffle cut.

  15. Thank You to Promo For This Useful Post:


  16. #98
    Legacy Member tatou's Avatar
    Join Date
    Sep 2008
    Last On
    11-12-2023 @ 04:55 PM
    Posts
    281
    Local Date
    04-19-2024
    Local Time
    06:20 PM
    Thread Starter
    Quote Originally Posted by Salt Flat View Post
    The fun part is standing back at each step and feeling good about a project.
    Agreed and some steps are more satisfying than others. Some are small but popup more and give a sense of completion like the next ones, below.

    Quote Originally Posted by browningautorifleicon View Post
    Looks nice and square, looks good.
    Thank you

    Quote Originally Posted by Promo View Post
    Your front end restoration looks so excellent that if you had not posted the pictures showing the process, most would otherwise would consider it just a weird duffle cut.
    And that is partially why i showed the whole process... to prove this was all done from scratch.
    I know some would say buying a new stock would have been easier and faster... but where's the fun in that.

  17. #99
    Legacy Member tatou's Avatar
    Join Date
    Sep 2008
    Last On
    11-12-2023 @ 04:55 PM
    Posts
    281
    Local Date
    04-19-2024
    Local Time
    06:20 PM
    Thread Starter
    The devil is in the details they say.... Finished a a few more today.
    Installed the pilling swivel... had to thin the lug since it was too wide.


    Since the stock was initially sanded during the ''sporterization'', the new wood had to follow the same profile. That meant the volley sight disc would sit higher than the wood near the bottom. I cheated by installing it at a slight angle and in order to do so i had to make a shim to go under it.
    I also drilled the hole that goes though the stock to secure it in place... and to my amazement i was able to align it perfectly the first time. A small win that i gladly take.

    I fabricated the small lower band stop pin using a common nail, rounded the tips, oil blackened and installed it.


    Finally i had to remove a bit of wood of the inletting for the butt swivel base so it sat lower in the stock.


    There's a bunch of small tweaking, fitting and tiny repairs i still want to make before final finishing (nothing worth showing) but if i'm not mistaking that completes all fabrication work.
    Last edited by tatou; 03-25-2022 at 01:05 AM.

  18. The Following 2 Members Say Thank You to tatou For This Useful Post:


  19. #100
    Legacy Member tatou's Avatar
    Join Date
    Sep 2008
    Last On
    11-12-2023 @ 04:55 PM
    Posts
    281
    Local Date
    04-19-2024
    Local Time
    06:20 PM
    Thread Starter
    After taking a bit of a break i got back to work.
    Tweaks, fitting, repairs and final shaping is done.
    Most of those small things are not visible unless you know what you are searching for but they needed some attention none the less.
    I knew i needed to fix them and that's a good enough reason for me.
    Unless i forgot something or made an oversight the wood is DONE ... well except stain and oil.

    I have a new bottle of FIEBING'S dye coming in soon but in the meantime i'll run some tests with what i have left on some scrap pieces.


+ Reply to Thread
Page 10 of 13 FirstFirst ... 8 9 10 11 12 ... LastLast

Similar Threads

  1. Restoring a sporterized P13...
    By Fazakerley in forum Gunsmithing for Old Milsurps
    Replies: 25
    Last Post: 02-22-2021, 09:02 PM
  2. Who I turn to?
    By Katzenjammer Kid in forum Gunsmithing for Old Milsurps
    Replies: 5
    Last Post: 04-27-2013, 10:37 PM
  3. Amount of play on No4 Mk1 bolts
    By spinecracker in forum The Lee Enfield Knowledge Library Collectors Forum
    Replies: 13
    Last Post: 08-09-2009, 11:56 PM
  4. Let's play a game...... c'mon it's easy......
    By Son in forum The Lee Enfield Knowledge Library Collectors Forum
    Replies: 11
    Last Post: 04-21-2007, 01:26 AM

Tags for this Thread

Posting Permissions

  • You may not post new threads
  • You may not post replies
  • You may not post attachments
  • You may not edit your posts