-
Contributing Member


Minelli stock review and fitting
Hello. I'm working on building a 1903a4 clone from a nice sporter rifle I bought cheap that a previous owner decided to play a game of baseball against a tree with. I got luck in that this rifle was already drilled and tapped for an original Redfield 2-hole mount. I thought I'd make a separate thread on just fitting the new stock. I've read several questions about the Minelli vs. Boyds stocks. This will be the third Minelli that I have personally fit. I have fitted two Boyds/CMP stocks that came on rifles that were just "dropped in", but not fitted. I have to say I prefer the Minelli stocks, but in all fairness I never bought a stock from Boyds...the ones I did were already on the rifle.
The very first time I fit a stock, I basically followed Doco Overboard's instructions at https://www.mdshooters.com/showthread.php?t=232416, reading between the lines with my own carefully analysis and intuition. I'm not a professional, but with thoughtful attention to detail, careful planning and research, measure twice cut once...the right tools for the right job etc, I'm generally successful at most things I take up, and the stocks I've fit have produced groups that more than satisfy me.
So here we go...unboxing a Minelli stock. What do we get? A stock with a light oil based stain, and handgaurd that is inletted for clips... no hardware, no cross bolts.
If you are comparing against original wood, you will be disappointed. USGI stocks came from "heart cuts" of American walnut. Minelli is not so selective. A previous Minelli I fit had wide grain on the right side, and tight/small grain on the left. The oil stain hides grain variation. It feels like wood, and certainly isn't "fancy" or "extra fancy", but is certainly serviceable walnut, so lets move on.
I first like to drop in the action (if it goes in) and get a feel for what I may be up against before checking the bedding. Tap it back so the recoil lug is as far back as it will go (hopefully engaging the wood), and take a look around the receiver. This one will certainly need relieved for the back side of the tang, and the right side (stock) is low..but this may fix itself when it's tightened up. don't panic.
Attachment 116533
Next, you will notice the outer profile is very FAAAAT. All previous Minelli stocks I've fit were fat, this one is the same. The barrel bands won't fit, even with the screw backed out all the way. Here is how far the lower band goes on before it's too tight. Notice the stock shape doesn't match the barrel band, which is NOS, taken out of it's original undamaged USGI package. It's not the band, the stock is very wide. Fixing the profile will happen last. Plenty of wood to work with. Notice the extra "ledge" at the step.
Attachment 116534Attachment 116535Attachment 116536
On a positive note, the handgaurd has always aligned perfectly with the forend. Can't say the same for the Boyds, they have always been uneven, getting pulled and twisted into alignment by the bands. I'm 3 or 3 on the handgaurd tenon not fitting into the ring on the Minelli stocks.
Attachment 116545
Now check the exterior inletting...bottommetal and furniture.
Attachment 116537Attachment 116539Attachment 116538
rear swivel is spot on, I've never had a problem. Barrel channel is always straight and even, I've had issues with both Boyds/cmp in the past with crooked barrel channels.
bottom metal has always been perfect...but with milled floor plate, this is the second time the wood slightly presses against the front corner of the floor plate. When the screws are tightened this makes it impossible to remove the floor plate. Easy fix. better tight than loose.
Butt plates have been hit or miss, but I don't think this is Minelli's fault. There is a lot of variation in butt plates. Here are 3. In each, the top screw is spot on.
Attachment 116540Attachment 116541Attachment 116542
There is a 0.02 to 0.04 variation in the bottom hole location. The thickness at the bend in the plates makes them each hang slightly different. I plan to use the first buttplate, which will require the most work. Perhaps even re-drilling the bottom hole. Plenty of time to decide.
The screw holes are always too tight, and need to be cleaned out slightly, especially the upper part where the straight top of the screw sits. Here is how far I can get a greased bottom screw in without surely buggering the slot.
Attachment 116543
Now, this is the third time that the receiver inletting has been nice and snug. I tighten the front action screw thumb tight, then start to tighten the back..just to test the initial fit of the wood. Every Minelli I've done, I've heard the wood around the tang creak. This one is no exception. We have some work to do, but plenty of wood to work with.
Last, with receiver pressed hand tight into the action, take a look at the length of the tang bushing. this confirms the depth of the inletting is correct. I always grind an eighth inch or so off the bushing, to ensure light compression of the wood when tightening instead of tightening entirely against the bushing
Attachment 116544
the bushing always has a loose fit in it's hole, and I've had to glue the bushing in place. This one snug, but the bushing still falls through, The last Minelli it was so wide I had to wrap aluminum tape around the bushing.
next post, we will further check the interior fit, step by step, and identify what needs to be done. This one, other than the fat outer profile, is the closest to being "drop in ready" I've seen. In my overall comparisons the worst Minelli has been closer to drop in than the best Boyds.
EDIT: Another thing to check over is the initial depth of inletting around the chamber base. Tighten the action with the handgaurd ring on. If the ring should not interfere with the bedding of the receiver. We will have to address this when the time comes to fit the handgaurd.
Attachment 116646Attachment 116645
you can see where the ring was pressing into the top.
Information
 |
Warning: This is a relatively older thread
This discussion is older than 360 days. Some information contained in it may no longer be current. |
|
Last edited by ssgross; 04-16-2021 at 04:24 PM.
-
The Following 4 Members Say Thank You to ssgross For This Useful Post:
-
04-13-2021 12:35 AM
# ADS
Friends and Sponsors

-
Contributing Member
Here we go.
There will be only 3 places of contact between the wood and the barreled action...1) the last couple inches of wood at the muzzle end in the barrel channel must create uniform upward pressure on the barrel 2) the flat of a the receiver where the recoil lug, and the recoil lug, must bear uniformly when the bottom metal is tightened 3) there must be even contact on the sides and under the tang. I'll reuse Doco's pictures...

Since these are the only areas of contact, our first objective is to eliminate any other contact in the barrel channel. If we don't do this first, it won't matter how much we screw around with the receiver area.
Tighten the barreled action into the stock. Don't over tighten your hand screws (or regular screws if you don't have hand screws), just snug them gently - a little past hand tight. All our steps will be with just snug screws. This will ensure that when we fully tighten to ~30-40 inch*lbs, we will get good, even compression of the wood without crushing it.
Slip an index card under the barrel and move it back and forth, checking where it stops.
Attachment 116641Attachment 116642
Mark these spots with a pencil on the top, and take a look underneath
Attachment 116643Attachment 116644
Ignore the muzzle end for now since that is one of our 3 areas of final contact. Any other areas of contact must get relieved. Using a rounded chisel, or 100grit sandpaper wrapped on a dowel, lower the contact areas. You don't need to be super gently here, just give it a good sand or scrape, then put the action in and re-check. Don't mess with the sidewalls, just the bottom.
-
Thank You to ssgross For This Useful Post:
-
-
Contributing Member
today is the day for the inletting!
Attachment 116651
Some notes on tools. My palm chisels are from Harbor Freight. meh...they get the job done, but leave plenty of room for improvement. Big square chisels make good fine scrapers. different size dowels, wrapped in 100grit sandpaper work well for the barrel channel. Every time we adjust any of the contact areas, we always go back and check the barrel is floating everywhere but the last couple inches. Coffee is required for me to do anything serious, as is Beard wax to keep my beard out of my coffee, and not dripping off it and staining the perty stock (I stopped shaving when we went in lockdown over a year ago. My silent protest is not even trimming it until my kids are back in school full time).
For marking, the old candle suit trick is always mentioned, but I can't seem to get it right and even. I use jarrow's inletting black. dab the brush shown lightly in mineral spirits, then lightly in the black. it easily makes a mess, and doesn't clean off the wood very well if used wet. So....I found that using a heat gun, blow dryer (not the wife's) or a swipe of a hand torch to dry it gives perfect results without requiring decades of experience with candles.
Another option I use is very light smear of white lithium grease. I will use this towards the end of fitting on areas I know I have right, but just want to double check without getting the wood all black.
Last edited by ssgross; 04-17-2021 at 12:04 PM.
-
The Following 3 Members Say Thank You to ssgross For This Useful Post:
-
Contributing Member
Well, John Beard, you are popular enough that any mention of the word beard, as in keep the coffee from dripping off your beard onto the stock, inserts a hyperlink for every beard!
Blacken all parts of the receiver that live under the woodbine. of course we we are interested in the 2 contact surfaces there (hold off on the barrel bed area for now), but we want to check for any other contact as well.
Attachment 116652Attachment 116653
First priority of what we are looking for...the vertical surface of the recoil lug must bear across the corresponding vertical surface of the stock. The recoil lug should not touch anywhere else. We verify the well was cut deep enough - no contact from the bottom or the sides of the recoil lug. As you can see, these are cut generously. Second, check EVERYWHERE for contact outside of our 2 bearing surfaces, and relieve. Notice the contact on the left side of the receiver.
Contact from both the flat, and the tang, mean we have something to work with. On the last Minelli stock I did, there was contact all along the sides of the tang, but non underneath nor on the receiver flat, and the wood audibly "creaked" at the tang when tightening. Lots of work on that one. We want level contact on both the flat and tang...the sides and underneath. This stock looks like a really good start, and should not be very involved.
We use our chisels to LIGHTLY scrape away the black. The material removed will come off like a powder. Don't get aggressive and take off any more, and only remove material that was blackened.
Attachment 116654Attachment 116655Attachment 116656
My harbor freight chisels aren't the best. After a once over, I lightly smooth out any tiny gauges with a piece of 150 grit paper wrapped on a 1" chisel. Once its mostly flat, this heavy 1" chisel works well, but not with taking off the initial unevenness.
The curved surface of the tang can be a challenge. I used curved palm chisels, never taking any chunks, but just lightly scraping off the finish. Tiny sandpaper on a pinky finger will smooth out any scratches you made. The area under the tang barely shows contact. Don't touch it yet. We will want even compression of the wood here in the end. As you work the sides of the tang, the receiver will lower until there is uniform contact underneath.
Those "edges" in front of the tang are from the milling out of the receiver for the trigger pin area. If you look closely at the metal, you will see it's not flush to the edge, but raised slightly sloping up along where the edge is. This area of the stock must get knocked down so there is even bearing along the tang.
We keep at it, shave, check, shave, check, shave and check again, until we get even bearing in the 2 contact areas. As the receiver lowers slightly with each shave, check for contact anywhere else and relieve. You can blacken the muzzle area, but don't touch the bedding there yet. As you shave the receiver area, you will noticing the contact at the barrel bed becoming more pronounced, which is a good thing. Next post, I'll post pictures of my progress as I shave/check. This stock gave me a good out-of-the-box start. I estimate it will only take 3 more iterations.
Last edited by ssgross; 04-17-2021 at 03:53 PM.
-
Thank You to ssgross For This Useful Post:
-
Contributing Member
we are concentrating on the receiver flat, and tang. Working towards uniform contact under the flat, and under the tang and on the sides of the tang. If there are visible scratches from the chisel work, a very light few swipes with 150 grit will smooth them off.
Fit after 1st iteration (I suppose the last post was iteration 0)
Attachment 116657Attachment 116658
It's a bit rough, mostly I think because the first couple passes are smoothing out the imperfections from manufacturing, and the chisel catches on "burrs" in the wood. It may have helped to make a swipe with 150 grit and a finger first.
We nock down the ridge from the corner by the trigger pin area of the receiver each time.
After 2nd iteration
Attachment 116659Attachment 116660
notice the contact under the tang is getting better. receiver flat getting better too. this is when I notice the underside of the receiver is not perfectly flat in the corner behind the lug.
Don't forget to keep checking for contact in the undesired areas, and relieving as necessary!
Attachment 116664
3rd shave, and effects. getting smooth now!
Attachment 116661Attachment 116662Attachment 116663
The hard part is over. Now it's just fine tuning. Now we take notice of the magazine gap, and the barrel bed area.
Attachment 116665Attachment 116666Attachment 116667
The gap is a bit much, and may leave enough room for the follower to snag.
The barrel bed has a ridge running down the middle. There was a ridge down the middle of the whole channel, likely a tool mark from milling down each side.
Measure the barrel in the bed. At the front, it's 0.657. a the beginning of the bed it is 0.684. One of my dowels with 150grit wrapped on it measures 0.658. with 2 cotton patches under the paper, it's 0.680. Using the larger radius at the back, and smaller at the front, just a few swipes to nock down the ridge and make the bottom of the channel smooth.
Attachment 116668
Next up, we check the gap with follower...remember I noticed in the first post that the bottom metal contacts the wood, so I need to relieve the one corner of the bottom inletting for this. If the gap needs closing, I prefer to do it by lowering the receiver instead of messing with the trigger guard inletting because this creates more pressure at the barrel bed, which gives us more wood to work with on this most critical area. We need the right radius for the wood to wrap around the bottom of the barrel like a blanket. we can only get this by removing material. which we may not have.
To close the gap, I powder-shave the receiver flat, and since we have mostly uniform contact at the tang, a few swipes with 150 grit and a finger will keep it even. Keep checking for contact in the undesirable areas. Don't play too much with the barrel bed..just lightly swipe each iteration with 150 on the correct diameter dowel to help the wood wrap the barrel on it's underside. adjusting the final upward pressure will be our last step.
Last edited by ssgross; 04-17-2021 at 08:41 PM.
-
The Following 2 Members Say Thank You to ssgross For This Useful Post:
-
Contributing Member
Getting the right gap at this point is mechanically easy...everything is even right? While mechanically simple, it is conceptually a challenge. We have 3 bearing surfaces to consider, and our end goal is proper upward pressure of the stock on the muzzle end of the barrel. Also, the gap is easily overshot by just going after it and shaving the tang and flat...remember our wood has not yet sat in the stock, lightly compressed between receiver and bottom metal, for months on end. It WILL contract somewhat.
So, before we start going at it, take a careful look at the existing gap, check how much you can press down on the follower before it snags the rear of the magazine, and get an idea of the current upward pressure on the muzzle from the stock.
I stuck my cheap teslong camera in the bore, to get a good picture of the gap
Attachment 116677Attachment 116676Attachment 116675
First, check that the gap is even all the way around. If not, either the tang bedding is too high/low, or the bottom inletting is uneven. Ours is even all around - notice that the gap is the same as the distance between the top rear of the magazine, and the bolt raceway. I am therefore 3 for 3 on Minelli stocks having even/level inletting, and all 3 had too big a gap out of the box...but that is good. it means we have material to work with.
There is virtually no play below the back of the (stamped) follower when it is stuck. This means we don't have much to go. A key point to remember is that you are fitting the gap to the follower...not to any set distance. We close the gap until the follower doesn't stick - this will be our max value. The depth of the receiver bedding determines upward pressure at the muzzle. So once we have our max allowable gap, we focus on the the muzzle, and keep closing just until proper upward pressure is relieved.
So the next thing to do, while we have our hand screws in, is gauge the upward pressure at the muzzle to see if where it is at. This gives us the complete picture all around before we start removing material anyway. I think ideally we will und up closing the gap no more than half of what it is now. It won't take much of anything - Minelli did an OK, even job.
-
Thank You to ssgross For This Useful Post:
-
Contributing Member
measuring upward pressure...With the action in the stock, with snugged hand screws, I flip it upside down and clamp it in my padded vise a the midway point in the barrel channel. With my hand on the midway point of the forend, I use a spring trigger pull gauge to get a rough idea. Don't hold the nose of the stock...you will pull up and get false reading. Hand in the middle to steady it all, pull until you see the barrel just separate. I'm showing 5-6 lbs right now.
Attachment 116678
I've read that 8lbs ish was the standard, and 4-8lbs is the desired range. Also, this is a parameter that can be tuned to your rifle as you shoot it for maximum accuracy. Some rifles may want more (I've heard of a rifle with shims under the barrel to get 14lbs put 5 shots inside a dime at 100 yds), some want less (I've also heard of a rifle that didn't shoot well until the barrel was free floated). My point is that you will never be able to tune it later unless you get it to the upper end of the desired range now.
My somewhat experienced guess is that I will have about 9ish lbs just by decreasing the magazine gap evenly until the follower no longer stick, with no other work. We will check often as we close the gap from above. If at any time the muzzle pressure is too much and the follower still sticks, we will stop and asses whether to lower the barrel bed and/or work from the bottom metal to finish. AND DON'T FORGET TO KEEP CHECKING ALL THE OTHER SURFACES FOR CONTACT AS YOU WORK. Last thing you want is contact in the middle of the barrel, then it don't matter how much wood you remove elsewhere you won't notice any improvement, and will ruin your stock.
When tuning, cut some pieces of 3x5 index card and place under the tang and/or receiver flat to test before sanding away at the barrel bedding. Upward pressure can also be achieved on a worn or uneven stock by raising the tang, or by lowering the flat. However, this could cause uneven bedding and uneven stress in the receiver, and be counter productive if you are too agressive.
Once we have our gap where we like it, we will shave the flat one last time...fine layer of powder only, to ensure we have what we want at the muzzle - then we will be done with the inletting and move on to the outer profile.
Last edited by ssgross; 04-18-2021 at 12:33 AM.
-
Thank You to ssgross For This Useful Post:
-
Contributing Member
I worked on closing the gap today, and finished the bedding.
To recap...
1) make sure the barrel free floats between the muzzle bedding area and the receiver.
2) made sure the vertical portion of the recoil lug made contact with the corresponding part of the wood.
3) Check the contact in the 3 bedding areas, and nowhere else. Scape away just enough until you have even contact. be very careful with the barrel bed. it is very sensitive to even the most minor changes in the end. So for now, just a few swipes with sandpaper on a correctly sized dowel so the contact starts to wrap around the barrel a bit...as long as the wood is not touching tangent to the curve of the barrel, we are good.
4) The sides of the tang are tight, and there is no contact underneath (so far all Minelli's have been like this). So, lightly shave the flat and the sides of the tang until we get contact..we won't touch the barrel bed till the end. Keep checking and relieving any undesired contact
5)Check the inletting on the bottom metal. I had to very lightly relieve a front corner so it didn't press into the floor plate. I have never had to do anything else on the underside of a Minelli stock. The depth has always been perfect, holes aligned perfectly, and all fits snug, but not tight.
The gap between the magazine and receiver is too big, even though everything else is perfect at this point. The wood is flush with the metal, good contact at the muzzle...but the rear of the follower snags, preventing you from using stripper clips. Some people file or grind the bottom of the follower at an angle so that pressing down causes it to slip off. This fixes the rear...but the sides are a bigger problem. Insert 3 rounds. chamber one, then eject and try to chamber the second. The first round pushes the follower to the side, and 2 rounds in the magazine put it at just the right depth to wedge in that gap. No, the right way to fix it is to lower the bedding surfaces until the right gap is achieved.
The flat area acts as a fulcrum. Lightly and evenly scrape the sides and under the tang, and the flat area. If at any time you lose contact altogether under the receiver flat after tightening, then a few swipes of 150 grit under the barrel bed will bring it back. Most of the work will be around the tang. The trick is to only shave it each iteration. Removing too much material and you will "lose" the perfect curvature of the stock. Going slow, and just lightly shaving each iteration preserves the perfect even contact obtained so far. Took me half the day today to get it right.
Attachment 116687Attachment 116688
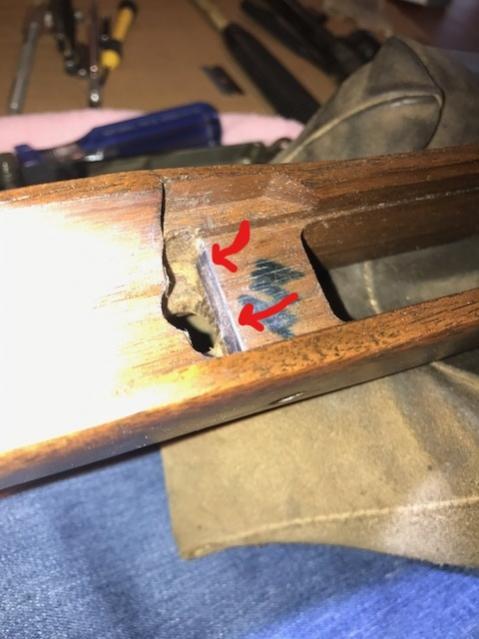
90% of the work was around the tang, so it is a good time to ensure the rear of the tang isn't touching the wood. Without a couple fingernail-wide gap, the wood can eventually split or crack with the force of the recoil.
THIS IS THE ONLY TIME A POWER TOOL MAY BE ADVISABLE. The sanding drum on my dremmel is the perfect diameter, and my harbor freight chisels are certainly not up to the task of creating a clean, sharp, curve.
Attachment 116689
How many times do I have to tell the kids "you must wear shoes if you come in the shop!"
Here is the final, perfect magazine gap...
Attachment 116690
I should mention that I didn't scrap until this gap was achieved. As I mentioned, I scraped away until about halfway from what you see in the initial picture...which wasn't enough...BUT, with repeated tightening of the screws as you fit, the magazine will dig into the wood and close the gap a bit more than where you stop. Here is where it was when I stopped messing with the tang.
Attachment 116691
Here is the tang before and after fitting the correct gap.
Attachment 116692Attachment 116693
The tang is now done. Don't touch it anymore. Next, I checked the pressure at the barrel bed - about 4-5 lbs. This is because we had to lower the tang so much. So now we scrape away the flat...evenly, until we get 8+ lbs at the muzzle. I also finalize how the wood at the barrel bed wraps around the barrel. I want about 1/4" wide uniform contact for the last 1/2-1". BE CAREFUL...just 1 swipe of the sandpaper can take away a pound or more. You can't put wood back on. Also, don't forget to keep checking for contact in any undesired areas. Any other contact can screw up your efforts efforts here.
So that's it. The bedding is now perfection, and we have plenty of material to tune the upward pressure at the barrel bed when we range test.
Next post, I need to fit the handgaurd ring. Then we will work on aligning the handgaurd and slimming down the oversized outer profile
-
Thank You to ssgross For This Useful Post:
-
Contributing Member
Fitting a Handgaurd
It seems simple enough...it just slides on right? That's what you would think. And if you try what seems obvious and natural, you will have a perfectly flat handgaurd and all will look perfect, except when you tighten the band screws to keep all snug, your swivels won't swivel! Now, if you think more about it, or read on, the common sense natural thing to do is not the correct way to do it.
The handgaurd ring and handgaurd must be fit together - don't fit the ring first then try to fit the handgaurd - you will end up with a gap between handgaurd and stock at the rear. You will wrench down on your lower band to try to fix it, and then your sling swivel won't swivel. When you achieve the perfect fit, the stacking swivel and the lower band swivel won't rattle, but will move freely. if you try to fit the ring first, you will likely destroy the flush alignment between the handgaurd and stock, and waste a lot of time trying to get rid of any gaps. So, fit them together, and preserve your perfect flush alignment as you go....ask me how I learned this lesson on the first 1903 stock I fit....hours and hours of work, and finally had to buy a new handgaurd and start over.
1) Put the hand guard ring on, use jerrows, a candle, white grease or whatever to check for contact in the groove. relieve any contact, but hold off on the contact on top of the channel.
Fitting an m1903 is similar, only the ring is fixed inside the sight base, which you already relieved when bedding the barreled action.
Attachment 116716
2) lay the stock upside down on a table. Make sure the barrel channel all the way back to area where the ring is is flat. If not, make it flat with a block of wood and sandpaper. Minelli stocks have all been perfect for me. this one is no exception.
3) Lay the handgaurd on a flat table. Make sure it lays flat from the rear up to where the barrel band is. It should start to drift upward slightly after the lower band. This is normal. If there is any unevenness, tape a sheet of sandpaper to your bench an even it out. The thinner wood of the handgaurd is prone to warping in storage, but the Minelli handgaurds are usually pretty good. Again, it's ok if it drifts SLIGHTLY upward after the lower band. you want this. Just make sure its flat before rear to lower band, and then flat lower band to front, with a slight tilt upward. When holding the rear flat, the front will be about 1/8" ish +/- off the table.
4) fit the INSIDE milling of the handgaurd. With the action in the stock, wipe some grease or whatever on the top of the barrel. Test fit your handgaurd. The tenon is likely fat and won't slide in. That's ok for now. Using a curved chisel, or sandpaper on a dowel for larger areas, releive any areas of contact forward of the handgaurd tenon.
5) use candle suet or jarrow and black the inside of the handgaurd ring and the lip of the receiver just in front of it. with the rear of the handgaurd laying flat against the top of the channel, slide it back slowly until it snags on the lip of the receiver. relieve any contact until tenon contacts the ring...it likely won't go in the ring, but that's OK for now.
Attachment 116717Attachment 116718
6) Now take the action out of the stock, and set the handgaurd on top. hold it at the lower band area, and verify there are no gaps toward the rear. Again, the front may point up slightly, but don't worry about that. Using a block with sandpaper, sand along the top of the channel to relieve where the ring dug into it. Sand primarily at the rear, be careful not to touch where the forward band (with bayonet lug) slips on. Pause every half dozen passes to check for the handgaurd sitting flush with the top of the stock, and that the barrel channel lays flat on your table for it's whole length.
7) Keep going until the handgaurd ring does not dig into the stock. Check for handgaurd eveness with the barreled action OUT of the stock, and check for ring contact with the action tightened in. You was the handgaurd ring to sit snuggle on top of the stock, but no pressure. It shouldn't be loose, but you should be able to move it by pushing with your finger. Keep checking under the ring too. As you relieve the top, it may settle and touch underneath.
8) Steps 5-7 happen simultaneausly. Sand the top of the stock, check for flush fit with the rear half of the handgaurd, put the action in. Slide the handgaurd back, relieve UNDERNEATH the tennon, remove the action relieve under the ring, then repeat sanding the top of the channel. Do this until the handgaurd tennon clears the receiver lip AND the ring does not dig into the top of the stock - not loose, but should move when pressed with your finger.
9) relieve the outside of the tennon until the handgaurd slides in to place with the action tightened in. I scrape lightly with a chisel, then use a file with a smooth edge to even it out. A very ight coat of grease on the tenon not only shows the contact area, but will "glaze" the surface without soaking into the wood. Perfect because when you shave this off with a chisel, you it's easy to tell the areas you hit. Do this until the tennon slips snuggly into the ring. It should press in tight, but not so tight that it requires force to pull back out.
Attachment 116719Attachment 116720
with handaurd on, action tightened in, the hand guard will point up slightly - about as much shown above. This is still ok. When the bands are fit, this will cause the handgaurds to fill out the bands, and all will be tight without having to wrench down on the band screws until the swivels no longer swivel.
Next step and post, we fit the stacking swivel band, then the upper band, then we fix the fat profile of the forend to fit the lower band, and clean up the vertical fit with the handgaurd.
Last edited by ssgross; 04-20-2021 at 01:03 AM.
-
-
Contributing Member
I fit the stacking swivel band first, then upper band, then lower band. Use a chisel or flat edged file to relieve the front tenon of the handgaurd under the stacking swivel, if needed. I only needed a light pass with a file on this one. make sure there is no barrel contact underneath first...relieve there first if needed.
Attachment 116759
Next, fit the front band (with the bayonet lug). keep the stacking swivel on. wipe a light coat of white grease on the inside of the upper band, or on the wood, and push the band on until snug. Don't force it. It should fit tight and snug, but pull of with just a couple light love taps from your chisel handle. This one required no work. it was perfect.
Attachment 116760
The screw hole was drilled perfectly too. I have another post somewhere making a repair to a botched hole on a CMP stock that was on a Gibbs A4 repro...the holes on the original upper band were off, and so they swirled a drill bit in the wood to make it work, nicking the barrel. No such problems here.
Next we fit the lower band at the same time we even out the vertical contact between forend and handgaurd.
keep the upper bands in place... they hold everything steady. Tape them off so they don't get scratched. Start sanding the sides to make flush...some work needed on the right side. left side is pretty close. Stay away from the upper bands and do that area last.
Attachment 116761Attachment 116762Attachment 116763
keep sliding the band down and checking where the contact is. Long smooth strokes to keep the even taper of the forend to the muzzle. I keep going until there is one bands width before the stop. Then, I switch to chisel and file. Notice there is a fat "bump" where the lower band seats. Remove it with file and chisel, little by little, until the band slides on snug.
At this point, the screw is backed out all the way. Slide the band off or back, and sand the contact areas until it slides on loose, and the forend tapers evenly from the band to the muzzle. Keep checking how far you have to tighten the screw to tighten the band. You want it tight, but so that the swivel still swivels. It is critical that the top of the band sits flush against the wood after tightening. If not, then you don't have the right shape (not narrow enough). keep working it.
Attachment 116764
Now is when I remove upper bands and lightly sand all flush just behind them. tape off the area where the upper bands were so you don't alter the fit.
Attachment 116765
Next up, make all flush and nice along the lower end of the handgaurd. I keep the lower band on, and tape it off to prevent sanding off the lip too low. The wood should sit flush with the band, or slightly proud of it.
Attachment 116766Attachment 116767
Next post, the action and grip.
Last edited by ssgross; 04-20-2021 at 08:32 PM.
-
Thank You to ssgross For This Useful Post:


 PM
PM


