-
Legacy Member

Looking for Advice on Stripping Plated Screws and Then Bluing
Hello,
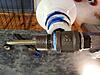
I have a screw that needs replacing for a project gun and surprisingly, it seems to be a relatively common thread. I have the choice of stainless steel and zinc plated. Naturally, the stainless would look out of place. I was thinking I should be able to strip the zinc plating off with muriatic acid and have a good bare surface to blue. Was wondering it anyone has done it before and could tell me if it would still be suitable for bluing afterward or if I would still have issues.
Thanks.
Information
 |
Warning: This is a relatively older thread
This discussion is older than 360 days. Some information contained in it may no longer be current. |
|
-
-
03-06-2022 10:52 PM
# ADS
Friends and Sponsors

-
Advisory Panel


Originally Posted by
RossMkIIEnjoyer

strip the zinc plating off with muriatic acid
Yes, I've done it and it works.
-
Thank You to browningautorifle For This Useful Post:
-
-
Contributing Member

white vinegar and more time will work too. Slower acting makes it more forgiving. I've done muriatic, and vinegar before on zinc plated sheet steel to fabricate handgaurd clips recently. What I found worked the absolute best was a dremmel and an abrasive bob...like these.
The bobs work great for cleaning screw heads too before bluing.
For quick bluing a screw head, use a torch, hold in flame until you see it turn peacock blue. It will turn light straw, then dingy brown, then quickly turn bright blue for just a moment before it starts to lighten and turn white again. If you go to far, just let it cool, lightly hit it with your bob again, and try again until you like it. If you want it dark, put a drop of oil on it when you take it out of the flame. let it sit for a moment, then dance it in the flame until it cooks on. Lightly buff with steel wool. To keep it peacock blue, let it cool, oil it, and wipe with a good grease before assembly.
For a good, quick, thick rust blue on screws and other small parts, mark lee's express is the way to go. warm the screw, wipe the head with a q-tip dipped in the solution, flame it till it dries. Repeat a couple times. The last time you dry with flame, heat it up a bit, then quench in water. Do this several times For small parts that you can heat, like screws, you don't need to boil (although you can if you want). Card with steel wool in between iterations until you get the depth of color you want.
-
Thank You to ssgross For This Useful Post:
-
Legacy Member
Thanks. I just already had the muriatic acid for use on concrete and figure I'd try it first. Hadn't seen those abrasive bobs before, will have to order some. I may just oil these until I get the rest of the gun reblued, the barreled receiver is a bigger job than I can do in the house.
-
-
Contributing Member
Originally Posted by
RossMkIIEnjoyer
the barreled receiver is a bigger job than I can do in the house.
In another thread, with the pictures probably lost in our blackout a while back, I built a slow-bluing-boiler-"tank" out of 4" cellular core pvc drain pipe, and a hot water heating element. Takes 2 gallons of distilled water and fits a full krag rifle length barreled action. Works perfect - I've done maybe 2 dozen boils in it and it's still on the porch in good shape. I had it strapped upright to the rail with a bungie cord. Far cheaper than building a tank, propane burner, or any of the other solution. On large parts like a barreled action, I think boiling achieves more uniform color results then steaming, and with my boil tube I didn't need to buy a pot or burner for the steam.
-
-
Contributing Member
-
-
Legacy Member
ssgross:
I'll have to look into building myself one. How did you control the elements and stand them off the pvc?
AGB-1:
For my 1905 Ross project, the screw is the one on the front of the front sight base that seems to clamp the sight in. Original had been mangled before I got it. Someone put an odd sight in it and they piled on solder. It's a 5-40 screw a little over 5/8" long. I've got some 5-40 allen screws, while not correct or as nice looking, they will be difficult for someone to damage down the road. If it isn't discreet enough, I'll make some closer to original. I just need to turn the heads down to sit in the counterbore and cut them to length.
-
-
Contributing Member
Originally Posted by
RossMkIIEnjoyer
ssgross:
I'll have to look into building myself one. How did you control the elements and stand them off the pvc?
Let me dig for some picture...
found one.
This shows my final setup, and what I learned the hard way.
1) Use a short 1500 watt element. You will need to use a metal pipe nipple and coupling...there are not enough threads on the element to form a seal with the pvc threads.
2) Setup is just a section of 4 inch cellular core pvc drain pipe, a pvc reducer, and a threaded pvc fitting. glue it all up, lots of teflon tape on the pipe nipple with the element. cut your pipe to whatever length you need to fit your barreled action, a few inches away from the element. leave 6 inches or so head room at the top so it doesn't boil over, and long enough then that your action is submerged a couple inches.
3) For the element, I wired up an section of extension cord, and soldered the ground wire to the pipe nipple (eventually, I think I just taped it on real tight in the beginning). I wrapped the whole base in many layers of electrical tape.
4) for a stand, you can get as elaborate as you want. I used an old scrap of plywood, and gut a hole in it large enough that the bottom fittings would would go through, but not the pipe. I just set it on top of a few blocks of scrap 2x4 to keep the element off the deck, and strapped it to the rail with a bungie cord.
I got tired of shutting it off, then waiting for it to reheat, or topping off with water and waiting to reheat, so I plugged in to a spare temp controller I had lying around (cheap one. like 10 bucks on amazon), and kept it at 208 while I carded, then wiped on and flamed another iteration of lees express. Took under 2 minutes to boil again when I was ready. I kept it running for 10+ hours one day like this. no problems, no leaks. pvc gets soft, but no where near collapse. small indentation where the bungie cord crossed.
Mine takes 1.5 or so gallons of distilled water to cover a krag barreled action. Top it off when it gets low.
Key thing I learned, other than metal prep, degreasing, carding technique, etc. is don't plug the barrel when boiling. wipe dry with a loose patch hot out of the boiler, then wipe with very light coat wd40, patch out excess. If you plug the barrel, loose oxide that builds up in your boil water and makes it's way through your wood plugs will lightly etch your bore. it will smooth with shooting or scrubbing with jb paste for hours on end to get a mirror finish back again.
Lastly, to neutralize your rusting, just let your boiler cool, dump the water, and use fresh water on your last boil after you like the finish, otherwise you may get some surface rust a few days after you oiled your perfect blued finish. If you forget this, just degrease, boil and card one more time.
for small parts, or just a receiver, I just boil in old tin cans on the stove. I never have gotten the hang of steaming, although I've tried it and experimented plenty.
One of these days, I'll build a nice 3 tube stand for degrease, hot rinse, and boil. or maybe a 4th for parking. There was a video of a guy parking in a pvc tube. Brownells solution instructions say it boils at 210, and proper range is 190-195 for parking. From what I read, though, parking and getting perfect matching color is an art, never mind you can't just pour it down the drain when done. I might play with it one day, but why bother when chuckndenver is still in business, price is reasonable, and he does a perfect job every time.
Last edited by ssgross; 03-12-2022 at 03:39 PM.
-
The Following 2 Members Say Thank You to ssgross For This Useful Post:
-
Legacy Member
That'll make a nice project for this summer. So how did you catalyze the rusting process before boiling to convert it? I have seen some people just let it happen naturally but I think that'd take far too long.
I had a local guy park an 03a3 sporter so I could turn it back into military form. 3 times and always had a streak over the top of the receiver that was off color. He does nice bluing, though.
-
-
Stay away from muricatic acid..
What you need is phosphoric acid..
I make repro No.4(T) chests and have to clean the coating off the slotted screws before bluing them and have been doing it for years.
Canadian tire or most of the paint shops sell rust remover and just make sure it is phosphoric acid.
You can also buy the powder at the drug store.
Nothing better than a spoonful in the dishwasher to clean it up and also get that iron ring out of the toilet...the wife will love you for it.
It is the taste in Pepsi cola by the way and you can find food grade on amazon....
Also...ready for this..Kosher
-


 PM
PM


