-
Contributing Member


My M1C
I've been behind on pictures for what I have going on. I'm finally ready now to start my M1C (not the one in this post. this is the one I'll be replacing). It will be slow, as I have several other rifles going on right now as well.
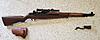
I bought the below M1C complete with all its accessories maybe 2ish years ago. I knew I had no real use for it in my collection then or long term, but the price was very right and gave me something to study until I can build my own. I'll just say that my particular flavor of milsurps does not generally include "collectables", where my definition of this term is anything that I should feel shy to shoot frequently and extensively while I possess it. I would much rather build and restore, and enjoy the feeling I get knowing the same hands that pull the trigger are the very same that brought it (back) to life. I was also squeamish about investing in a rifle made only for righties when I prefer to shoot lefty. But, I found the M1C and D to be very comfortable lefty - in fact even more comfortable lefty than they are righty with the cheek pad attached.
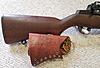
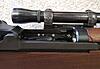
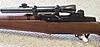
This rifle came with all of its CMP paperwork, including invoice with the original owner's name. The upper scope mount's serial is mismatched, as is normal for the M1C's that came through CMP. I know there is a forum somewhere where people match them up when possible. I haven't done any digging yet though. The period scope was added - fine cross hair with black dot. The screw holes for the cheek pad appear to be old - that is not newly drilled, and the cheek pad appears original too. I removed it as it got in the way of my grip shooting lefty, and because the laces seemed to be getting brittle with age and needed some neatsfoot oil TLC to last the coming decades.
I happened to be in the neighborhood of Anniston for work last week, and popped in to the CMP. While chatting with the staff, our conversation took a turn to this rifle. I was told, given the time period it was sold to its original owner and it's obvious arsenal refurbished condition that it likely was reconditioned during the time leading up to the Vietnam war, and may have even saw service there during the initial year. Some circumstantial evidence points in that direction...the rear sight had internal filth expected if this were the case, and the elevation pinion was actually an M14 variant.
So, I have 2 parts rifles from CMP now - a shot out field grade and an equally shot out rack grade which wears the scars of its neglect under the new finish that was applied when it went through arsenal refurb long ago. Neither barrel is original and, as I said, they are each collections of mismatched parts. I have a new production barrel and good quality repop scope base and mount to work with. When I finish, I will sell the above original M1C, or hold onto it as the queen of the safe until it's ready contribute to college for the little ones. Next up will be examination of these parts rifles. They are interesting.
Information
 |
Warning: This is a relatively older thread
This discussion is older than 360 days. Some information contained in it may no longer be current. |
|
-
The Following 7 Members Say Thank You to ssgross For This Useful Post:
-
03-31-2023 02:27 PM
# ADS
Friends and Sponsors

-
Contributing Member
Well, since I am still paying off my "little one's" college education at McGill, I wont be able to afford to buy your M1C and send your little one to college! It is a beautiful gun and anyone would be very happy to own it!
-
-
-
Contributing Member
-
Thank You to ssgross For This Useful Post:
-
Advisory Panel

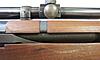
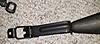
It must have been a brute before refinish, the receiver tail has been polished by wheel to within an inch of it's life. The distance at the back of the trigger guard is visible. I'll bet you can bed it to tighten that though. The sander wasn't kind to the exterior either... I wonder if the "Grit" feel is parkerizing solution on the exterior? Dry crystalline structure?
Last edited by browningautorifle; 04-01-2023 at 06:47 PM.
Regards, Jim
-
-
Contributing Member
"Grit" feel is parkerizing solution on the exterior? Dry crystalline structure?
I think so. The metal was pretty bone dry. I imagine it went straight from the light oil tank to storage.

Originally Posted by
browningautorifle

the receiver tail has been polished by wheel to within an inch of it's like
The picture doesn't do it justice. It has a rather fine dusting of pock marks from the rust it wore before they refinished. It only looks polished because I wiped on a thin film of rig grease after I cleaned all the residue and grime off. It looks like all metal was very lightly sandblasted to remove all the rust, just enough to remove the active rust.
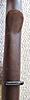
I don't think the stock was sanded. Maybe. I think it more looks like it was wet and dried out. The eagle is visible on the side, as is the P on the pistol grip. They both look like the fibers swelled back up.
-
-
Advisory Panel
Originally Posted by
ssgross
I don't think the stock was sanded.
If you looks the pistol grip you see how it's rounded, should be square and flat there. Look at the front of the comb up top and it's almost non descript, should be proud and a definite prominence. At the buttplate, the stock should drop off sharp to the edge, it's almost round... At the receiver tail on top, the left rear corner is almost off the wood. There should be lots of meat there.
The roll marking on the receiver tail is all dished round at the edge of the letters suggesting a polish wheel. Then it would be bead blasted to rough the metal so it's not like a sporting rifle. The letters show what's happened though. They should be strong and sharp at the edges.
-
-
-
-
Advisory Panel
-
-
Contributing Member
I'm clearing out the many other milsurp projects I have going on. I'm many months away from sitting down to pull this one off, but it's constantly on my mind, and will be until the time comes. I'm in no hurry, and I don't ever rush perfection  . Anyway, I've been daydreaming for long before I started this thread on drilling the receiver.
I've emailed a few notable places, and both don't want to do the work of mounting the base - likely due to how involved it is rather than actual difficulty. Bear with me as I think out loud.
My drill press has 0.0000 runout on the spindle as well as the taper of my large Jacobs chuck, but an index pin in the jaws shows about 0.0015 runout 1" below the jaws. So I'm thinking if I use a carbide index bit in collet chuck to start and align the hole, I'll be fine.
Which brings us to holding the workpiece. I have small milling table on the drill press. To make a fixture, I was thinking of bedding the underside of the receiver onto a metal plate with jb weld to get perfectly level and perpendicular to my drill, and properly supported across as large an area of the receiver as possible, and then clamp the receiver and plate to the table.
I think the holes can be drilled with a carbide bit without spot annealing. To ream the taper pins and tap the screw holes, I may need to consider annealing the inner surface of the holes. Brass pins tapped into the holes with the correct lubricant (based on it's smoke point), then heating the exposed end of the pins until the lubricant smokes, should do it. I've seen at least one report though of spot annealing not required at all - carbide tap aligned in a tap fixture indexed to the hole with the drill press chuck, backing off every 1/8 turn to clean out.
I'll be practicing several times on tool steel bar stock, where hardness won't be an issue. This will tell me if at least I have a hope of getting everything properly aligned. I can also practice spot annealing where I can review the color change in the holes so I know how to best get the temp I need.
So that's my thoughts...along with "wait a few years maybe until I get my own mill set up and make a proper fixture for myself" or "send it out, providing I find a worthy professional who is at least as careful and detailed as I am."
Last edited by ssgross; 04-19-2023 at 02:24 PM.
-
-
Contributing Member
-
Thank You to ssgross For This Useful Post:


 PM
PM


