-
Legacy Member

Disappearing trigger stage. Ideas welcome.
Hi folks,
I have a number of Enfields, just two of which exhibit this problem, and I'm stumped.
The positive first stage is missing. Just a slow uptake and a surprise at the end!
With stock removed, all works fine. When reassembling and testing as the front guard screw is slowly tightened, it is good up until the very last couple of turns.
I know this can be done by distortion of the trigger guard when assembling, but this isn't the case here. Nothing is being forced.
Any pointers would be most welcome.
Cheers.
Information
 |
Warning: This is a relatively older thread
This discussion is older than 360 days. Some information contained in it may no longer be current. |
|
-
-
04-21-2009 12:11 AM
# ADS
Friends and Sponsors

-
FREE MEMBER
NO Posting or PM's Allowed
This problem was eliminated in the No4 Mk2 rifle by attaching the trigger to the reciever instead of the trigger guard. This was due do changes in trigger pull due to changes in pressure of the wood over time.
The fact that your rifle(s) work fine out of the wood shows you probably have a stock problem
-
-
Banned

-
I did a series about triggers and pull offs some time ago. Not wanting to bore everyone to tears, maybe someone could forward the article on to you. Be prepared for a long read and a few pictures. Theart of setting triggers and the theory of such too us months suring our Armourer apprenticeship so don't expect to digest it on a Saturday afternoon!.
But by pure coincidence, I'm just off to the Armourers shop here to go through the process with a No4 myself. I'll get a couple of the young Armourers to actually DO the job under my supervision then we'll discuss the practicalities afterwards over a cup of tea. Maybe you'd like to pop over and we'll make a small class of it................
Regards from the Land Warfare Centre at the School of Infantry
-
-
Trigger pull adjustment is my favorite part of refurbing Lee Enfields! It really is! (call me crazy if you want...)
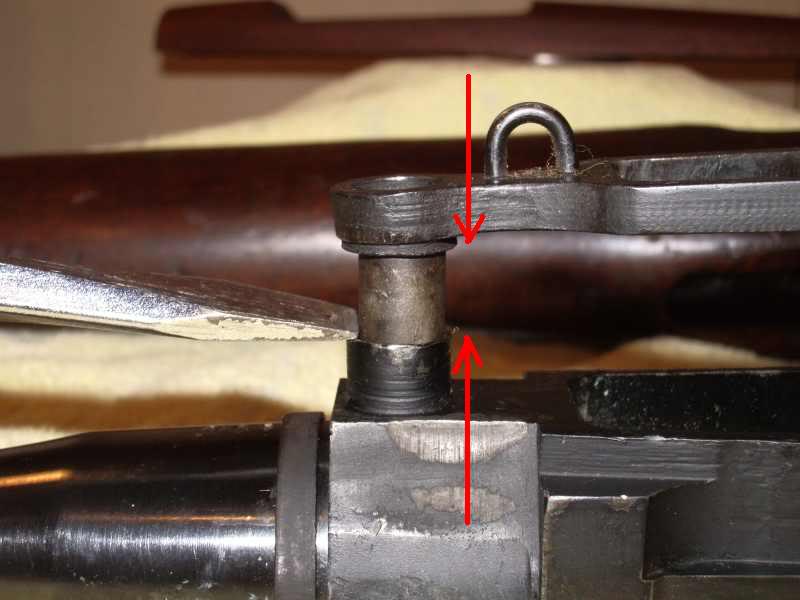
Indeed if all works well without the forend, then teh forend (or Ed's pictured bushing) are to be worked on.
One place where sometimes I can spend a bit of time tweaking is the part of the forend that receives the rear of the trigger guard. That can interfere in many ways.
Lou
-
-
Legacy Member

trigger pull-offs. Part 1
Posted By: Peter Laidler
Date: Sat 3 Jan 2009 3:58 am
THE TRIGGER PULL-OFF
I hope that by now you’ve all got on your workbench and almost fully assembled No1 or No4 or 5 rifle. Assembled and almost complete except for the trigger pull offs. Now, you’ll see the importance of starting the job with a perfectly assembled bolt. The FIRST thing I want to emphasise is that if the cocking piece on your bolt is loose on the striker….., in any way, or wobbles up and down or left and right, then read no further because whatever happens, you’ll never get a consistent pull off. But what you CAN do is strip it down, degrease it and if my memory serves me correctly, then clean the ¼” BSF threads ……ah, it makes me breath a sigh of relief to hear those old imperial thread sizes again…. In the cocking piece and striker and do one of two things.
The EMER states that if they are loose, then you can stamp a small letter ‘S’ on the striker thread to tighten it up in the cocking piece. I’d prefer it if you would flux it and run a coating of soft solder around the threads. That never fails and I don’t call that a bodge either. Having got the striker tight in the cocking piece, we’re ready to go. The second test is to draw the assembled bolt back and forth in the body and make sure that the nose of the cocking piece fully clears the short/underside locking lug of the bolt. If it does, then we’re ready to go.
But first, here’s a few points I’d like to make clear. The top of the sear that contacts the cocking piece is the NOSE and this must be undamaged, beautifully smooth and round. The flat that the trigger ribs bear on is the trigger bent. This must be absolutely flat and polished in an up and down manner. NOT across! I know this might sound a bit long winded but believe me, when you’ve done it a few thousand times, it becomes second nature, believe me …….., especially when you have beady eyed examiners like David Lines, Mr Amto and Mr Saw out-inspecting your work prior to range testing. Oh yes, where were we? Yes ….., the trigger has two raised humps on it. These are the ribs. The BOTTOM one, closest to the axis pin or finger part is the FIRST rib or bent. All this rib does is act on the trigger bent of the sear, drawing the sear smooooothly down the face of the cocking piece until the topmost rib contacts the trigger bent of the sear. This TOP trigger rib or bent is called the second or the PULL-OFF rib.
Then, just as the second or pull-off rib of the trigger contacts the trigger bent of the sear, several things happen. Firstly the rotatory angle of attack between the trigger and the sear changes slightly increasing the leverage required by your finger to squeeze (or rotate) the trigger any further. Now the trigger pressure increases from the FIRST pull of between 3 and 4 pounds pressure to the second pull off pressure of between 5 and 6.5 pounds pressure. And at the same time, the first pull has lowered the nose of the sear to within a gnats knacker of the very bottom edge of the face of the cocking piece. Now, you just need to gently squeeeeeeeze the trigger that last smidgin, exhale, cross-hair level, pointer upright, add that extra pound and a half of pressure and off it goes.
Now DO NOT MOVE, observe the target, follow the flight of the bullet through the haze. The observer will be doing the same through his binoculars……… Good hit, now release the trigger and wait. But wait ….., just how do we get to the point of perfection with the trigger pull off……………. That’s coming next
Are you sitting comfortably-, then we’ll begin. (apologies to all those post war 50’s era kids who remember this phrase from the BBC ‘listen with mother’ programmes!)
Re: trigger pull-offs. Part 2
Posted By: Peter Laidler
Date: Sun 4 Jan 2009 5:12 am
In Response To: Re: trigger pull-offs. Part 1 (Peter Laidler)
Still sitting comfortably kids?
TRIGGER PULL-OFFS, PART 2
What we’re going to do is to set up a rifle as we would for an Armourers trade test or as the instructor teaching it to the class. By now, you’ll all have a perfectly set-up bolt that slides into the body and is clear of the sear. Next, we’re going to select a No1, a No4 Mk1 or a bog standard No5 because how the pull-off affects the No4 Mk1/2, 1/3 and 2 will become clear later. First, I want you to run a steel rule or straightedge along the top edge of the trigger-less trigger guard. It must be flat and not warped. Now, place it into its recess in the fore-end and insert the rear trigger guard screw through the body, trigger guard and screw it up. The trigger guard should lay down flat. If it doesn’t, it tells me that the draws at the rear of the fore-end are too tight (unlikely with your original fore-end) OR that the wood in the trigger guard recess is too proud. Identify what the problem is and scrape it so that the trigger guard fits flat and square. Ok, so, if it is slightly raised at the front trigger guard screw (NO, NO, it’s NOT the king screw, it’s the SCREW, Front, trigger guard……….), by, say a 1/16th or 1/10th of an inch or so, what the heck but remember, the fore-end is secured by the front trigger guard screw and not the tension of a distorted trigger guard….., got that? After ensuring that the collar is a PERFECT fit and is nipped between the body, the trigger guard and that the fore-end is tight, fit the trigger guard and trigger. You also need to ensure that there is no undue slack between the trigger guard, the trigger axis pin and the trigger. The trigger axis pins do wear and form a shoulder along the shaft so watch out for this. If you do need a spare, then they’re readily available from the usual parts suppliers or, if you want to cheat, then just use a spare PIN, cap, fore-end or shank for any of the 4BA screws such as rear trigger guard or foresight protector screw or even a 4BA clearance drill at .144” or 9-SWG for you oldies
Now test the action of the trigger as there is one thing you ought to be aware of. If the body is worn, then the bolt might be loose in an up and down way and this CAN affect the second pull-off. If this is the case in your rifle, adjust the pull-off when it is in its natural position and not under any other form of control, such as pressing down onto the top rear of the bolt. The trigger will give one of the following reactions.
1. A crisp clean first pull of the trigger until it meets with a slight resistance, then a second squeeze, and almost without noticing it, the sear is drawn down another millionth of an inch and off she goes. Sheer poetry in motion, perfection and a first class trade test pass
2. You can have a long uninterrupted straight pull down and fire off the action. This is a first pull only (or FPO on the In-Inspection sheet)
3. Or you can have the same again but heavier. This a second pull only (…yep, 2PO on the in-inspectors sheet)
4. Or you can have a good clean first pull, then the resistance, then another long heavier pull then it’ll go off, well, whenever it feels like it. But YOU won’t know except that it’ll be ‘sometime………’ This is a ‘drag 2nd pull’
2 - is caused by only the FIRST rib or bottom rounded rib of the trigger contacting the trigger flat of the sear
3 - is caused by only the TOP or PULL-OFF rib of the trigger contacting the sear
4 - the drag second pull is caused by the first rib being too low and it not drawing the sear down sufficiently before the top pull-off rib engages the sear
You have to identify which of these is affecting YOUR rifle. If the pull off is as identified as 1, then go no further. It’s just practice and feel as to whether there is absolutely no drag on the second pull. When I was the snipers Armourer, I used to squeeze the trigger with another finger from the other hand between the back of the trigger and the guard. Just the slightest feel of resistance and then a click as it fired was good enough. If you do have the perfect pull-off, as in 1, then you must do the following to confirm it.
After taking up the first and are now onto the second pull, release the trigger fully. The sear MUST resume its original raised position. In other words, the trigger and sear must reassert themselves
If you have feature 2, it indicates that the rounded LOWER rib is too high and drawing the sear down off the cocking piece before the top bent comes into operation. So, you must carefully stone the bottom rib squarely, while retaining the rounded profile, a few .001” at a time. Use a micrometer from the rear….., you’ll soon start to take it down bit by bit. This is the best option, so go carefully because you’ll quickly find that you have shortened the first pull and have JUST started to get the second pull, which is JUST what you want and need. Now it’s a case of fine adjustment so that the second pull comes into operation as the sear is right at the bottom of the cocking piece.
Option 3 is going to cost you because it indicates that a butcher has been at your rifle and has probably stoned away the lower trigger bent so that only the top, second rib is operating on the sear. You’ll actually see this by the shape of the trigger. I have to say that although we had this fault set up on out trade test and training school examples, I never ever saw it in service because such a butchered rifle/trigger couldn’t get past the system and no amount of warpage in the fore-end would cater for it. I suppose you could replicate it by bending the trigger guard, but you’d have to go some…………………………….
Now to option 4. The most common, the drag 2nd pull. This is caused by an excessive TOP rib. Now, the first rib draws the sear down until the second rib meets it. Then the second rib takes over…., the trigger pressure increases but now, because the top rib is excessive, the sear is still too far from the lowest point of the sear bent of the cocking piece. So now, the sear is drawn further down the face of the cocking piece by the second rib before it fires off. This is the DRAG we refer to. And it’s something we definitely don’t want. Like option 2, this is relatively simple to cure, by carefully stoning down the TOP rib, a couple of thou’s at a time until you get to the all important perfect pull off.
If you have a Mk1/2, a 1/3 or Mk2 rifle, then you can immediately SEE what’s going on because you can perform this task with the fore-end removed. But with the No1, No4 Mk1 and 1/1 and No5 you’ve just got to keep removing the trigger and trigger guard to carry out the minute adjustments. I use a micrometer when I’m doing or teaching the youngsters to do it and take off 1 or two thou at a time, measured from the flat at the rear of the trigger. This way you can maintain the radius and keep the bent square-on to the axis of the trigger. It’ll take a bit of practice but once you’ve mastered it, it’ll come naturally.
Each Armourers shop had a big box of triggers, which, like bolt heads, might not be right for one rifle, might be almost or even perfect for another.
As you can understand now, there has been some behind the scenes discussion among the more experienced forumers about whether it is permissible to bend the trigger guard to achieve the same aim of a perfect first and second pull. Well, whatever your views, you can only achieve it constantly in this way, that is by stoning the upper or lower trigger ribs. While you CAN bend or distort the trigger guard, just how much ‘bend’ do you put into it. And just how much ‘bend’ is acceptable? This is what the EMER, the Armourers bible says on the subject. ‘……….trigger guard is not distorted and seats evenly in the stock fore-end. Trigger guards will not be set in order adjust the pull-off’. Well, that’s pretty unambiguous………………….
But as I always say, my experience in this field is limited and at the risk of upsetting some, I could be wrong
Just thinking out aloud, I wonder if it's worth buying the cheapest old dog of a No1, 4 or 5 that its possible to get, just to play about with it. There must be some old junkers or bubbas (see, I'm learning these wild colonial expressions too...) that are fit for training use only.
-
The Following 2 Members Say Thank You to Alan de Enfield For This Useful Post:
-
Banned
-
Legacy Member
Gentlemen All,
Thank you very much indeed for the replies. The wealth of knowledge in this community is staggering, as is the willingness to help.
As soon as the "Honey Do" list allows some workshop time, I will try out, and check out, all the points raised. No doubt with that amount of info I should be able to get it fixed.
My very sincere thanks to everyone that posted a reply. I'll update once I get a go at it.
-
-
Legacy Member
Oh, by the way. Mr Laidler I would give my eye teeth to pop over and benefit from your experience. Shame it is such a long way. Thanks for the invite, though!
-
-


Originally Posted by
gravityfan

Any pointers would be most welcome.

With thanks to Advisory Panel member Peter Laidler, an interesting article may be found in the Technical Articles for Milsurp Collectors and Re-loaders (click here).
"The Trigger Pull-Off" - Part 1 (By Peter Laidler) (click here)
"The Trigger Pull-Off" - Part 2 (By Peter Laidler) (click here)
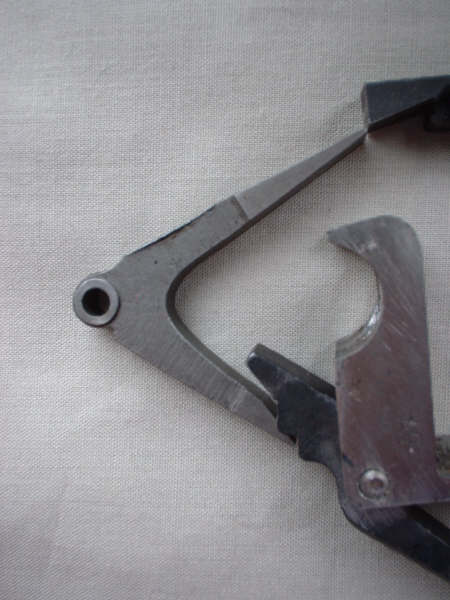
It's is accompanied by a detailed photo montage of a previously damaged skeletonised No.4(T) rifle, used as a training piece for budding Armourers to learn with and develop their skills. As Peter says "It appeared that this ‘rifle’ had never been finished as a ‘T’ as the front pad hole had not been drilled. During bead blasting after a hard life as a skeletonised rifle, it was established that the screw had sheared off and simply been made off level. Drilled out and extracted, it’s back to its former self. Waste not, want not as they say…". Other photos in the article show the clear interaction of the sear, cocking piece and trigger during various phases of its operation.
Article Extract .....
Pictorially, this shows the trigger at the end of the first pull, both ribs touching the trigger bent or flat of the sear with the sear nose at the extreme edge of the cocking piece………, just ready for the off.

(Click PIC to Enlarge)
Regards,
Badger
-


 PM
PM