+ Reply to Thread
Page 2 of 3 FirstFirst 1 2 3 LastLast
Results 11 to 20 of 22

Thread: No4 Mk1 firing pin & refinish

Click here to increase the font size Click here to reduce the font size
  1. #11
    Advisory Panel woodchopper's Avatar
    Join Date
    Oct 2006
    Last On
    09-16-2014 @ 05:31 PM
    Location
    Edmonton
    Posts
    60
    Local Date
    05-31-2024
    Local Time
    09:13 AM
    I broke the little fingers off my first bolt tool as well.

    I made a heavier one

  2. # ADS
    Friends and Sponsors
    Join Date
    October 2006
    Location
    Milsurps.Com
    Posts
    All Threads
    A Collector's View - The SMLE Short Magazine Lee Enfield 1903-1989. It is 300 8.5x11 inch pages with 1,000+ photo’s, most in color, and each book is serial-numbered.  Covering the SMLE from 1903 to the end of production in India in 1989 it looks at how each model differs and manufacturer differences from a collecting point of view along with the major accessories that could be attached to the rifle. For the record this is not a moneymaker, I hope just to break even, eventually, at $80/book plus shipping.  In the USA shipping is $5.00 for media mail.  I will accept PayPal, Zelle, MO and good old checks (and cash if you want to stop by for a tour!).  CLICK BANNER to send me a PM for International pricing and shipping. Manufacturer of various vintage rifle scopes for the 1903 such as our M73G4 (reproduction of the Weaver 330C) and Malcolm 8X Gen II (Unertl reproduction). Several of our scopes are used in the CMP Vintage Sniper competition on top of 1903 rifles. Brian Dick ... BDL Ltd. - Specializing in British and Commonwealth weapons Specializing in premium ammunition and reloading components. Your source for the finest in High Power Competition Gear. Here at T-bones Shipwrighting we specialise in vintage service rifle: re-barrelling, bedding, repairs, modifications and accurizing. We also provide importation services for firearms, parts and weapons, for both private or commercial businesses.
     

  3. #12
    FREE MEMBER
    NO Posting or PM's Allowed
    busdriver72's Avatar
    Join Date
    Mar 2007
    Last On
    01-02-2009 @ 10:44 AM
    Posts
    21
    Local Date
    05-31-2024
    Local Time
    10:13 AM
    Thread Starter
    I feel better now.
    I got a complete bolt assembly in from Numrich.
    The bolt wouldn't slide in at first. I noticed the bolt head wouldn't turn enough counter-clockwise to slip into the receiver. It was very tight, but I managed to unscrew it. Using 600 grit wet/dry sandpaper I smoothed the flat areas where the bolt and bolt head meet, then finished it off with 1500 grit. The bolt head lined up perfectly.
    Took her to the range and it funtions great.
    Lotta work to get a gun to go 'bang.'
    Also ordered an issue WWII Enfield sling. My gun is a 1943, and the sling I got just happened to be dated 1943. Sweet!

  4. Avoid Ads - Become a Contributing Member - Click HERE
  5. #13
    Legacy Member Cantom's Avatar
    Join Date
    Oct 2006
    Last On
    05-24-2021 @ 08:44 AM
    Location
    Ontario Canada
    Posts
    411
    Real Name
    Tom
    Local Date
    05-31-2024
    Local Time
    11:13 AM
    Quote Originally Posted by busdriver72 View Post
    Well...this went good...............not!
    After removing the correct screw and soaking in penetrating oil, I broke the two "teeth" off of the special removal tool. I think the striker had been in there since 1943 and it wasn't going anywhere.
    You know, I think I'm gonna just get a complete bolt from Numrich for $44.95. That's less expensive than just getting the parts I need, as well as another special striker remover tool. When they say "complete" do they really mean it....head, striker (firing) pin, everything?
    Wait! You have a new firing pin right? Read the last post in this thread.

    Was the old bolt serial number matched to the receiver? What number was on the bolt head? Does the firing pin protrude more on the new bolt than on the old?

    https://www.milsurps.com/showthread.php?t=341&page=2
    Last edited by Cantom; 04-11-2007 at 06:22 PM.

  6. #14
    Legacy Member Mk VII's Avatar
    Join Date
    Dec 2008
    Last On
    05-20-2024 @ 05:26 PM
    Location
    England
    Age
    62
    Posts
    1,410
    Real Name
    James West
    Local Date
    05-31-2024
    Local Time
    04:13 PM
    Everybody breaks the tool. Especially if the lugs are too soft, or hard as glass. A decent one that doesn't break thirty seconds after you brandished it at the bolt is worth a good deal.

  7. #15
    Advisory Panel

    jmoore's Avatar
    Join Date
    Mar 2009
    Last On
    06-09-2023 @ 04:20 AM
    Location
    US of A
    Posts
    7,066
    Local Date
    05-31-2024
    Local Time
    11:13 AM
    17-4ph 180-200kpsi h.t. No breakee in 20years...

  8. #16
    Legacy Member armabill's Avatar
    Join Date
    Jan 2010
    Last On
    Yesterday @ 07:03 PM
    Location
    Glenolden, Pa. USA
    Posts
    111
    Real Name
    William Crane
    Local Date
    05-31-2024
    Local Time
    11:13 AM
    I bought one of those striker removal tools for $50. It's not from Numrich.

    I haven't tried it yet.

  9. #17
    FREE MEMBER
    NO Posting or PM's Allowed
    JBS's Avatar
    Join Date
    Aug 2009
    Last On
    07-08-2019 @ 09:37 AM
    Location
    removed
    Posts
    455
    Local Date
    05-31-2024
    Local Time
    10:13 AM

  10. #18
    (Deceased April 21, 2018) John Sukey (Deceased)'s Avatar
    Join Date
    Nov 2006
    Last On
    05-14-2012 @ 06:03 PM
    Location
    Tucson Arizona
    Posts
    762
    Local Date
    05-31-2024
    Local Time
    08:13 AM
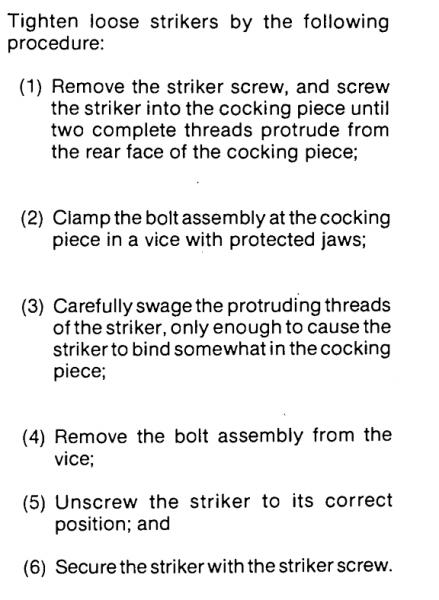
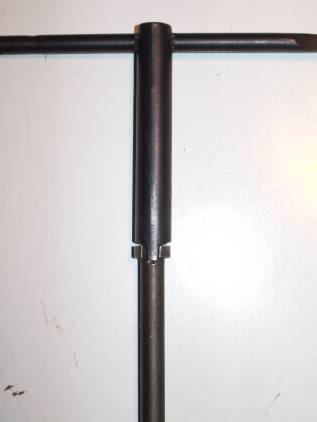
    There is the butcher method. pulling back the cocking piece to expose the striker and clamping a set of vise grips on the exposed part. Then holding the cocking piece in a vise and turning the striker with the vise grips to break it free, (often the striker is peened ) You lose nothing because the striker is already buggered,
    Now as for turning the striker out one turn to make the firing pin move forward, that ain't gonna work, cause the collar on the striker is stopped by the rear of the bolt head.

  11. #19
    FREE MEMBER
    NO Posting or PM's Allowed
    buffdog's Avatar
    Join Date
    Apr 2008
    Last On
    12-02-2013 @ 11:01 AM
    Location
    Manitoba, Canada
    Posts
    191
    Local Date
    05-31-2024
    Local Time
    09:13 AM

    Removing firing pin

    I ordered a firing pin tool from Numrich a long time ago. I was cast metal, and the teeth did not last very long.

    One thing. Did you remove the firing pin locking screw from the end of the cocking piece?

    Remove it, then soak the cocking piece in penetrating oil. You might even heat the cocking piece slightly and apply the penetrating oil when it is WARM, not HOT. The heat will expand the cocking piece slightly, and break any "seal" on the threads.

    Any good machinist can make you a STEEL tool for a firing pin removal. If you have a buddy with a metal lathe, it can be done in well under an hour, including a beer while you are admiring your handiwork.

    I like things a bit robust, so I use a 3/4 inch diameter steel rod about 4 inches lone, put it in the lathe, and turn about 2 1/2 inches down to about 3/8 inch diameter. Drill a 1/4 inch hole, about 1 3/4 length inside the turned down diameter. In the large end, drill a 1/4 inch hole cross ways for a 1/4 inch x 3 inch bolt for a handle to turn the tool with. Now, you have to file two "fingers, about 1/4 inch width x 1/4 inch depth in the end with the lengthwise hole. These fingers have to fit inside the notches of the firing pin, and are rounded on the inside. It helps to have an old firing pin (or the new one) handy, and simply fit the fingers to the new one, ROUNDING OFF THE INSIDE EDGES to fit the round recesses in the firing pin.

    Again, make sure you take the locking screw out of the rear of the cocking piece. After using penetrating oil, put the cocking piece in a padded vise, insert the tool, and see if you can unscrew the firing pin.

    The new firing pin should protrude from the face of the bolt approximately .040 inches.

    Note. Sometimes people disassemble the firing pin, and screw the firing pin in one too many turns. As mentioned, you might be able to simply unscrew the bolt a turn or so, IF THE FIRING PIN IS ROUNDED, AND NOT BROKEN.
    .

  12. #20
    Banned Edward Horton's Avatar
    Join Date
    Jan 2008
    Last On
    09-10-2011 @ 01:42 PM
    Location
    Harrisburg, PA USA
    Age
    73
    Posts
    935
    Local Date
    05-31-2024
    Local Time
    11:13 AM
    The proper way to loosen the firing pin would be to "TIGHTEN" it thus screwing the swedged threads "OUT" and to the rear of the cocking piece. Clamp the cocking piece in a padded vice preventing ANY movement of the bolt. Chase the swedged threads with a file and clean, oil threads and now remove the firing pin/striker by alternately going righty tighty-lefty loosey reforming the threads to a normal pitch.

    Or if your stubborn and don't understand the phrase swedged threads just make a indestructible titanium bolt tool and keep turning the firing pin even if the threads start smoking and the cocking piece starts glowing cherry red.


    Make sure you are pushing straight down on your bolt tool while removing the firing pin striker.


    If the tool is not straight and aligned with the firing pin/striker the prongs will break off.


    The following message was brought to you by the Society of Prevention of Cruelty to Enfield Riflesicon.


+ Reply to Thread
Page 2 of 3 FirstFirst 1 2 3 LastLast

Tags for this Thread

Posting Permissions

  • You may not post new threads
  • You may not post replies
  • You may not post attachments
  • You may not edit your posts