-
One day when I'm in the mood, I'll draw-up/sketch a breeching up clamp and wrench that we used that would slide on and off the action and barrel very quickly, without having to unscrew anything. It also incorporated a 17 degree underurn mark that we could use to initially hand tighten. Being quick to remove, it was simple to slip it off or move it round a tad, go over to the breeching up sheet, do the rock test and back to do the final adjustments, back to the breeching up sheet........... No rock on the sheet, iinspectors check, tick the work sheet and that was it. Slide the barrel wrench off, body clamp and that was it. All done.
-
The Following 10 Members Say Thank You to Peter Laidler For This Useful Post:
-
06-25-2011 11:51 AM
# ADS
Friends and Sponsors

-
Advisory Panel


Rusty.303, My posting in the middle of page one shows a receiver wrench that fits both. The main difference is the radius leading down to the front trigger guard screw lug.
-
Thank You to Son For This Useful Post:
-
-
Be warned anyone out there who is contemplating making their own breeching and unbreeching kit that you can sooooooooo easily crush the front trigger guard threaded spigot and thread unless you make sure that the body clamp if fully clear of it. Once you put the unbreeching load on it instead of the shoulders and it's crushed, that's it, body is finished.
I've even seen one with a scxrew inserted into the hole to protect the thread. It was so tight after the botched unbreeching that it was impossible to even remove the slave screw. So just be advised
Can I also suggest that you make sure that the lever part, whether it's the barrel or body clamp, that you make sure it is TWO handled to spread the load and balance.
Every major Base workshop had a couple of breeching up kits, usually made on site (the official kits relegated to some dark and dusty store.......) but they always followed a very similar pattern, based on years and years of experience.
Oh yes, just one other thing too............. The body and barrel clamps must be 1" wide to spread the torque loading and prevent damage when you get a REALLY tight basxxxd
Last edited by Peter Laidler; 06-26-2011 at 06:02 AM.
-
The Following 10 Members Say Thank You to Peter Laidler For This Useful Post:
-
One day when I'm in the mood, I'll draw-up/sketch a breeching up clamp and wrench that we used that would slide on and off the action and barrel very quickly, without having to unscrew anything. It also incorporated a 17 degree underurn mark that we could use to initially hand tighten. Being quick to remove, it was simple to slip it off or move it round a tad, go over to the breeching up sheet, do the rock test and back to do the final adjustments, back to the breeching up sheet...........
I'd like to make one of those, mine works fine but it's a PITA having to undo and do it up again repeatedly to fine tune the location.
-
-
FREE MEMBER
NO Posting or PM's Allowed

No 32 scope tools
Made the allen key lead screw wrench as per Capt Laidler 's instructions and made the lockring spanner from a pressed steel throwaway found in an IKEA flatpack, used a bench grinder to get it to the right dimentions then bent it to 90' in a vice. Works brilliantly.
See my range report in my thread "WOT I GOT FOR MY BIRTHDAY"
-
If you set the clamping pressure just right you won't need the spanner for range work, just the modded Allen wrench. You can hold the turret in place with your fingers. A little less fiddle-y. But to get to that point the spanner surely IS useful!
-
-
In my limited experience with these things, JM is dead right................. If you are a sniper advancing, carrying out a bit of sniping, harrying and covert intelligence gathering ahead of the main force advancing into Antwerp in 1944 then you'll need to clamp up the lead screw locking nuts like there's no tomorrow. But for us mere mortals on the ranges, so long as they are nipped up sufficient that when you turn the drum, the lead screw is locked to it and turns at the same time, then that is tight enough. Get that........... JUST nipped up. Not Jumbo Jet wheel nut tight but just nipped up.
That way you can zero in at, say, 300 yards and when it's bang on, just hold the leadscrew with the modified allen key and swing the drum back to 3.
That's only my experience. Others might have other experiences
-
-
Contributing Member


Just a few of the bits I use.
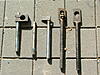
1st. receiver clamp, 2nd. Omark barrel tool, 3rd mauser receiver wrench 4th. smle barrel wrench, 5th. enfield receiver wrench. 2nd pic. barrel vise/case former/ full lenght resizer.
I use a 10 ton jack, saves dicking around tightening bolts and swearing if the barrel slips, a barrel block is sitting on top of the press.
I have finally got a computer set up to post photo's. This one will not be getting the same security program that the others have, so if you buggers virus it, I will be rather peeved.
Last edited by muffett.2008; 12-18-2021 at 06:56 PM.
-
The Following 5 Members Say Thank You to muffett.2008 For This Useful Post:
-
FREE MEMBER
NO Posting or PM's Allowed

This was the first tool I made on my lathe when I got it a couple of years ago. It's made of 304 stainless steel (some threaded rod offcuts) and I've used it heaps, and on some really tight ones and it's stood up really well. It's a close fit, but I havn't come across a striker it won't go into yet.
I bead blasted it when I was done.
I have been wanting to make one of those striker removal tools but haven't been able to find any dimensions for it. Do you happen to have any drawings for your's that you would be able to share?
I have searched around but haven't been able to find any drawings for them.
-
FREE MEMBER
NO Posting or PM's Allowed


Originally Posted by
muffett.2008

Just a few of the bits I use.
1st. receiver clamp, 2nd. Omark barrel tool, 3rd mauser receiver wrench 4th. smle barrel wrench, 5th. enfield receiver wrench. 2nd pic. barrel vise/case former/ full lenght resizer.
I use a 10 ton jack, saves dicking around tightening bolts and swearing if the barrel slips, a barrel block is sitting on top of the press.
I have finally got a computer set up to post photo's. This one will not be getting the same security program that the others have, so if you buggers virus it, I will be rather peeved.
crikey that is one big reloading press!!! you must have a few oversize chambers to use a jack to resize your cases!!!
too much time way too idle hands and mind!!!
cheers
Ned


 PM
PM


