-
FREE MEMBER
NO Posting or PM's Allowed

Fascinating post. Thanks for the photos. I looked at all of them. I am amazed by your skill and dedication.
-
11-18-2014 05:27 PM
# ADS
Friends and Sponsors

-
FREE MEMBER
NO Posting or PM's Allowed
Absolutely amazing. I wish someone had videoed the process to make a TV show. I'm eagerly awaiting the next installment.
Dave
-
-
FREE MEMBER
NO Posting or PM's Allowed
2016 and the "Debut year" of 116714 and time to revive this lapsed thread and finish the work done on the kett
Ok................. obviously I have forgotten the finer points at Copy/Pasting stuff from CGN over to Milsurp as there are no pictures. Anyone care to tell me again (Claven) the process so I can wrap this all up. And if a Mod can delete my post (#34) I will start running the rest of the vehicles restoration story over here.
Thanks in advance
Last edited by XRCD011; 01-14-2016 at 06:38 PM.
-
FREE MEMBER
NO Posting or PM's Allowed
The rebuild of the original Opel 1.5L motor
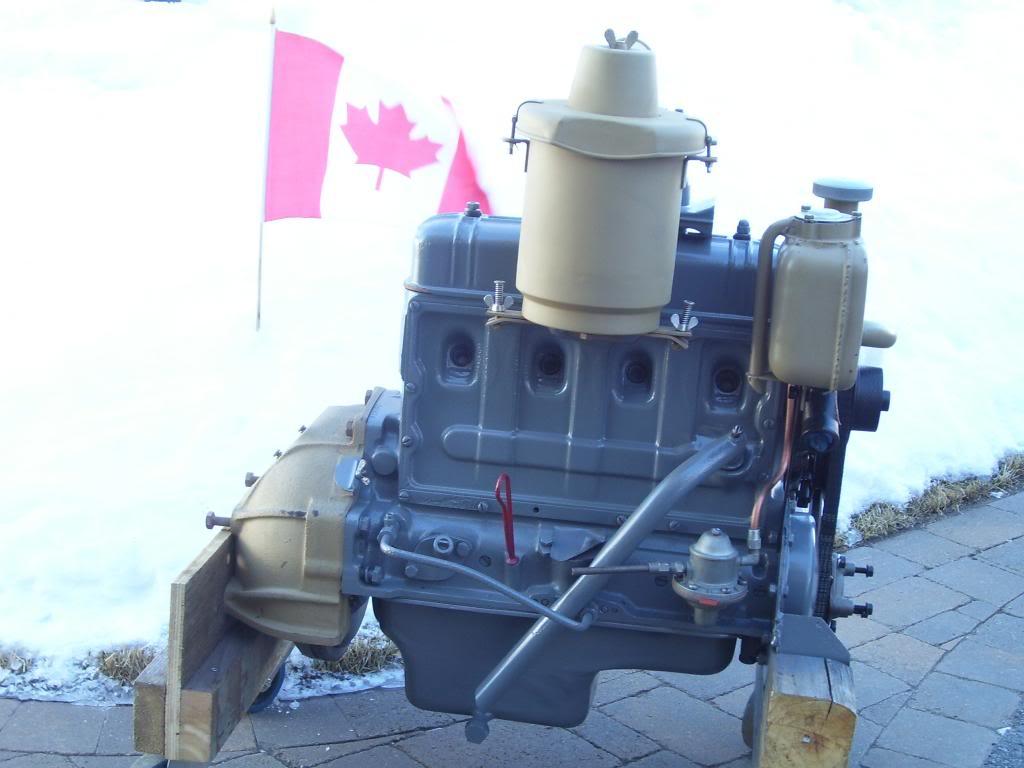
Kettenkrads are powered with a Opel Olympia 1.5L car motor of 36Hp that was built by the Adam Opel Company of Rüsselsheim (a subsidery of General Motors in pre war days, GM washed their hands of Opel at the end of WWII). My kett came to me with its original 1.5L P1 type motor which is a VERY rare thing as the wartime built units are notorious for being of weak construction and generally poor quality, especially true in the later stages of the war. Lots of kett owners in Europe are in amazement I have the original motor for my vehicle and it is not uncommon for ketts to be running with a post war P2,3 or 4 motor (which are better built and of heavier construction). As there are only two of these motors in Canada and maybe a dozen or so (in ketts) in the US and it is the original I have to go the distance to save this motor.
Verbus marked rod bolt, note the thread not true to shaft and it going off on a bias.
Going to West Carleton Automotive for rebuild.
As the motor turned freely I thought, naive me, that I was not going to experiance to much butt hurt on the motor rebuild, sadly that was not to be. Once Jeff at WCA took off the push rod cover I got the phone call I was hoping I would not get. Seems Euro Bubba, had froze the block and done a repair with lead (got to really contaminate the crack) to keep it running. Two cracks this large C shaped piece of evil and another on the opposite side. Both, according to folks in Europe common failure points, sort of like the MB block failing cracking behind the starter.
So the block takes a nice ride down to David Cromptons in Michigan and is left for him to work his magic. WCA had asked me when I dropped off the block for disassembly if it has Babbit or insert bearings? Christ knows? I did not even know what a babbit bearing was (I do now) and all the torques and specs they would need to rebuild (More ?????? on my part).
^ Note the 44- T-R XXXX number from Opel on the block, NSU stamps it number on a second location, either number is good on the data plate with the NSU one generally being the most common.
So to get the info Larry and Jeff needed at WCA I Googled "Opel Olympia Car Clubs" in Europe and it popped up about 15 clubs. I just started at the top contacting clubs and organizations stating what I was seeking for torques and specs, parts contacts, etc. A couple weeks go by with nothing heard from Europe, then the flood gates opened. A fellow in Germany responds, who at first I thought was just some "Euro version of a Opel Gearhead". I could not be more wrong if I tried. Turns out Rainer Weiler is a Prof. Dr. at the University of Augsburg Hochschule für Applied Sciences, who very fortunitely for me, is "into" Opels. I hit a freaking home run connecting with Rainer, a great guy who has passed on a ton of data, further contacts and assisted in the purchases of numerous parts.
With the block back from the US all welded up I treated in internally with Goodsons and just about melted my wifes hairdryer curing the stuff, amazing how much heat that can put out after about five hours of running, externally JB Weld, pressure test, evil cracks gone, or at least not an issue in my lifetime.
With the rods back from Ted Koudys at Precision Bearing Service of Beamsville, a bunch of parts out of Europe and the torques and specs by Rainer, and a nice drive to the United States and back for the welding, West Carleton can, after just about one year of agony rebuild my motor.
Original motor, back home after a year.
BEFORE
AFTER
Next posts will be on the upper bodywork.
Last edited by XRCD011; 04-10-2014 at 12:07 AM.
Edit / Delete Edit Post Quick reply to this message Reply Reply With Quote Reply With Quote Multi-Quote This Message
-
FREE MEMBER
NO Posting or PM's Allowed
The rebuild of the original Opel 1.5L motor
Kettenkrads are powered with a Opel Olympia 1.5L car motor of 36Hp that was built by the Adam Opel Company of Rüsselsheim (a subsidery of General Motors in pre war days, GM washed their hands of Opel at the end of WWII). My kett came to me with its original 1.5L P1 type motor which is a VERY rare thing as the wartime built units are notorious for being of weak construction and generally poor quality, especially true in the later stages of the war. Lots of kett owners in Europe are in amazement I have the original motor for my vehicle and it is not uncommon for ketts to be running with a post war P2,3 or 4 motor (which are better built and of heavier construction). As there are only two of these motors in Canada and maybe a dozen or so (in ketts) in the US and it is the original I have to go the distance to save this motor.

Verbus marked rod bolt, note the thread not true to shaft and it going off on a bias.

Going to West Carleton Automotive for rebuild.


As the motor turned freely I thought, naive me, that I was not going to experiance to much butt hurt on the motor rebuild, sadly that was not to be. Once Jeff at WCA took off the push rod cover I got the phone call I was hoping I would not get. Seems Euro Bubba, had froze the block and done a repair with lead (got to really contaminate the crack) to keep it running. Two cracks this large C shaped piece of evil and another on the opposite side. Both, according to folks in Europe common failure points, sort of like the MB block failing cracking behind the starter.

So the block takes a nice ride down to David Cromptons in Michigan and is left for him to work his magic. WCA had asked me when I dropped off the block for disassembly if it has Babbit or insert bearings? Christ knows? I did not even know what a babbit bearing was (I do now) and all the torques and specs they would need to rebuild (More ?????? on my part).
^ Note the 44- T-R XXXX number from Opel on the block, NSU stamps it number on a second location, either number is good on the data plate with the NSU one generally being the most common.
So to get the info Larry and Jeff needed at WCA I Googled "Opel Olympia Car Clubs" in Europe and it popped up about 15 clubs. I just started at the top contacting clubs and organizations stating what I was seeking for torques and specs, parts contacts, etc. A couple weeks go by with nothing heard from Europe, then the flood gates opened. A fellow in Germany responds, who at first I thought was just some "Euro version of a Opel Gearhead". I could not be more wrong if I tried. Turns out Rainer Weiler is a Prof. Dr. at the University of Augsburg Hochschule für Applied Sciences, who very fortunitely for me, is "into" Opels. I hit a freaking home run connecting with Rainer, a great guy who has passed on a ton of data, further contacts and assisted in the purchases of numerous parts.
With the block back from the US all welded up I treated in internally with Goodsons and just about melted my wifes hairdryer curing the stuff, amazing how much heat that can put out after about five hours of running, externally JB Weld, pressure test, evil cracks gone, or at least not an issue in my lifetime.

With the rods back from Ted Koudys at Precision Bearing Service of Beamsville, a bunch of parts out of Europe and the torques and specs by Rainer, and a nice drive to the United States and back for the welding, West Carleton can, after just about one year of agony rebuild my motor.

Original motor, back home after a year.
BEFORE

AFTER

Next posts will be on the upper bodywork.
---------- Post added at 06:24 AM ---------- Previous post was at 06:20 AM ----------
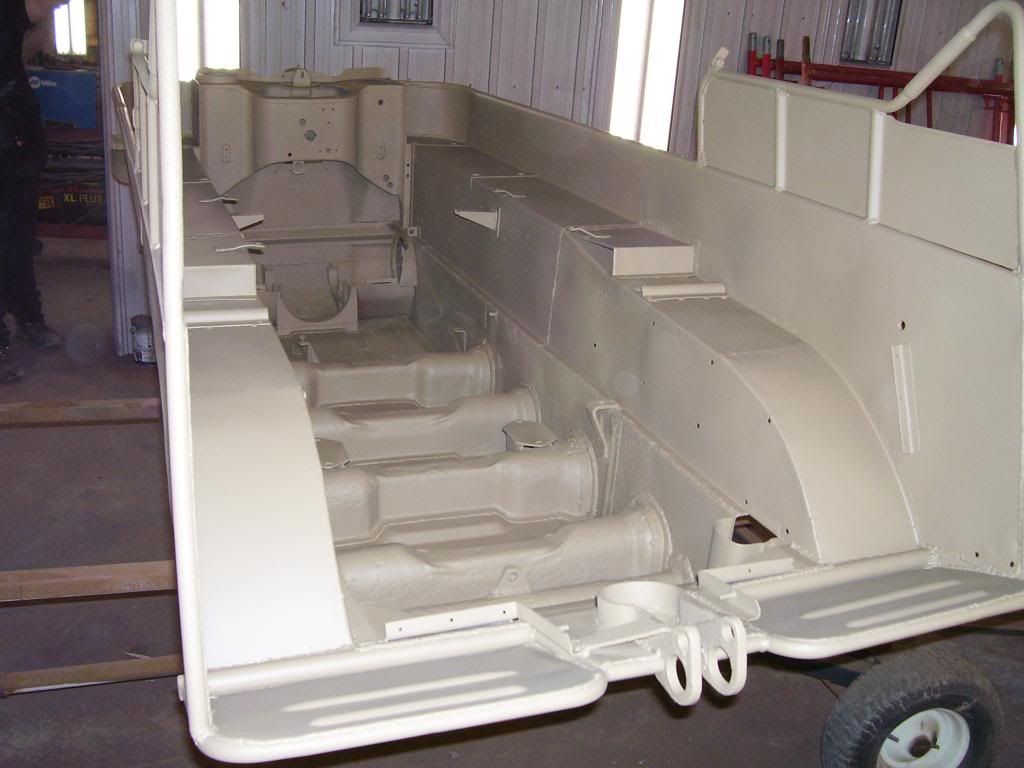
UPPER BODYWERK (PART ONE)
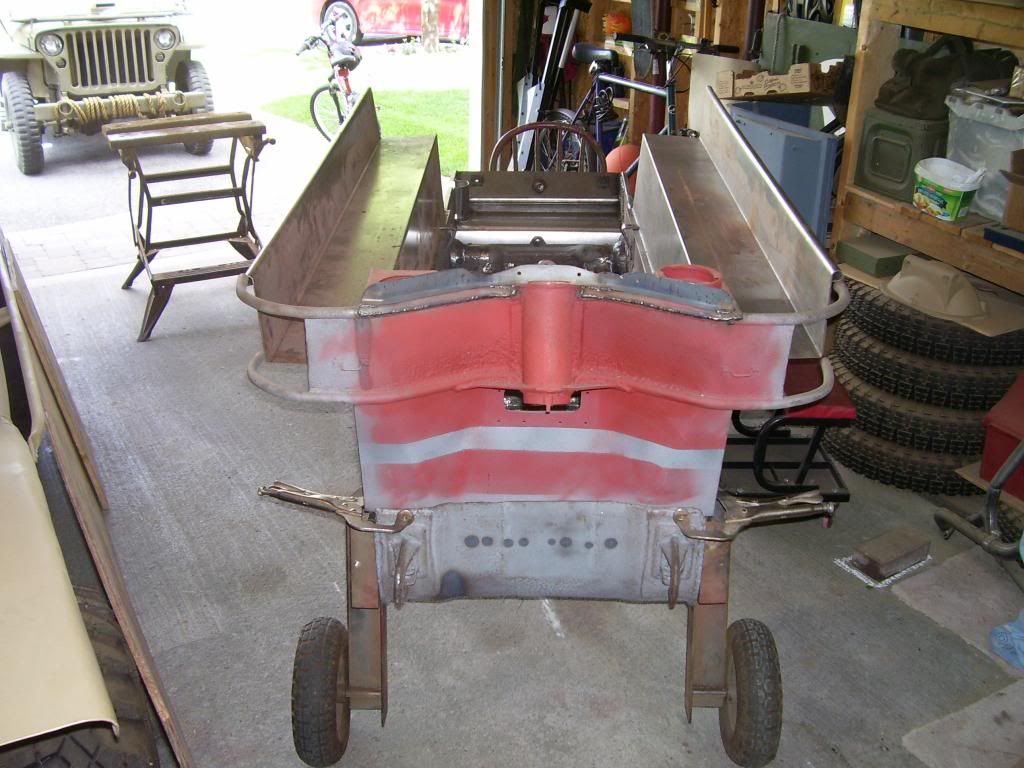
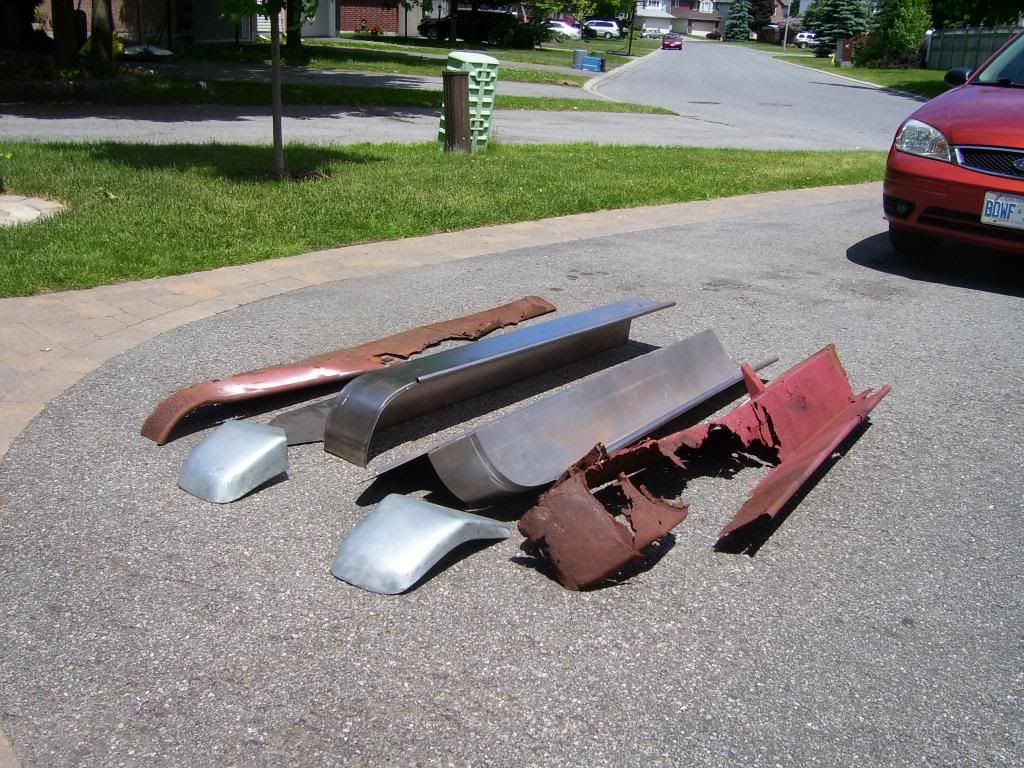
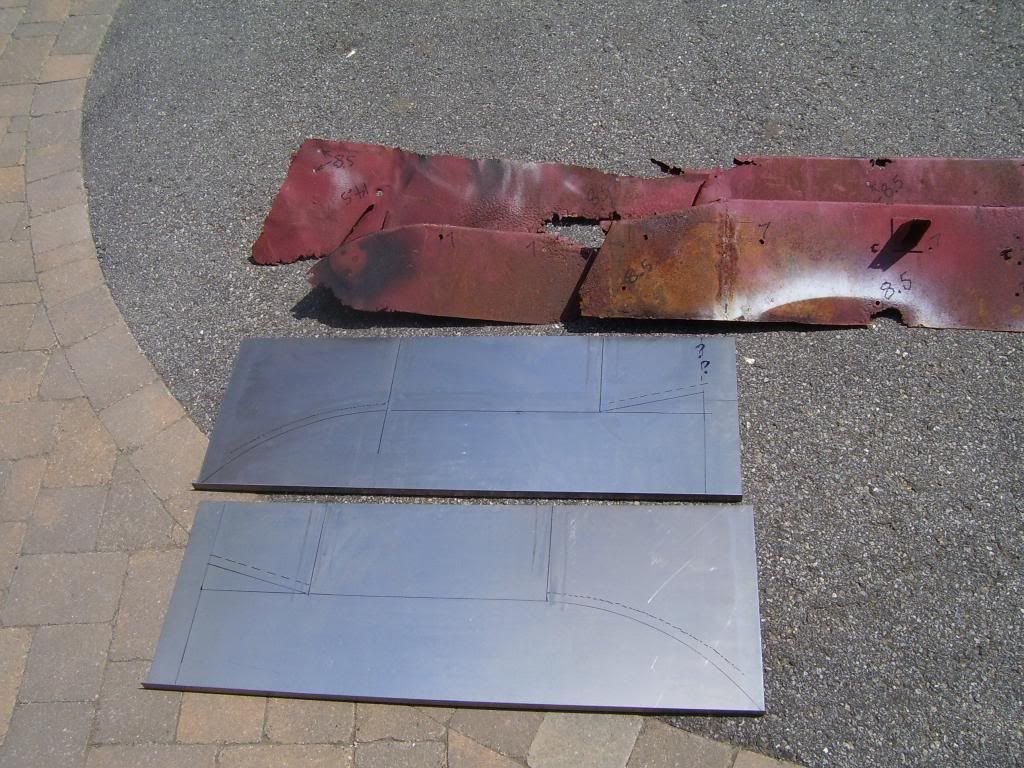
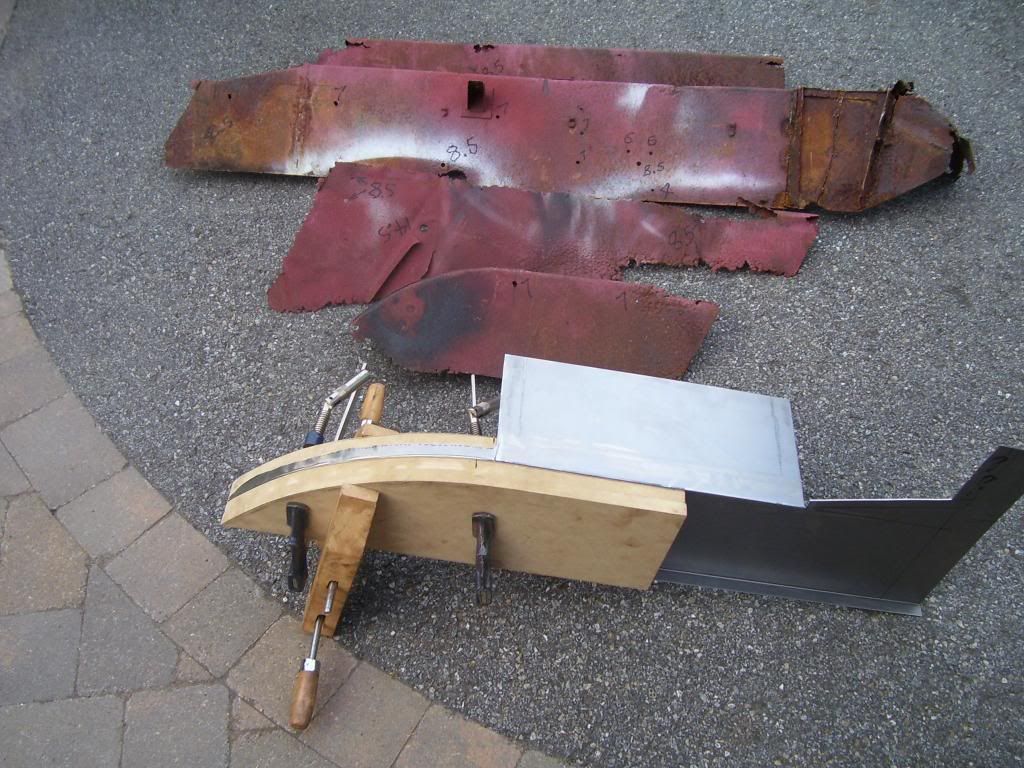
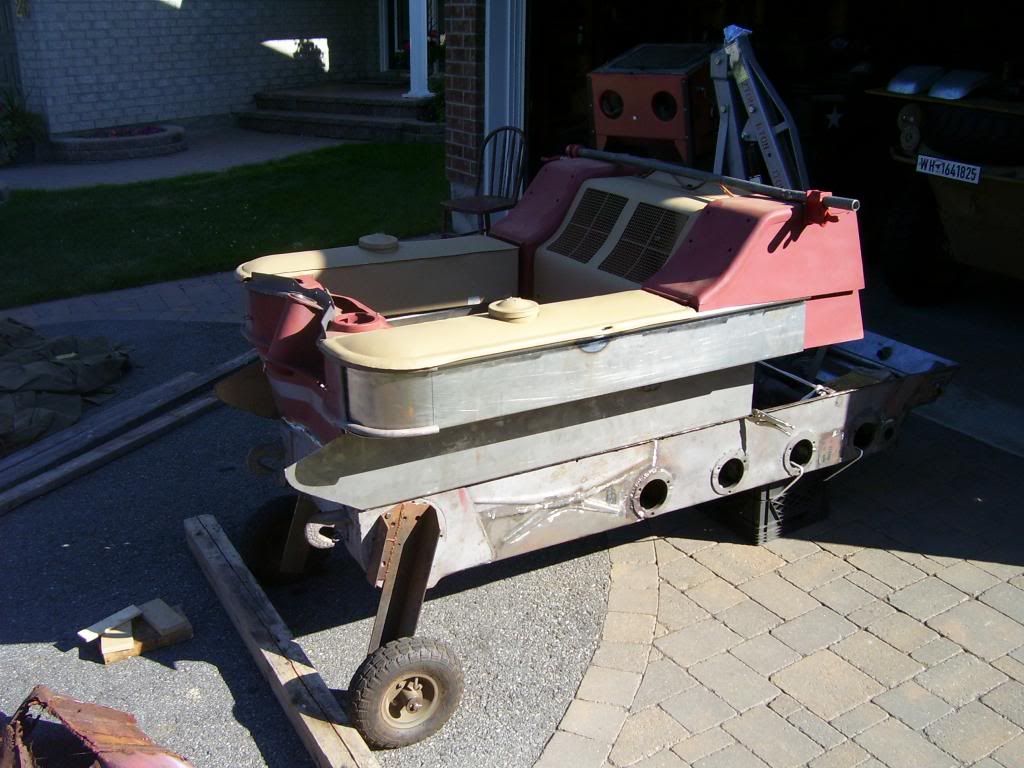
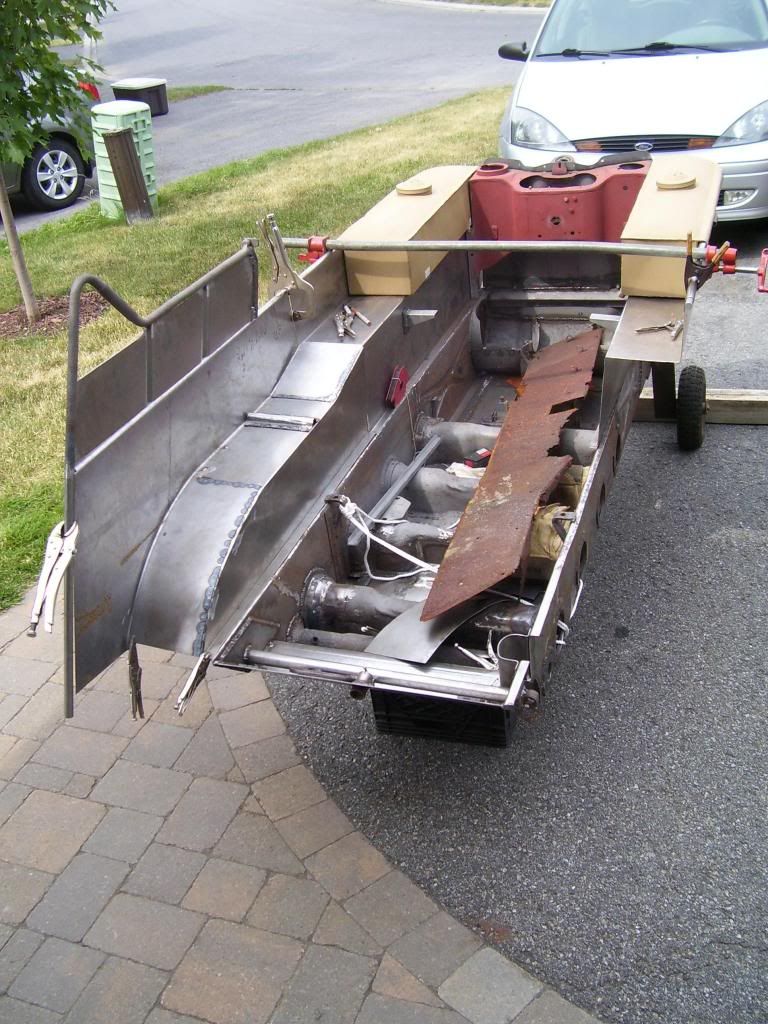
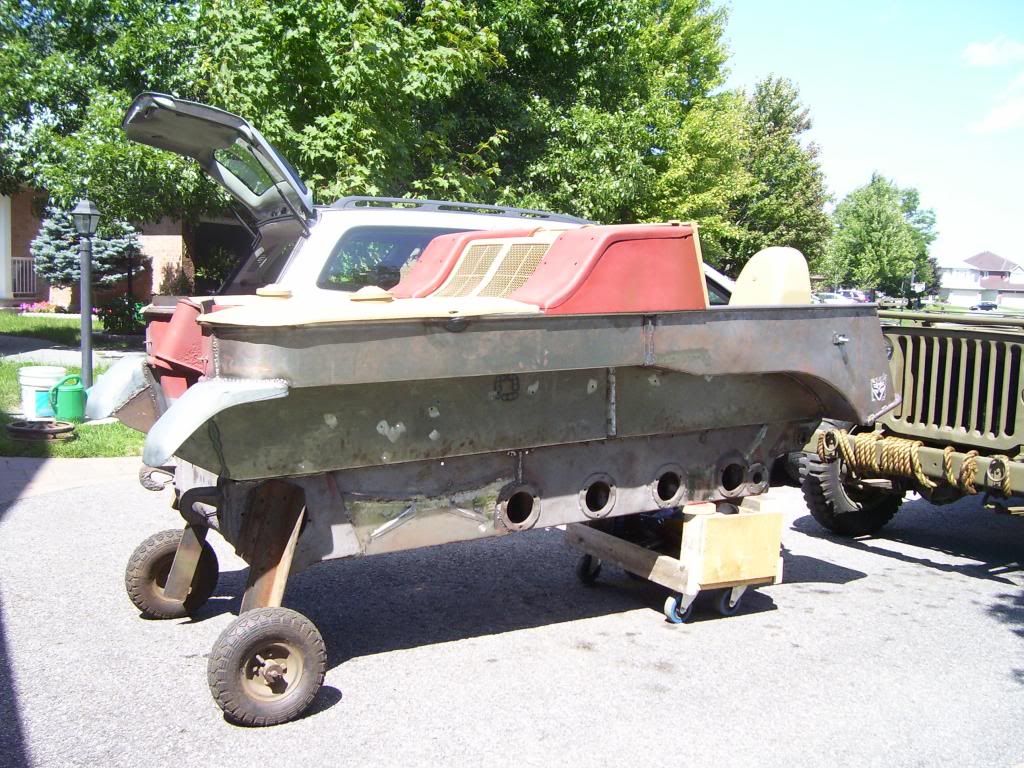
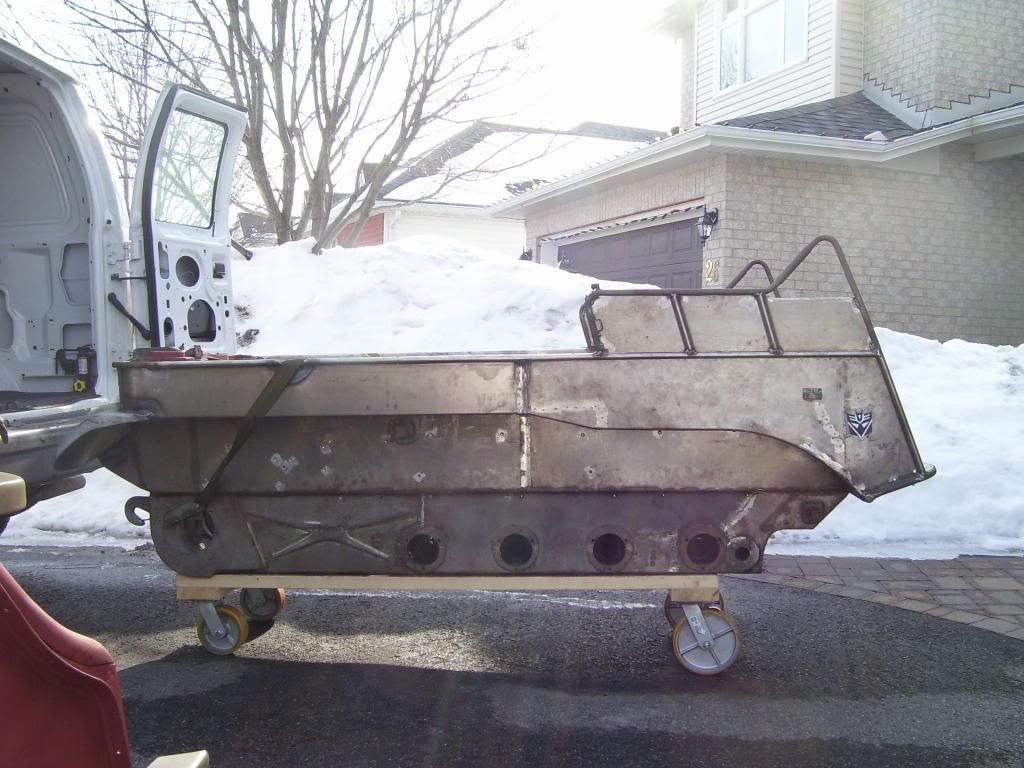
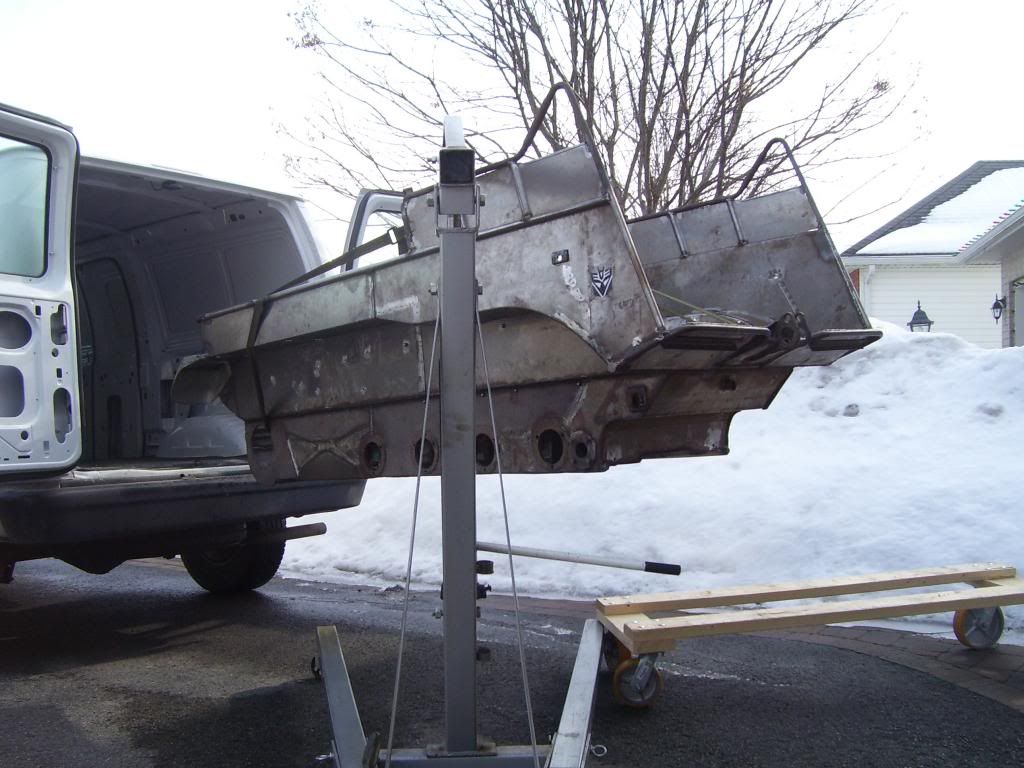
With the lower body now one unit I now focus on the upper body which again like the lower half will be broken down into upper front and upper rear. The upper sheet metal is four large panels that appear to have a stiffening "pipe" running about the top edge. The pipe is actaully the sheet metal rolled back on itself. I drove the chopped off rusted panels down to Ohio to hand them off to David Crompton to replicate, then pick up at a later date at his shop in Michigan.
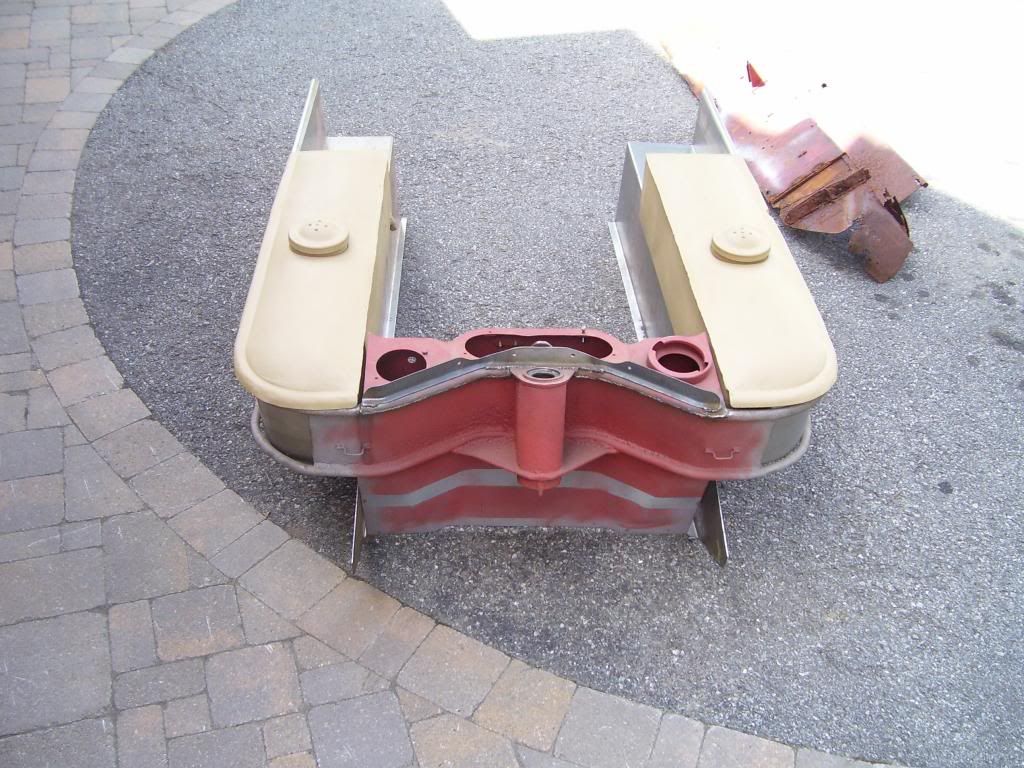
I could not resist clamping the front uppers on one day and was shocked at how big the body "grew", after working on small sections in isolation to each other I had lost prospective of the ketts size.

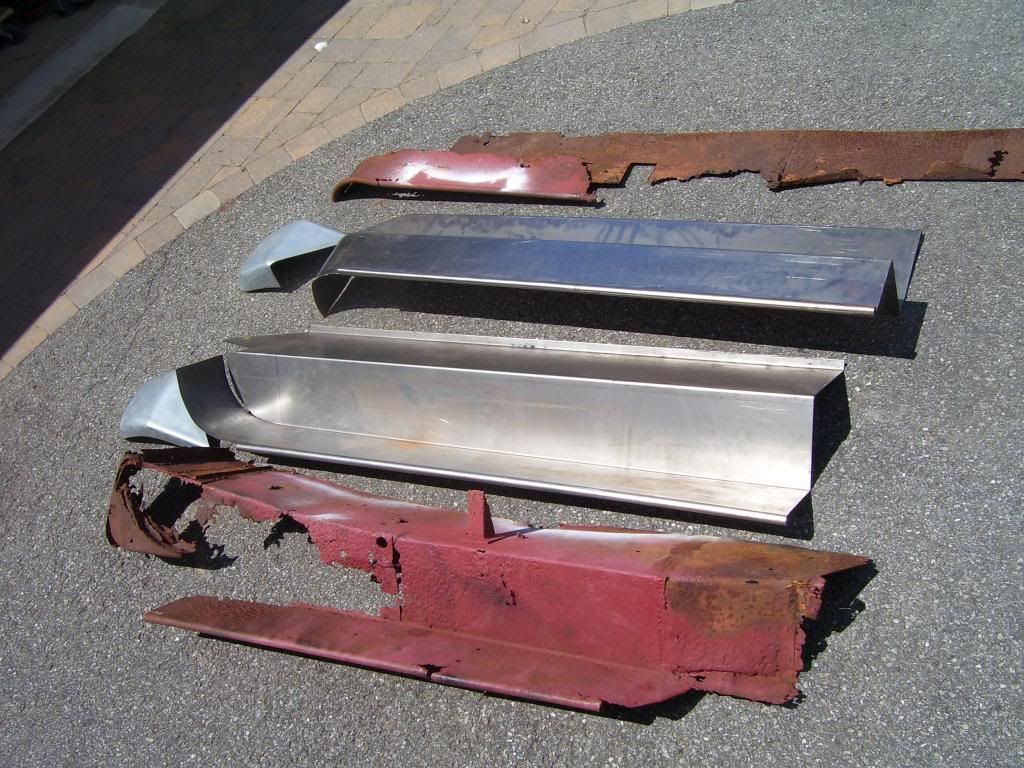
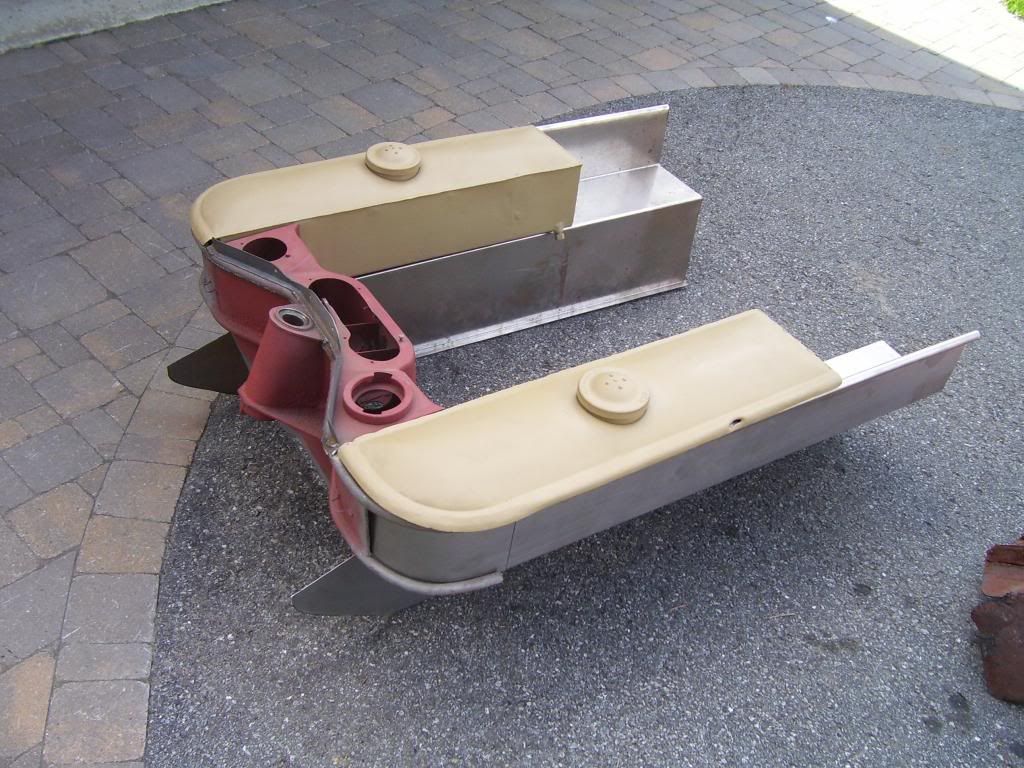
Old and new sections of upper body.
Constantly measure, measure measure and check, check, check, then measure and check again. Forming the radius for the gas tank fronts.
Test fit a couple hundred times, then test fit again.
Laying out the pattern for the inside panel of the upper rear, thankfully enough original panel was there to draw from.
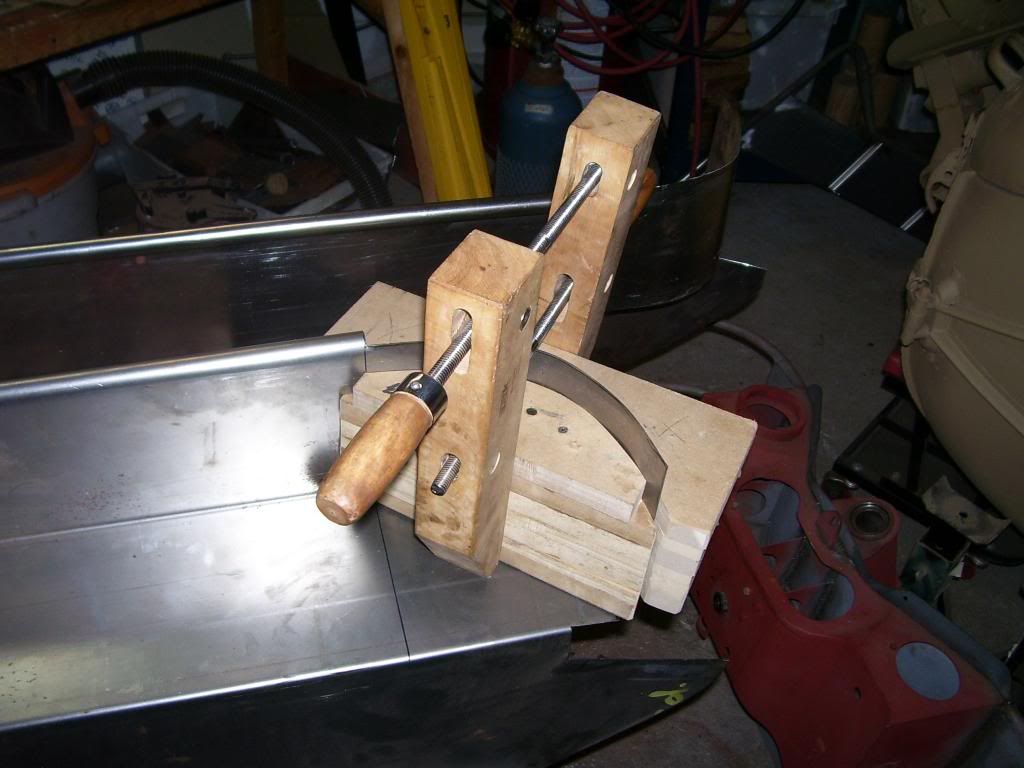
Sandwiching the new 18Ga (lower body is 16 Ga) between two pieces of Medium Density Fiberboard (MDF) to ding in the flange for the correct profile of the arc. MDF is a restorer friend and has a thousand and one uses for stuff like this.
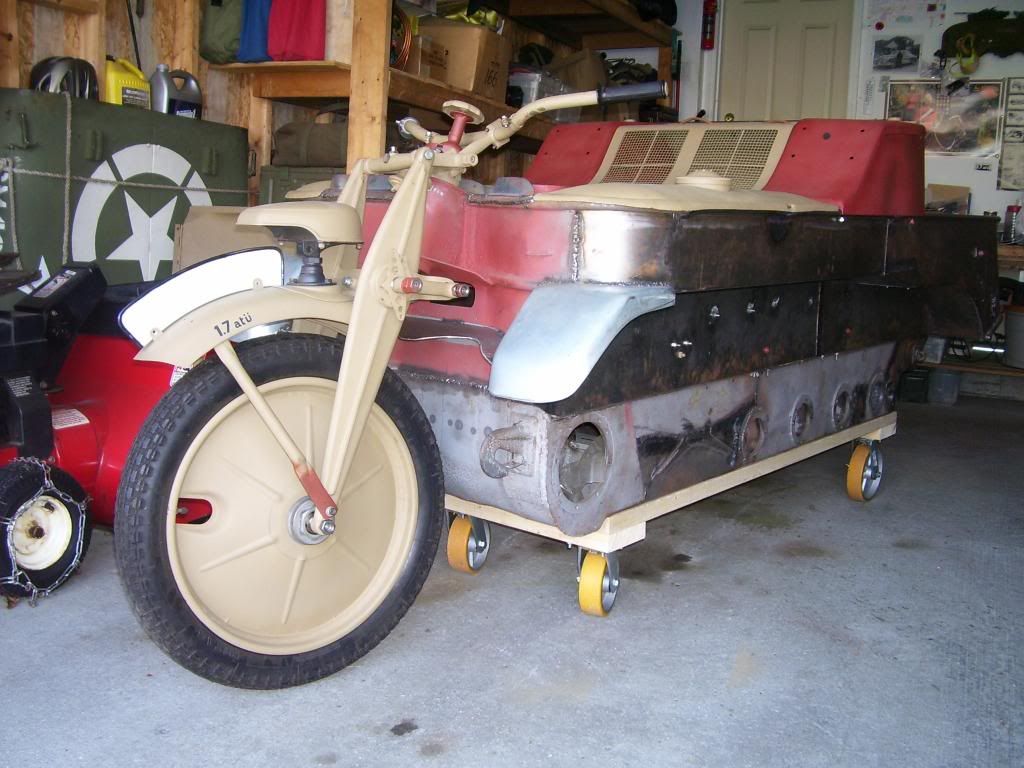
UPPER BODYWERK (PART TWO) Will be the collection of a jumble of sheet metal panels into a kettenkrad reborn.
A sneak peek.
---------- Post added at 06:28 AM ---------- Previous post was at 06:24 AM ----------
UPPER BODYWERK (PART TWO)
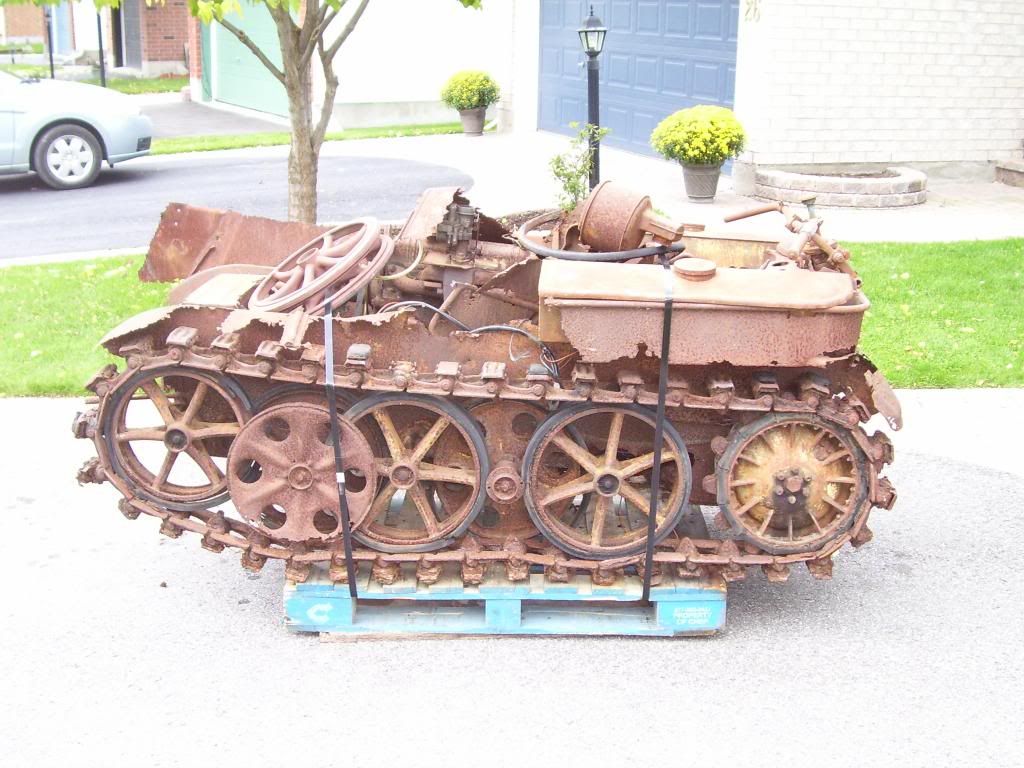
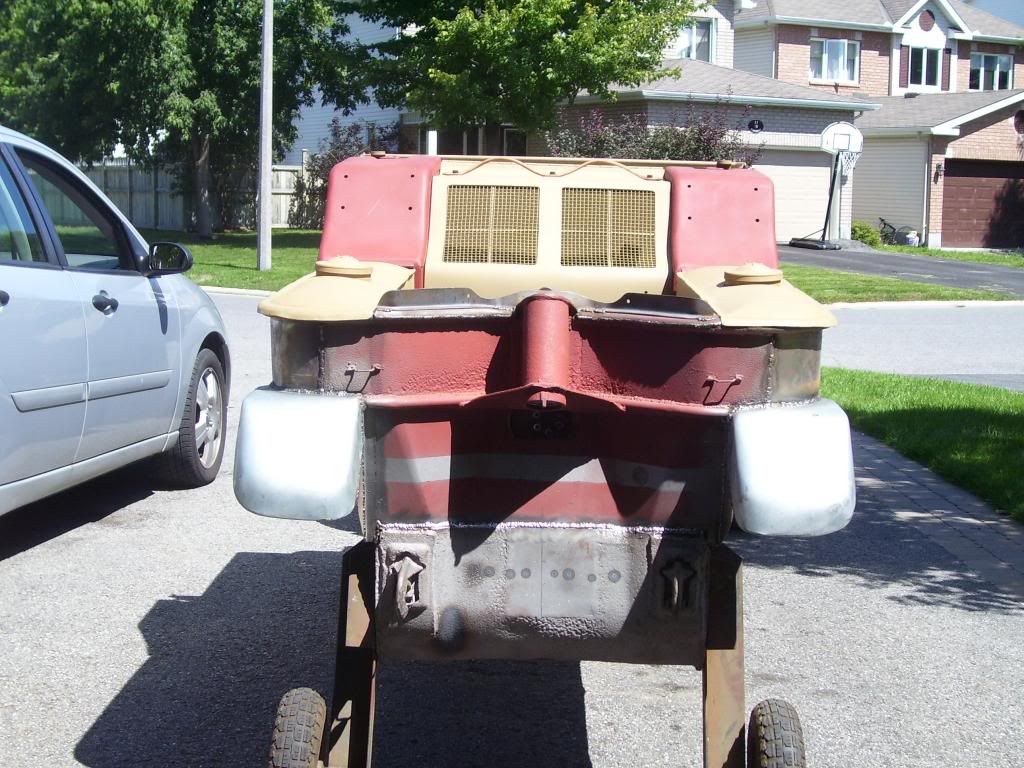
So to recap here is 116714 as it arrived, obviously there was little concern about dinging the body work or paint at this stage as a major restoration was in order for this kettenkrad. Some people have wondered about the point of investing so much time/money and effort into restoring this old kett. For me there is no one defining reason but several 1. its a piece of history that was there back then 2. its rarer then moon rocks and rocking horse poop 3. they command big bucks for those who just have to have one, 4. its the challenge of seeing just what I can do with my two hands and brain and 5. I have met some really excellant people and made deep friendships along the journey. So lets start.
D-Day, it arrives.
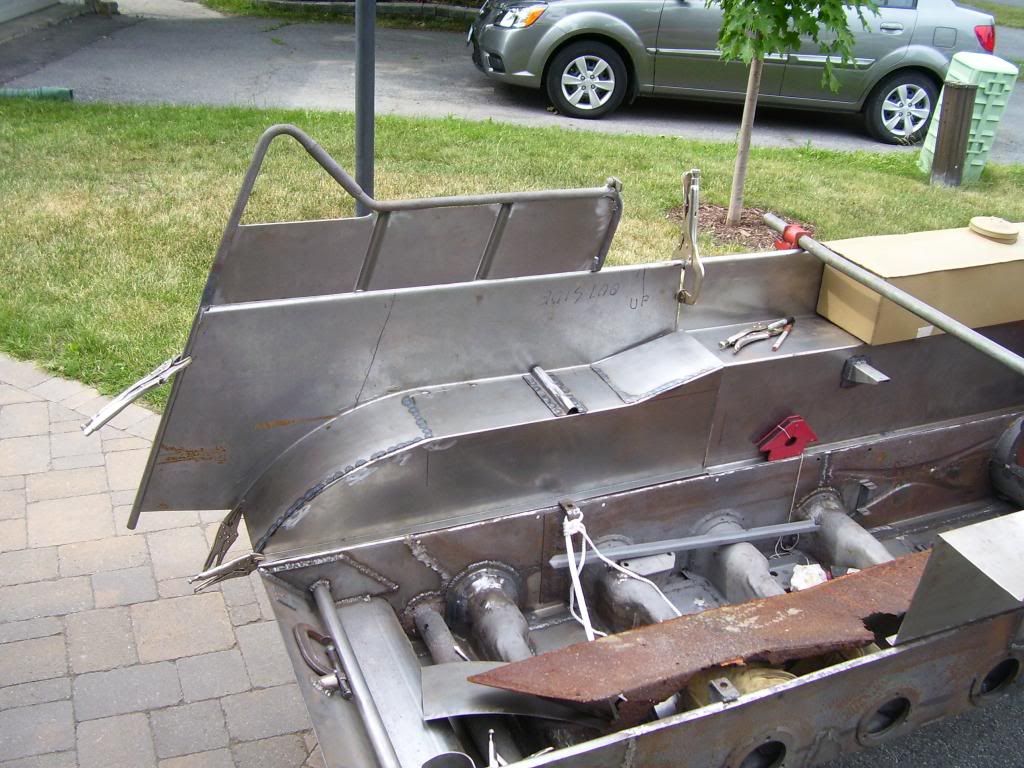
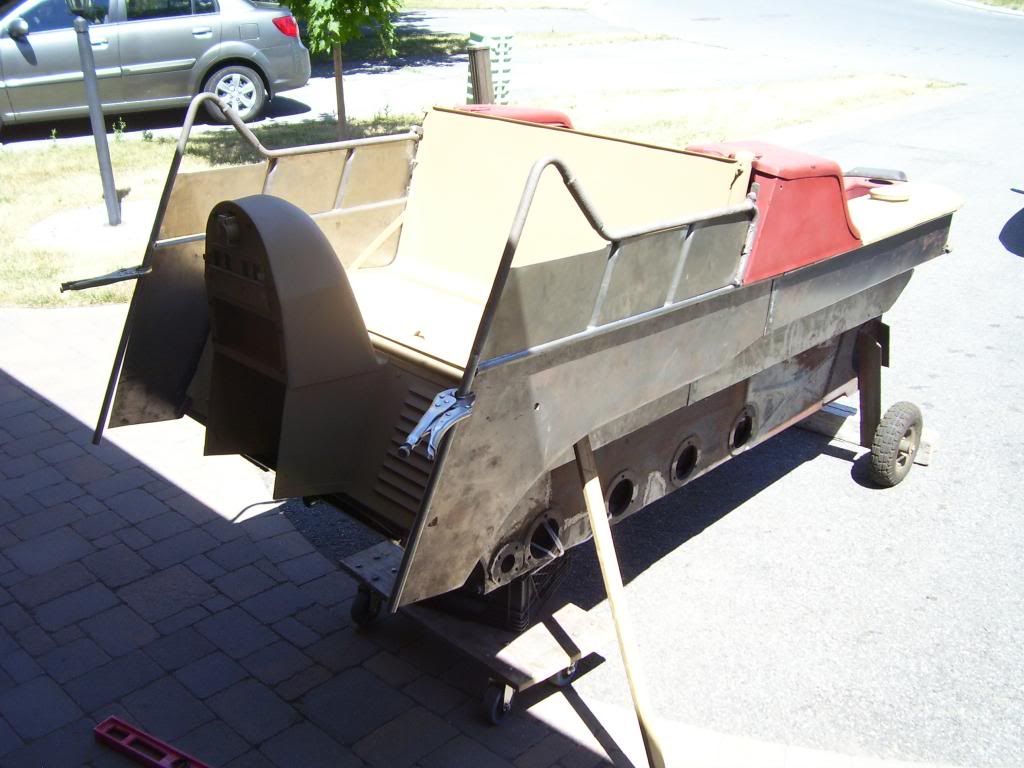
After much cutting, grinding, fabrication and welding its time to get the body restored/reborn. Starting from the front with gas tanks and front upper to get spacing and sizes correct.
And so begins many, many test fits and measurements before commiting to welding
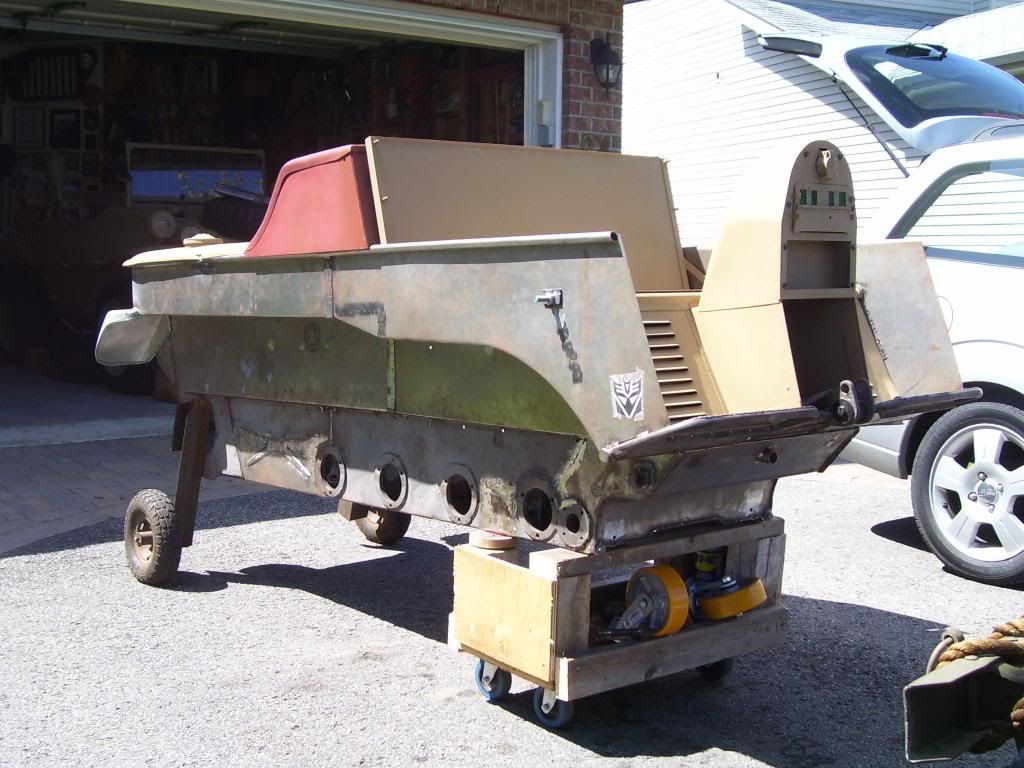
Getting a random jumble of sheet metal panels to start looking like something remotely like a kettenkrad. Clamps and tape measure are your best friends.
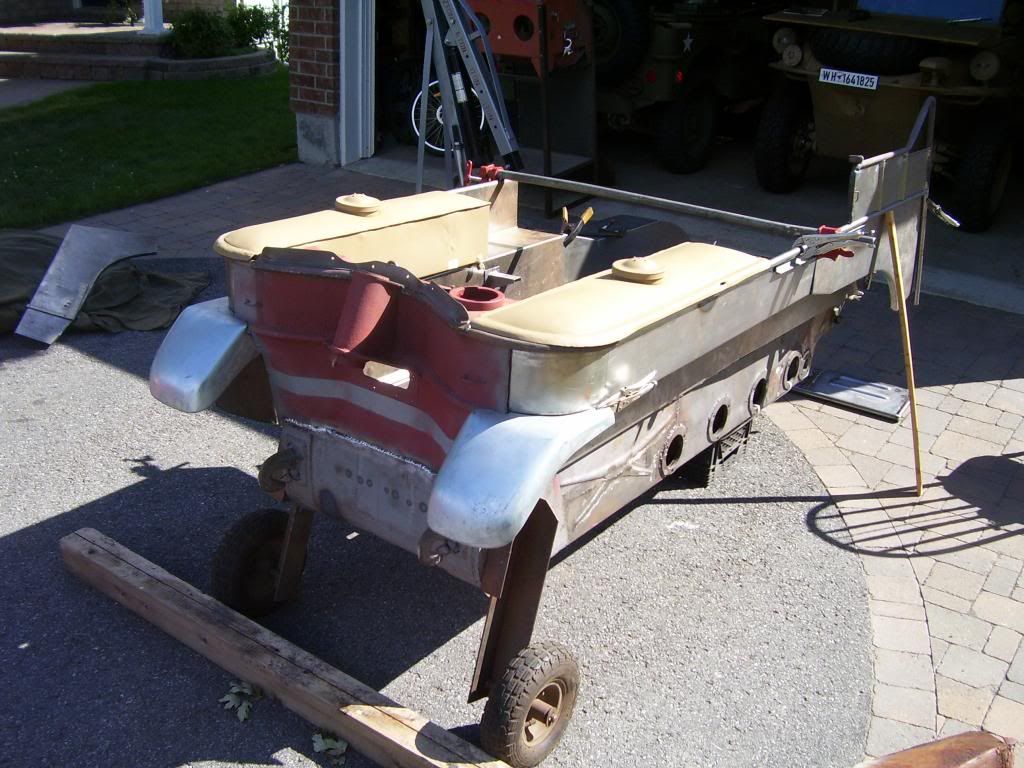
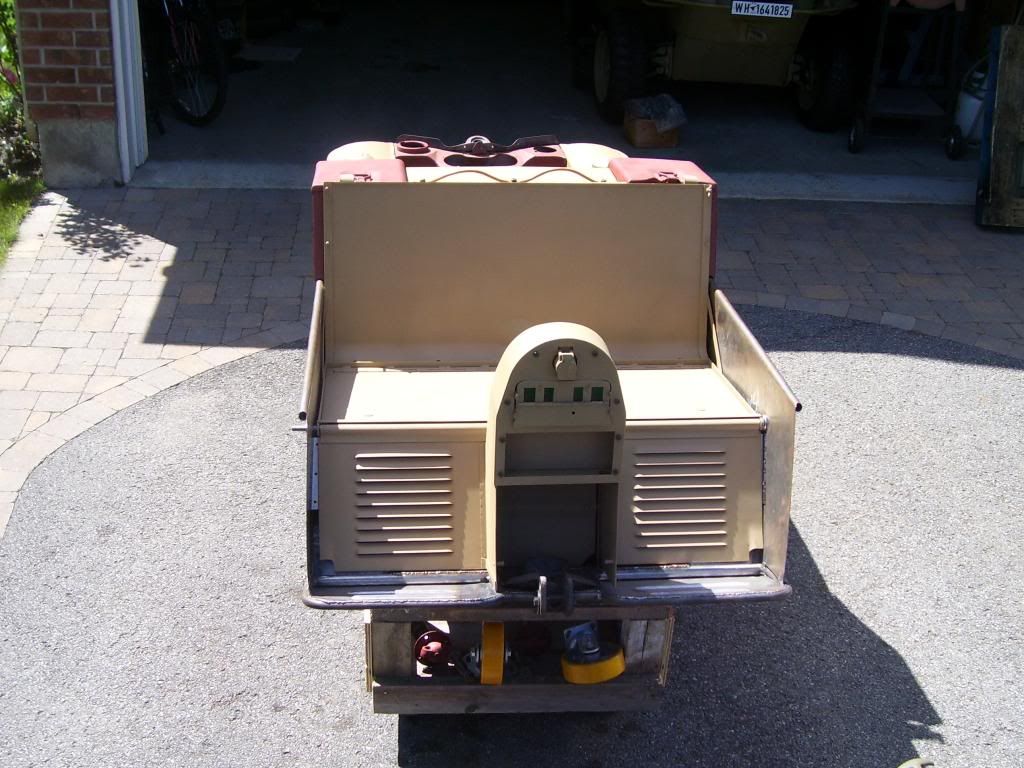
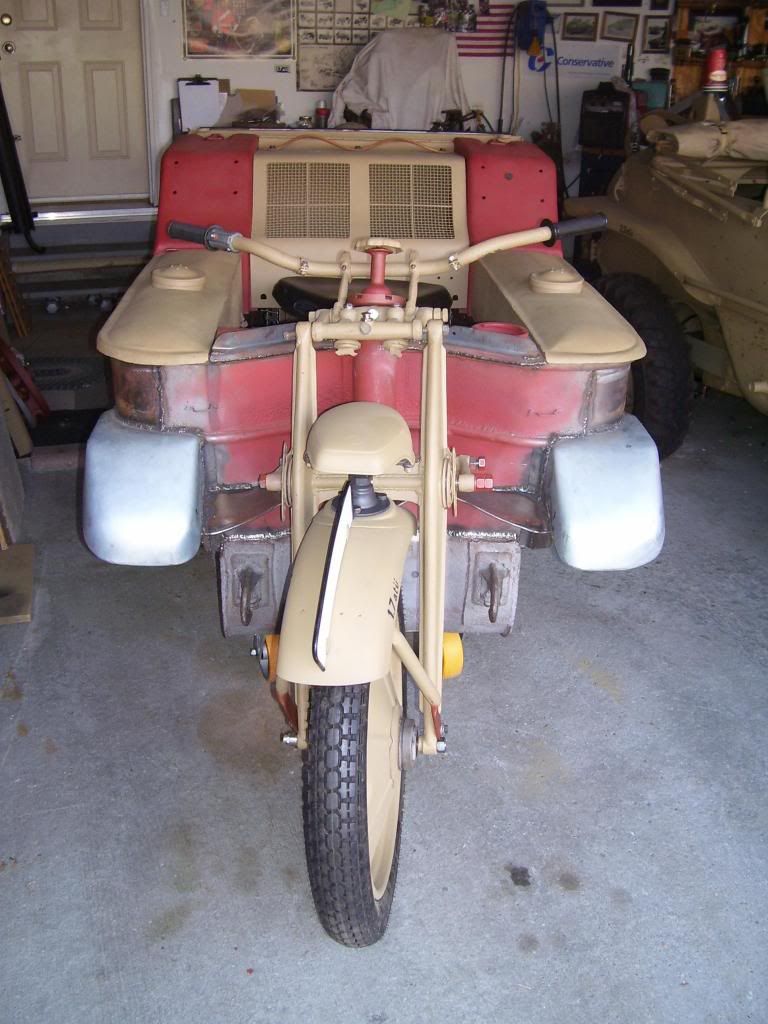
Test fit of the "tombstone" Notek taillight , trailer plug receptical and license plate mount and engine louver panel.
Just about there for fitting and mocking up panels.
Still need to attach the hand hold panels, but starting to look more like a kett.
Front lower before.
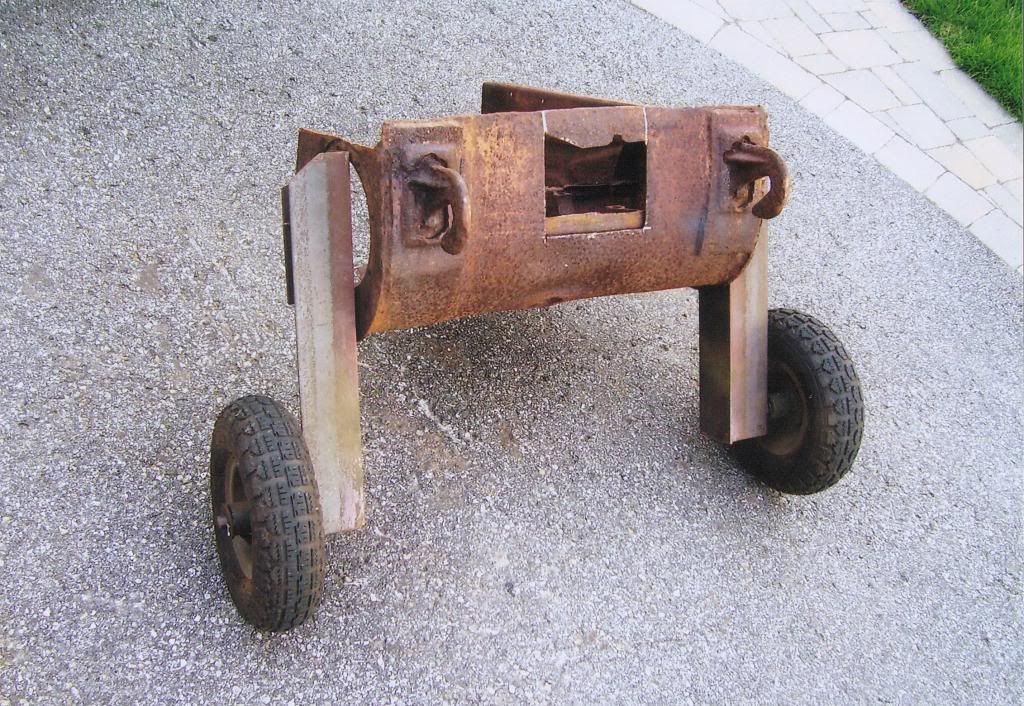
Same front lower and steering knuckle section, brought back from the grave.
First test fit of the fork, I just had to do it because I could. My little kett has turned the corner from being a sad rusted pile of rust back into a vehicle.
NEXT UP - OFF TO PAINT
---------- Post added at 06:30 AM ---------- Previous post was at 06:28 AM ----------
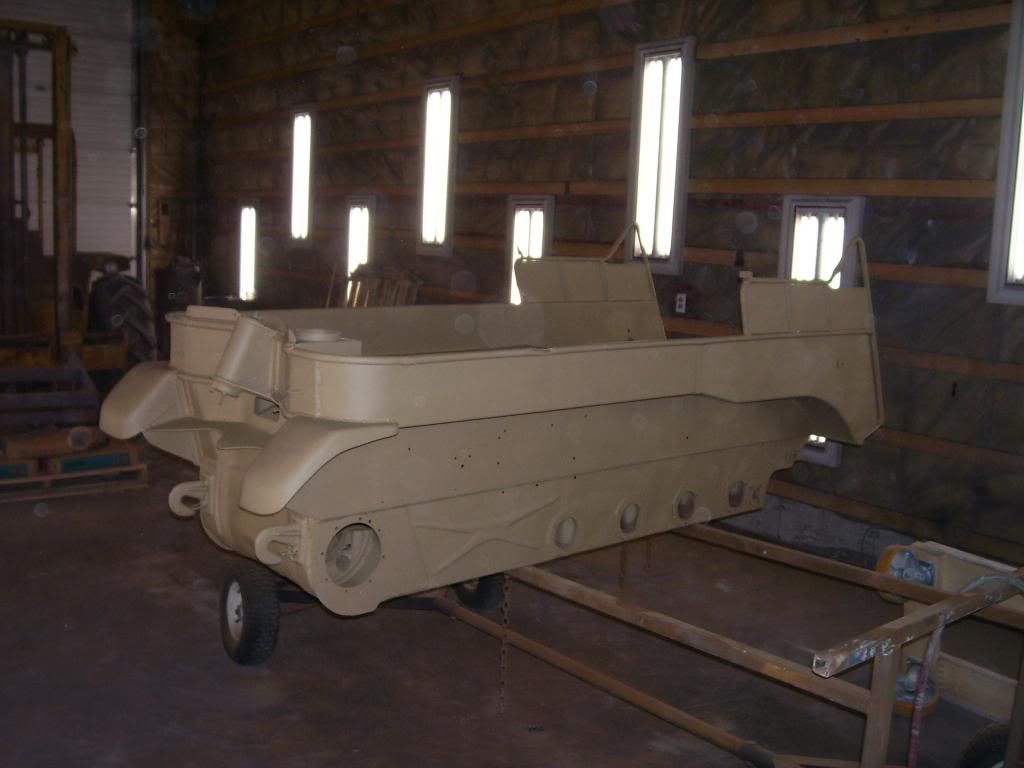
OFF FOR FINAL SANDBLASTING AND PAINT[/B]
Sooner or later one runs out of things to make, correct, adjust and the time comes to send the body off for the trip up to Bruce at Blast-It-All in Almonte. Bruce does great work at sand blasting and at the same time I had will shoot on two coats of Dunkel Gelb with me doing stuff like air hosing, vacuuming, media out of every nook and cranny and scuff sanding the primer and first coat. The urge to do a show room perfect paint job has to be fought back as wartime paint werk was sloppy and runs galore are totally acceptable to be correct.
Sandblasting, and working around Blast-it-Alls schedule took longer then I hoped for but I had long determined that the kettenkrad was going to be restored on its schedule and taken the long view for it to be "finished", one is never really "finished" or done a restoration as there is always something to attend to, new/better part to source, paint work to retouch, the list goes on and on. So here is the big day the body of 116714 goes for its drive to Almonte.
The "HoverKrad"
116714 finally in paint and looking pretty close to it did one day back in 1944.
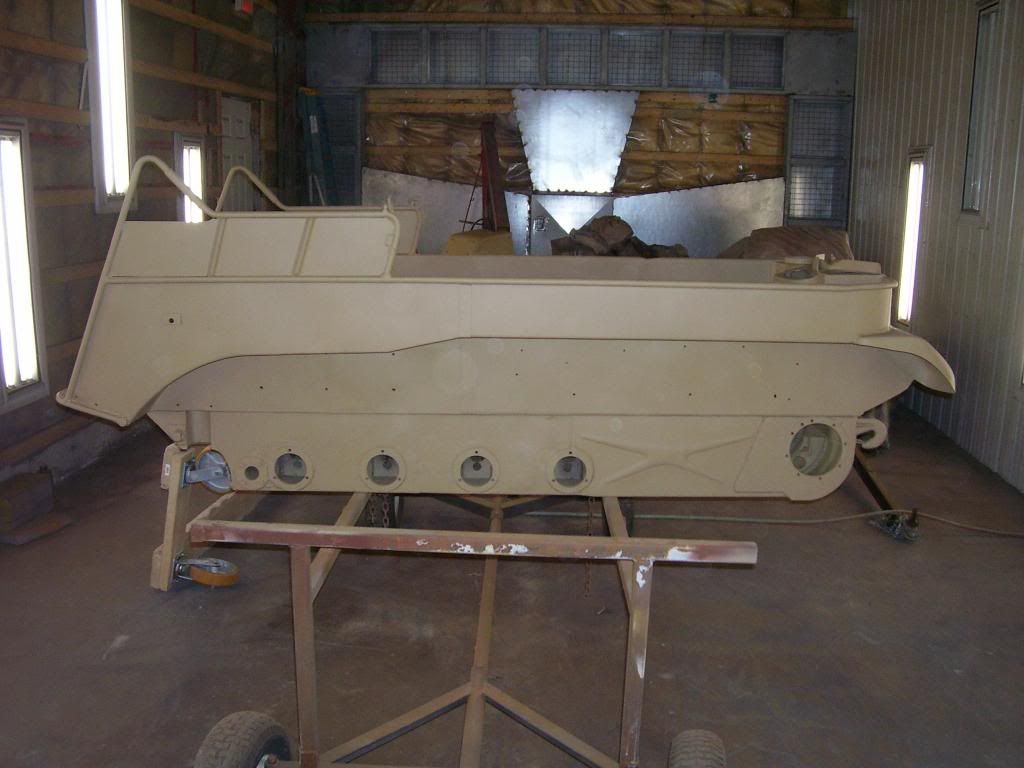
Now looking about 300% better then when it arrived on a pallet three years earlier. I long decided to leave the rust pitted panels, pits and all early on. At first (when I first received the kett) I was inclined to smooth the pitting in with bondo but grew to see that as part of the vehicles lifestory plus it shows at a glance whats is new made Vs original panel wise. Anyways when painted one hardly notices.
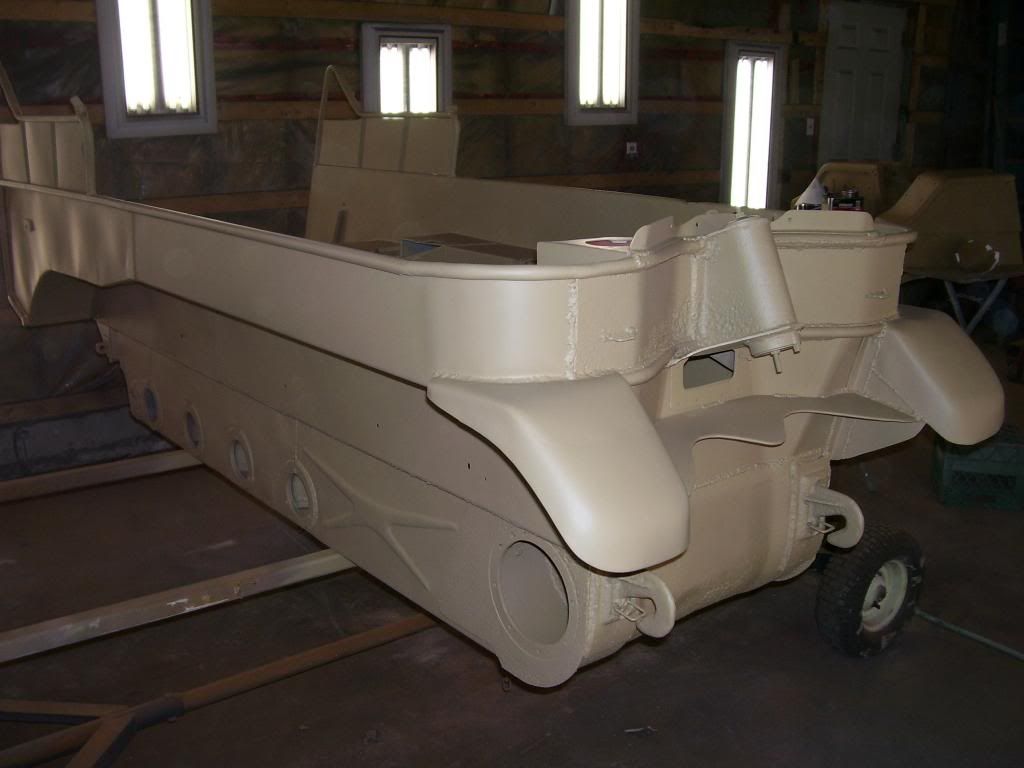
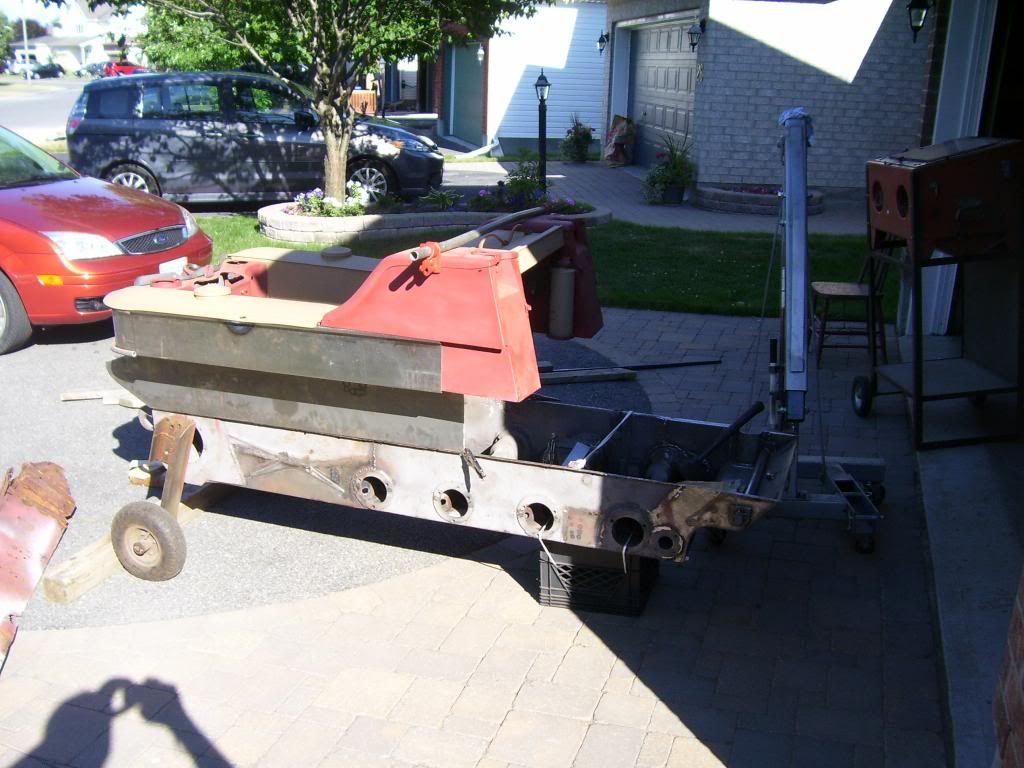
Back at the garage of dreams, drivetrain meet refreshed body. No more rust, no more bearings galore, no more insanely expensive parts to locate in Europe (thank god for the internet), its time to start wrenching this thing and its umpteen parts and pieces back together again.

-
Legacy Member

-
-
Moderator
(M1 Garand/M14/M1A Rifles)


What a work of love. By the way, the last pic doesn't show. "Photo not found"
Bob
"It is said, 'Go not to the elves for counsel for they will say both no and yes.' "
Frodo Baggins to Gildor Inglorion, The Fellowship of the Ring
-
-
Not just amazing but incredibly amazing. And what a pleasure to see dedicated craftsmanship like that. Made my day.........
-
-
Legacy Member
It is indeed incredibly amazing, and that goes especially for the worksmanship you've put into it.
I'm wondering if Opel used that same 1.5 L Opel engine design in the Kadett I had back in the day. It certainly looks the same from memory.
-
-
Legacy Member

That is an interesting engine, a large block with side plate design, with some features that I have never seen personally in my engine experience. (mainly 1960-Present and Flathead Ford engines.)
Please correct my guesses where possible.
It looks like crank case pressure is handled by that long down draft tube? That would suggest this engine will mist the hull interior with oil during operation and require top ups.
What is that bellmouth or "trumpet" on top of the valve cover for? I imagine that is the fill hole for fresh oil, but what does the trumpet do?
Does this engine have an oil filter? I don't see a provision for an external one, or a housing for a reusable mesh unit.
And finally, did the engine shop do a run up on a dyno for you, and if so did you get some performance numbers? I seen the engine was 36 HP spec rated, but I would wonder how much torque it would make, a workhorse engine like that would sure be biased to produce better torque than horsepower.
That is a fantastic build, excellent craftsmanship overall, and should prove to be a very unique machine to drive.
- Darren
1 PL West Nova Scotia Regiment 2000-2003
1 BN Princess Patricia's Canadian Light Infantry 2003-2013
-


 Register To Reply


