-
Contributing Member


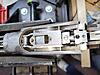
spent several evenings this past weak soaking parts that weren't originally blued in evaporust overnight and cleaning them up. Today's goal was then to figure out how it all goes together in order to make sure sure I had everything. Well, I certain it is all servicable, but I am missing a couple minor parts.
- The top-lever tension spring I already mentioned. I have what I think will work from the older crass model on the way from Numrich. No big deal. There is some backlash in the top lever with out it, but is of no consequence
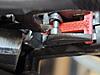
- I'm missing the trip pin and flat trip spring, which locks the top lever to the right when opening, and automatically release to lock when closing. I think I can make these myself pretty easily.
- I'm missing the safety bar and the safety T-bar which make the thumb safety work, and automatically engages the safety as the hammers cock during opening. This doesn't affect safely shooting or test firing from a bench, but I would never carry it loaded afield without. I have a picture of what I need. The T-bar I can make easily enough. The safety bar has some bends in it. I would need some measurements from someone to make one.
That's it! all else is in working and serviceable order. The main spring install threw me for a loop last night and all morning. But once that was figure out, it's all actually pretty simple.
Some pitting on the underside receiver to polish out. I'll 3d print some special sanding blocks to preserve the edges and contours. Now that it's stable and no longer deteriorating, I will likely take my time to finish it, given the couple missing parts and all.
-
Thank You to ssgross For This Useful Post:
-
02-24-2024 03:33 PM
# ADS
Friends and Sponsors

-
Legacy Member
-
Thank You to Salt Flat For This Useful Post:
-
-
Contributing Member
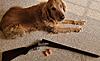
The safety bar - the part that would be the most impossible to make - was found at Numrich. Much of the parts for the Crass hammerless and Lewis are the same. It wasn't expensive, so worth a try. Still much to do get things working - including the dog. She is itching to get out, literally 
-
-
Contributing Member
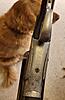
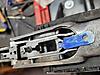
I was able to fit the safety connector. I made a trigger lock (T-bar) from scratch and fit it up by first 3d-printing several attempts just to figure out how everything is supposed to function, and then use as a pattern to make a permanent one out of steel. I found a good picture of one next to parts I already had so I could get some relative measurements to start with. In this process, I figured out that these old side-by-sides have a 3 position safety. Forward is fire+auto-safe-when-opening, middle is safe, and rear is fire without auto-safe. Neat. Anyways, all this works as intended now. After drilling 2 holes for the slot (which is only 0.045 wide) I did the best I could to open up the middle with a small centering bit, and then used some flathead screwdriver bits to break the middle and broach the slot open and most of the way so that cleaning it out with a small centering bit would make get the tab of the safety connector to slip in.
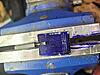
It was delicate to fit. First I fit the connector so the notch in the tab fits against the trigger pivot pin with the safety in the rear position. This then provides an index measurement for the slot on the trigger lock bar. The hardest part then was evenly removing about 0.040 of thickness from the 1/8" bar stock by hand with a file. In the words of the great Obi-Wan Kenobi...patience. This took me 2 evenings.
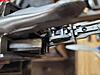
Next up, make a trip spring and pin.
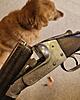
The spring was made from an old hacksaw blade. It's a bit thin, but I was able to confirm in another forum that the original is 0.038 thick, and my blade was 0.024. I have an old sawzall blade that is 0.040 powder coated, so I will likely make another. I made the trip pin out of the original left firing pin which had a cracked head. Does this count as an original part? The pin has a notch that engages the spring. I slotted the top to make it easy to align the notch when assembling. The trip assembly locks the top lever to the right (bolt unlocked position) when opening, and snaps the bolt closed when closing the action, without the need to touch the toplever.
So that's basically it. The gun has all its parts now in working and serviceable condition. It will likely sit on the shelf for a while now. Next up will be to fix the stock and/or carve a new one, then raise the dents in the right barrel. I also noticed the muzzle of the right barrel is out of round from bubba dropping it likely. That will need swage out. I might beg one of you guys with a lathe to make me tapered swage once I pull the measurements. Lastly, I'll clean up the screw heads and refinish. The barrels look pretty good. Will probably only need a single rust blue pass, without stripping/polishing, and a quick dunk to re-etch the twist pattern. For the frame, I'm thinking some faux color case, https://steelfxpatinas.com/product-c...-starter-kits/. In my experience, real color case finish is pretty much just as delicate as cold bluing anyway. I don't mind a little lipstick on a pig.
-
-
Contributing Member
-
Thank You to ssgross For This Useful Post:
-
Contributing Member
-
-
Advisory Panel

Looks pretty good, once it's stained or oiled you'll have a hard time seeing the difference.
-
-
Advisory Panel
I'm cleaning up the parts of a little Hopkins & Allan falling block .22 at the moment and there are hours of careful work with needle files and diamond laps in involved in "improving" the original finish and removing as much of the damage as can be removed. It's something you either do because you enjoy it so much or because the piece is worth the effort. A surface grinder or a rotary power lap are useful tools for this sort of job. Buffing wheels have no place in the process if one wants to achieve anything like an original appearance with crisp edges etc.
Last edited by Surpmil; 04-04-2024 at 08:06 PM.
“There are invisible rulers who control the destinies of millions. It is not generally realized to what extent the words and actions of our most influential public men are dictated by shrewd persons operating behind the scenes.”
Edward Bernays, 1928
Much changes, much remains the same. 
-
-
Contributing Member

Originally Posted by
Surpmil

because you enjoy it so much or because the piece is worth the effort.
It's the best form of mental therapy for me. In my day-job profession success with most problems comes at the end of a long river of constant failure. When I am truly stuck, and all progress seems hopeless, a short escape in the shop often makes all things clear. I've lost count of the times I've finally solved a hard problem while mowing the lawn, scraping away on a stock, or doing some menial physical task. I think the reason why it works is that it provides an equivalent re-direction of sorts and a mental release. Smithing of this sort requires equal focus, but in a way that diverts attention to the hands.
All mathematicians are aware of a thing called a "really good, bad idea" - ideas that are so promising you invest all of yourself, mind body and soul, in the approach, only to find out weeks, months, or years later it's a dead end. But it was so good and so clever it cannot be forgotten. The effect is any subsequent idea ends up in a logic circle right back to just rephrasing the original dead end. Finding a solution now requires a great purge, only accomplished by putting it down for a very long time and moving on to something completely different, or with massive amounts of alcohol. I'm too old for the latter now, and time spent doing this kind of project greatly speeds up the former. Apologies - I'm a romantic at heart.
Sorry for the delays. I've been busy. Slowly making progress on building my checkering cradle for next steps.
Last edited by ssgross; 04-04-2024 at 09:04 PM.
-
Thank You to ssgross For This Useful Post:
-
Advisory Panel
Originally Posted by
ssgross
The effect is any subsequent idea ends up in a logic circle right back to just rephrasing the original dead end. Finding a solution now requires a great purge, only accomplished by putting it down for a very long time and moving on to something completely different
And other times perhaps genuinely "really good" appearing ideas are still-born only because they appear to similar dead-ends?
“There are invisible rulers who control the destinies of millions. It is not generally realized to what extent the words and actions of our most influential public men are dictated by shrewd persons operating behind the scenes.”
Edward Bernays, 1928
Much changes, much remains the same.
-
Thank You to Surpmil For This Useful Post:


 PM
PM


