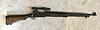
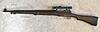
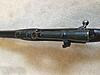
So I finally got my representative Pattern 1914 Mk1* W (T) sniper built. I had an original scope with rings and was able to get bases that only a handful were made in the UK from the original blueprints. I think it came out really well and was worth the extra cost and work versus using the typical repro mounts which aren’t even close to originals and don’t mount like originals. This is as close as you can get down to the BA threaded screws and Winchester fine rear sight. All I need to do is find an original Winchester P14 stock and I can call this done. I can’t wait to try it out at the range.
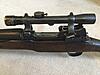
Appearance is excellent; hard to tell they're not original.
How did you go about collimating the bore and the scope or was that your intent? It's a tricky job I know.
“There are invisible rulers who control the destinies of millions. It is not generally realized to what extent the words and actions of our most influential public men are dictated by shrewd persons operating behind the scenes.”
Funny that you ask about the collimation. My gunsmith always laser bore sights when mounting scopes to ensure everything is as close as possible short of test firing. He was telling me what a challenge it was on this one the way the rear base is mounted in the rear sight ear protector cutout but he said he was able to finally get everything aligned. He didn’t know you can adjust for windage on the ocular of the 1918 scope so fingers crossed there should be plenty of room for adjustment if needed between that front ocular and the elevation dial.
Lasers can be the way to go, if accurate enough, and aligned at a decent distance from the muzzle. Hopefully the prism was more or less centered when he set it up. The nature of these rings is that vertical collimation is set on the rear base, while horizontal is principally on the front base, however as you can imagine, any horizontal movement necessarily involves removing metal from the "hook" on a front "claw" where it rests against the cross-pin. Fail to do that and you've got two points of contact rather than three! Not a very clever design at all.
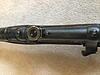
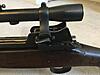
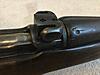
It was this gap that caught my eye.
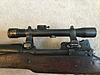
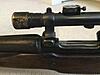
Rifle No. 184302 on the scope; in case the rifle turns up one day.
Has the scope been cerakoted or painted? I'm just wondering about that flaking off by the ring screws.
Relatively easy to make up an adjusting key for the front prism from a piece of an old handsaw blade or similar. Important to carefully round the edges though so they can't scrape the tops off the brass threads of the prism housing. Might be worth standing the scope on the ocular end and applying a few small drops of a light high grade oil to the locking ring threads and letting that soak in while in that position for a week or so before trying any adjustment.
Last edited by Surpmil; 04-07-2024 at 03:35 PM.
“There are invisible rulers who control the destinies of millions. It is not generally realized to what extent the words and actions of our most influential public men are dictated by shrewd persons operating behind the scenes.”
First off, my mistake saying the windage adjustment on the 1918 scope was on the ocular end, it is on the objective lens end.
Surpmil has quite the eye… he saw the one hiccup in the build in that the rear ring isn’t perfectly flat and true against the rear base. These are tough setups and require a lot of hand fitting of the rear base and cutting the rear sight protector ear notch to get the correct elevation and then having to basically file the locking lever screw to get everything to lock up. That alone is somewhat disturbing as you are filing halfway through the locking lever shaft and the tiny locking lever screw but that’s how the originals were done.
The lockup is rock solid and both front claws are super tight in the front base and fully against the front pin so I’m hoping this one imperfection on the rear base is merely cosmetic.
The scope and rings still have their original blued finish. That is buggering to the screw and not flaking off the finish. And the one dot on the ring looks like a spot that the bluing didn’t take.
In the end I’m really thrilled with how this came out and the work that my gunsmith did! The Accumounts mounts are way easier to install since they just screw onto the side of receiver and don’t require the angled notch to “hang” the bases on. Lots of angles and variables on this one following the original design in order to get it perfect. It shows how talented those gunsmiths were in the day. I’m so appreciative that my gunsmith worked so hard to get this done. He had built a few with the Accumounts bases before but this was a totally new adventure.
Also a huge thanks to the die hard member that reproduced the bases from the original blueprint! The original scope and rings deserved the most authentic bases possible.
Fiddly to set up for sure. A good deal of calculation required vis a vis the ballistic curve and point of aim, centre to centre distance of bore and scope etc.. One way to do it would be to attach the rear base to the rear "leg" so that the two mate properly and then use the front base and scope to locate the rear base; all while getting the proper vertical and horizontal alignment! Not easy to do of course as the rear base only goes as far down as the metal removed from the backsight "ear" permits! I've just set up bases on a Ross Mk.III and it is not a simple process if proper collimation and range of adjustment on the scope is to be achieved.
“There are invisible rulers who control the destinies of millions. It is not generally realized to what extent the words and actions of our most influential public men are dictated by shrewd persons operating behind the scenes.”


from the original blueprints. I think it came out really well and was worth the extra cost and work versus using the typical repro mounts which aren’t even close to originals and don’t mount like originals. This is as close as you can get down to the BA threaded screws and Winchester fine rear sight. All I need to do is find an original Winchester P14 stock and I can call this done. I can’t wait to try it out at the range.


 PM
PM


