-
FREE MEMBER
NO Posting or PM's Allowed

Problem with No. 4 Mk1* Trigger
I have a Savage No. 4 Mk1*.
I bought it used and it acts as a single stage trigger. I decided to see what I could do about it and read Peter's articles...
When the bolt is open and back the trigger is two stage. When the bolt is closed the sear is pushed away from the first bump and only acts against the second stage yet, when I measure the weight of the trigger pull it averages 4 lbs 4 oz with an electronic gage.
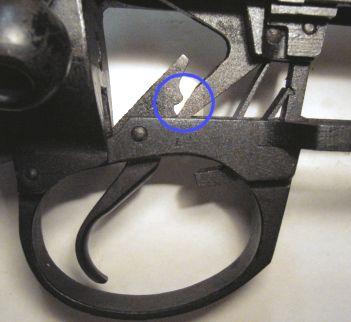
The trigger assy. fits flush against the wood, the wood isn't crushed, the sear is clear of the small locking lug, the sear on the bent isn't half way up but about 40% up and it is mostly even judging by the removal of the grease.
When I close the bolt, I can see it moving the sear away from the first bump. With the trigger assy screws removed and the bolt closed, if I lift up (with the rifle upside down) on the back of the trigger guard to the point where the sear moves back against the first bump then the whole for the small screw is way too far up for it to fit.
I never realized how precise this is and I'm a bit at a loss.
Any suggestions?
Information
 |
Warning: This is a relatively older thread
This discussion is older than 360 days. Some information contained in it may no longer be current. |
|
Last edited by limazulu; 08-13-2011 at 10:02 PM.
-
08-13-2011 09:58 PM
# ADS
Friends and Sponsors

-
Legacy Member
Does the rifle have its bedding screw collar? That is supposed to keep the front end solid between the trigger guard and the receiver, and then the trigger can be tested as issued. I suspect you need to swap in a few parts to find what's not working. Ypur problem is the back end. Have you considered that the trigger guard itself is bent? Maybe you should experiment with that.
Once my unit was on a machine gun shoot and my 7.62 C1 MG (M1919A4) wouldn't fire. The trigger would not release the sear on the bolt. I was horrified to see the weapons technician strip out the trigger bar, feed it into the barrel jacket holes and give it a strategic bend. Reassemble and resume firing. And I thought all along that there were guages and new parts in plastic baggies or bins to fix things. He shattered my exalted opinion of gun plumbers!
Last edited by Maple_Leaf_Eh; 08-13-2011 at 11:07 PM.
-
-
-
Hey, you're right Maple Leaf......... a slight bend of the trigger WAS the way to adjust the gun timing of the old M1919 Browning - and successfull it was too! But that was the ONLY gun where you bent anything to adjust it. And while others might disagree, bending the trigger guard to get the correct two stage pull-off is a bubba bodge. The trigger guard MUST be flat.
The sequence of events is all simply explained in the article limazulu. Make sure that your trigger guard is FLAT along the bottom and sits into the magazine well of the fore-end, That's the first bit. Now make sure that the collar is present and to the correct length and the front trigger guard screw JUST nips up the fore-enjd nice and tightly as it clamps the trigger guard onto the collar.
Now follow the instructions. Read it, now read it again and slowly set about it...........................
-
-
FREE MEMBER
NO Posting or PM's Allowed

Originally Posted by
Maple_Leaf_Eh

Does the rifle have its bedding screw collar?
It does. I considered bending but what, which way and how much is one of the problems. I tried shimming one end or the other as a temporary bend effect but that took up all the slack in the trigger and still was single stage.
I forgot to mention that its headspace is fine.
When I pull up on the back of the trigger to the point where it is two stage with the bolt closed, I can see part of the hole the small screw should go thru. There is a very slight crusing of the wood at the back end but its nothing like the picture Peter showed in one of his pictures of wood crushed in the front end.
I'm just hoping someone has encountered this problem before so I don't have to re-invent the wheel.
-
Advisory Panel


Remove the forestock and reassemble the mechanism, including the front screw bushing. You can then observe the action of the trigger and sear and correct any problem with the metal bits. If there's no problem with the wood removed, then you know that the forestock is the source of the the trouble and can work on fitting it appropriately.
-
-
One problem there Parashooter is that he/we don't know whether the collar is the correct length before he starts. Hold on a bit Limazulu and I'll tell you how to make sure that the collar is the correct length for your fore-end.
But without repeating myself yet again, I'm sure I have mentioned how top check this important length. Can someone resurrect it for Limazulu.
But before we go any further Limazulu, please, please, please forget about lifting the front, back, sides or anything else to do with bending the trigger guard. That is just complicating a simple problem. Help is at hand.............................
-
Thank You to Peter Laidler For This Useful Post:
-
But without repeating myself yet again, I'm sure I have mentioned how top check this important length. Can someone resurrect it for Limazulu.
http://photos.imageevent.com/badgerd...0correctly.pdf
Top of page 4.
-
-
There it is in black and white Limazulu. Before you set about adjusting your trigger pull-off without the fore-end fitted, just make sure that you have ACCURATELY adjusted the length of the collar to reflect the length it needs to be for YOUR fore-end.
-
-
FREE MEMBER
NO Posting or PM's Allowed
I've read all of that and I'm either getting confused by the terminolgy or confusion over our common language. The inspection shows the trigger lays flat. The wood is nice and smooth with no marks on the front. The only thing I noticed is the back part of the fore end does stick up a bit from the metal. If it was down further then the trigger would sit up higher and perhaps that would solve my problem. I remember a picture of Peter's adjustment for it with a block of wood but I can't seem to locate the picture and I'd like to see it before I attempt it myself. Does anyone have a link to that picture?
-
FREE MEMBER
NO Posting or PM's Allowed
Now it’s time to fit the trigger guard and Screw, rear, tie, fore-end if
you have a Mk1/2 or 1/3. There’s a good chance that the rear of the
trigger guard will foul due to the height of the new wood. If that’s the
case, then simply scrape away the wood inside its seating to allow it to
seat correctly all the way to the front. The trigger guard should not
spring at the rear or front….., NO it shouldn’t! If it was meant to, it’d
be made of spring steel! Now for a little tip. The COLLAR. You
MUST have a collar and spring washer. This is what WE used to do.
Put the front trigger guard screw into the trigger guard and body
WITHOUT the washer or collar. Reverse it (that’s anti-clockwise …..)
until you hear it click over the start thread and tighten it BUT COUNT
THE TURNS UNTIL IT TIGHTENS AND LOCKS. Say, that it’s 7 ¼
turns to lock. Now do this with the collar fitted if it’s now, say 8 ½
turns, shorten the collar, a smidgin at a time, until the screw tightens up
at exactly 7 ¼ turns. That way, you KNOW that the screw is tight, the
fore-end is tight between the trigger guard and the screw and you are
not crushing the living daylights out of the fore-end. And if it feels a
little loose in a years time, then you can safely turn a few thou off the
collar.
How can it be more turns with the collar installed then without the collar?
With or without the collar I have a single stage trigger and the trigger guard lays flat so how can this be causing my lack of a two stage trigger?
Why would a closed bolt cause a loss of two stages when the open bolt doesn't?
Your Knowledge Library doesn't answer these questions.
")

")


 Register To Reply
. CLICK BANNER to send me a PM for International pricing and shipping.")
 and Malcolm 8X Gen II (Unertl reproduction). Several of our scopes are used in the CMP Vintage Sniper competition on top of 1903 rifles.")


 Milsurps Voice Mail