-
Once you get a 'system' down you an take photos fairly quickly and consistently. I took the desk lamp idea from John Holbrook who takes the best photos of guns I have ever seen. I think he uses two lamps though.
I always use the work bench in my garage so I don't need to depend on outside light and can take pictures any time of day.
Simple background - Drape the neutral color blanket over my workbench and raise the rear portion by attaching the blanket to hooks on pegboard with clothes pins
Position desk lamp for best shadow and adjust rheostat for brightness - less brightness for lighter objects. The articulating arm on the lamp really helps. My lamp has a bright halogen bulb.
Always use a tripod - $20 from discount store
Set camera to 'macro' setting for the extreme close-ups - most all cameras have one with a symbol shaped like a flower
Always use the two second delay - most all cameras have them.
Never use a flash - the desk lamp and overhead lights should provided enough light. Might try one of the built-in settings on camera if not bright enough.
Press the button using the delay feature and take your hand off of camera. It should focus itself without disturbing it and it'll take a clear focused photo most every time
I'm using a basic, entry level Sony S-85 I bought about eight years ago. I once used my sister's high-end Nikon and it didn't do any better that I could tell.
-
Thank You to Harlan (Deceased) For This Useful Post:
-
12-16-2011 07:47 AM
# ADS
Friends and Sponsors

-
Contributing Member


-
The Following 2 Members Say Thank You to DaveN For This Useful Post:
-
Advisory Panel


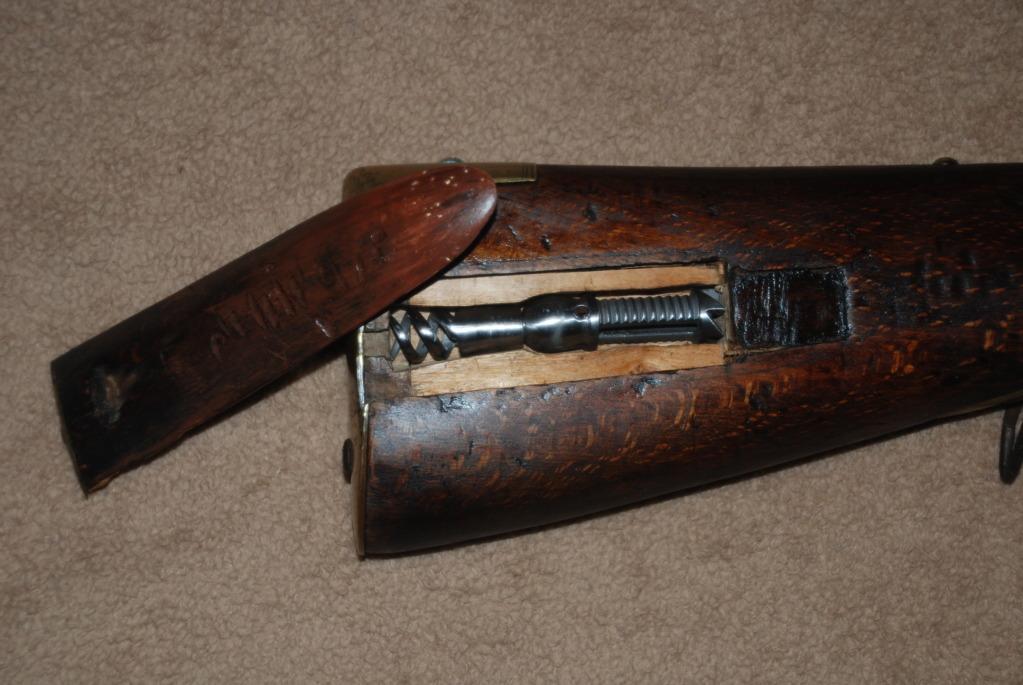
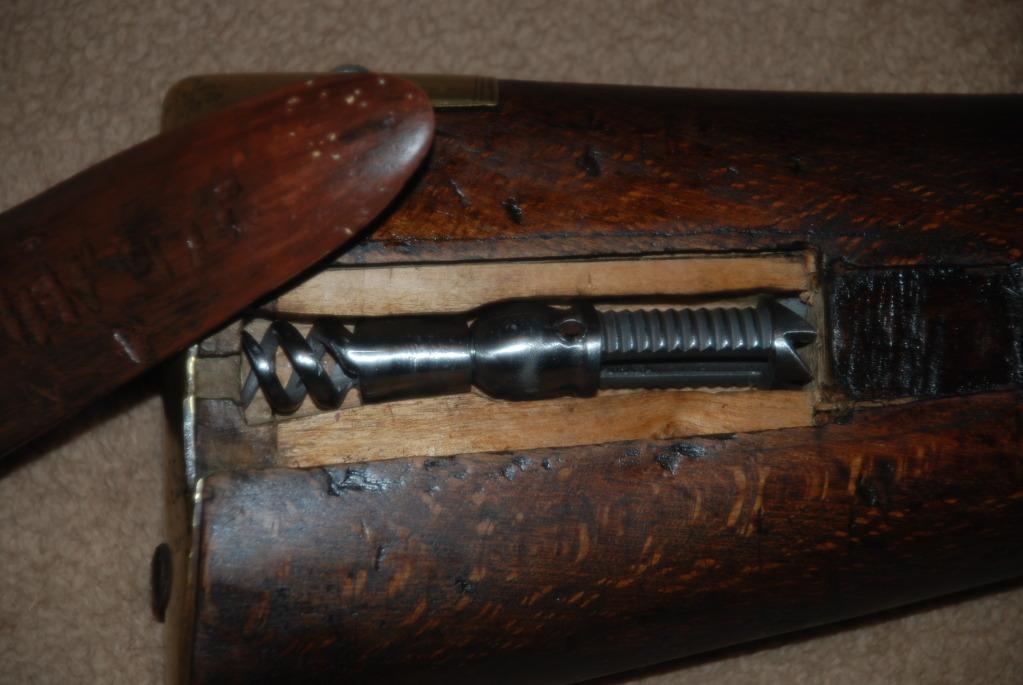
The worm/reamer combination looks really good in there!
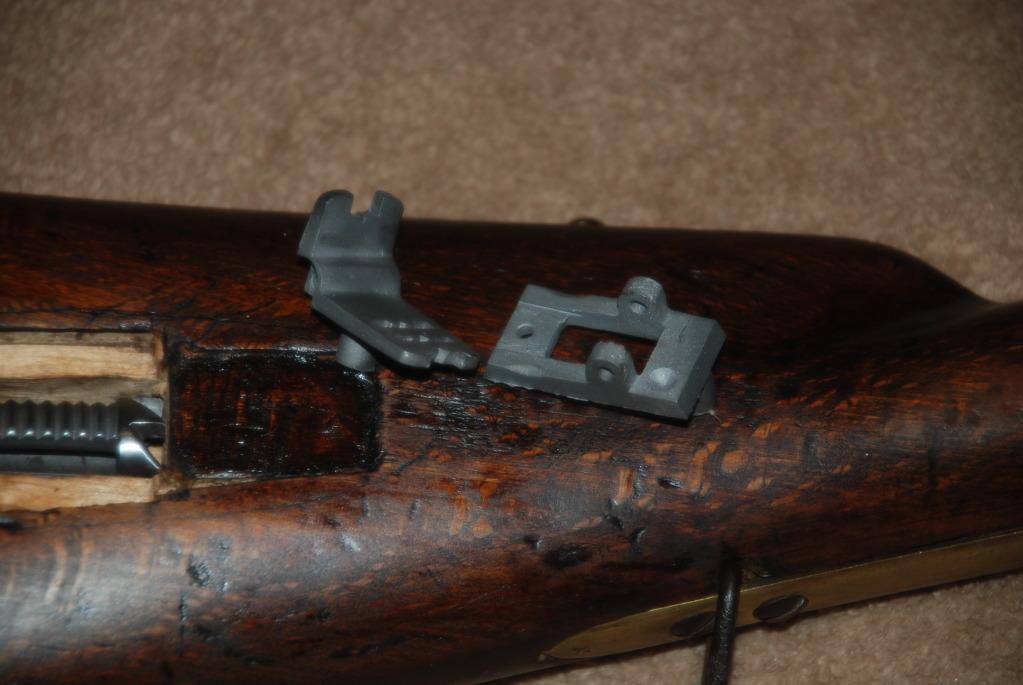
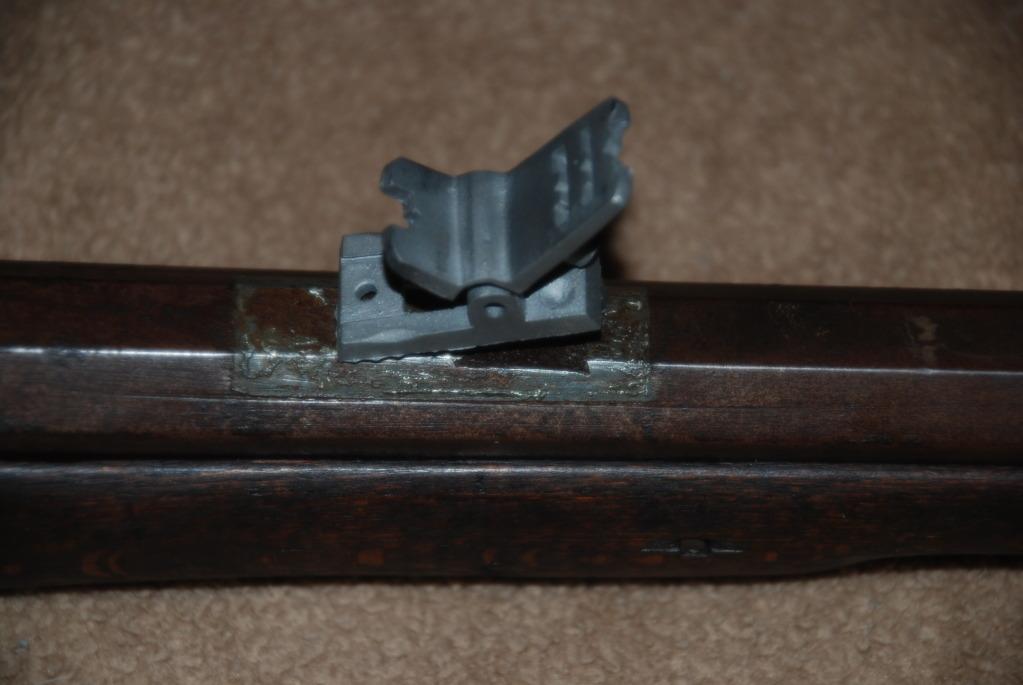
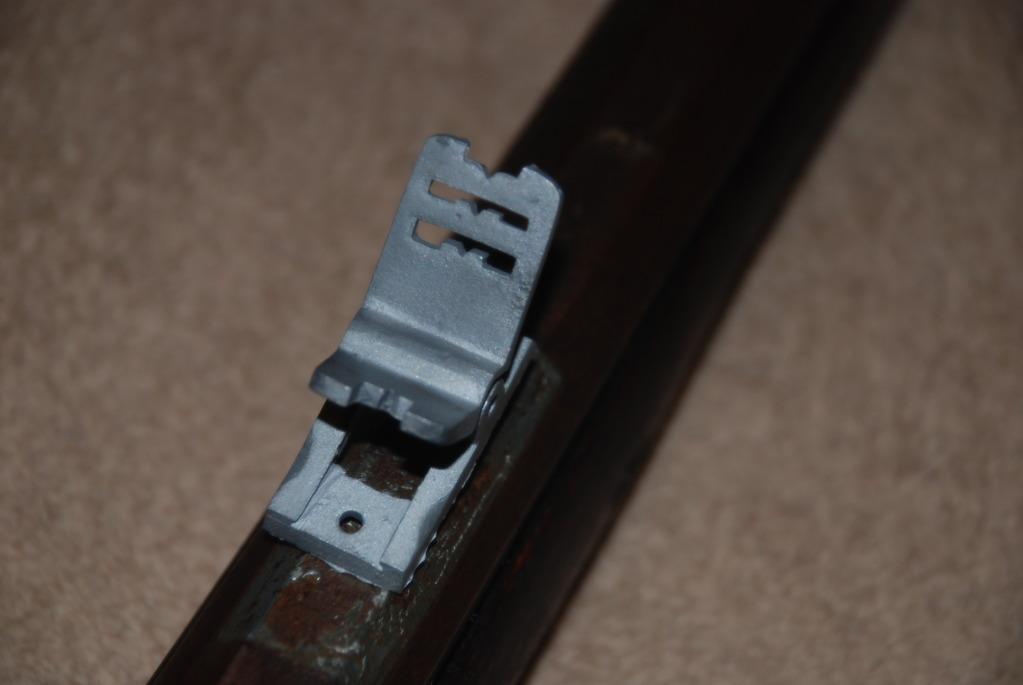
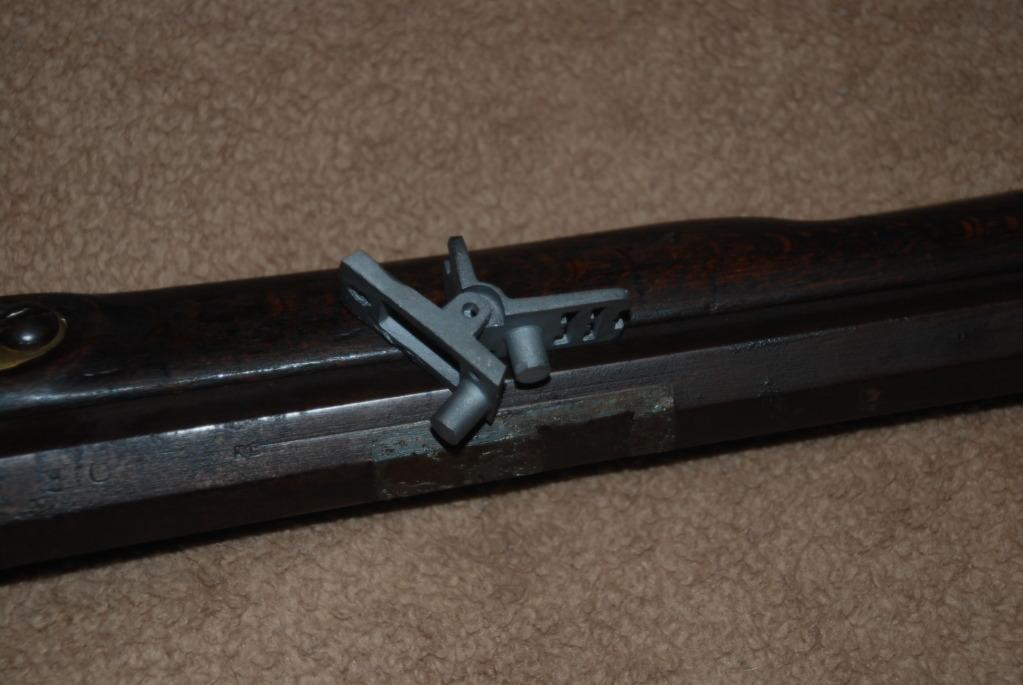
The sight parts look like a (lost wax?) casting that needs to be hand-polished to get rid of the rough surface. After removing the casting spigots, of course. A case for a Dremel or similar hand-held grinding/polishing spindle with a good selection of felt polishing tips. A slow job for a wet weekend! But it appears to be stylistically OK for the period, so you will just have to (literally!) get down to the grind. Make the dovetail by filing up a section that you can attach (hard solder?) below the cast sight base. Just a piece of mild streel strip really plus lots of time!

Patrick
Last edited by Patrick Chadwick; 12-18-2011 at 09:06 AM.
-
The Following 2 Members Say Thank You to Patrick Chadwick For This Useful Post:
-
Contributing Member


I had thought this was the right sight with the wrong base as you can see the original base of the 2nd (upgraded)sight was longer and wider and shaped to the octagon barrel. I was thinking of making a base the same as the impression on the barrel and you seem to confirm that or did I misunderstand you? And I to think the parts in the box complete that section,should I blue or brown them or leave them be? thanks, dave
For all you members, $30(price subject to inflation) makes you a contributing member. I think this great site is worth it.
-
-
I think they look great just as they are Dave. Plus they would have been protected in there.
-
Thank You to Harlan (Deceased) For This Useful Post:
-
Contributing Member


Patrick,
What order should the soldering go? Do I solder sight base to I'll call it main base and then solder main base to barrel? Or do I solder main base to barrel and then sight base to main base?
My concern is the heat in the 2nd step no mater what order I choose will undo the 1st step.
You are probably laughing or shaking your head but I have never done this before.
Thanks
Dave
For all you members, $30(price subject to inflation) makes you a contributing member. I think this great site is worth it.
-
-
Advisory Panel


Making up the dovetail

Originally Posted by
DaveN

You are probably laughing or shaking your head but I have never done this before.
I most certainly am neither laughing nor shaking my head, and if you have not done this before then you are right to ask and I must clarify what is required. And I am assuming that you do not have a milling machine available. So it's going to be all hand work. And the sight base must be properly finished - casting spigot removed, surfaces smoothed, hole for axis pin drilled/reamed to size - but not blued. (That would prevent proper soldering)
First, you should NOT try to hard solder the sight to the barrel. Repeat NOT. That could be a disaster. The barrel may well be damascened, and the temperature required for hard soldering could start delamination, because of the stress induced by the extreme temperature gradient resulting from localized heating. And the existing plate with the dovetail slot is probably soft-soldered in place. You are not even going to soft-solder the sight to the barrel.
What I am suggesting is that you file up a slip of mild steel so that it has a trapezoidal cross-section. When you solder that onto the bottom of the cast baseplate, it will form the dovetail.
Now there is an old saying, that it is easier to file metal off than to file it back on again.
Which means, in this case, take a slip of mild steel that is as thick as the depth of the dovetail slot.
Too thick is bad, because it means that the base of the sight will not seat flat on the rifle.
A touch thinner is OK, because this merely means that there is a little gap below the dovetail, between it and the barrel, which no-one sees anyway, but the sight will seat down properly.
Make the slip about 1/16 longer than the width of the cleaned-up baseplate.
Make it about 1/32 wider than the width of the bottom of the dovetail slot. As this is difficult to measure acurately, you may prefer to measure the top of the slot and add about 3/32 on to that.
Now file one long edge of the slip so that it has a slope corresponding to the angle of the dovetail slot. As the two edges of that slot look as if they may be unequal, pick one as your reference and stick to it.
When you have one edge satisfactory, so that the embryo dovetail fits in as well as it can on one side - bearing in mind that it will have a slight tilt, because the other side cannot fit (yet) - then start to file the opposite edge down, at the angle to fit its dovetail slot edge. If you have a milling machine, this would be much simpler, but if you do not, you must proceed with due care.
When you feel nervous because you are getting sooo close, change the filing strategy.
Keeping the correct angle, file the last 1/8 of the edge a bit further in, so that this last 1/8 is a little narrower across the width of the slip.
As soon as the slip has been narrowed enough that it starts to fit into the dovetail slot, stop. You must now establish from which side the dovetail needs to be inserted.
Don't assume anything, try it from left and right.
On one side, the dovetail slip will enter a bit further - that is the side from which it wil be pressed in later.
Having established the direction, gradually file down the rest of that edge to the same size. This is the most difficult part of the operation, as you must keep the edge straight, but also with the requisite angle. Inevitably it will be an approximation, but that is OK, we will fix it later.
When you have the slip so far that you can push it in about 1/4 or so, stop. Final finishing will be done when the slip has been soldered onto the sight base.
Now for soldering. I recommend hard sodering for two reasons 1) castings are b.... awful for soft-soldering 2) the result will be too fragile, and likely to break when you press the complet assembly into the dovetail , or if you knock the sight assembly.
If you have never done hard-soldering, then I cannot teach you how this evening. If you don't want to waste all the work you have put into that slip so far, have it done by someone with experience. That slip must be hard-soldered onto the bottom of the sight base, with the sloping edges at perfect right-angle to the lonigtudinal axis. Once again, I recommend anyone starting in this kind of mechanical puzzle work to join a model engineering club and meet some people who have exactly the kind of skills required for this DIY gunsmithing.
So let us assume that you have found someone who is a dab hand at hard-soldering, bought him a couple of beers, and the hard-soldering job is done. After soldering, file off the excess width (remember the 1/16 added on at the start?) and clean up any solder filling of the inside angle. If done well, the hard solder will only show as a fine line between the two component parts. Now comes the final fitting.
You have a cleaned-up sight base with a trapezoidal cross-sectioned slip of mild steel hard-soldered across the bottom. With the narrower side on the base!!! Looking at it from the side, you can see that you now have a sight base with a dovetail.
Try the sight base in the dovetail slot on the barrel. You will have to do some very fine filing until the base slides in so far that you have the feeling that with a good press it would go all the way. Pressing is difficult to achieve, because of the shape of the barrel. So use a plastic hammer and a piece of brass as a drift, and try to tap it in. Very likely, unless you are a master toolmaker, in which case you would not have needed this description, it is by now a little loose at one end. No worries - this is corrected by removing the sight assembly, turning it over, clamping it in a vice, and LIGHTLY peening the dovetail edge in the loose area. Then put it back in and drive it into the dovetail slot until it is centerd with respect to the bore axis.
Now you can remove it and blue it if you wish. I suggest cold bluing as it can be made to match the old barrel better than real hot bluing, which will look odd with all that old metal. And fit again, and shoot!
Yes it's work, but you can do it. And like the rest of the work you did on that wonderful antique rifle, when you have done it, it is very, very satisfying.
Good luck, and go slowly, carefully and patiently!

Patrick
Last edited by Patrick Chadwick; 01-01-2012 at 06:31 PM.
Reason: 3 bad typos
-
-
Contributing Member


Guess what? I'll be spending some time at my Brother in laws house for this one. You see when you said trapezoid I thought why do I have to get one of those things I see kids jumping up and down on in backyards. Oh! That's a trampoline? Any way I will be hands on but with a toolmaker/Machinist/Army armorer looking over my shoulder and why lie in the end he will do the most work so I won't bodge it up. Patrick, I'll use your info and when he gets time when our other project is done I'll get to it. For now thanks again, and HAPPY NEW YEAR. Dave
For all you members, $30(price subject to inflation) makes you a contributing member. I think this great site is worth it.
-
-
Legacy Member

Wow Dave!!! That rifle looks great! I just read this whole thread and am very impressed with what you have done. Keep up the good work.
-
Thank You to USMC 00-08 For This Useful Post:
-
Advisory Panel


Originally Posted by
DaveN

Any way I will be hands on but with a toolmaker/Machinist/Army armorer looking over my shoulder and why lie in the end he will do the most work so I won't bodge it up.
Sounds good, and you'll learn a bit more at the same time! Don't forget to let us see the finished result.

Patrick
-
Thank You to Patrick Chadwick For This Useful Post:


 Register To Reply


