-
Legacy Member

I'm someone who is more computer literate will bring it up but unless you have some serious breeching up kit and the correct stuff, then my advice would be to leave the breeching up to an expert
Hello from wet, miserable, rainy Warminster, home of the Infantry, where Salisbury Plain has turned to mud. Ah, yes, breeching up.
I wonder how many of you read the thread on our sister Enfield collectors milsurp site regarding take-off barrels and the problems re-indexing them when used in another rifle afterwards. This is nothing new, not even with NEW barrels, especially ‘new’ old 40’s barrels that were still in the system until a few years ago. And dare I say it, but Savage spare barrels seemed to be the worst offenders.
At our big field and base workshops it wasn’t such a problem because we’d usually have a long racks of barrels, both new and almost new that we could use until we’d get one with the correct ‘hand-tight’ underturn that we could select for final fitting. Oh, yes……, before I forget, we always graded our barrels in quarters of life. If a barrel was in its first quarter of life then it’d be almost as new and so on to a last quarter of life where it was probably shot out. But shot out didn’t mean that it was duff or inaccurate either. Anyway, I digress………….. But don’t get the impression that it was just barrels where the breeching up threads were slightly out of index. It was the rifle bodies too. And if you got a rifle where the breeching up thread was ‘late’ (that is, commenced even a minute of angle late), then getting a barrel that would underturn was difficult. So I’ll take you through what could and would happen.
Sniper rifles were the worst because they were always at a premium and the Command AIA, (the Assistant Inspector of Armaments) would always specify new barrels for these but that was easy to say but sometimes difficult in practice. So where a new barrel couldn’t be found with the correct underturn, the breeching-up face of the body would be smoother-off with a smooth file, just a gnats knacker or as you wild antipodeans or colonial savages say, a RCH so that a datum surface was available. Then the best-fit barrel would be fitted until it read the correct underturn THEN a reading would be ascertained as to the thickness of material required to get the correct underturn. Lets say that in our case, it was .028”. That’s twenty eight thousandths of an inch.
Someone suggested that his gunsmith will insert a .028” steel shim and that’s the answer. Others have suggested that it’d be a good idea to gently swage the shoulder of the breeching-up face of the barrel, sufficient to take up the slack. DO NOT USE THESE METHODS. THEY ARE XXXX POOR ENGINEERING PRACTICE and verging on the best bubba practice you will ever have the privilege of seeing. Have you digested that?
This is what you do. Knowing that your barrel needs .028” underturn, get yourself a proper breeching up washer made. I’m not going to teach you or your machinist pal how to suck eggs but if you need .028”, then get the breeching washer made .128” THEN machine .100” off the breeching up face of the barrel (no, the breeching UP face, not the BREECH face silly…..). But I’ll let you into a secret. At our large Base workshop in Singapore, we were running major overhaul programmes of everything including L1A1 rifles. Then, someone noticed that the tough, hard, readily available and exact diameter required L1A1 breeching up washers were between about .055” and .070” thick. Now, we’d just take the barrel to the little Chinese fitter/turner (he had a big pile of breeching up washers in his tray anyway) and say .”028” please Lim” and he’d mount the barrel and machine away .032” from the breeching up face. You’d walk back to the Armourers shop, past Steve’s Magnolia ice-cream van where you’d spend the next half an hour discussing politics or the Viet-nam situation or the new flower arrangement in the church with the rest of the blokes……..Oh, I’ve gone off at a tangent again…… Anyway, armed with the new barrel with .032” machined off the breeching up face PLUS a new .060” L1A1 breeching up washer you’d know that .060” - .032” was .028” which is JUST the underturn we need to tighten the barrel to make it PERFECT on the flat-plate we used to ensure that it was perfectly tight, upright and square.
Is that simple enough? It might be a tad more thoughtful that a steel shim or a good battering around the barrel flange that won’t last twenty minutes but it’s how the pro’s do it.
There are a few afterthoughts too. I’m telling you this so that when YOU need to do the job, then YOU tell your gunsmith how its done properly. And go and buy a selection of L1A1 breeching up washers now, while they’re available. When a badly shot-out/rusty bore No4T Lyman TP rifle was recovered recently, it too overturned by as much as it should have underturned, even with a new barrel. Our main workshops were at their wits end as there were only a few barrels from which to select. So what method do you think THEY utilized? Yep, got it in one. And it shoots as sweetly and accurately as it ever did. And as for us young 20 year old lads discussing politics, Vietnam or Flower arranging in 60’s Singapore…………, then if they did, I wasn’t part of the discussion!
ARE YOU ON THE SQUARE? A guide to breeching up!
ON THE SQUARE
As a result of a request from forumers, I’m going to tell you how WE, the REME Armourers breeched up No4 and 5 rifles. And while we’re at it, this is the principle of how we did L1A1’s too.
I must stress that we were all taught the correct method of breeching up but to be honest, and I’m going to be simple now, you were relying on a parallel gauge, one end of which crossed the flat we call the KNOX FORM. And as you are well aware, while it is meant to be a datum surface and therefore accurate, in MOST cases so far as I was aware, it simply wasn’t! What I’m going to tell you ignores the relationship of the knox form with this that and the other and relies on good, sound, honest, common sense!
You have all (hopefully) read the previously published article about how we would select a barrel from a large rack of ‘em, that gave us about 18 degrees or so of underturn. If it was, say, 25 degrees, then you simply skim a gnats knacker or a RCH from the breeching up face. If it’s, say only 10 degrees, then you insert a breeching up washer to suit. Has all that stuff been read and digested?
Someone asked a couple of questions/comments about the breeching up washers after I said that we used the plentiful L1A1 washers. And simply put, the L1A1 washers are a good fit and do the job perfectly. As for the quality, well, simply put, they might not be HARD, as in mechanical engineering terms but they are TOUGH and that’s what counts in this application.
When you have breeched up your barrel so that it LOOKS pretty-well square, I want you to select a solid (as in not the fabricated type) foresight protector with straight and undamaged sides and secure it to the foresight block band When the screw it tightened up, this foresight protector should grip the block band each side. In other words, even when the screw is loosened a tad, you should not be able to rotate the protector….., not even a little bit. It must slide and sit on the foresight block band tightly.
Now you probably won’t have a hundred or so foresight protectors to try before you get one that’s perfect. You won’t need that many, and most probably, the first or second you try will do. If you can’t find one, then just make sure that before you tighten yours up, then it is sat EXACTLY equidistant/centrally astride the block band. Do you understand this. It is important.
As a matter of interest, we had an exact protector that was painted BFA yellow (that’s Blank Firing Adaptor paint colour …..) that stayed with the breeching up kit together with an extended screw with an allen-key end for ease of use but I digress…...
Now, you insert a 4” long or so .144” diameter or 9 SWG (Standard Wire Gauge) ground steel bar, through the backsight axis pin hole and rest this across two matched vee blocks that are sat on a surface plate at a height that allows the rifle to lay parallel to the surface plate or something else that is 36” or so long and absolutely FLAT. We had a sheet of plate glass that did the job as well as anything. Now, allow the foresight protectors to touch the glass. Now, gently rock the barrel and the body between the axis pin and the protectors. It SHOULD sit absolutely square, supported between the axis of the backsight axis pin and the square of the foresight protectors.
If it’s not EXACTLY square and rock free, then just tighten or undo the barrel a further gnats knacker until it is ‘no-rock’ perfect. And that is it! If we were 2nd Class Craftsmen, we’d ask a 1st class Armourer to sign off the work but to be honest, after a couple of times, it was like riding a bike
Now you have a backsight and a foresight that are both exactly upright and square to each other, regardless of what the parallel gauge or alignment lines say……….., and that’s really all that’s needed. Oh yes, and don’t talk to me about alignment bars/lines either. If you have ever breeched up Thompson guns or SA80 rifles, then you soon learn to ignore them and do it properly. If you have any fears that the extractor slot might not align with the extractor then forget it because there is ample width to cater for it.
The same idea applied to L1A1 rifles except this time, the vee block was positioned inside the body, resting on the machined inner surface. Same with No5 rifles too but this time, because we couldn’t be sure that the splayed foresight protector ‘ears’ were both splayed exactly, then a simple square was cramped to the parallel part of the upright that really needs no further explanation.
Now here’s something that you didn’t know or thought about. If you have a rifle that won’t zero until the foresight it well over to the left or right, and I’ve seen plenty of then too….., now is the time to consider whether the barrel is slightly over or under breeched. Just a slight amount will upset the balance of the foresight block…………..
Mine are not the best, but they are not too bad. I can think of lots of Enfields I'd rather have but instead of constantly striving for more, sometimes it's good to be satisfied with what one has...
-
The Following 2 Members Say Thank You to Alan de Enfield For This Useful Post:
-
02-13-2012 11:11 AM
# ADS
Friends and Sponsors

-
-
-
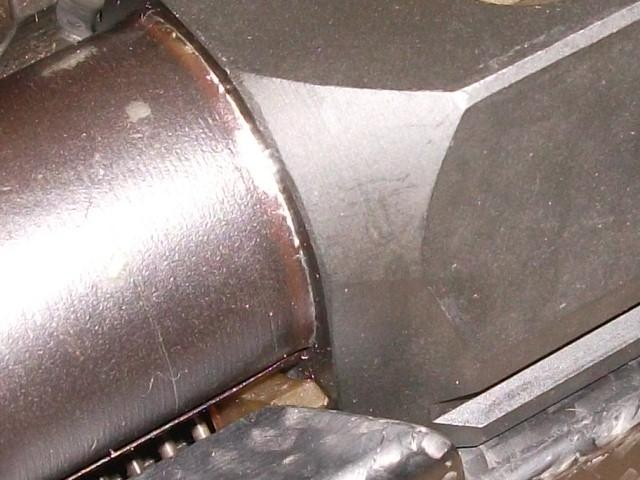
JM............ I'm absolutely staggered at what I'm seeing........... Is this common practice? Is it definately a factory bubba? Not that I disbelieve you, but surely not? PLEASE tell me that it is the work of a saboteur in the factory quality control department or some backyard farmer getting the most dollars out of his old rifle........ Can I take it that Springfiend Inc isn't the Springfield Armoury/US Military arsenal - or is it?
Centre punching around the perhipery is worse than peening the whole edge over with a pein hammer. At least with a pein hammer you'll get an even ring of swage (albeit a bubba swage to me......) around the edge.
When you said that this practice was done at the factory, I was imagining some sort of tidy ball-rolling around the breeching up edge to give a constant amount of deflection of the steel but hammering it with a centre punch is in my own honest opinion, well......., the realm of bubba engineering.
But, having said that, we did use a ball rolling method to tighten up the threads of Bren Gun barrels. A special tool (similar in design to a pipe cutter in effect....) was fitted onto and over the interrupted thread and a hard steel ball was screwed down onto the raised thread and rolled up and down the thread. As it did so, it spread the raised thread which tightened up the barrel in the barrel locking nut. But having said that, it was only authorised for use on blank firing and DP barrels. But, by tacit agreement, it was used on live firing guns where two worn but still serviceable barrels were towards the end of their life and one had worked loose.
Maybe this last paragraph ought to be in the Bren thread. So, Bren fiends, if one of your barrels has a clear distinct rounded impression going down the interrupted thread, then that's the reason. But I never saw or heard of an underturned barrel being tightened up in this way. Unless you'd showed me the pics JM, I'd never have bvelieved it - quite staggered to the point of speechless
-
-
Legacy Member

In my kit of rifle tools I have a Barrel Shoulder Roller, lathe tool. It's a roller bearing mounted on a square shank that is held in a KDK quick change tool post. Chuck up the barrel, use a live center and force the roller against the shoulder while it rotates slowly. Workes great.
-
-
Legacy Member


Link to the breeching up thread, as per the re-post by Alan de Enfield.
Breeching Up
Paul
-
-
JM............ I'm absolutely staggered at what I'm seeing........... Is this common practice? Is it definately a factory bubba? Not that I disbelieve you, but surely not? PLEASE tell me that it is the work of a saboteur in the factory quality control department or some backyard farmer getting the most dollars out of his old rifle........ Can I take it that Springfiend Inc isn't the Springfield Armoury/US Military arsenal - or is it?
Centre punching around the perhipery is worse than peening the whole edge over with a pein hammer. At least with a pein hammer you'll get an even ring of swage (albeit a bubba swage to me......) around the edge.
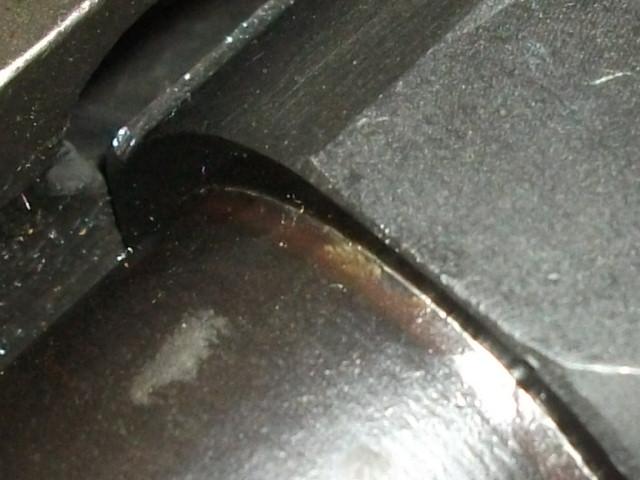
It is indeed planished around the periphery, but not center punched. Just regular old lightly crowned and polished hammer face. And, yah, it's pretty common esp. on Springfield Inc (Not the former US Armory!) barrels of either GI OR civilian manufacture! I know I have some in the shop that will show it better, but that one was only a couple of feet away at the time. You want more photos?
It it weren't for the requirement of keeping the sights aligned and torque induced by bayoneting bad guys, there's really no reason for an ultra tight barrel. Benchrest shooters have been known to do swap barrel guns that rquire only a strap wrench to make barrel changes. We even used to make takedown bolt rifles that were positioned by nothing more than a spring loaded ball. And they were quite accurate!
The main downside to peening for a civilain is that it can be unsightly. Or some ham-fisted lout might miss and b***** up the threads.
There's no structural reason against it- unless he wants to do drive-by bayonetings or pry open crates.
Last edited by jmoore; 02-14-2012 at 04:10 AM.
-
-
Contributing Member

Well Allan, you should have a quick peek at that thread now. I've allready wet myself once.
-
-
It just looks like a series of centre dot marks around that edge JM. But it's not what you want to do with the rifle, it's just the quality of the work on such a grand old lady - or should that read 'a Garand old lady'.
-
-
Legacy Member
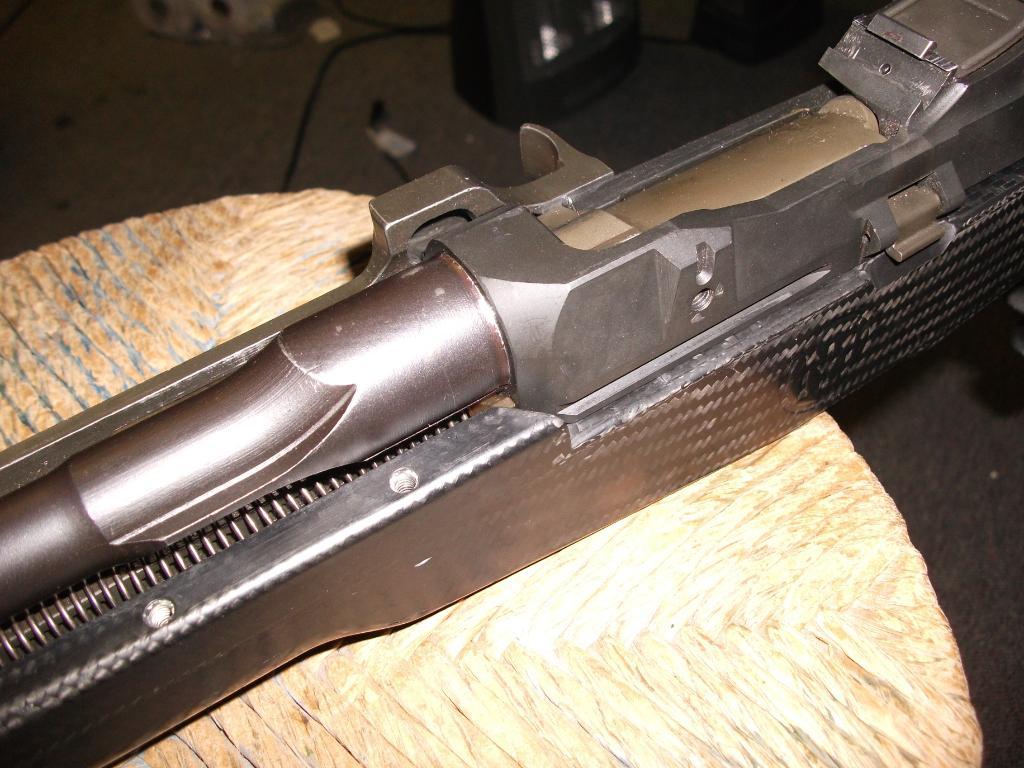
The "donor" P-14 (Mk1*) that I used to test the first new barrel was a classic. Apparently from one of the Baltic states, one clue that "interesting things" were to come was the mismatch of receiver and barrel, obvious when the handguard was removed.
The barrel was a classic "sewer pipe" but worse than that, it unscrewed by hand pressure alone and the barrel had a BNP stamp!
Upon further investigation, the three P-14 barrels in my "scrap" box all pulled up short but to wildly different points.
-
-
It just looks like a series of centre dot marks around that edge JM. But it's not what you want to do with the rifle, it's just the quality of the work on such a grand old lady - or should that read 'a Garand old lady'.
Just M14 clones. Have yet to run across it on a Garand- but that just may mean I forgot. So many barrels!
Stupidly enough, peening is pretty well accepted in the M1A/M14 communities. Conversely, breeching up washers would have m14 folk running down the street with their hair on fire. But there's probably only a few hundred (at most) real M14s in civilian hands in the U.S. so it's not like there's a collector's market. But folk want real GI parts.
BTW, It ought not look like "dots" in the photo... I'll try and do some more, but it may be a few days before they get uploaded.
-


 PM
PM