-
The front pad might well lay flat on the receiver Flying pig, but it's got to lay flat on the receiver AND be parallel to the bore................. And there's only one way that you can be sure of that. Start reading the article, digest, then read again
-
The Following 2 Members Say Thank You to Peter Laidler For This Useful Post:
-
01-31-2013 04:25 AM
# ADS
Friends and Sponsors

-
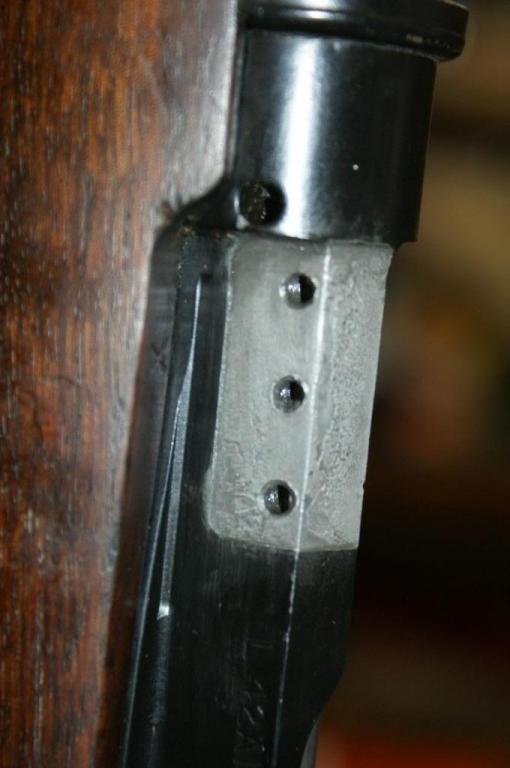
It's been shown recently in another thread, but this photo seems appropriate here as well:

If for no other reason to note that ALL of the finish under the pad has to come off even if you don't get it properly milled. Otherwise your soldering efforts will come to naught. And those screws won't do the job alone! No real shear resistance at all.
ETA: looking further, the incomplete old solder coverage shown here may be why it had to be done again...
-
The Following 4 Members Say Thank You to jmoore For This Useful Post:
-
-
Good photo too JM as it appears to show the depth of milling at the FRONT of the pad recess is greater than the depth of milling at the rear judging from the slight taper of the lower step.
-
-
Contributing Member


Thank you both for the insight. I'll be extra careful to take my time and get it right.
I've had it suggested that I use more standard drill bits and taps than the 3.7/3mm etc ones just because the proper ones will be tough to find here and quite expensive. What has everyone used? Does anyone have a list of exactly what I will need for bits and taps, as well as screws? I also need to order screws for the cheek rest? Also wondering what size pilot hole to use for it? Also was there a special type of solder that should be used or any regular solder will do as long as its done right?
I read Peter's articles again last night and things made a lot more sense this time now that everything is here.
-
-
The drills and taps you need are as common as muck here. Just order them from the UK on Ebay or Tracey Tools by mail order, use them, do the job properly and then sell them on to someone else who wants to do the same. Cheap or what? Don't spoil the ship for a hap'orth of tar
-
-
Contributing Member


Haha yes Sir I am a wee bit cheap. However I do want to do a nice job of this so I will order the proper tools and fasteners. Thanks for the lead.
-
-
I would get more than one tap of each size. In fact, if was doing this project I'd get one for each of the front holes. Because broken taps are no fun at all!
-
-
Contributing Member


Originally Posted by
jmoore

I would get more than one tap of each size. In fact, if was doing this project I'd get one for each of the front holes. Because broken taps are no fun at all!
Especially not when they are coming from the UK !
!
If anyone has a list of the specific drill bits, taps and fasteners I need to get to complete this conversion it would sure help me out a lot. Obviously I'll want cobalt bits or at least HSS? Same for taps I'm guessing. I haven't worked with solder much, I'm actually more nervous about that part of this than anything else, I pretty much know nothing about it other than a little bit of utility work I've done maintaining heavy equipment at work.
I am brand new to this stuff still but I'm a perfectionist with whatever I put my mind to so I'm very confident in my ability to complete it, just may take a lot more time and I may ask for a lot more help than others have.
Last edited by flying pig; 02-01-2013 at 12:25 AM.
-
-
You certainly won't need cobalt anything. The body is just bog standard 'mild' steel and cuts like a top. I say bog standard but that's not quite correct of course, but not into what we'd call quality. med carbon steel of today. Just your bog standard HSS taps dies and drills should see you through. You can always sharped drills yourself in any case
-
The Following 2 Members Say Thank You to Peter Laidler For This Useful Post:
-
Contributing Member


Ok perfect. Does anyone know off hand what thread the small screws, rear knob, and cheek pad screws are and their lengths?
-


 PM
PM


