-
FREE MEMBER
NO Posting or PM's Allowed

An Enfield comes back from the grave, here's the story... warning, lots of photos..
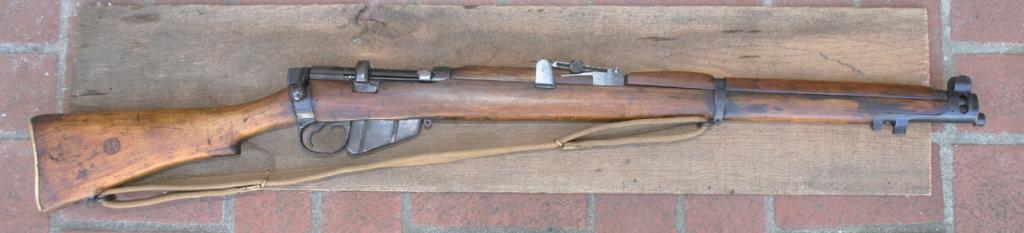
This might be an ideal post for insomniacs, if you can't get to sleep after reading this post, you have a problem. I thought I'd dig as deep into this old 1942 Enfield and see what I could learn and how it would look put back together. Here's the story.
I asked my local gunsmith if he could help me find a barrel for a 1914 SMLE that really needed help. He said he'd look through his batch of old barrels. I talked to him a couple of days later and he said he had 3, 100.00 for all would do it. Seemed fair so I showed up at his shop.
He brought out 3 complete Enfields, I could not tell what they were at first glance as they looked like he had planted Enfield seeds and this is what grew. They were covered in mud and rust but looked fairly complete so I was pleased and hauled them out after gladly paying the 100 bucks. I figured I'd get one good barrel out of the pile of iron oxide. Well, after one restoration, I think I'm ok.
Here's an example, I forgot to take the photo of the first restoration before I started but this is pretty much exactly what they all looked like. I really didn't know how to put them in the car without destroying something but I made it home, glad my wife didn't see what I had returned with. My already questionable judgement would have been confirmed for sure.

So I started by stripping every part down, nothing was left but a pile of rusted parts and a bunch of wood, which started looking less like Walnut as I went along, a pattern was emerging.
The rust was stubborn but bead blasting and other methods removed it pretty well. The wood was carefully cleaned and stripped of something unknown that was on it. Under the crud layer was some pretty nice wood, not English Walnut (to my eye at least) and possibly Birch but even that I'm not sure of...
I spent a lot of time, as you can imagine, cleaning and de-rusting parts. I never tired to remove all the pitting as it would have left some parts in worse shape, just stopping the rust was my main concern, and then trying to get things to look as good as possible.
In the process, a date of 1942 was discovered and the fact that it was an SMLE rifle became apparent. Not being an expert on these rifles, I knew enough to know that it was not likely a product of an English factory that late in the process. So I started assuming it was probably
Indian made.
I cleaned and re-blued each part over many days. I started noting that the factory had stamped every part that was not a screw (and may have tried to stamp them as well....). It's not secret that these rifles are well known for being marked, probably as well or better than most armories attempt. That was a help as it confirmed my suspicions that this rifled really had not been touched that much since it was made. Sure, it had the classic furniture repairs, all of them in fact. The butt stock had been patched up well, even the long lower grip had been patched. The short top forestock had the classic routed biscuit repairs, though I swear these left that factory with them in as no cracks in that piece were evident. The long ears which wrap around the volley sights were broken off, as most are, so I grafted on two pieces from a doner piece. I have way too much time in this rifle but that's what happens when you get caught up in a project, you loose all sense of value, time etc. and just get in a zone.
So, here's some photos of the marks I found and what some of the pieces looked like as I finished:
This one shows that it was indeed an Indian made early style Enfield SMLE, or that's my conclusion, I'm ready for input as to all of the conclusions I've drawn that may be wrong, glad to hear from anyone in fact.

I thought this stamping on the barrel was interesting, it has a corresponding stamp on the inside of the front forearm wood...


I don't recall seeing this much information on the side of a barrel before, some makes sense, other marks mean nothing to me...

The serial number show up nicely here, and in other places...

and on the back of the sight...

and on the side of the bolt arm

and on the end of the fore-end cap

and on the side of the magazine

I thought this one on the receiver barrel ring was interesting..

And one on top of the front sight.

And, of course, no matter where the rifle is made, this shows up, at least until the colonies
became independent...

I've got many more but this is already overdosing it so here's the finished project, not
a museum candidate but a good shooter. I took it out to the range yesterday and hit the
300 yard marker on the first round so I'm satisfied. I never thought it would become much
but I'm starting to like it. Now I've got two more to go....


So, nothing new here, just an interesting Ishipore with no screw and still a great shooter.
Only the brass plate on the stock is not original, can't seem to remember what I did with the original once I got it re-blued... it's around.
Thanks for putting up with all the photos. Maybe it was somewhat interesting.
Best
Bruce
Information
 |
Warning: This is a relatively older thread
This discussion is older than 360 days. Some information contained in it may no longer be current. |
|
-
02-23-2013 10:11 PM
# ADS
Friends and Sponsors

-
FREE MEMBER
NO Posting or PM's Allowed

Nice work! It turned into a pretty nice looking rifle.
-
-
FREE MEMBER
NO Posting or PM's Allowed

Tremendous restoration, and it looks like a real good'n now!
-
That's JUST how I like to see 'em. Been there, done that, bags of character and more important, useable too! None of this safe queen stuff. Now, can I be so bold as to suggest something.......? Take a good look at those butt batches. Many years ago a REAL Armourer took a bit of pride in prepariung, cutting fitting, glueing, pegging and finishing those. And as a testimony to his work, they're STILL there. You could do exactly the same and carefully dovetail in and replace the missing ear (s) that sit astride the backsight bed on the rear of the top handguard. It wouldn't take you long nor would it detract from the rifle BUT it'd add more to the character that your rifle already possesses.
-
-
FREE MEMBER
NO Posting or PM's Allowed
-
I mentioned on here a couple of years ago of a couple of old absolutely derelict No1 rifles found in the cellar of an old TA centre. They came into one of our big workshops for destruction originally but eventually, they were restored. The Examiner asked me if I could do anything with the woodwork. So I took it off home and sat and pondered for a week - then set about it. To be honest, it was finished really but I made good and patched it where necessary and to show off a bit, did them to apprentice test-piece standards. The number of patches exceeded that allowed in the EMER's but it wasn't going anywhere except in the foyer of the Armourers shop.
The upshot was that the rifle and woodwork ended up as a masterpiece but there was a downside........... While most people stopped and looked at it, gleaming with the bayonet attached, there were two reactions. The unwise and clearly NOT Armourers would turn their noses up a bit and comment '........ugh, look at those wood patches'. While the many real Armourers that would stop by - as Armourers are want to do - would look at it, take a sharp intake of breath, rub their finger and eyes over the rifle and gleaming linseeded satin finish woodwork and comment '........wow......, look at those wood patches'.
Remember those happy days Dave and Roger if you're reading this? Dave eventually took the rifle when the workshop closed down as a centre of excellence and headed off to the better commercialised world of part changing
-
The Following 3 Members Say Thank You to Peter Laidler For This Useful Post:
-
Legacy Member

-
-
FREE MEMBER
NO Posting or PM's Allowed
Thanks to all for the useful and kind comments, I feel like the guy who slipped in the back door trying not to be caught in a place he does not deserve to be. There are so many folks here with real knowledge that I'm just glad to read all these great posts, I learn something every time I visit here. Me posting about an Enfield in the midst of these pros is a bit presumptuous but maybe I got away with it.
The finish is like all finishes, cars, guitars etc. It's about the prep. Some woods lend themselves to a finish more easily than others. Pore size, density, etc. affect the outcome and demand a certain style and type of finish. Hardwoods with small pores like this one are pretty easy. Sandpaper is not your friend and if you can avoid it, do so. Use strippers that are kind to wood and the environment and scrape off the excess old finish with care, leaving just a good steel wool to clean up the surface. Once it's free of dirt, oils etc. you can proceed. I use 100% pure tung oil or linseed oil . This one was tung oil finished and applied over time letting the surface build. You can tell when you are there. Then let some time go by, smooth out the surface, usually with a 4-0000 steel wool and apply the wax of your choice.
I make my own and have several versions, some with a tint or stain in the wax, some pure
ingredients with no stain. But the bottom line is always preparation. Without that, the best finish material in the world will detract from the beauty of the wood.
I have finished hundreds of guitars and several cars and they each have something to teach
you when it comes to finish work on a rifle. But there is never a point at which you can say
you have it all figured out. You learn every time. At least that's my experience.
-
Legacy Member
Thank you. That's very helpful.
V
-
-
FREE MEMBER
NO Posting or PM's Allowed
Nice job! Love those butt patches. There is something sad about Smle's missing the wings on the handguards, like an otherwise good looking girl missing a front tooth.
Cheers
Last edited by Father Ted; 02-28-2013 at 01:23 PM.


 Register To Reply


