-
Contributing Member


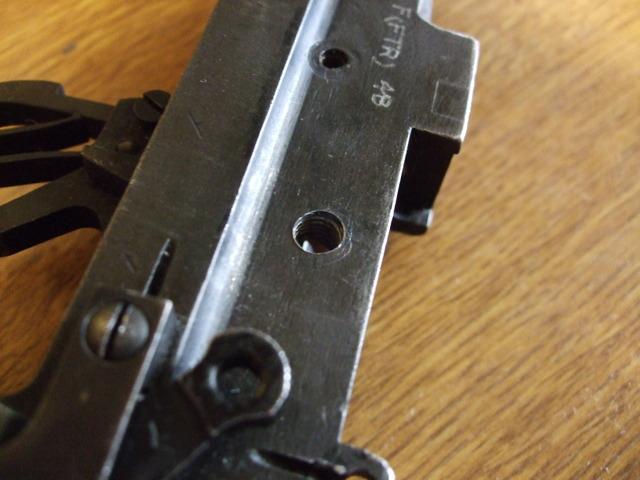
Rear Pad
Put a pic of my '44 Shirley and you can see the difference in the rear pad to yours, also why the different center screw on the front pad it seems bigger than the others.
Plus the rear ones are not flushed nor are they staked I thought it may help you to visualize the rear pads position and the set up of the screws flushed and staked.
I still feel for you and whats happened as that is very nice blonde furniture on the rifle I sincerely hope this story has a good ending for you..
-
The Following 2 Members Say Thank You to CINDERS For This Useful Post:
-
02-24-2016 08:46 AM
# ADS
Friends and Sponsors

-
Contributing Member

His eyes must need re seating to get the rear pad so poorly fitted and that far out, at least 5-6mm higher than it should be. Clearly no plans when he started that job then, as each pad is already milled to fit the action in a pre determined way. It is only the drilling and tapping and of course the final staking that takes a bit more time!! Oh dear.
One thing to add......................... as you say the front location may be recoverable, as it doesn't look too far out but without it in your hands hard to say. The rear pad being fitted that high may be your saving grace. If the holes have been drilled higher by at least 5-10mm, you may just have a chance that new holes can be properly inserted clear below the existing ones. Peter L might be able to tell you what the long term movement might be though in causing issues further down the line
Last edited by Gil Boyd; 02-24-2016 at 09:21 AM.
'Tonight my men and I have been through hell and back again, but the look on your faces when we let you out of the hall - we'd do it all again tomorrow.' Major Chris Keeble's words to Goose Green villagers on 29th May 1982 - 2 PARA
-
Thank You to Gil Boyd For This Useful Post:
-
I hope that the more optimistic amongst us are correct, & I certainly take no joy in offering a negative opinion, but I think that rear pad is so high the rifle body is practically knackered. However, this is assuming the front pad is of approximately the right dimensions & fitted in approximately the right position, & that the rear pad is approximately of the right overall dimensions. If that is the case the rear pad is far too high & the only way of retrieving the situation would be to raise the front pad in equal proportion (not recommended) or to remove the rear pad, fill in the holes, & the re-fit it correctly), again, not a worthwhile proposition, I would have thought - remember that heat treatment to the locking lug recess in this area.
I would be interested to know what Peter or any other service trained armourer thinks, though.....
-
Thank You to Roger Payne For This Useful Post:
-
Peter is thinking about this after browsing the photos and looking at the utterly dismal work of the so-called REME Armourer (of which I know more but prefer to stay silent). But while it looks a disaster area and a total waste of one of the very historic and last No4's produced, there might be an optimistic shred of hope. I will add more later. But it will take a real Armourer or gunsmith to fix it. So please, please please stay clear of enthusiastic amateurs and butchers who have absolutely no concept of the dynamics and mechanics of what you hope to achieve. Indeed, some will be offering you some, er......, what we call 'bullsh........, er....., bovine scattology.
Anyone can bolt a telescope to a rifle but not everyone can get it right. I'll come back later.........
LATER; If I was you, this is what I'd do. First, I'd accept that your rifle is now worth the sum of its parts BUT you can(?) salvage it like this. Remove the rear pad and see just how well the front pad is aligned. You do this by fitting the bracket with your telescope to the rifle. But ONLY do this after having first centred the optical axis of the tip of the graticle to the mechanical axis of the tube. A better bet would be to use/borrow a proper No32. I say this because this is the telescope that you will eventually (?) put on the rifle.
If the telescope can be brought into alignment as per the details I gave in the article I wrote, then you might be part way to seeing some optimism ahead.
Take your rifle to someone who knows what he's doing and ask him to slightly countersink the three existing BA and BSF holes and then silver solder steel threaded plugs into the existing holes into the rear screw holes. If your man can't do something this simple, go somewhere else or ask me and I will put you in contact with someone who can.
When the holes are plugged and filed flush, get the same person to start the rear pad operation again but this time, EXACTLY as detailed previously. Naturally you/he will now be drilling and tapping part into the original now securely plugged original holes put there by the blind idiot who butchered it to start with. I see you and several others teccies out there wincing at the thought........ But don't be afraid. Those motor racing 998 Mini's and MG Midgets/Modsport racers have been doing this offset plugging to extreme pressure engine blocks and cylinder heads since the 60's.
By silver soldering the threaded plugs in place they will be secure and the heat generated will be insufficient to affect the hardened locking lugs that you've got to preserve. Do not be tempted to use hard steel plugs for technical reasons. Mild steel is what you need.
When he's finished it, ask him to bead blast, phosphate and paint the body. You won't even need to un-breech the barrel.
That's all there is to it unless you need to ask any questions. Anyone of a more technical bent please, please feel free to question my idea. I appreciate that we'd just scrap the thing but needs must and all that.
Last edited by Peter Laidler; 02-24-2016 at 03:20 PM.
Reason: Add a bit.....
-
The Following 10 Members Say Thank You to Peter Laidler For This Useful Post:
-
** Must point out due to the fix below the rifle is now a .22, **
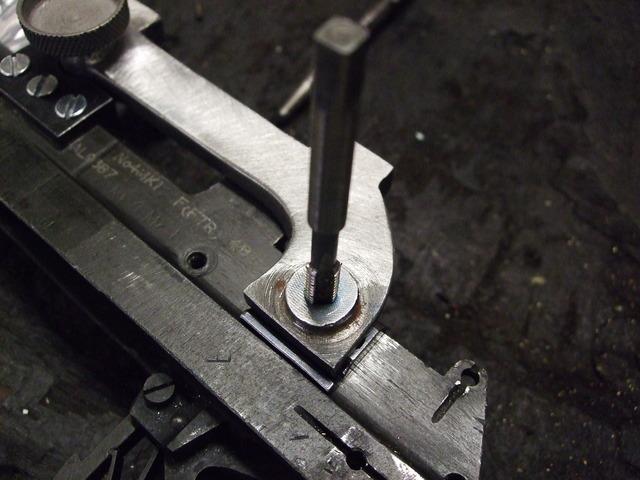
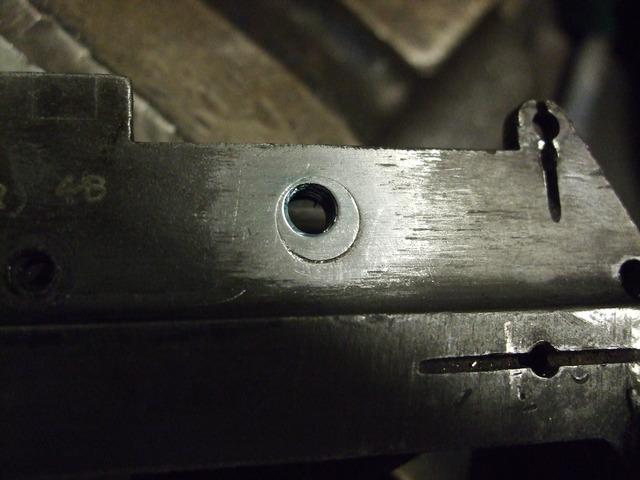
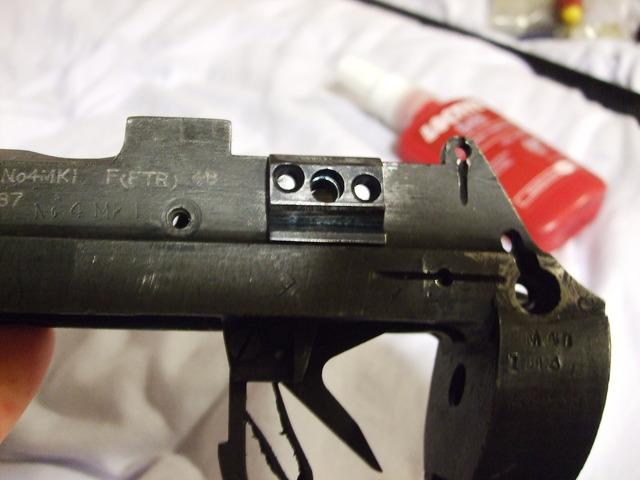
A few pics of a fix I did on my own No4, the rear screw hole had been drilled at an angle, and therefore the screw from a sarco mount went in at an angle, the rifle shot well but was never happy with it, as the pad fixing screws were never drilled there was hope, only problem was due to the angle the hole had to opened up then tapped to take a (IIRC) a 10mm bolt that was used as a plug, there was a bit more to it but you get the idea.
as it was,
Plugged
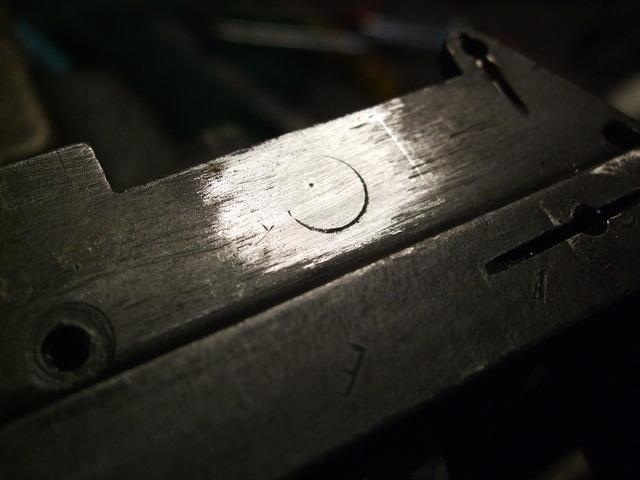
Tap used to make a slight indent on the plug ( as seen on above),
Drilled and Tapped hole, the outline of the plug gives an idea how far out the original hole was, although there is a small taper on the plug, (think countersunk screw)
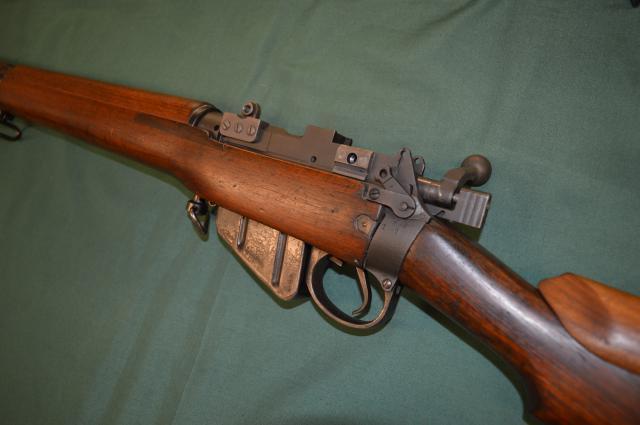
The DRP Bracket in the white and ready for bead blasting fits like a glove,
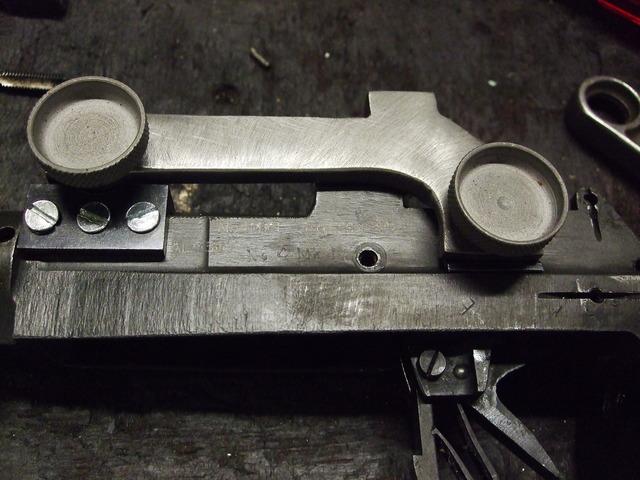
Rear pad still holding out with the lock tight, and ready for the fixing screw holes to be drilled and tapped
Finished article, bead blasted, phosphated and ready for its Suncorite
Last edited by bigduke6; 02-25-2016 at 01:06 PM.
-
The Following 13 Members Say Thank You to bigduke6 For This Useful Post:
brent65,
Brian Dick,
CINDERS,
Gil Boyd,
jr57,
Kiwisteve,
Peter Laidler,
Ridolpho,
Roger Payne,
Seaspriter,
Sentryduty,
Steve H. in N.Y.,
Vincent
-
FREE MEMBER
NO Posting or PM's Allowed

So please, please please stay clear of enthusiastic amateurs and butchers who have absolutely no concept of the dynamics of what you hope to achieve.
After following this post, I am so relieved to have had Brian Dick do the work on my Long Branch Sniper (https://www.milsurps.com/showthread.php?t=55567 ). I had considered doing the work myself, and after reading Captain Laidler's detailed description of the job, it became quite evident I had neither the expertise nor the tools to do the job at any level that would be a world class standard. (I realized I would be characterized as one of Peter's "enthusiastic amateurs and butchers")

Originally Posted by
CINDERS

I mean no disrespect but for us the collectors/users of these rifles, [but] where will we go in 15/20 years people like Peter L and Brian D and others in the background are, like all of us, on a clock.
So very true CINDERS. We do need a new generation of Lee Enfield gunsmiths to carry the tradition. As you say:
Originally Posted by
CINDERS
Properly cared for these Enfields/Mausers/Garands/M-1's will outlast us as long as the spares allow them.
Perhaps there is an aspiring young man in Edmonton who sees himself in this role?
Last edited by Seaspriter; 02-24-2016 at 04:18 PM.
-
Legacy Member

Originally Posted by
Seaspriter
Originally Posted by CINDERS
Properly cared for these Enfields/Mausers/Garands/M-1's will outlast us as long as the spares allow them.
Perhaps there is an aspiring young man in Edmonton who sees himself in this role?
Soaking up everything I can, as fast as I can. I will see how far I can go!
I have a couple ideas on how I would tackle this this specific situation, however I am more keen to see how it should be done.
- Darren
1 PL West Nova Scotia Regiment 2000-2003
1 BN Princess Patricia's Canadian Light Infantry 2003-2013
-
Thank You to Sentryduty For This Useful Post:
-
Cheers Peter. I feared the holes may have needed tigging, & then with the heat, the risk to the hardened area.......etc. Knowing that silver soldered mild steel plugs will do is useful & may come in handy one day.
-
Thank You to Roger Payne For This Useful Post:
-
FREE MEMBER
NO Posting or PM's Allowed
Peter is thinking about this after browsing the photos and looking at the utterly dismal work of the so-called REME Armourer (of which I know more but prefer to stay silent). But while it looks a disaster area and a total waste of one of the very historic and last No4's produced, there might be an optimistic shred of hope. I will add more later. But it will take a real Armourer or gunsmith to fix it. So please, please please stay clear of enthusiastic amateurs and butchers who have absolutely no concept of the dynamics and mechanics of what you hope to achieve. Indeed, some will be offering you some, er......, what we call 'bullsh........, er....., bovine scattology.
Anyone can bolt a telescope to a rifle but not everyone can get it right. I'll come back later.........
LATER; If I was you, this is what I'd do. First, I'd accept that your rifle is now worth the sum of its parts BUT you can(?) salvage it like this. Remove the rear pad and see just how well the front pad is aligned. You do this by fitting the bracket with your telescope to the rifle. But ONLY do this after having first centred the optical axis of the tip of the graticle to the mechanical axis of the tube. A better bet would be to use/borrow a proper No32. I say this because this is the telescope that you will eventually (?) put on the rifle.
If the telescope can be brought into alignment as per the details I gave in the article I wrote, then you might be part way to seeing some optimism ahead.
Take your rifle to someone who knows what he's doing and ask him to slightly countersink the three existing BA and BSF holes and then silver solder steel threaded plugs into the existing holes into the rear screw holes. If your man can't do something this simple, go somewhere else or ask me and I will put you in contact with someone who can.
When the holes are plugged and filed flush, get the same person to start the rear pad operation again but this time, EXACTLY as detailed previously. Naturally you/he will now be drilling and tapping part into the original now securely plugged original holes put there by the blind idiot who butchered it to start with. I see you and several others teccies out there wincing at the thought........ But don't be afraid. Those motor racing 998 Mini's and MG Midgets/Modsport racers have been doing this offset plugging to extreme pressure engine blocks and cylinder heads since the 60's.
By silver soldering the threaded plugs in place they will be secure and the heat generated will be insufficient to affect the hardened locking lugs that you've got to preserve. Do not be tempted to use hard steel plugs for technical reasons. Mild steel is what you need.
When he's finished it, ask him to bead blast, phosphate and paint the body. You won't even need to un-breech the barrel.
That's all there is to it unless you need to ask any questions. Anyone of a more technical bent please, please feel free to question my idea. I appreciate that we'd just scrap the thing but needs must and all that.
Ok thanks Peter, I don't think I shall be returning to said person for the work. I'll make some enquiries and I do have some options but I may take you up on your offer.
Once again many thanks and to all for their inputs.
-
Legacy Member

I may be totally out to lunch here but does the top surface of the front pad not look a wee bit higher than normal? I dug my '43 T out of the safe and, in the OP's photos it seems a bit higher. is it possible the front pad is non-standard forcing the installer to put the rear pad higher than normal. Hard to believe someone would intentionally put the rear pad up that high for no reason. To the OP- how bad is the scopes collimation relative to the bore? The scope body doesn't look too badly misaligned (and it's amazing how easy it is to see misalignment).
Ridolpho
-


 PM
PM


