-
Allright, I was going to take the easy way out, but since someone on another forum dared me to... I'll go with the Nepalese style catch. Sorry for taking so long to get to this, but I was out of town most of the week.
So for starters, I fitted the patch box to the contour of the buttplate usi ng an assortment of files and sandpaper. The notch is what's left of the one that came on the cover for the brit type latch - I'll have it TIG welded later to get rid of it.

Then I put the cover into the mill and cut the slot for the catch slide.

Next I used a ball cutter to make the finger recess around the slot:

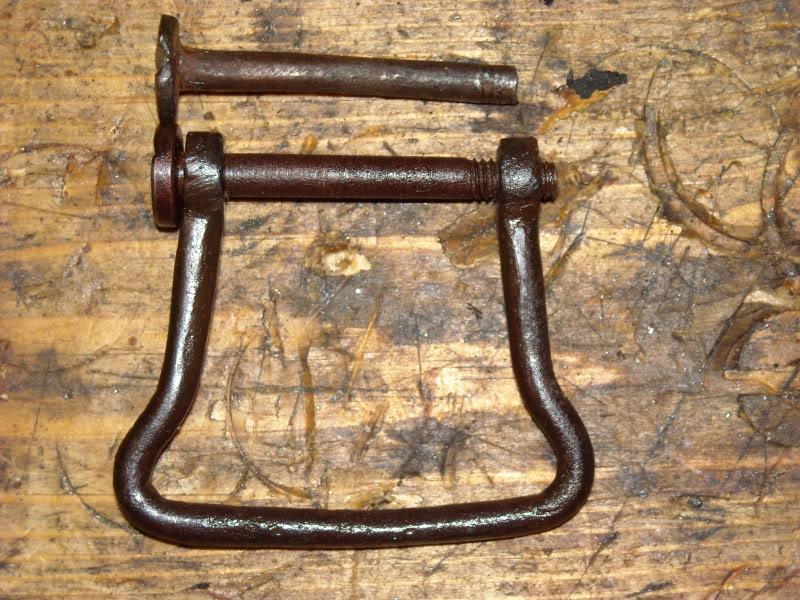
I decided to go with a stepped catch rod to make it sturdier and less likely to bend. I've no idea what the originals look like, all I have are some internet photos of the repros IMA used to have, so I hope you'll all excuse me if I deviated slightly from an proper catch for practical reasons according to me 

Next, I started making the catch housing by machining some brass billet, shaping it roughly with a ball cutter and boring the through-hole for the catch slide. The object of doing this is to give it a cast look and to provide more surface area to hold the braze.

I rounded the upper corners with files - the ultimate goal is I want it to look like it was a cast part, not a machined one, as I'm sure the originals were cast. Here you see the catch loosely fitted into the housing.

I then cut an identically sized slot into the housing on the mill to match the patch box cover slot.

Here you see the whole affair being prepped for silver soldering. There is sheet silver solder between the patch box cover and the housing and flux on every surface. I turned down aluminum dowels and hammered them tightly into the slot to keep everything aligned after the solder melts. Aluminum is a good choice as silver solder doesn't stick to it well and you can hammer them out again after soldering with a brass punch.


Brazed and ready for cleanup. Note that I started filing the front and rear faces round in this photo - all part of making the housing look like a casting - attention to detail IMHO really helps carry off your work if you want it to look period.

The pins are knocked out and the slot cleaned up with small files:

Solder overflow cleaned up and the housing is now properly contoured.

Next a small slide button was turned on the lathe with the head left a larger diameter to form the button - it press-fit into a slightly undersized hole on the catch rod. The head was hand-filed to fit the finger groove precisely.

Finally the catch rod was cut and dressed so that it would not protrude from the housing when the catch is retracted.

Did a little inletting so the slot through the rear wall of the buttstock patchbox inlet would properly line up with the catch and drilled the catch hole and installed the box cover.
The thing to remember when drilling the hole is to measure 5 times and cut once - and no, I'm not kidding. Even then, it won;t be right completely, so use a well undersized drill and bring the hole up to size with a fine round file for a snug fit.


Last edited by Claven2; 08-15-2010 at 08:41 AM.
Союз нерушимый республик свободных Сплотила навеки Великая Русь. Да здравствует созданный волей народов Единый, могучий Советский Союз!
-
The Following 2 Members Say Thank You to Claven2 For This Useful Post:
-
08-14-2010 09:12 PM
# ADS
Friends and Sponsors

-
Beautiful work partner ... 
Thanks for posting pics of this ongoing project and saving this old girl ... 
Regards,
Doug
-
-
-
Legacy Member

".... measure 5 times and cut once...."
I like that.
My comment in short? Great job.
-
-
FREE MEMBER
NO Posting or PM's Allowed

Outstanding work, and some people wonder why a first class restoration cost so much.
-
Some very minor progress today. I had to make a new front swivel screw because the old one was stripped and I had to drill out the tip to remove it when the rifle was first disassembled because it had been peened or riveted over on the exposed thread.
I wanted it to look authentic, so I made one up on the lathe using some old mild steel bar stock. I used a rather coarse cutter on purpose and cut the slot with some fine files so it would look hand made. I also filed the shank a little after machining it to further lend to the hand-made look and used a manual thread die by hand to cut the threads.


I'm now in the process of browning it. the swivel itself had some thick rust crusties on it so I had to lightly file it and am touching up the patina on it as well with browning solution.

Союз нерушимый республик свободных Сплотила навеки Великая Русь. Да здравствует созданный волей народов Единый, могучий Советский Союз!
-
The Following 3 Members Say Thank You to Claven2 For This Useful Post:
-
Advisory Panel


Very, very impressive. Keep at it!
Patrick
-
-
And progress is being made again after a busy week.
I finished browning and fitting the new front swivel screw - MUCH better than the original.

I also bedded the barrel tang using US Gov't Issue Bisonite bedding compound like is used in match M14 rifles. Yes, I know it's cheating, but I hope to shoot it without destroying the ancient stock so I hope everyone forgives me. I kept it to a bare minimum.
I also re-inforced the flaked and/or damaged wood aroudn the key ways using sawdust and epoxy. At the same time, I epoxied some 1/2mm thick walnut shavings into the ket slots to re-tighten up the keys so they don't come loose when handling the rifle. This is a pretty meticulous step, but if you are careful and patient, it really tightens up the keys in their slots. I also re-installed the keeper tacks and put a dab of cyano-acrylate glue on the heads to keep them in place.

I decided to go back to an old-faithful method and instead of staining the patches with cyano-acrylate, I used Fiebings oil dye to darken the patches to match the wood. For dark walnut stocks, I like the colours "chocolate" and "walnut". Chocolate is darker so I used it in areas where the wood grain was darkest and the walnut where it was lighter. Apply it with a small artist's brush, count to 60 or so, and wipe off the excess. Repeat. Then apply BLO once it's dry. n the below pics there's a coat of BLO soaking in. (coat No.2)
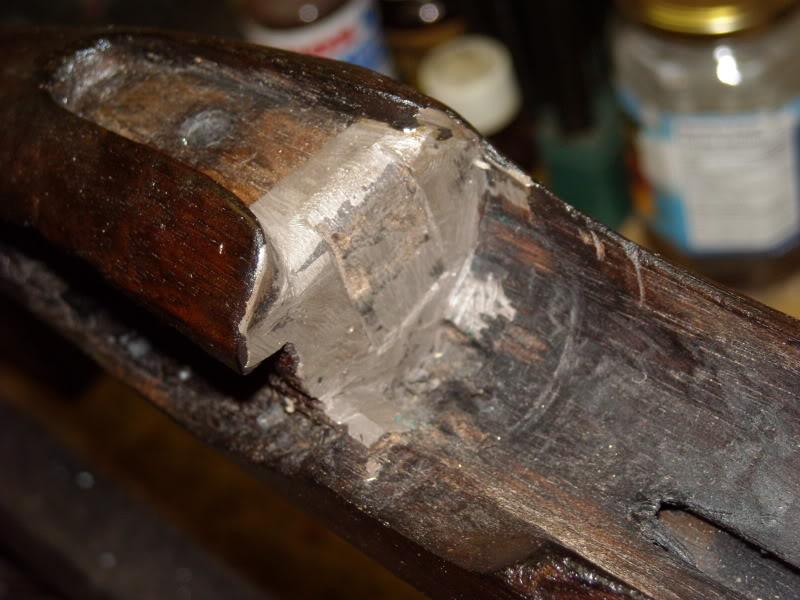
Toe repair blended fairly nicely:

Patch box repairs also blended very well:

So only about 8 more coats of BLO to go with 24hrs dry time between each and then a coat of 1/3 BLO 1/3 Bee's wax 1/3 turpentine melted together and allowed to dry to a paste wax. Fantastic stuff for that old smooth stock look.
My brass bits are still not back from the TIG welder so I'm in no rush.
Союз нерушимый республик свободных Сплотила навеки Великая Русь. Да здравствует созданный волей народов Единый, могучий Советский Союз!
-
-
-
The Following 3 Members Say Thank You to Claven2 For This Useful Post:
-
ok, well I got he rifle more or less finished tonight.
Here's how the bits looked like back form TIG welding, though I did take a couple file strokes on the trigger guard before remembering to take a photo - sorry!


Trigger guard dressed. Yes, the filler rod was slightly different composition than the hand-poured 170+ year old brass, but it's not that noticeable and once patinated it should be all but invisible. It had to do some minor bending and filing to get the guard to fit well into the inletting since the TIG process must have caused the tang to slightly warp since I last inletted the part. It was an easy fix though.

To drill the hole in the right spot, I used micrometer to locate the hole, more or less. I drilled it a bit undersized and then opened it up to best match the hole in the stock using a small rat-tail file. Once it was well centred, I counter-sunk the hole and polished the edges.

Screw installed:

The two rear screw holes had to be redrilled (remember this is a replacement trigger guard and the originals were hand-drilled in situ!). I re-used the original screws from the broken and partially missing original trigger guard.

Once the patchbox weld was dressed and the edge re-polished and fitted, I used a half-round file to cut a finger recess in the buttplate and polished the edges off. I think it looks great, though maybe too fine compared to an original?

And finally, all done:

Now where's my Staples/Office Depot "that was easy!" button???
Ultimately I'll be installing one of IMA's repro P1853 slings on it - should play the part well enough.
Союз нерушимый республик свободных Сплотила навеки Великая Русь. Да здравствует созданный волей народов Единый, могучий Советский Союз!
-
The Following 3 Members Say Thank You to Claven2 For This Useful Post:
-
Most commendable , sir!
-
Thank You to jmoore For This Useful Post:


 PM
PM


