-
FREE MEMBER
NO Posting or PM's Allowed

Help, a little trigger advice puhlease ...
... occasionally someone here, I think perhaps Son, pops up with a diagram showing the angles of the bolt engaging faces and the sear end.
Does any one have an eye on that diagram of the angles on the sear face and could post it again? ...
I've discovered that I have an awkward trigger on a no1mk3, it has grooves in the sear face where the two trigger bumps rub, and other little undesirable treats. The trouble really got going when I discovered that all 6 sears in the spares box have different cross section shapes at the bolt end.
Sears that are probably no4s have a quite square shape in cross section, the no1mk3s are quite rounded. Out of the 6 no two are alike in that cross section.
In the meantime I've been cleaning up the trigger/searface with 1200 wet and dry, and made a very light pass on the sear/bolt end to take off any very high spots, but a great deal of the bad feel remains.
What I'm getting is a stiff, dragging feel as I pull the trigger up along the first trigger pressure, the trigger comes along in jerky movements. It makes identifying the let off very imprecise.
Any ideas what part of the sear or bolt or trigger might be most responsible for that crunchy feel? I can see the striker knob move back slightly as I pull the trigger up.
thanks
Information
 |
Warning: This is a relatively older thread
This discussion is older than 360 days. Some information contained in it may no longer be current. |
|
Last edited by RJW NZ; 08-15-2010 at 02:25 AM.
-
08-15-2010 02:12 AM
# ADS
Friends and Sponsors

-
Edward Horton is a likely suspect for such drawings. Search posts under his name if he doesn't respond soon.
How's the sear engagement face of the cocking piece look? That's where i would start. Rarely do the other engagment surfaces give me fits.
-
Thank You to jmoore For This Useful Post:
-
-
Legacy Member

From the old Jouster Forum - posts by Peter Laidler :
Re SEARS, listen in .......
Posted By: Peter Laidler
Date: Mon 10 Dec 2007 9:02 am
In Response To: sear contact with full bent
Dear Anthropy and others ....., in the nicest possible way, this might be my next lesson. But here is lesson part 1. Also in the nicest possible way, judging from what I've been reading, DO NOT DO ANYTHING UNTIL YOU'VE READ THIS.
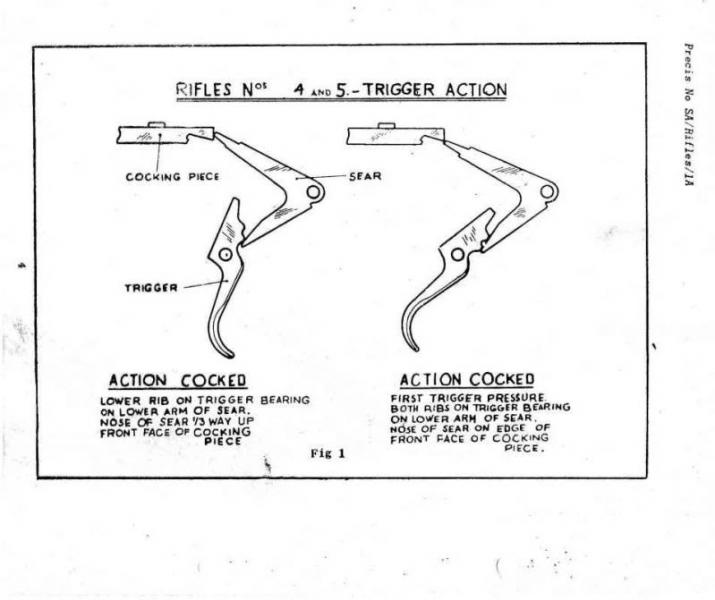
The cocking bent of the sear (the front face to give it its proper Armourers name) should start off SQUARE horizontally left to right and when measured vertically, from the bottom horizontal surface, it should slope outwards at 4.5 degrees. That is the starting point of a new sear and that is what we had the sears reground to should they need it.
Next. This SHOULD remain like this for ever and should only be touched for 1 reason in the whole wide world, regardless of what your uncle bill's father in law told your auntie who shot one in the war. And that reason is ......, but wait a minute!
Remember I told you earlier about the striker spring weight that must measure between 13 to 16 lbs in the fully cocked position? There are other very important weights that you MUST know about too. And they are these. The pull-offs. The first pull must be between 3 to 4lbs and the second MUST be between 5 to 6.5lbs. Repeat them after me. 1st; 3 to 4, 2nd; 5 to 6.5 pounds.
The only reason the cocking bent on the sear should be touched is to lighten or increase the pull off weights. There is NO other reason to vary this critical 4.5 degree angle.
In fact I would go as far as to say that if your pull-offs are light or heavy, change the striker spring FIRST because unless you have accurate measuring equipment and many years of experience, you a) won't get it horizontally square left to right and you certainly won't make the correct adjustment ot the sear bent ....., I can guarantee it!
That is part 1. Part two is this. If the cocking piece bent on the long arm of the sear is square and has a full radius, it WILL bear evenly and squarely on the cocking bent of the sear. Read that again. It WILL bear evenly and squarely.
So before we go any further, go and make sure that those two items are as per the specification. I'll come back later about trigger drag, long first pulls and whatever else is inter-related. Are you in for the long haul?
Re: Re SEARS, part 2
Posted By: peter laidler
Date: Tues 11 Dec 2007 5:06 am
In Response To: Re SEARS, listen in ....... (Peter Laidler)
Right, if you're all ready, then I'll begin part two of this series while I'm sitting at work with the full engineering regulations alongside me together with another Armourer, Geordie Ward, sat alongside too, for immoral support!
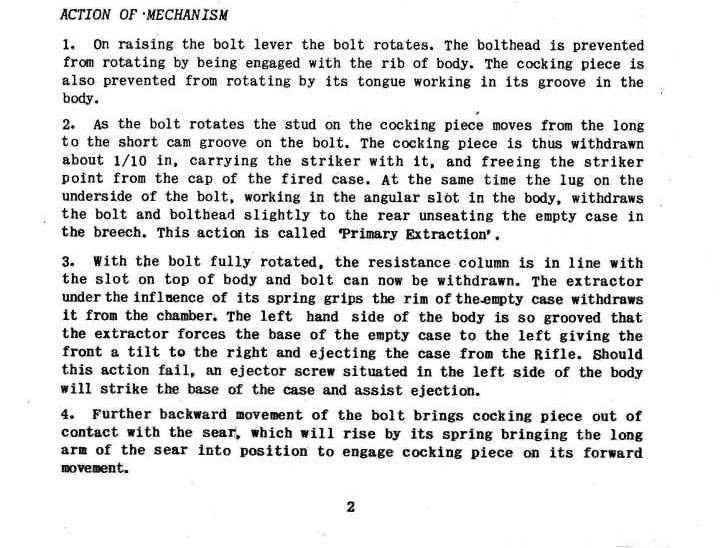
The HEIGHT of the long arm of the sear in the bolt way is decided by ONE THING and one thing only. It is prevented from rotating into the body by being obstructed by a ledge in the underside of the body, where the long arm intrudes into the bolt way. Have a look for this on yours ...... If it intrudes so far as to even touch or obstruct the small/lower bolt locking lug during the loading action, then the examiner had a small hard steel punch to set-up the steel in the ledge to give the rifle a further lease of life. But this 'set-up' is easily seen and noticeable and it is only done once.
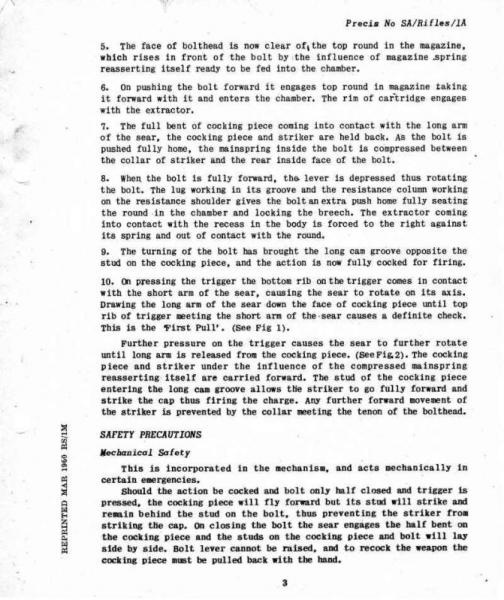
You can see now that while the trigger is relaxed, so long as the sear clears the small bolt locking lug, it is totally irrelevant where the nose of the sear contacts the cocking bent of the cocking piece.
There was a small relaxation in standards for the L42 rifles to cater for a small number that had wear in the bolt-way and allowed the sear to 'friction' against the small or bottom locking lug of the bolt. It didn't define 'friction' but it's accepted that there would be a distinct 'feel' as the small lug rode over the sear during the loading action. This relaxation allowed that a small flat could be ground on radius of the bottom lug, not more than 4.5mm across the flat, to clear the sear nose.
Have you got that? The height of the sear is correct IF IT CLEARS the small or bottom locking lug of the bolt during the loading action. Next, we'll look at drag and trigger action.
Are you still ready for the long haul?
SEARS, part 3
Posted By: Peter Laidler
Date: Fri 14 Dec 2007 11:37 am
You have all, hopefully, read and digested parts 1 and 2 of this article about the sear and its relation to the cocking piece. The next part I'll mention is 'drag'. In this article, Drag isn't what you're dressed up in to go out in on Saturday night or if my hazy memory serves me right, Bugis Street in Singapore, Not that I ever went there you understand. I was FAR too busy with my needlework classes and knitting scarves and socks for the needy.
Oh yes, harking back to an earlier note, I have sent Brian Dick, another regular forum contributor, a perfectly set-up but skeletonised L42 bolt (remember, with the small flat on the underside locking lug to clear the cocking piece .....). If you see him at a show, ask to see it and digest. The spring weights, overturn, protrusion and measurements are all to the most current FTR specification, just for your benefit
TRIGGER DRAG is usually caused by friction and I'll narrow it down to, in my very very limited experience in Enfield Rifle matters, to roughness as the lower bent on the trigger dragging down the sear during the first pressure or the nose of the sear (the cocking bent) dragging itself down the cocking bent of the sear. You should remember that when I told you about assembling a bolt CORRECTLY, I said that you must only ever polish the cocking bent of the sear UP AND DOWN and it's impossible to do this with the bolt asssembled. And when I say POLISH, I mean, POLISH with fine grade emery and not grind away at it with a bloody file! Armourers had 4 different grades of disposable emery sticks ....., but I digress
Likewise, the cocking bent of the sear should be polished likewise, with a rounded action, around the curvature to allow it to slide down the face of the cocking piece.
As for the lower arm of the sear, then the surface upon which the trigger acts should also be POLISHED, but in an up and down action and NOT in an acrossways action. From this you'll realise that the polishing action is in the direction of the movement of the parts.
Here's a little tip for you, should you ever need to replace the trigger, sear or magazine catch axis pins. Just get a couple of the 'PIN, cap, fore-end' and cut it to length and you'll have enough material to last you for the life of the rifle. That's what we used the pins for after we'd taken them from scrap fore-ends. If you feel the unnecessary urge to round or chamfer the ends, then feel free but during out huge FTR programmes with No4's and 5's, we didn't bother ...., just gently but slightly distort one end so that it holds secure in the body.
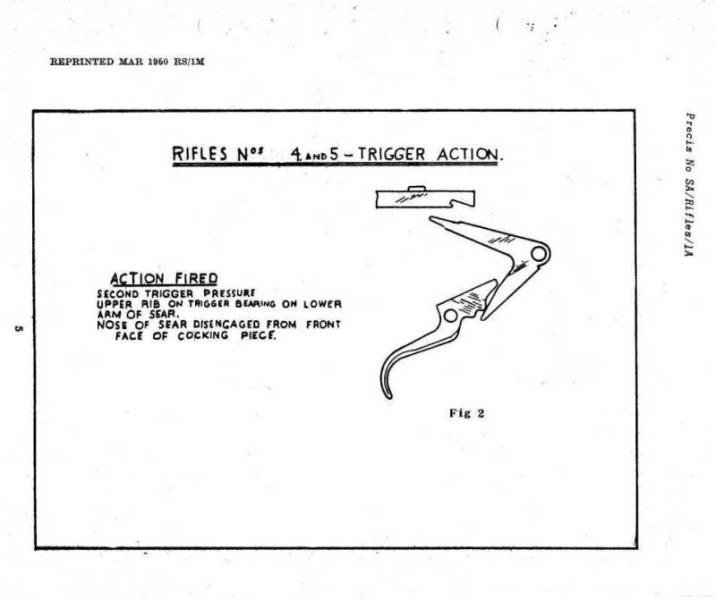
That's come to the end of this little section but in part 4, I'll mention about getting the first and secone pull-offs right. Not just RIGHT, but DEAD right. But if you have a cocking piece that's loose on the striker, then this won't apply to you because there ain't a snowball in hells chance that you will achieve perfection. Are you STILL in for the long haul?
Mine are not the best, but they are not too bad. I can think of lots of Enfields I'd rather have but instead of constantly striving for more, sometimes it's good to be satisfied with what one has...
-
The Following 4 Members Say Thank You to Alan de Enfield For This Useful Post:
-
Banned

-
FREE MEMBER
NO Posting or PM's Allowed
Thanks Ed, thats just what I was after ... some of these terms and what they apply to have been really confusing without seeing whats what, cheers R
-
FREE MEMBER
NO Posting or PM's Allowed
Hi Ed, and ..., I'm still getting drag on the trigger and just wanted to check something with you I don't see covered here; where the long arm of the sear engages the cocking piece, whats the ideal shape of the very end of the sear, the tip, in cross section would it be squared, like some I have, or rounded, like others I have?
I'm not sure how to explain this properly, I think I'll make a sketch and post it ...
-
Squared off! No rounding.
Any tool marks on the cocking piece and sear face must be vertical, but the smoother the better. Generally, the cocking piece will have to be removed to work it properly. An alignment jig will help scads, how you onsruct one is up to you, but it doesnt have to be elaborate or expensive to work.
-
-
FREE MEMBER
NO Posting or PM's Allowed
Thanks JMoore, that makes sense, the older mk3 stuff has rounded over years of use and the newer no4 stuff not so much, thanks ...
PS I've been trying for ran hour to upload a diagram but my 'file upload manager' is stuffed full of 8mb of pics and won't take any new items. I've been looking everywhere to find a delete button to dump the old pics, or even one, but no such luck, any ideas anyone? How to empty out the file upload manager that kicks in when we're trying to import a picture to a post?
-
The nose of the long arm of the cocking piece should be rounded. As to what radius........., well, in simple mechanical terms, it could be the radius of the centre of the axis pin hole to the end of the long arm but I always make a neat slightly smaller radius. As JM says, all the working you do must be vertical/top to bottom on the sear and cocking piece
-
Thank You to Peter Laidler For This Useful Post:
-
FREE MEMBER
NO Posting or PM's Allowed
Thanks Peter, much appreciated, it was well worth getting to the right answer, its for a fultons rifle that deserves to be spot on, and has to be to earn its keep at the range, lol. cheers R


 Register To Reply


") )
)