-
 Building the BP trade rifle from a TOTW kit
Well, I'm going to build a TOTW Lehman Trade rifle in left handed flint and figure it will be fun to document the build. For those looking to try one of these, these builds are not quite as easy as the TOTW ad copy makes them out to be if you want it to look as nice as the finished rifles displayed on their page.
Hopefully this will be an instructive thread that helps people decide if this project is within your abilities and if so, as a guide so as not to make any of the mistakes I sometimes make - LOL.
So as for what to expect when ordering... well, for starters, your kit will not ship with a lock n all likelihood. Track does not usually keep many locks in stock, so it will be backordered and arrive later - you will get dinged with shipping costs twice as a result, so get ready for that.
Depending on the stock grade you order, the price of the rifle can be vastly different than the initial pricing you see. In the case of this kit, all-in price (August 2010) was about $750 with a fancy grade maple stock (semi-inlet - more on that later).
Now for state of parts. You will get raw sand or wax castings. What does this mean? Well, the photos will help, but it means no surfaces on anything will be finished. few, if any, holes will be located or drilled. no mating surfaces will mate without tool work, and not all possible parts (like some small screws or springs) will be included. This is NOT like a Lyman or Pedersoli kit where are you do is sand and finish the stock then install everything. Do not expect that.
The stock will have the barrel channel roughly inlet, but not the tang or even the rear of the barrel itself. The ramrod hole will be drilled. There will be no lock inletting done. The buttplate are will be rough from the carving machine.
These rifes can be made with iron or brass trim. I prefer iron so this build will reflect that. If you aren't great at metal working, consider the brass set - its easier to work with and more forgiving.
Now if you're not scared away yet... here's some pics of the things I already started before deciding to begin this thread.
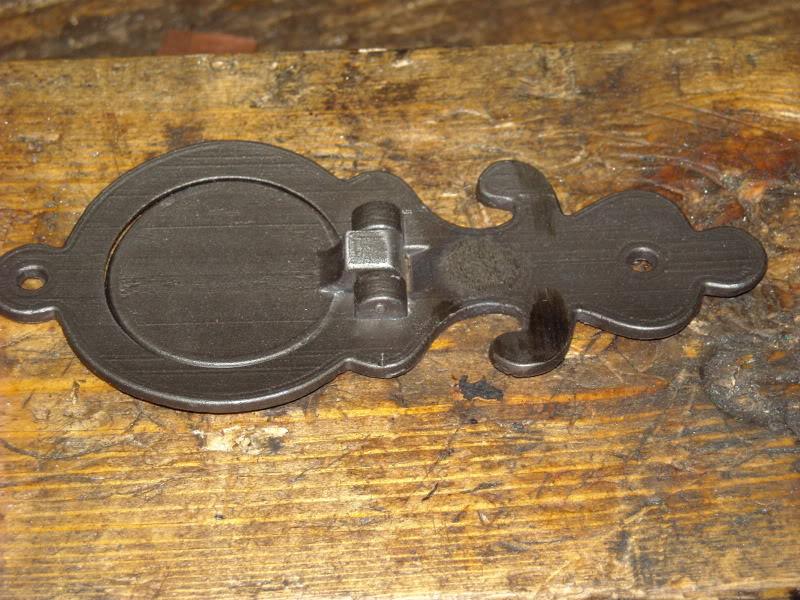
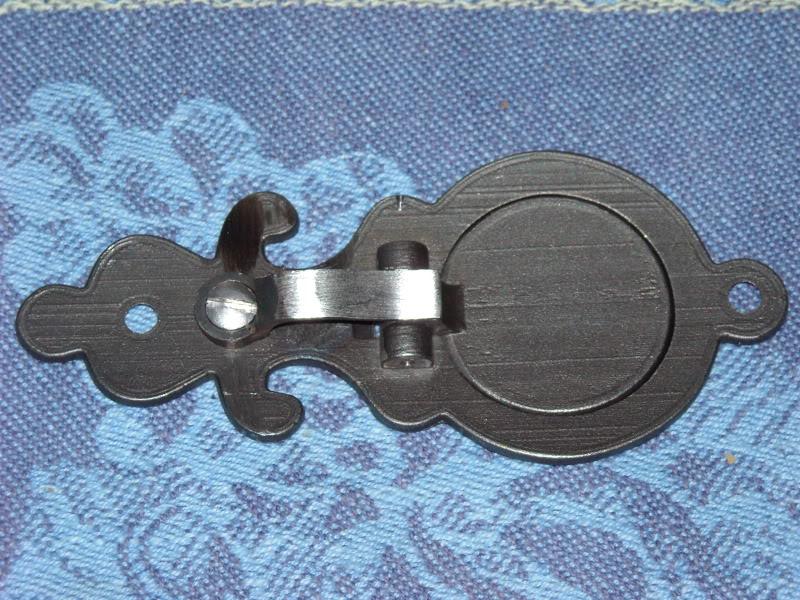
This is how the patch box arrives to you. No casting sprues are removed apart from a rough grind. No casting burrs are removed. The finish is as-cast.
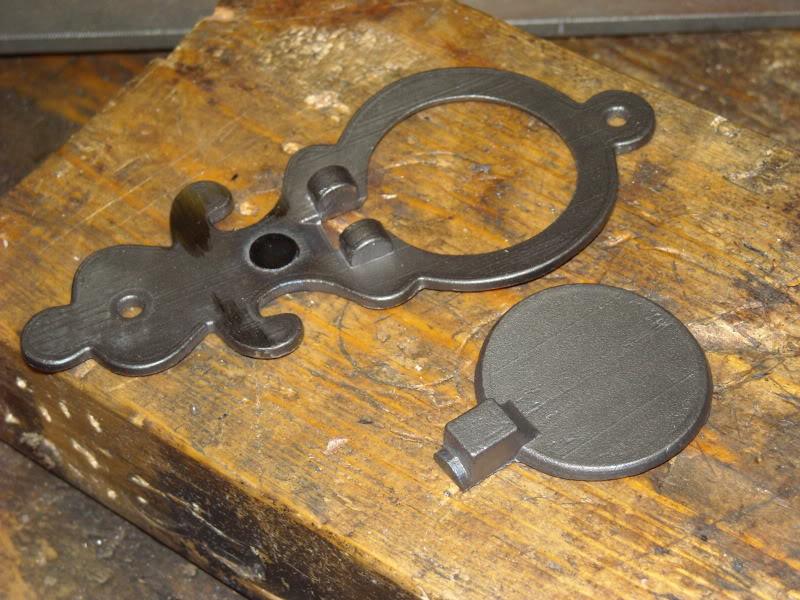
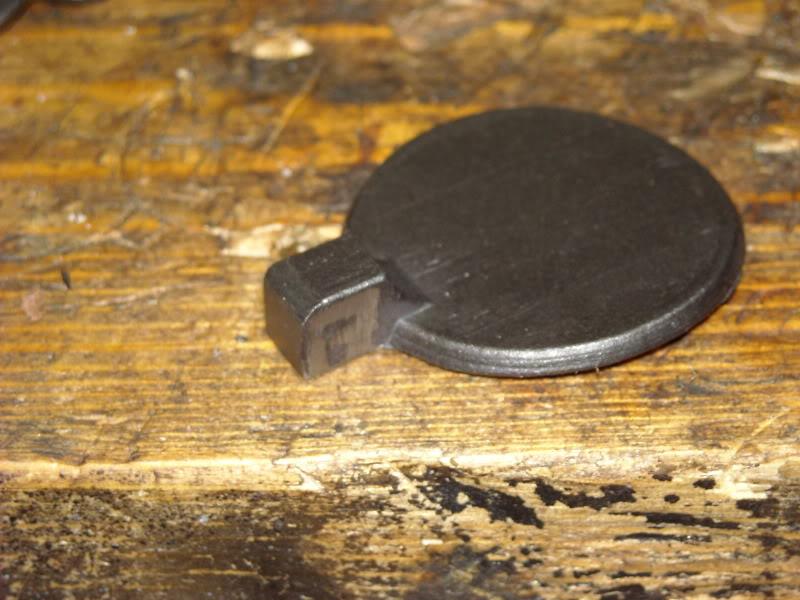
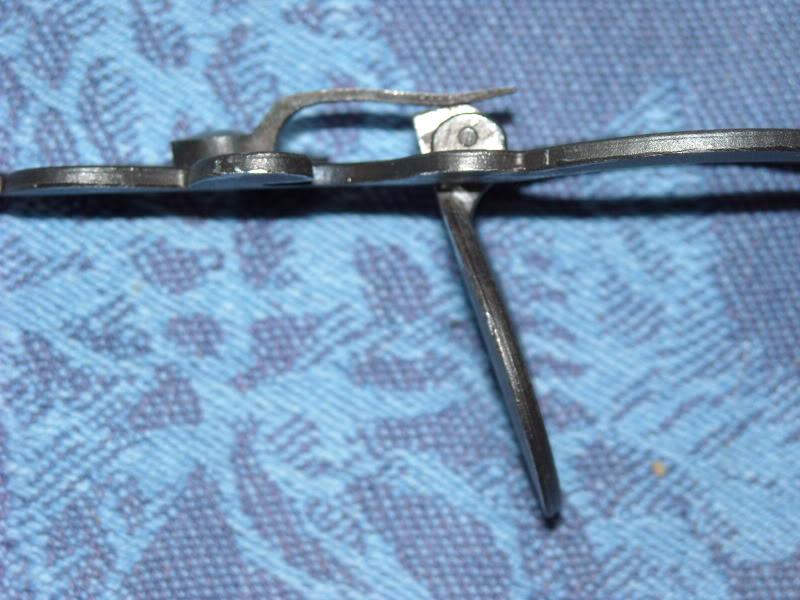
Here I started shaping the door hinge. Not the sprue is filed off and I started rounding the bottom rear edge. This will be to accommodate a latch spring which isn't included with the kit that I will have to make and install later.
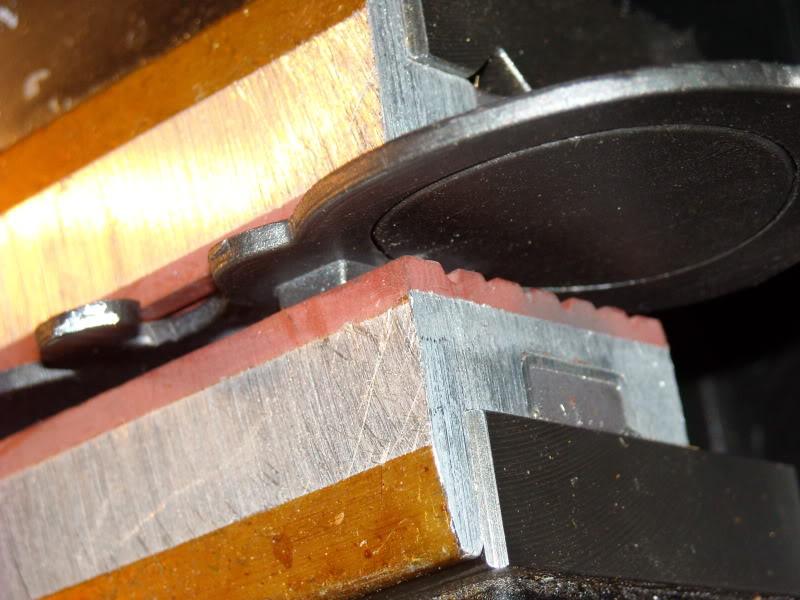
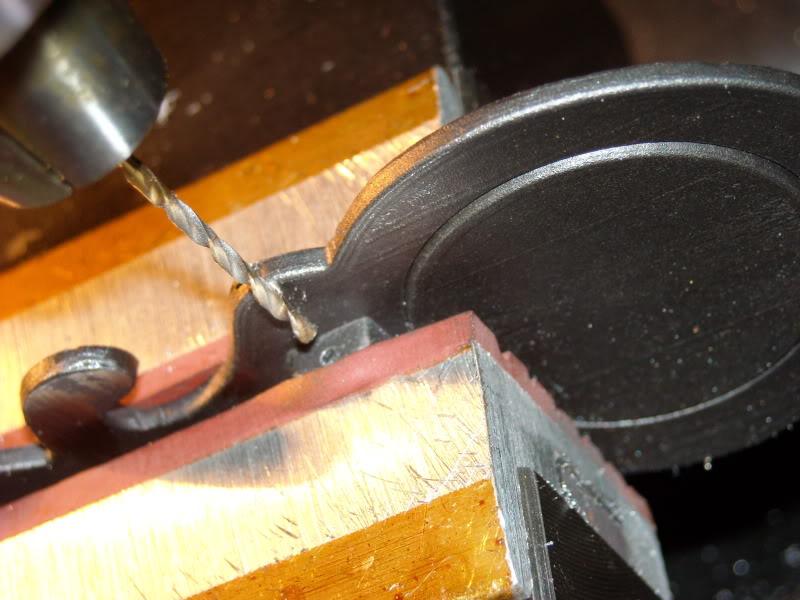
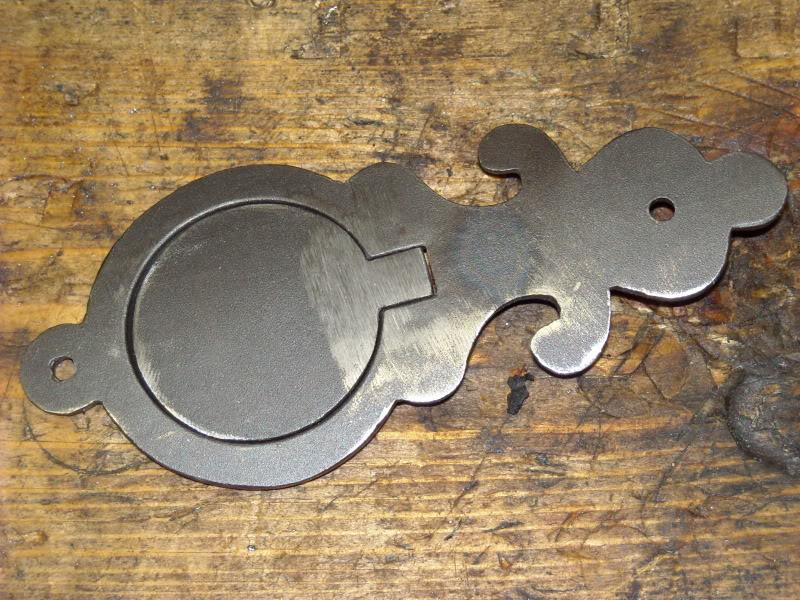
Next I use soft-jaws in the milling vise to start setting up for the drilling operation that locates the hinge pin. I used a 3 axis milling machine, but a good job can be done with a drill press if you are careful. Start with an oversize drill or centre-drill to divot the surface before you actually the pilot hole. This will prevent bit wandering - you need this hole to be precisely aligned Drill the hinge plate and door together, clamped as shown. If you don't have soft jaws, use leather to prevent your vise from bending or chewing up the parts.
Work up through several drill sizes until the pin will fit in. I drill mine a thou or two oversize and when I do final install on the stock, I will peen either end of the hinge plate to prevent the pin form coming out.
Pinned:
Now once it's pinned you will not the doow and the hinge plate will not be flat to one another at the hinge. Use a mill file to correct this.
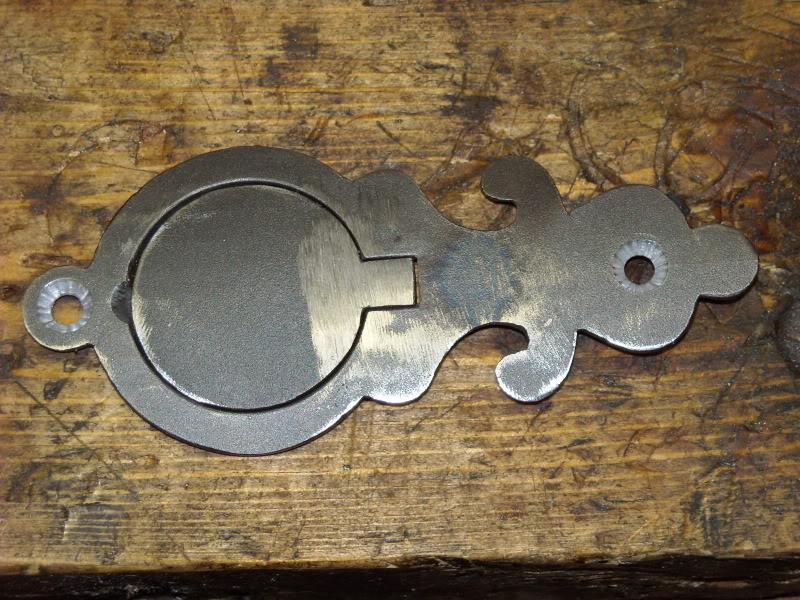
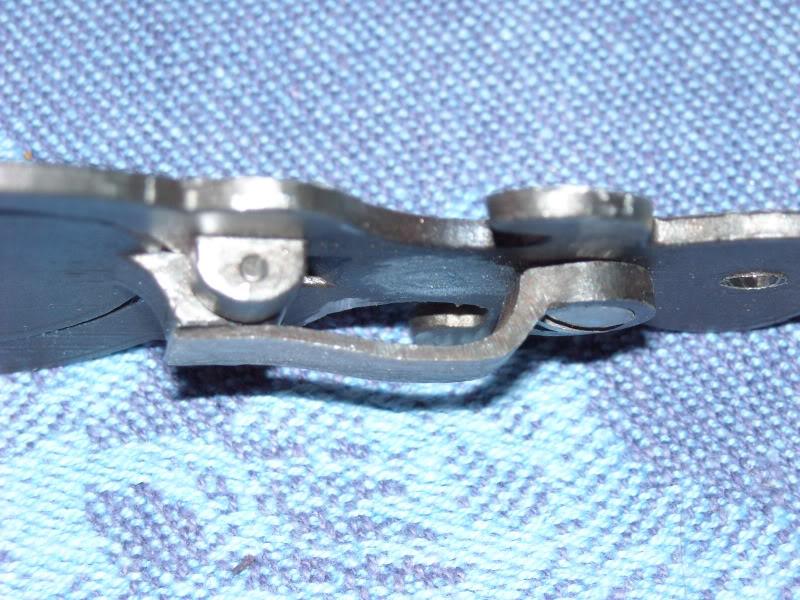
Finally (for now) select the wood screws you want to use - track provided some that will work - and select a counter-sink that matches the screw head pitch. Before fitting, de-bur the screws - mine were pretty crude. The hinge plate had rough as-cast holes already there for the screws. I drilled mine smooth to match the screw shanks and used the counter-sink until my screw heads were 90% inlet. The rest will be blended after installation in the stock. Don't forget to file a little recess into the hinge plate for your fingernail so that you can open the door once the patchbox is inletted into the stock.
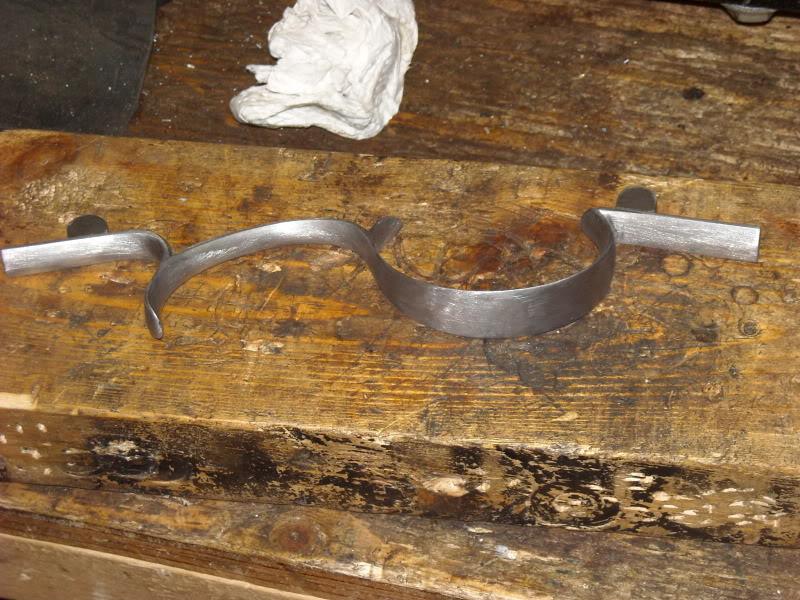
Now the trigger guard. It comes ROUGH. Sand-cast rough. Use a hacksaw and then a file to remove the sprue and then a file to shape the pin tangs. File off the casting seams and then wrap a small half-round file with 120 grit wet/dry paper and start into it. I don't go past 120 until I have the guard semi-inlet later, then I'll go 180 and finally 400 grit.
Have patience - the sanding is the longest part BY FAR - but how good a job you do here will dictate how it looks later after install. You want it to look custom-built, not machine made like a Lyman Great Plains rifle off the rack.
Sanded to 120:
More to follow.
Information
 |
Warning: This is a relatively older thread
This discussion is older than 360 days. Some information contained in it may no longer be current. |
|
Союз нерушимый республик свободных Сплотила навеки Великая Русь. Да здравствует созданный волей народов Единый, могучий Советский Союз!
-
The Following 6 Members Say Thank You to Claven2 For This Useful Post:
-
09-05-2010 10:24 AM
# ADS
Friends and Sponsors

-
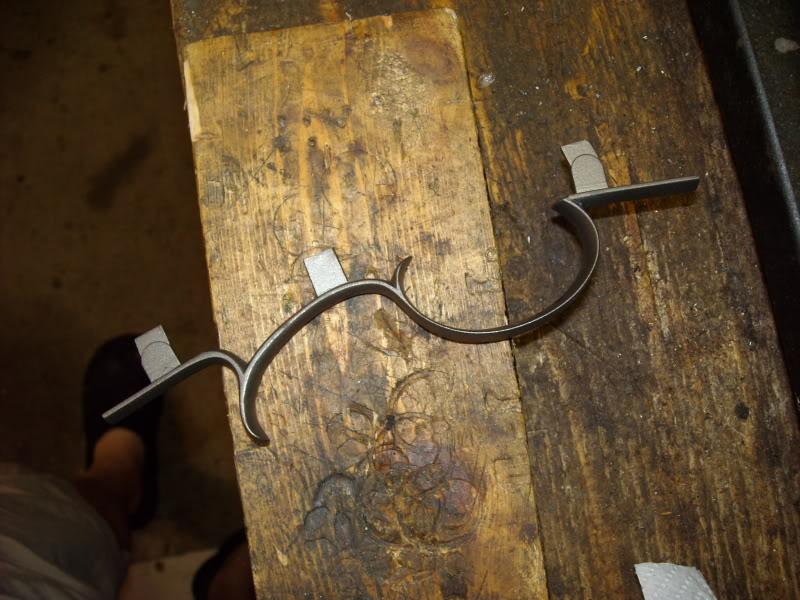
ok, today I made the spring assembly for the patch box. For a spring I used an old spring off an SMLE bolt head release. I heated it up and re-bent it to shape, ground off some excess material, and then re-tempered it. The screw was turned in the lathe from a hardware store screw. I also burnt the zinc off it with muriatic acid. Turned out reasonably well and it does a great job of holding the door open or closed. I set the amount of tension by slowly grinding material off it until the cross-sectional thickness was appropriate.
Союз нерушимый республик свободных Сплотила навеки Великая Русь. Да здравствует созданный волей народов Единый, могучий Советский Союз!
-
Thank You to Claven2 For This Useful Post:
-
-
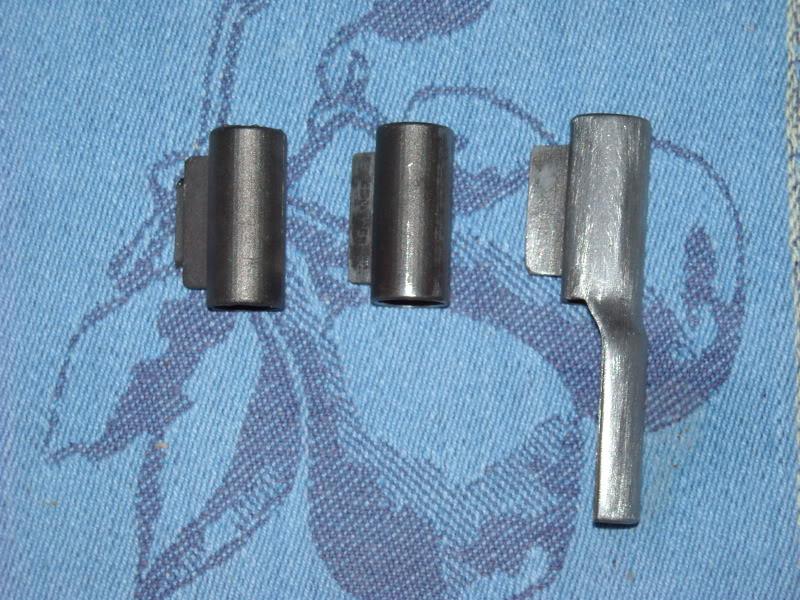
OK, here's a good representative pic of what you have to do for the ramrod pipes. From left to right:
1) As received except I already ground the sprue back close enough that I have to switch to a file. It arrived almost 1/2" long.
2) File-cleaned to remove casting seams, imperfections, etc. and the mouths bevelled by hand with a counter-sink bit.
3) Finish sanded to 120 grit. I don't go further than this prior to inletting as they will just get scratched up anyhow. After inletting they will get polished to 400 grit.
Союз нерушимый республик свободных Сплотила навеки Великая Русь. Да здравствует созданный волей народов Единый, могучий Советский Союз!
-
The Following 3 Members Say Thank You to Claven2 For This Useful Post:
-
FREE MEMBER
NO Posting or PM's Allowed

LOL about you didn't get a lock with the kit. That's standard for TOTW. They already have your money correct.
Some of their suppliers want payment when they order the parts. For these suppliers TOTW waits until they have sold X number of kits. They have your money and don't care if you have to wait. Once they have the cash from several kit sales they will order the parts and then ship them to the customers'.
TOTW doesn't pay their bills until it's 90 days past due. Neat isn't it. They have your money AND can keep it in the bank. They also want their suppliers to wait to get paid. Then they get you for another shipping charge.
Don't get me wrong, you will be getting quality parts. I just have a problem with the way they do business.
Check the barrel and breech plug with a dial caliper. I've have seen some of their breeching operation are 20 to 40 thousands off.
-
Thanks for the tip on the breech plug  I'll check that. Either way, it IS fixable.
Союз нерушимый республик свободных Сплотила навеки Великая Русь. Да здравствует созданный волей народов Единый, могучий Советский Союз!
-
-
FREE MEMBER
NO Posting or PM's Allowed
I'm looking forward to see your progress on this
-
FREE MEMBER
NO Posting or PM's Allowed
-
unfortunately it has not progressed these last 3 weeks. I spent two of them in British Columbia on business and the replacement barrel has not arrived yet (the original had a fatal machining flaw on one of the flats). I'll post as soon as I can progress it
Союз нерушимый республик свободных Сплотила навеки Великая Русь. Да здравствует созданный волей народов Единый, могучий Советский Союз!
-
-
OK, well the replacement barrel (36" .54cal Green Mountain) arrived on Friday. they told me it was their last .54 GM barrel in stock - something about GM getting a US Army contract to produce machine-gun barrels and their commercial orders being insanely backed-up as a result. Lucky me
Now when you get these, they are surface-ground on the flats to what looks like approximately 80grit. I think they also must have changed to a less expensive supplier of breech plugs. According to their plan set that ships with the kit, the breech plug is supposed to be already contoured and sized. Mine was neither, though I did pull the plug (it was in b@lls-deep tight) and measured the clearance. Distance to rifling is exactly 0.630" and the plug is exactly 0.630" long - so no wonder it's in so tight at top-dead centre. It's completely bottomed-out which is a very good fit. Much better than I expected.
Here's the barrel internal threading. It looks die-cut to me, not machined. Either way though, it IS well done and the thread fit (male to female) is very good.
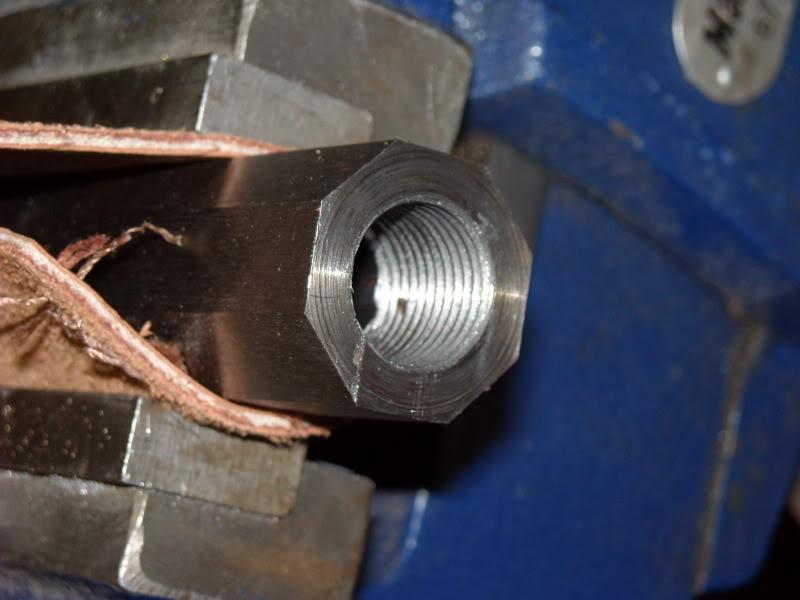
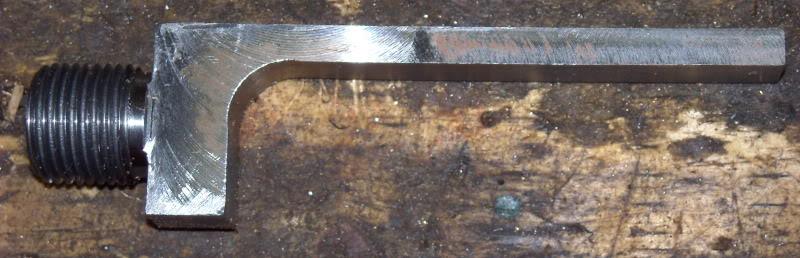
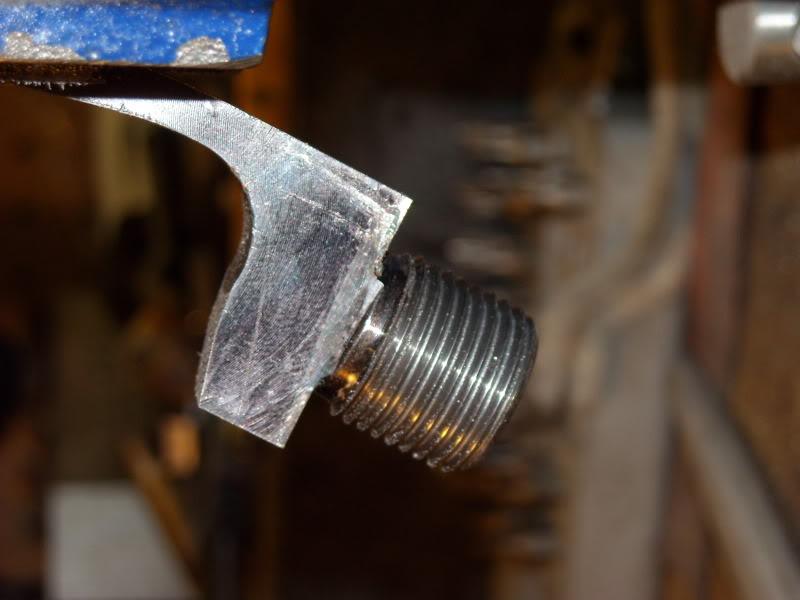
And this is the plug as-received. It is taller than the barrel is and MUCH longer than the plans call for, leading me to believe it's a generic part made for any number of their rifle models. It's machined from what looks like hot-rolled billet. The machining is nice enough executed, though the facing cut (lathe done) could have been a little smoother, but it'll work fine as-is.
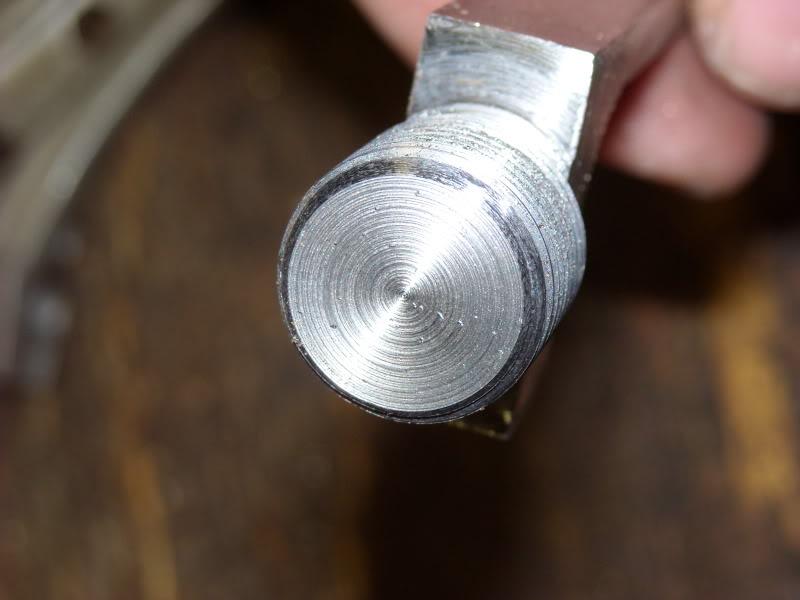
Here you see the base is proud and the witness marks they made don't line up well.
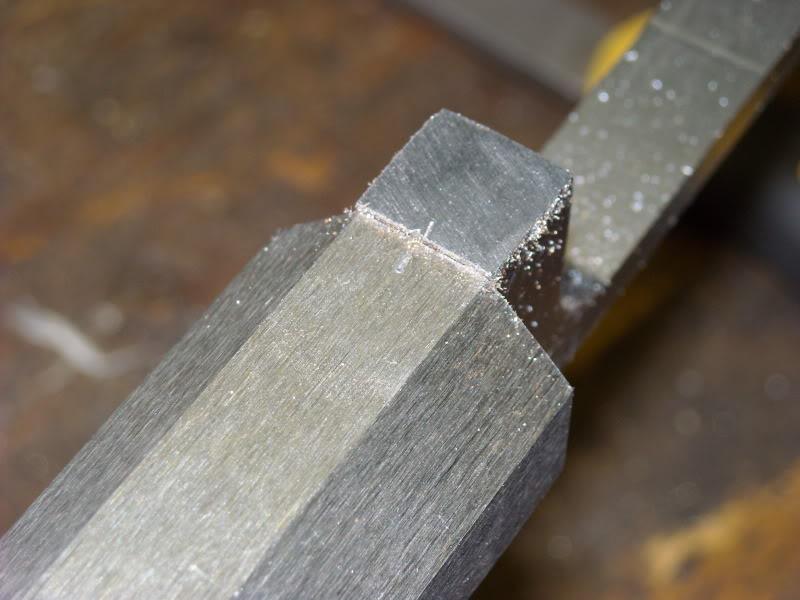
I filed the base flush to the flat and re-struck the witness mark, better this time.

This is what the tang that the instructions say is included was supposed to look like. The top one is a cardboard cutout I made to act as a template for when I use hte oxy-acetylene torch to heat up the tang and bend it to the right profile.
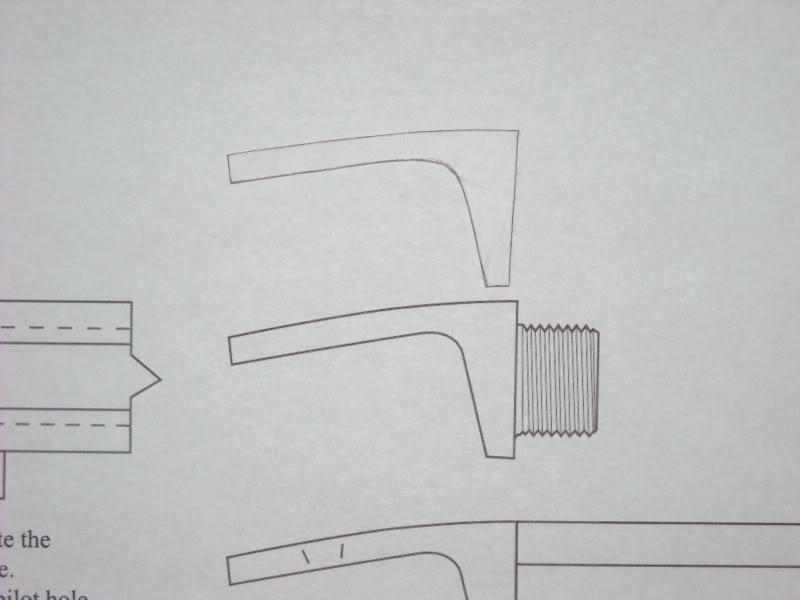
Here the tang is after bending and it's been scribed to match the template.
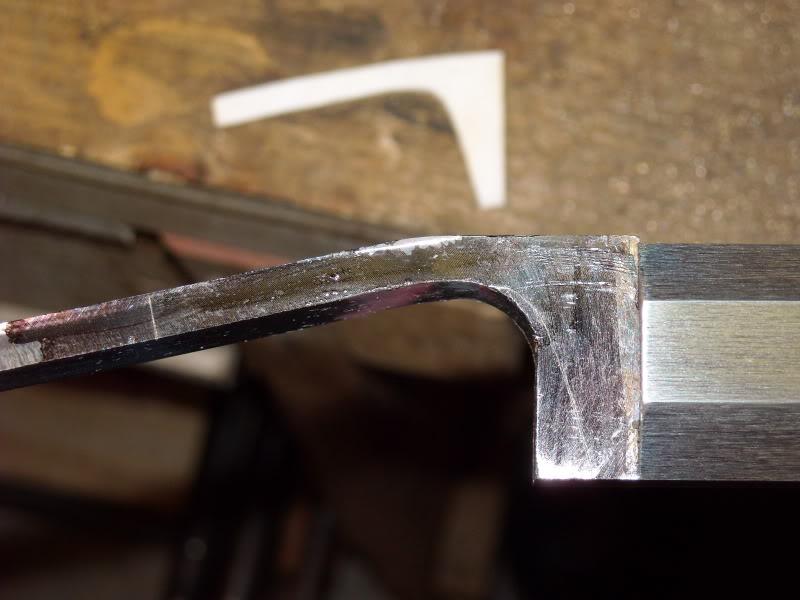
And now the top of the tang is filed flush.
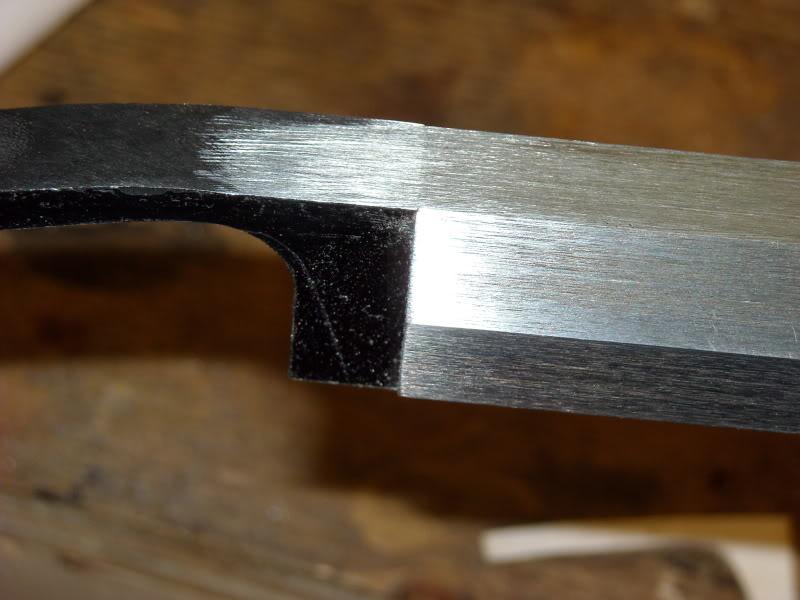
Plug removed and I'm now shaping the tang to match the template scribe-marks with a file.
Cut to length and filed to shape:

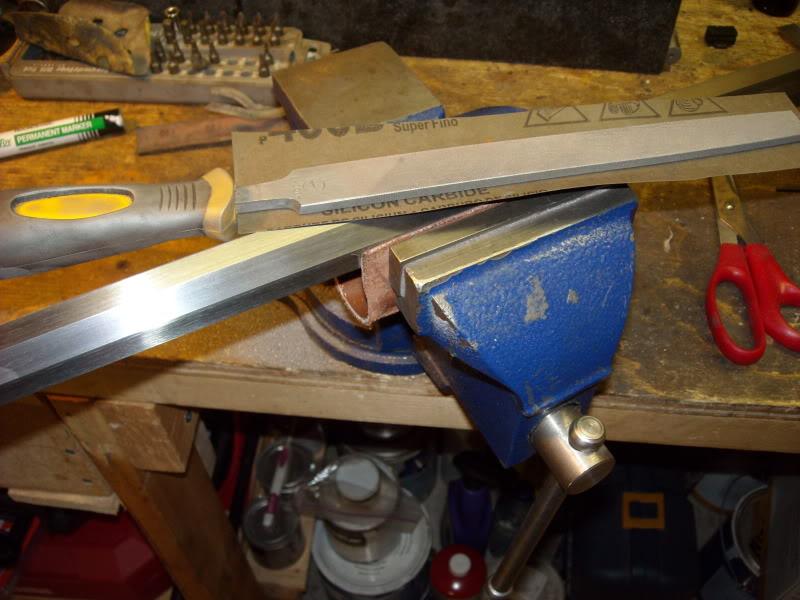
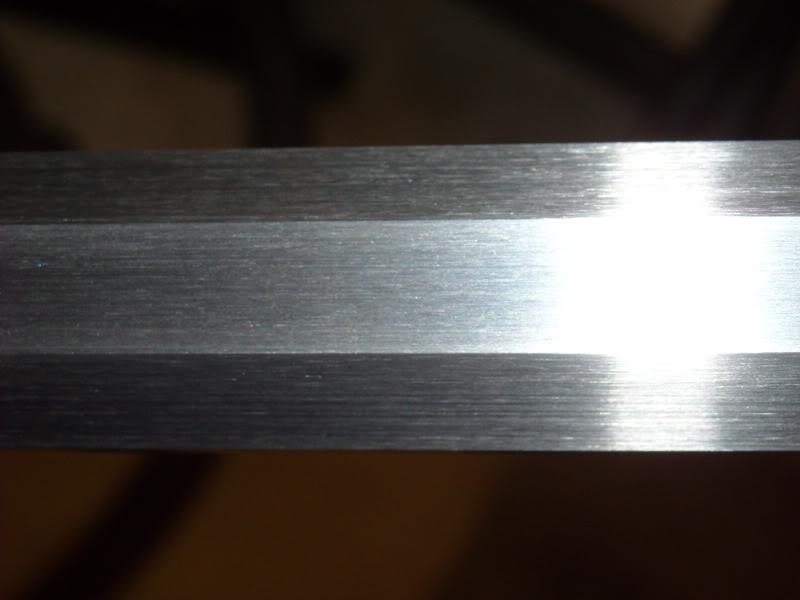
Now to draw-file the 5 exposed flats to 400grit. For reference, the left-flat is as-received (surface ground coarse), the right flat has been draw-filed to 400 grit.
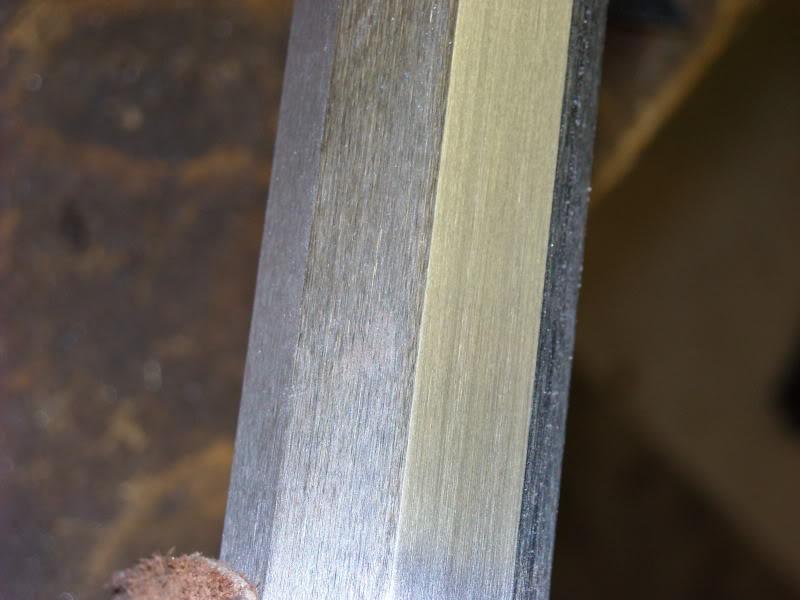
To draw file (for those who don't know) means to draw your file lengthwise down a barrel to make sure you get no ripples in the surface finish like you would get with localized sanding or filing. I find you get the best results with the file about 45 degrees to the axis of the barrel, flat on the barrel flat (you need a steady hand so the file doesn't wobble) and you either push the file down the length of the barrel or pull it towards you. Which you use is personal preference, but I find I get more control by pushing the file away from me. I also find you get much better results if you push the file down the entire length of the barrel with one continuous pass, repeated as many times as needed to get the finish you want.
On a rough-machined barrel you would start with a smooth file and then graduate to varying grits of paper. On these Green Mountain barrels, you already have 80 grit or so. I start with a smooth file to press 120 grit wet-dry paper over the length of the barrel. The file keeps the paper pressed flat to the steel ensuring you don't round off the corners of the flats. After 20 or 30 strokes (with practise you can tell when enough is enough by eye) I switch to 180 grit and repeat. After 180 I go to 400 which is about all you need if you are going to brown the barrel. If you are going to rust-blue it and you want it to have a higher sheen, go to 600 and then deaden the gleam a little with a scotch-brite pad.
And here are the top three flats at 400 grit.
Союз нерушимый республик свободных Сплотила навеки Великая Русь. Да здравствует созданный волей народов Единый, могучий Советский Союз!
-
The Following 2 Members Say Thank You to Claven2 For This Useful Post:
-
Oh, and by the way, I forgot to mention - the instructions for the rifle and the ad copy forthe stock is that all you have to do to fit the barrel is to square up the back of the inletting. this is not true as the inletting is too narrow for the barrel, so next up, I will have to widen the inletting and square the end of the barrel channel. I might have to deepen it too - we shall see. It's only a few thou too narrow, so instead of chisels I may use a file or a small sanding block.
Союз нерушимый республик свободных Сплотила навеки Великая Русь. Да здравствует созданный волей народов Единый, могучий Советский Союз!
-
The Following 4 Members Say Thank You to Claven2 For This Useful Post:


 PM
PM


