+ Reply to Thread
Page 4 of 7 FirstFirst ... 2 3 4 5 6 ... LastLast
Results 31 to 40 of 69

Thread: Building the BP trade rifle from a TOTW kit

Click here to increase the font size Click here to reduce the font size
  1. #31
    Senior Moderator
    (Founding Partner)


    Site Founder
    Claven2's Avatar
    Join Date
    Oct 2006
    Last On
    08-09-2023 @ 10:17 PM
    Location
    Scandaltown, Ontario
    Posts
    3,242
    Real Name
    Ronald
    Local Date
    04-29-2024
    Local Time
    04:53 AM
    Thread Starter
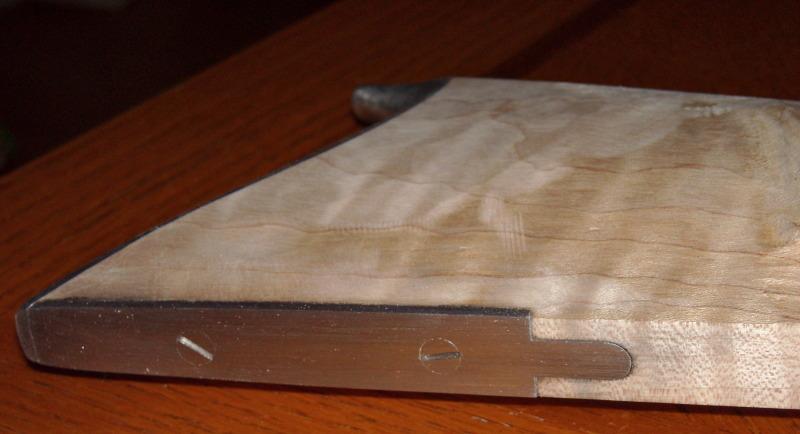
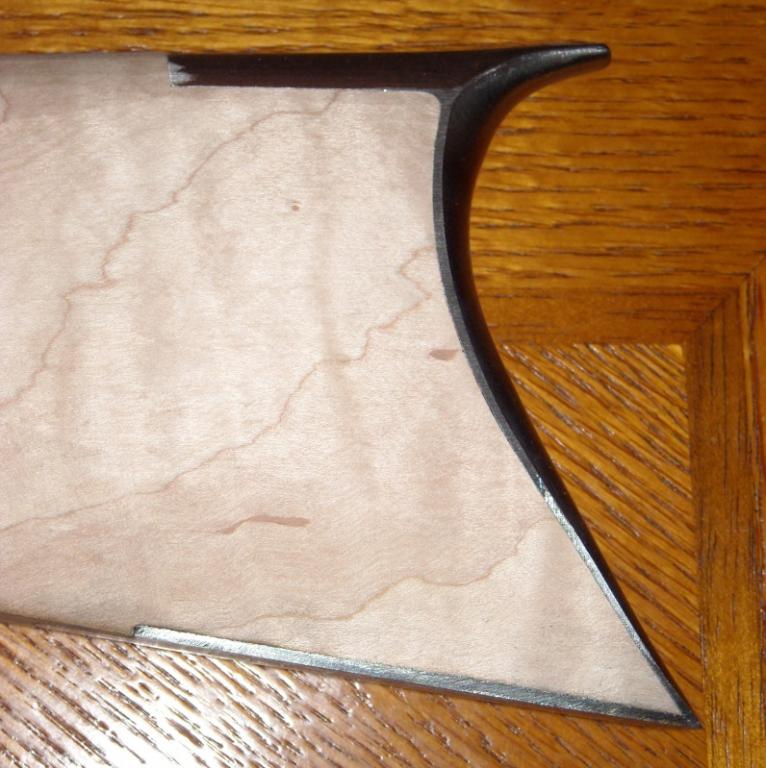
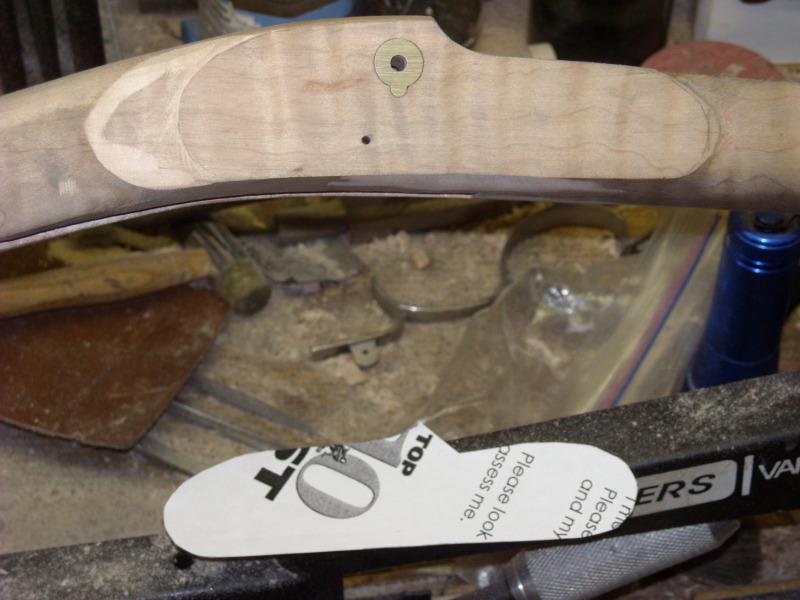
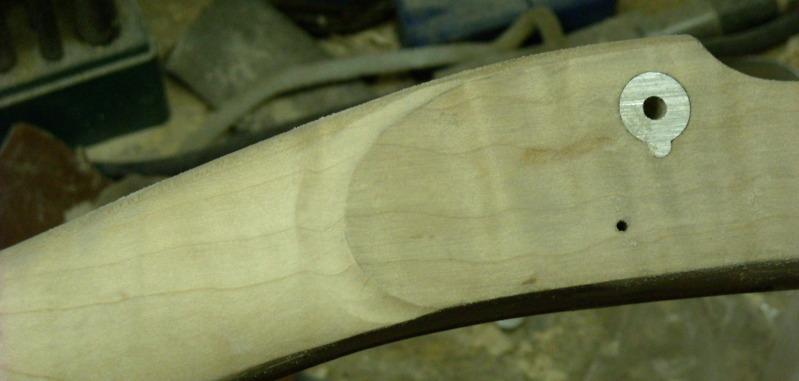
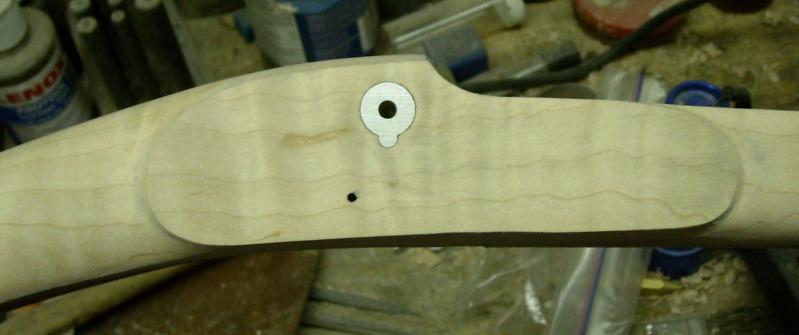
    ok, as promised, pics of the tope plate inletted and installed:


    Note that the stock has also been reduced in width to the size of the buttplate.

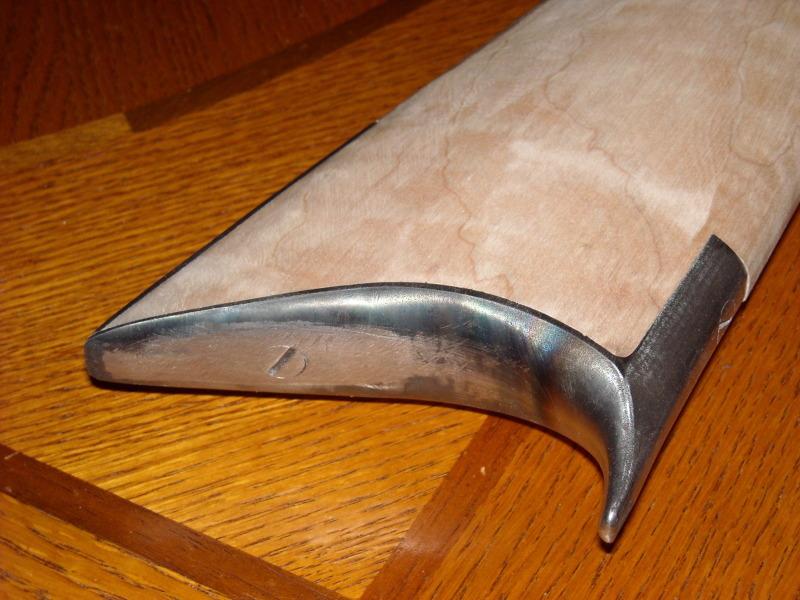
    Now here is the forestock tip rasped down to transition to the nosecap:


    Союз нерушимый республик свободных Сплотила навеки Великая Русь. Да здравствует созданный волей народов Единый, могучий Советский Союз!

  2. Thank You to Claven2 For This Useful Post:


  3. # ADS
    Friends and Sponsors
    Join Date
    October 2006
    Location
    Milsurps.Com
    Posts
    All Threads
    A Collector's View - The SMLE Short Magazine Lee Enfield 1903-1989. It is 300 8.5x11 inch pages with 1,000+ photo’s, most in color, and each book is serial-numbered.  Covering the SMLE from 1903 to the end of production in India in 1989 it looks at how each model differs and manufacturer differences from a collecting point of view along with the major accessories that could be attached to the rifle. For the record this is not a moneymaker, I hope just to break even, eventually, at $80/book plus shipping.  In the USA shipping is $5.00 for media mail.  I will accept PayPal, Zelle, MO and good old checks (and cash if you want to stop by for a tour!).  CLICK BANNER to send me a PM for International pricing and shipping. Manufacturer of various vintage rifle scopes for the 1903 such as our M73G4 (reproduction of the Weaver 330C) and Malcolm 8X Gen II (Unertl reproduction). Several of our scopes are used in the CMP Vintage Sniper competition on top of 1903 rifles. Brian Dick ... BDL Ltd. - Specializing in British and Commonwealth weapons Specializing in premium ammunition and reloading components. Your source for the finest in High Power Competition Gear. Here at T-bones Shipwrighting we specialise in vintage service rifle: re-barrelling, bedding, repairs, modifications and accurizing. We also provide importation services for firearms, parts and weapons, for both private or commercial businesses.
     

  4. #32
    Legacy Member Bear43's Avatar
    Join Date
    Nov 2010
    Last On
    10-23-2021 @ 08:11 AM
    Location
    South Dakota, USA
    Age
    49
    Posts
    151
    Real Name
    Mike Shea
    Local Date
    04-29-2024
    Local Time
    04:53 AM
    I wish I had the talent and equipment to do what you do. This is turning out beautifully!

  5. Thank You to Bear43 For This Useful Post:


  6. Avoid Ads - Become a Contributing Member - Click HERE
  7. #33
    Senior Moderator
    (Founding Partner)


    Site Founder
    Claven2's Avatar
    Join Date
    Oct 2006
    Last On
    08-09-2023 @ 10:17 PM
    Location
    Scandaltown, Ontario
    Posts
    3,242
    Real Name
    Ronald
    Local Date
    04-29-2024
    Local Time
    04:53 AM
    Thread Starter
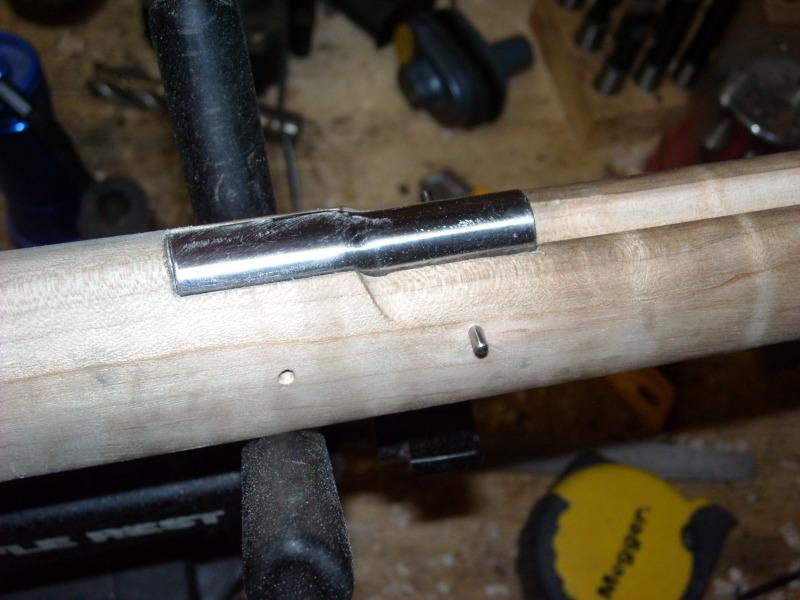
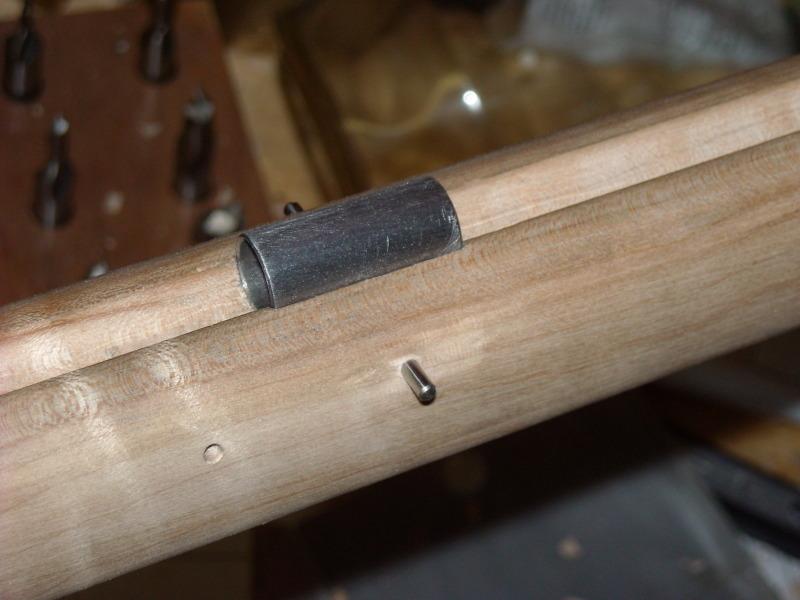
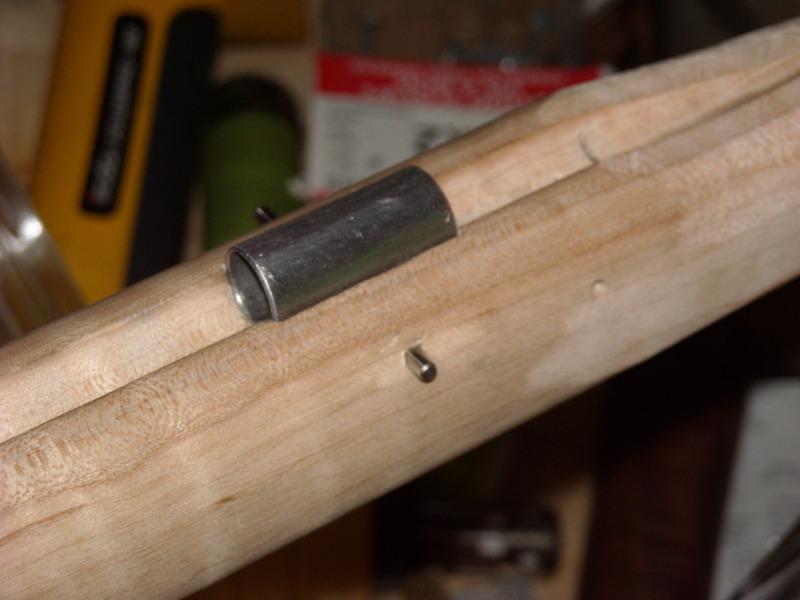
    Next step was to drill the pins for the ramrod ferrules, so that has now been done.


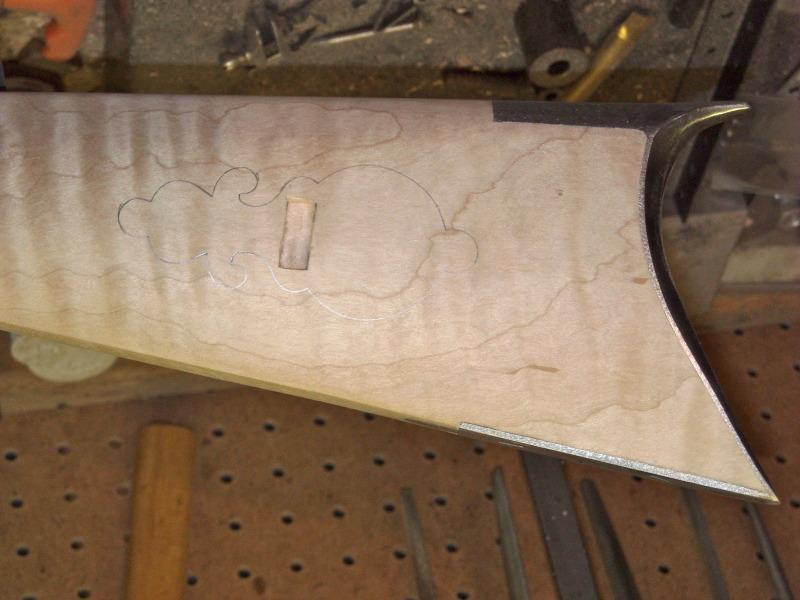
    After that, I disassembled the patch box and cut a recess for the hinge lugs, then traced the outline. Next step is to inlet it.

    Союз нерушимый республик свободных Сплотила навеки Великая Русь. Да здравствует созданный волей народов Единый, могучий Советский Союз!

  8. Thank You to Claven2 For This Useful Post:


  9. #34
    Senior Moderator
    (Founding Partner)


    Site Founder
    Claven2's Avatar
    Join Date
    Oct 2006
    Last On
    08-09-2023 @ 10:17 PM
    Location
    Scandaltown, Ontario
    Posts
    3,242
    Real Name
    Ronald
    Local Date
    04-29-2024
    Local Time
    04:53 AM
    Thread Starter
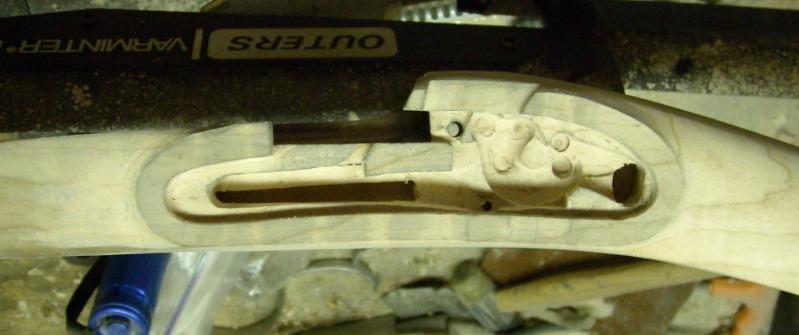
    Time to start inletting the patchbox plate. Obviously, you strip the plate first to doe this, then re-assemble and inlet the operating mechanisms. The round cutout for the patches is the last thing you inlet.

    Here the plate is rough inlet, still a tad proud. I'm slowly taking it down to flush. This is a fairly complex inlet and you need to take your time to keep gaps to a minimum.
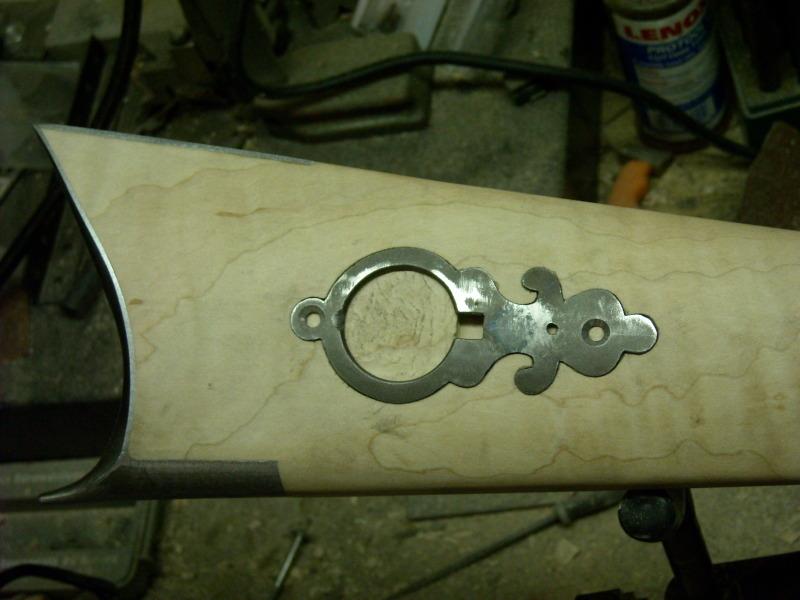
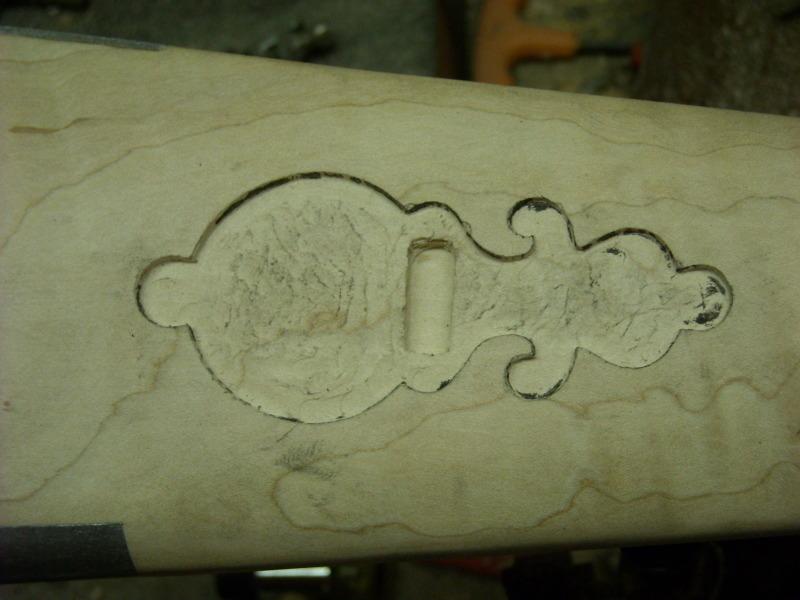


    I start with a fine dremel gouging tip to get within a milimeter or two of my scribe lines and then switch to a scraping chisel and inletting black to strive for a tight fit. This is literally one of the only things you should ever use a dremel for on a gun build IMHO
    Союз нерушимый республик свободных Сплотила навеки Великая Русь. Да здравствует созданный волей народов Единый, могучий Советский Союз!

  10. The Following 2 Members Say Thank You to Claven2 For This Useful Post:


  11. #35
    Moderator
    (Lee Enfield Forum)


    tbonesmith's Avatar
    Join Date
    Sep 2007
    Last On
    04-05-2024 @ 02:42 AM
    Location
    Sydney, Australia
    Posts
    1,076
    Real Name
    Thomas Smith
    Local Date
    04-29-2024
    Local Time
    08:53 PM
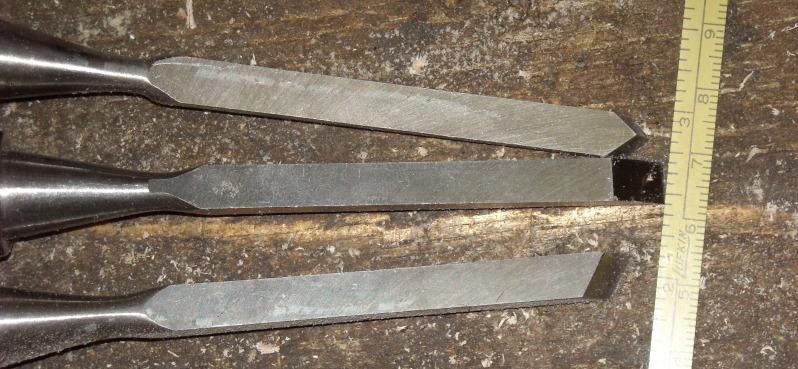
    Can you post a pic or 2 of the chisels/gouges you used for the inletting (around the outline)?

  12. #36
    Legacy Member gew8805's Avatar
    Join Date
    Dec 2008
    Last On
    07-19-2022 @ 08:59 AM
    Location
    Virginia
    Posts
    578
    Local Date
    04-29-2024
    Local Time
    05:53 AM
    Claven, an excellent start on the forend, fitting the tip is often a buggaboo for beginners, your tutorial will help those who have not done these things before. Please also show the results of slimming the entire forearm, that too will benefit everyone. People may miss the fact that there is a great deal of wood to be removed.

  13. #37
    Senior Moderator
    (Founding Partner)


    Site Founder
    Claven2's Avatar
    Join Date
    Oct 2006
    Last On
    08-09-2023 @ 10:17 PM
    Location
    Scandaltown, Ontario
    Posts
    3,242
    Real Name
    Ronald
    Local Date
    04-29-2024
    Local Time
    04:53 AM
    Thread Starter
    Hey guys, sorry to take so long to answer, I was out in BC on business last week. Since you asked, here are the chisels I use as scrapers. For around the perimeter of shallow outlines, I use the 45 degree chisel (the one on top) flipped upside down as a scraper. It works well as long as you aren't dragging it into the open grain, so for half the inlet you pull it one direction, for the other half, you pull it in the other direction so that you are always pulling along or away from open wood grain, if that makes sense?


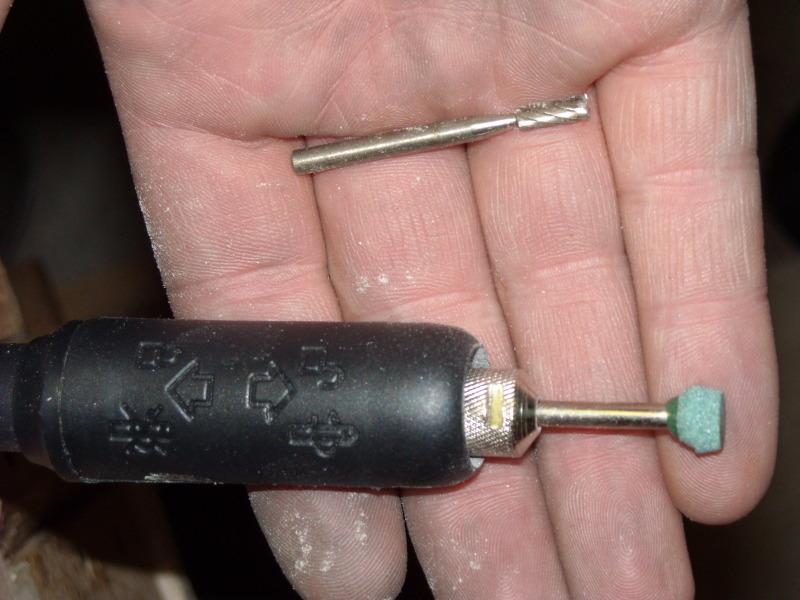
    For removing the material roughly in the middle, I use a dremel flex shaft as pictured mounting the small wood gouge bit (loose in my hand above). GO SLOW. A slip can ruin your inlet in a big way. I keep the speeds pretty slow, around a "2" on my 8 speed rotary tool.


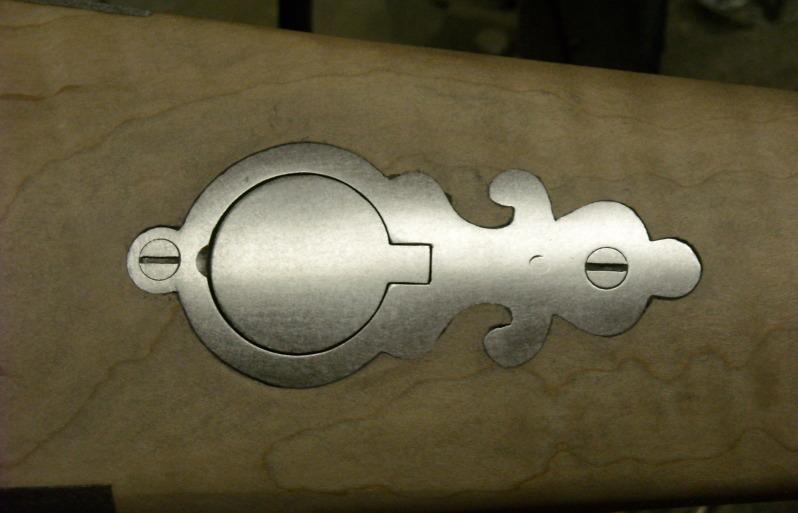
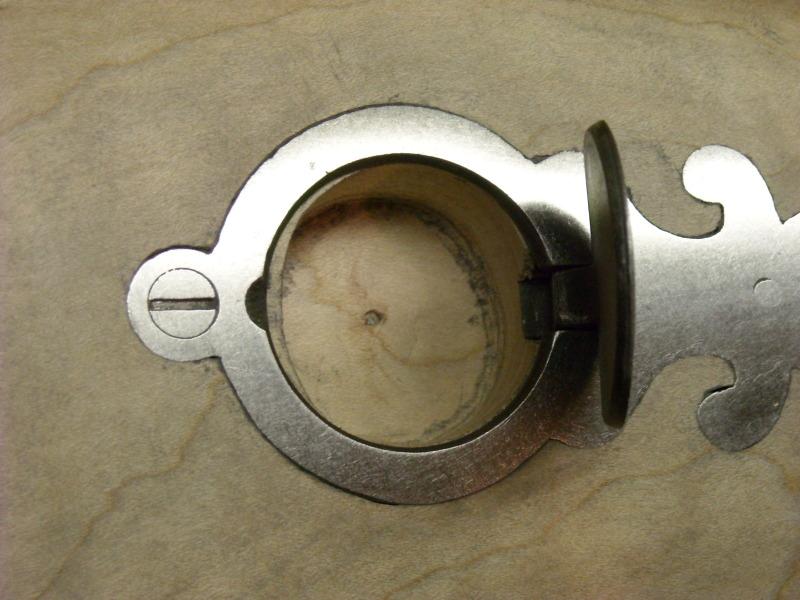
    Here the inlet is done and the exterior is lightly sanded. I need to sand it flush to the wood a hair more, but will wait until the stock is completely shaped before I do more finish sanding I think.


    And here we see the hole underneath. I don't cut this with a spade drill like some guys do, it's actually a bit D-shaped. I like leaving a small lip of wood at the front end because these steel wax castings fit fairly loosely and if you want the door to sit up flush with the main plate after it's installed, it helps to leave just enough wood to press the door up a hair. I actually ground out the recess roughly with a gouging bit and then use a small drum sander and sanding disc to smooth the insides of the patch box recess.


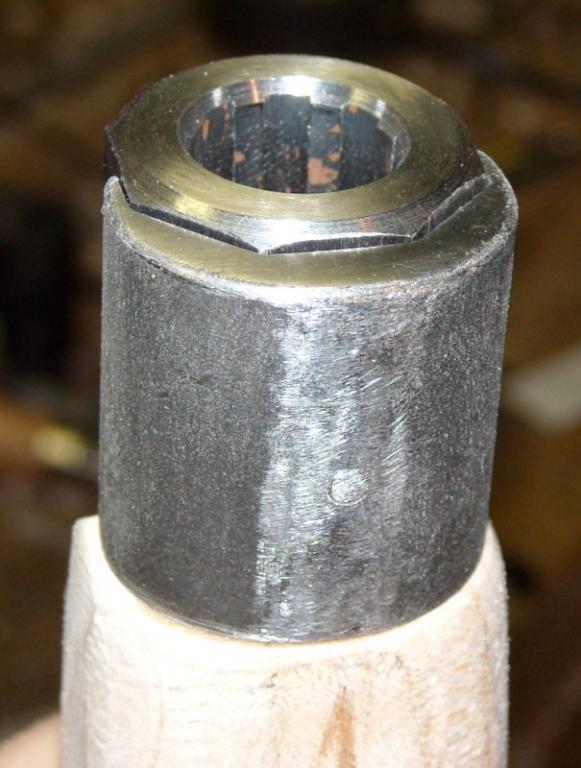
    Ans since the nosecap came up, this pic show where I set the nosecap, just to the base of the points at the corner of each barrel flat:
    Союз нерушимый республик свободных Сплотила навеки Великая Русь. Да здравствует созданный волей народов Единый, могучий Советский Союз!

  14. The Following 2 Members Say Thank You to Claven2 For This Useful Post:


  15. #38
    Senior Moderator
    (Founding Partner)


    Site Founder
    Claven2's Avatar
    Join Date
    Oct 2006
    Last On
    08-09-2023 @ 10:17 PM
    Location
    Scandaltown, Ontario
    Posts
    3,242
    Real Name
    Ronald
    Local Date
    04-29-2024
    Local Time
    04:53 AM
    Thread Starter
    Next I decided it was high-time I profile around the lock plate. I traced the perimeter I wanted in pencil, and went at the remainder with files until I had the profile I wanted.


    At this stage, you take a piece of plain paper and rub around the edges of the profile with the end of a pencil. Then you cut out the shape and use it as a pattern to trace the identical profile on the reverse side, then copy it there


    Once I have some excess material removed, I file a "dish" cut around the profile I want like so...


    then I feather out the dis cut to the narrower grip section, and voila!

    Союз нерушимый республик свободных Сплотила навеки Великая Русь. Да здравствует созданный волей народов Единый, могучий Советский Союз!

  16. The Following 2 Members Say Thank You to Claven2 For This Useful Post:


  17. #39
    Senior Moderator
    (Founding Partner)


    Site Founder
    Claven2's Avatar
    Join Date
    Oct 2006
    Last On
    08-09-2023 @ 10:17 PM
    Location
    Scandaltown, Ontario
    Posts
    3,242
    Real Name
    Ronald
    Local Date
    04-29-2024
    Local Time
    04:53 AM
    Thread Starter
    So now we get to forearm thinning. There are a number of ways to do this, and I find which you use is HIGHLY dependent on the type of wood. For straight grain wood, bar nonw, I like a proper scraper. This one is made by Veritas and is pretty high-end, interchangeable blades, etc.
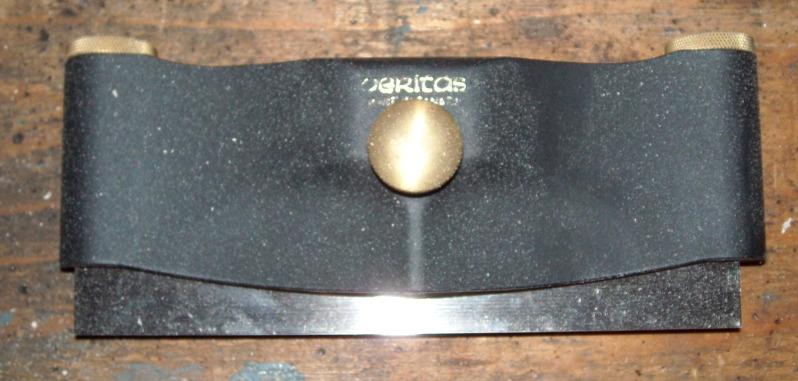


    The problem with fiddlebacked maple, however, is that a scraped edge will leave a wavy surface due to the nature of the grain and you will have to sand it smooth again, so make sure you leave some meat for sanding if you use a scraper. I typically will only use it in small areas that need precise removal of material when working with fiddleback maple.

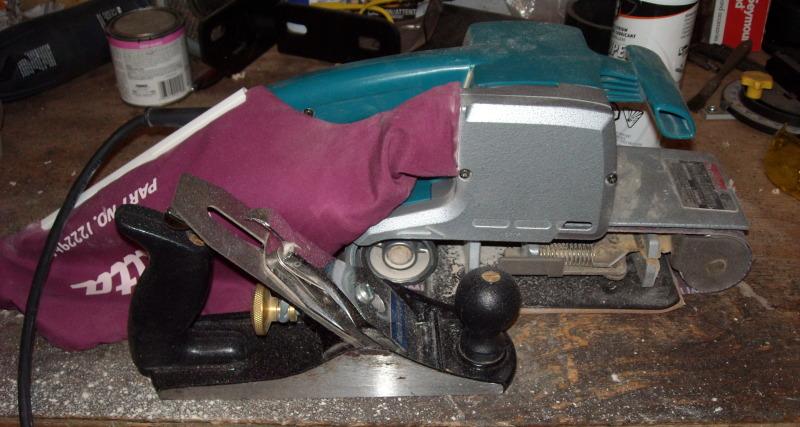
    Next, you have the wood plane. This works OK if you have long flats to remove material from, but for fiddleback you need to keep it razor sharp and only remove very thin curls of wood. I will use this to remove high-points I'm trying to round, etc.

    Now I know it sounds crazy, and frankly it does require a LOT of practise to not ruin the piece, but for fiddleback, I like an industrial power belt sander like this Makita. DO NOT USE the 80 grit belts they come with or you WILL remove too much wood and ruin the stock. Buy a 120 grit belt, clamp the stock REALLY firmly in a good vise (use leather to pad the jaws) and GO SLOW. 2-3 seconds of sanding, stop and check, repeat. You can scribe lines, but I just do it by practised eye. I don't use a sander for straight grain,. but for fast removal of a lot of wood from fiddleback, IF YOU ARE VERY CAREFUL, this way works and leaves you with a flat, non-grain-wavy surface.


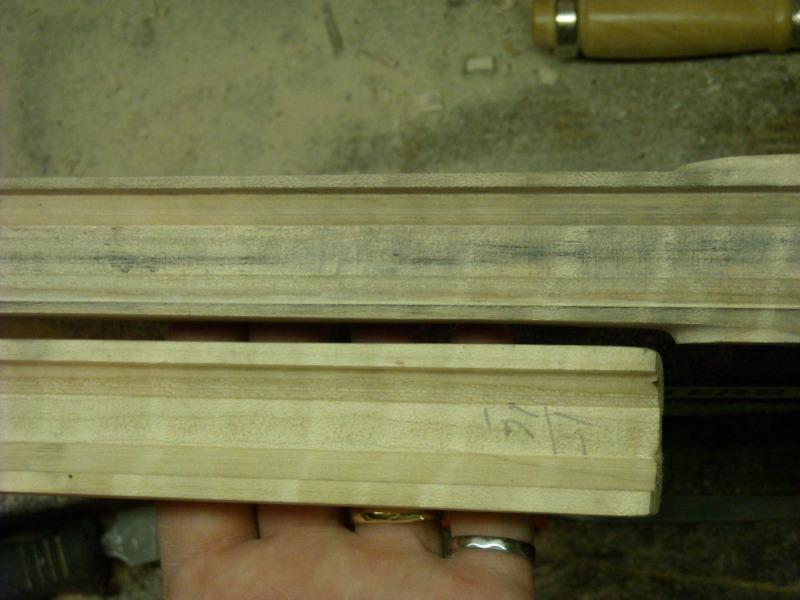
    Now here is a chunk of the original forearm from when I shortened it to show you how much the stock has been thinned:
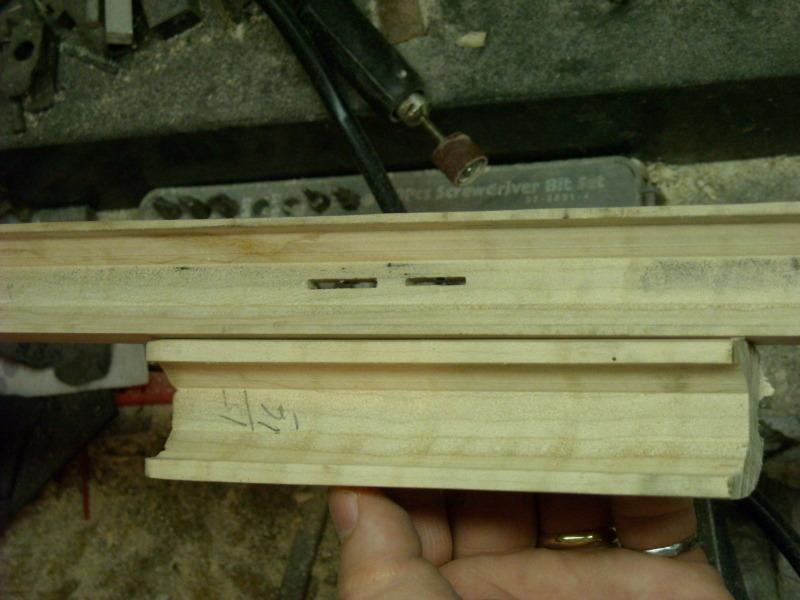


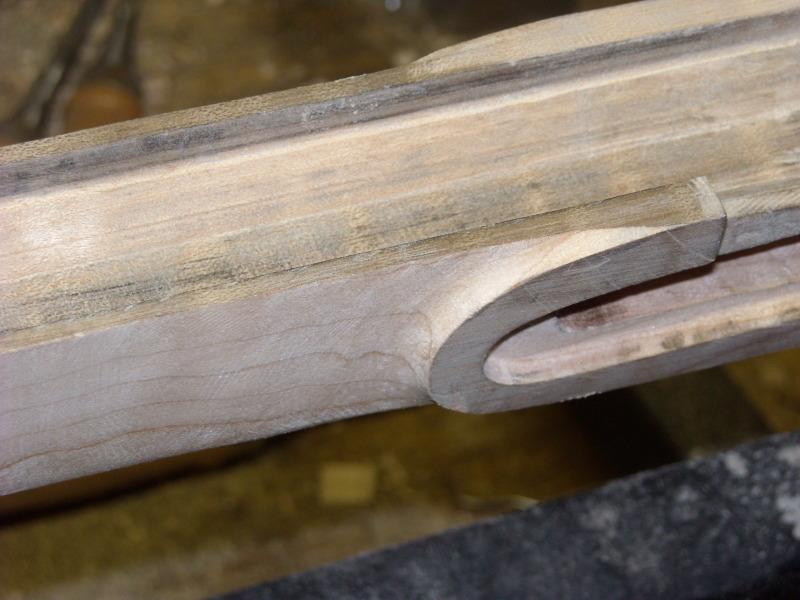
    Notice when we approach the lockplate flare and the cosmetic flare on the opposite side, I let the barrel channel walls get slightly thicker, this is to fill out the hand a bit where the stock is gripped.


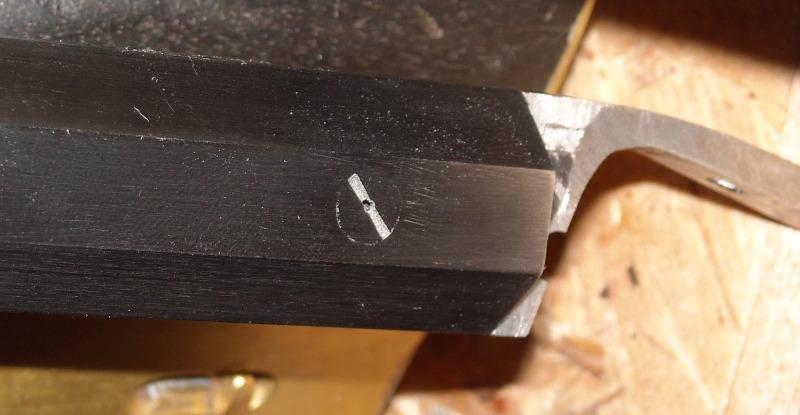
    Oh, I also fit the touch-hole liner. This ones is TOTW brand liner threaded 1/2x28. I recommend you drill this with the barrel clamped in a vise on a milling machine - you only get one chance to drill it to the right diameter. Use a centre-drill prior to drilling to final diameter and mark the location first with the barrel and lockplate installed to best locate the flash hole. put a 90 degree bevel on the finished hole, no larger than the diameter of the flange on the liner. Once installed, file it flat and polish to 400 grit with the flat of the barrel.


    I still have to finish sanding and scraping the final rounded contour under the forearm, right now, it's parallel-sided with the thickness reduced.
    Союз нерушимый республик свободных Сплотила навеки Великая Русь. Да здравствует созданный волей народов Единый, могучий Советский Союз!

  18. Thank You to Claven2 For This Useful Post:


  19. #40
    Legacy Member gew8805's Avatar
    Join Date
    Dec 2008
    Last On
    07-19-2022 @ 08:59 AM
    Location
    Virginia
    Posts
    578
    Local Date
    04-29-2024
    Local Time
    05:53 AM
    Good work on the forearm. I personally use a large, course file to remove the majority of the wood moving then to a finer file and then on to 220 grit sand paper or a scraper since power tools, unless you are very, very careful, can remove too much wood too quickly but you are obviously capable of handling the power sander very well.
    Last edited by gew8805; 06-14-2011 at 02:55 PM.

+ Reply to Thread
Page 4 of 7 FirstFirst ... 2 3 4 5 6 ... LastLast

Similar Threads

  1. Recommended gunsmith for building a NO 4 (T) reproduction?
    By rascal32 in forum The Lee Enfield Knowledge Library Collectors Forum
    Replies: 0
    Last Post: 11-01-2010, 09:30 PM
  2. Building a better mousetrap: The red rifle front sight tool.
    By Claven2 in forum Gunsmithing for Old Milsurps
    Replies: 1
    Last Post: 03-21-2010, 06:56 AM
  3. building a L42A1
    By J Tal in forum The Lee Enfield Knowledge Library Collectors Forum
    Replies: 5
    Last Post: 02-17-2010, 01:48 AM
  4. Building a match #4
    By sdh1911 in forum The Lee Enfield Knowledge Library Collectors Forum
    Replies: 6
    Last Post: 12-14-2008, 02:32 PM
  5. Building a British arms collection
    By sdh1911 in forum The Lee Enfield Knowledge Library Collectors Forum
    Replies: 4
    Last Post: 11-18-2006, 06:50 PM

Tags for this Thread

Posting Permissions

  • You may not post new threads
  • You may not post replies
  • You may not post attachments
  • You may not edit your posts