-
FREE MEMBER
NO Posting or PM's Allowed

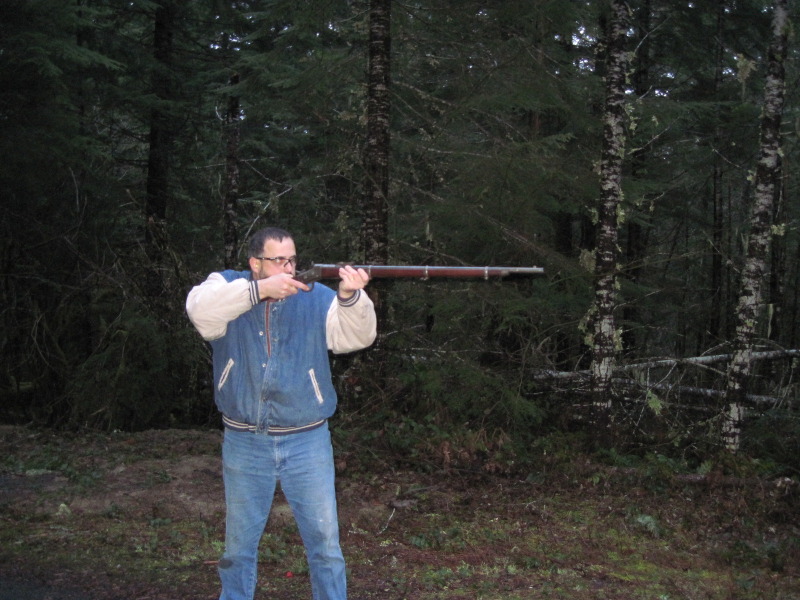
Despite Saturday being a busy day, my son Caleb and I still managed to get up the mountain with just enough light left to shoot the Rolling Block. We ended up having to travel further than our first choice because a recent storm had dropped a large fir tree across our road. We tried another logging road further up and I began to feel the excitement build, that is until we came to a locked gate.
 At first I thought, what a bummer but then I rationalized, locked gate, no cars coming or going… perfect, our own private shooting range.
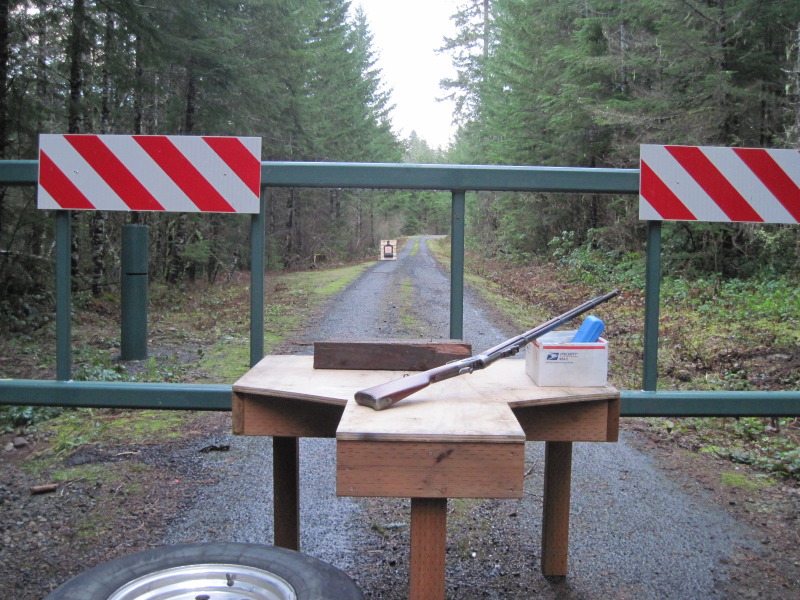
 We quickly unloaded my shooting bench and tossed out a couple spare tires to sit on. Then we hauled an old pallet up the road about 60 yards and propped it up with a stick. Here’s the setup.
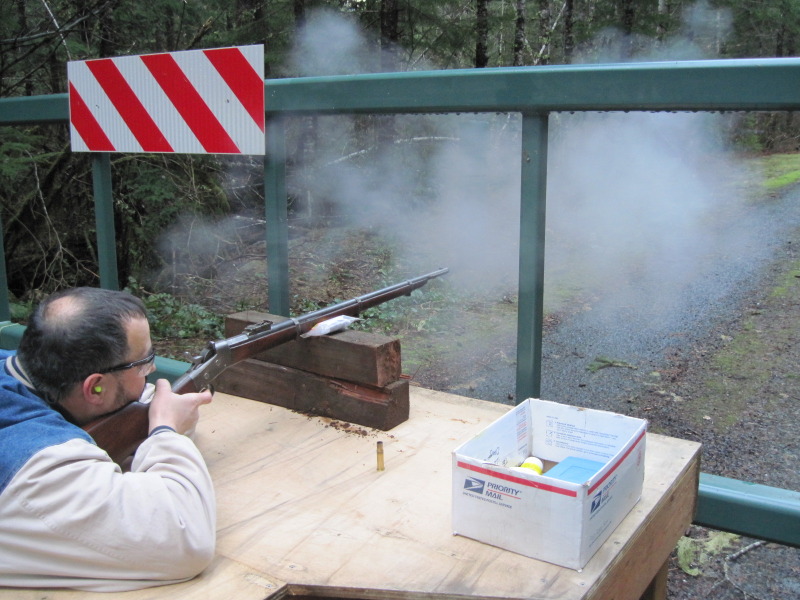
I sent a quick fouler down range and attempted to get serious. My eyes have degraded quite a lot in the last couple years and I was having a terrible time seeing the sights. Now I fully understand why almost all of my rifles wear scopes.
My first impressions were…
Where’s the front site?
This trigger is harder to pull than Excalibur.
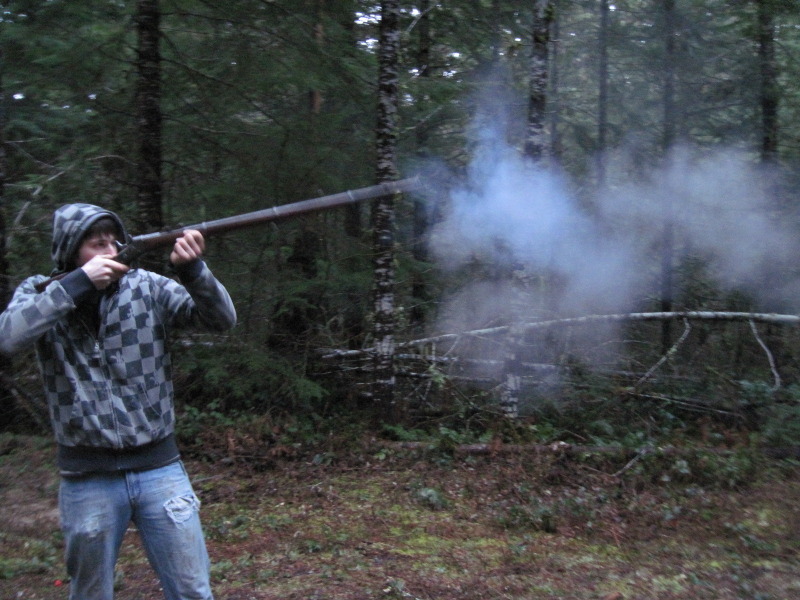
Cool, look at the sparks fly.
MAN these things bellow a lot of smoke.
Hey, that didn’t kick hard at all.
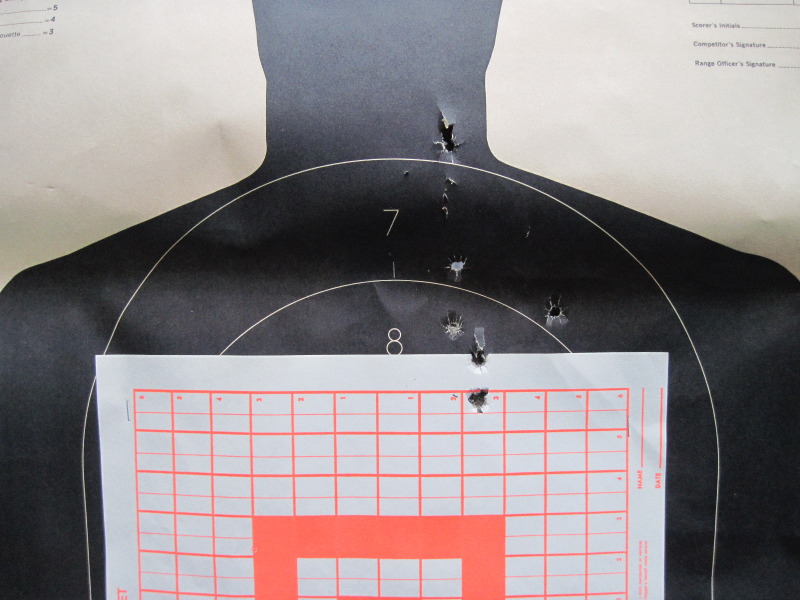
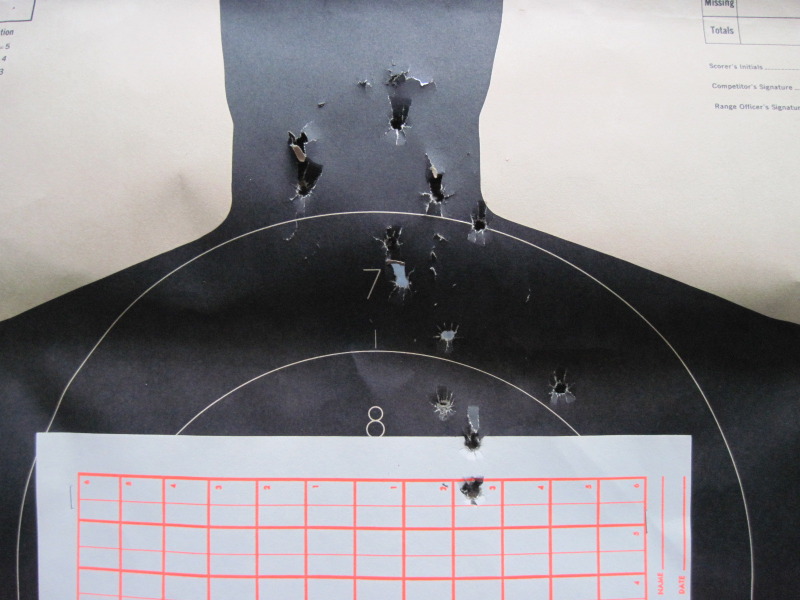
Here’s my first six shots. The highest one up in the neck area was the fouler.
Honestly I’m not very impressed with this group but there are issues that need to be addressed before we can truly ascertain the accuracy of this rifle.
The trigger pull is horrendous. I need glasses or to shoot in better light and the front site needs to be taller. Also at some point I will probably need to re-crown the muzzle.
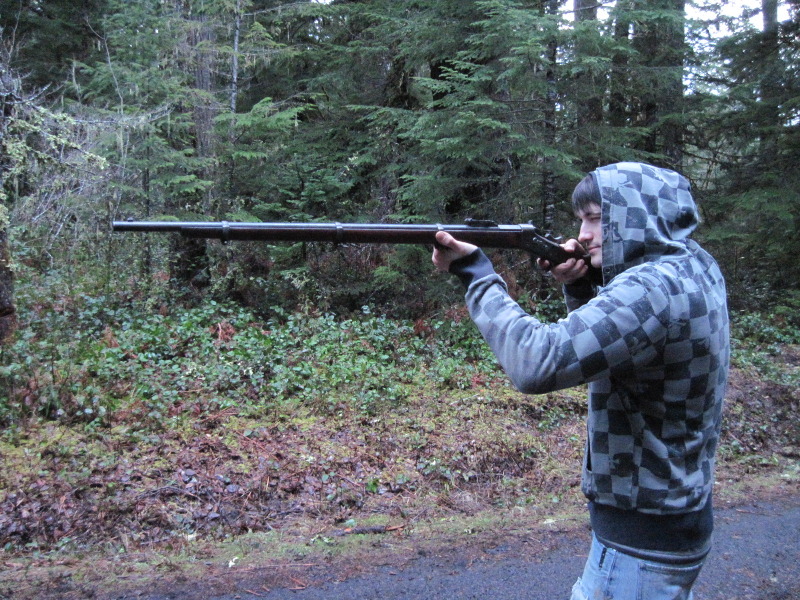
Caleb shot the next group.
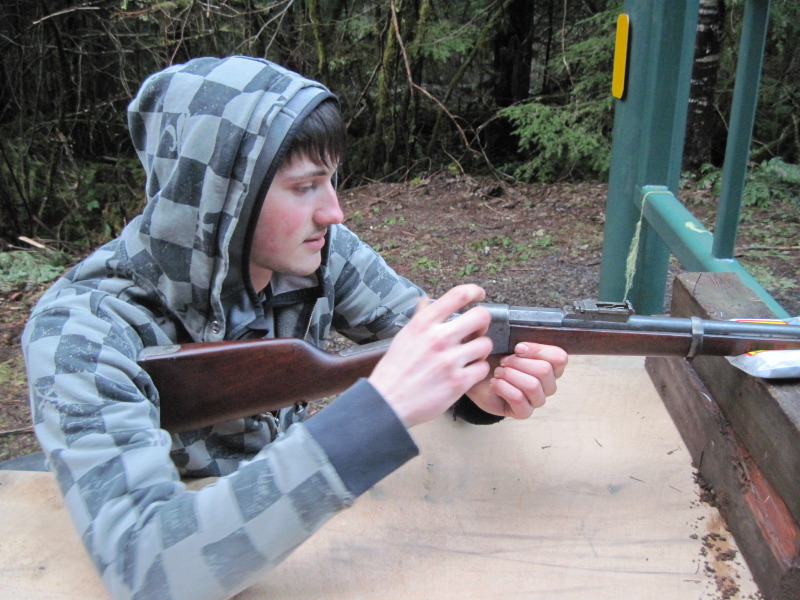
He’s got a steady hand and I trust his young eyes over mine.

Curiously his group came in even higher than mine. I guess I will need to somehow raise the front site. No, the bullets are not key holing. Because the paper was very thin and poorly supported from behind, the holes ended up being very ragged.
The light was fading fast and it didn’t make sense to try and shoot for group anymore, so we shot offhand just for fun.
I think Caleb enjoyed it every bit as much as I did, it’s in our blood.
It’s actually very comfortable to shoot. The recoil is very manageable. Caleb said it didn’t kick with the sharp slap typical of a smokeless rifle but more like a hard push.
That was fun, I just wish I had more brass, twenty shots went way too fast.
-
01-31-2011 11:48 PM
# ADS
Friends and Sponsors

-
FREE MEMBER
NO Posting or PM's Allowed

Originally Posted by
Claven2

Nice looking loads

Thanks.
Originally Posted by
Claven2
(for the record, I DO prefer a wad under the bullet and a harder crisco/wax cookie - but I'm old school like that. Heck, I even paper patch my bullets for the Martini - lol)
In due time Claven2, I'm still learning the basics.
Do you guys have a preferred cleaning method?
I used Thompson/Center Number 13 Bore Cleaner until clean and then followed up with a patch with Bore Butter on it.
Is there anything special about cleaning BP brass? I usually use a vibratory full of crushed walnut media.
-
-
"Is there anything special about cleaning BP brass?"
Deprime immediately and soak in soapy water (or equivalent). Keeps the brass from corroding.
A lee depriming tool from one of their basic hand kits works, or make your own. Whilst at the range just deprime and throw the empties into a milk jug full of water based cleaner. Brush out and dry at home.
-
-
I go to the range with a plastic bottle full of hot soapy water and I drop the rounds in as soon as I shoot. When I get home they are mostly clean. I take them to a slop sink and then scrub the inside of the brass with a small children's toothbrush and then let the brass dry out. Finally, I tumble.
For the rifle, I use a bore snake in the right diameter. Two pulls through dry to get the caked crud out. Then I use a patch wet with water - several passes. Next a patch soaked with water-soluble ballistol to neutralize the water, then I switch to Hoppes BP solvent - enough patches to come out clean. Finally a patch of ballistol for storage. Check again in 2-3 days to make sure nothing is rusting. One ballistol patch through and then forget about the rifle until next range session.
This works 100% for me, but some will consider it overkill.
Союз нерушимый республик свободных Сплотила навеки Великая Русь. Да здравствует созданный волей народов Единый, могучий Советский Союз!
-
-
Advisory Panel


Refurbishing an Argentine RB - Part 15 - Yippee, it works!
Yipppeeeeeee!!!!!
It works! 
And for a very first shoot that is quite satisfactory! It is in fact, very promising.
There is a lot to be learnt from the pictures of the target.
1) The shots are not keyholing
So the bullets are coming out straight enough and flying true. Any wear in the muzzle is not so strongly asymmetrical that it makes the bullets tumble.
2) They are all on the paper.
So you do not have a “blunderbuss muzzle.
3) After the fouling shot, you had a better than 4”group (assuming that the target is divided into 1” squares). The load is indeed a PDG first approximation.
These three points indicate that, for the moment at least, we do not need to worry about the muzzle. It could surely be improved, but there are other, simpler things that need to be attended to first, before you undertake what really is an irreversible (if minor) alteration to the rifle.
The very first aspect for improvement is “the vision thing”.
4) Take a look at your group, including the fouling shot. Apart from one shot out to the right, the horizontal spread is hardly 1”. That would be good with a modern rifle using open sights. Are those protective shooting glasses you are wearing? If so, Caleb should have worn them as well. Or are they glasses for driving? In which case, they are probably optimized for a distance of about 25 yards. Do you find it difficult to see the dashboard when driving? Then you can probably see the target well enough, but the foresight is a fuzzy blob and the backsight is a thing of the imagination.
Open sights were made for teenage conscripts, not for us more advanced teenagers (5th time around in my case). Since open sights are symmetrical about the vertical axis, one can center the sight picture well enough horizontally, but the vertical position is a matter of guesswork that varies with the light. This is one possible reason why the group from Caleb has a higher POI than yours - he is seeing the foresight blade sharper.
Age, lack of visual accommodation, and maybe a touch of astigmatism, all make it well-nigh impossible to see backsight, foresight and target all clearly at the same time. The only way to improve this is to reduce the aperture. If you stop down the optical aperture, you will instantly see an improvement in the sight picture.
Since the RB does not have provision for fitting a peep-sight, the answer is to wear glasses that have an aperture-adjusting device attached. I have an iris that can be attached to my driving glasses by a sucker pad, but for serious shooting I use shooting glasses with an iris on an adjustable fixture. Regardless of what kind of gun you are shooting, for any non-dynamic shooting this is the very first aspect to be improved before worrying about sights.
For a quick-and-dirty solution to check whether an aperture would help, you can punch out a hole in a piece of thin plastic, using a leather punch set for the smallest hole, and hold it over your glasses while aiming.
Get the sight picture improved, and the group will tighten up somewhat - maybe even a lot. But there is no point in trying to improve the rifle if any improvements are swamped by a poor sight picture.
When you have dealt with point 4), we can move on.
5) POI - point of impact.
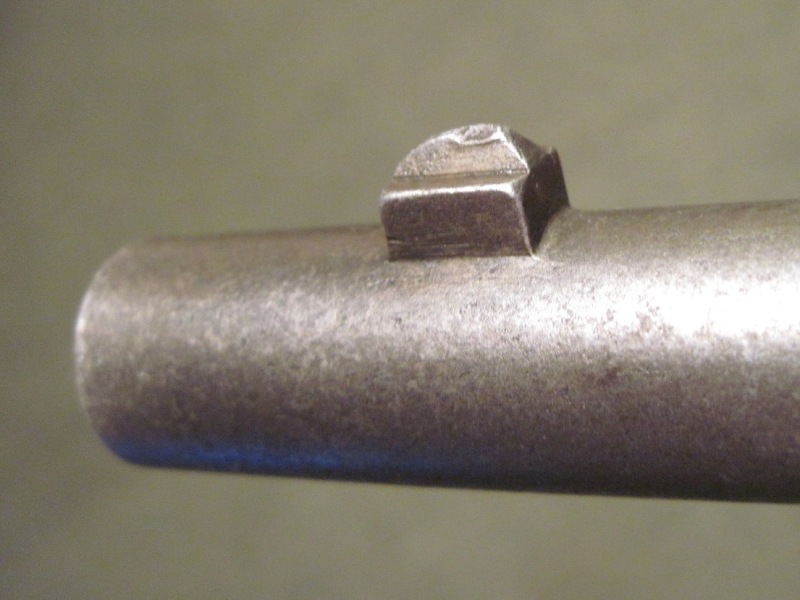
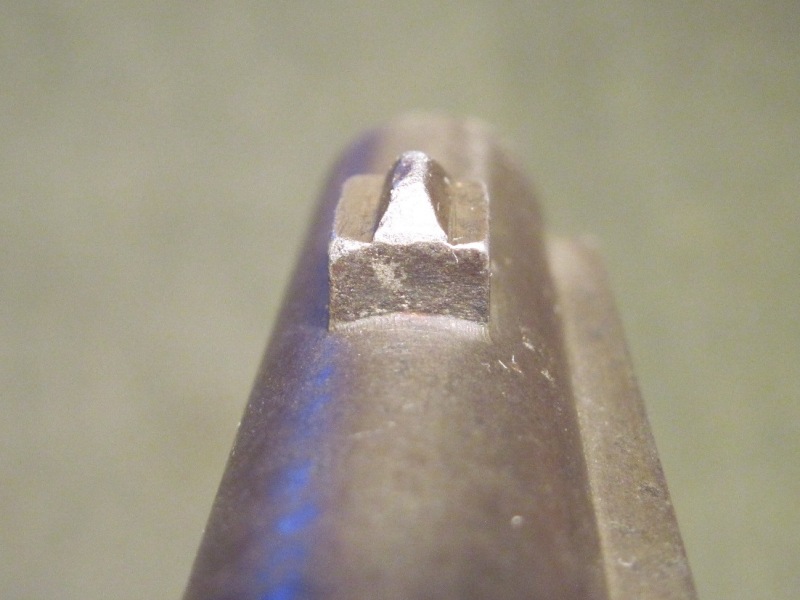
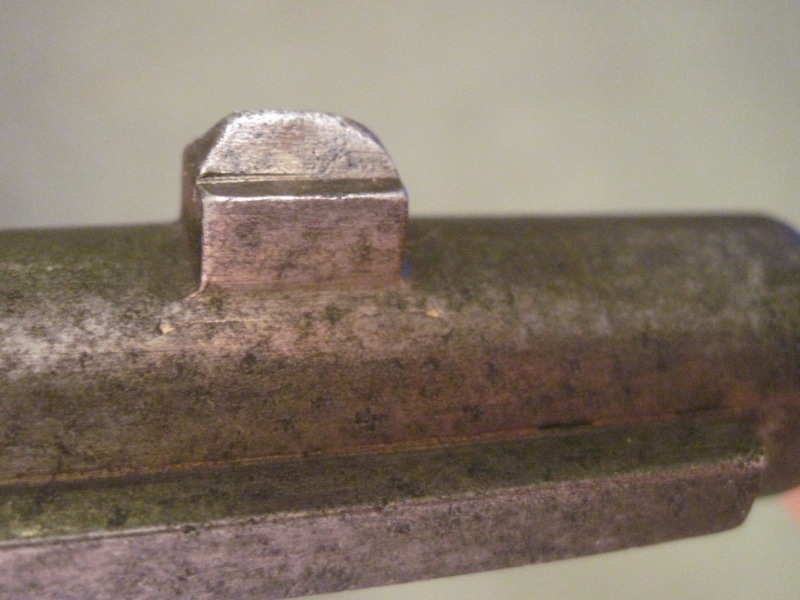
Take a look at the side of the backsight block. The lowest marked setting is probably 100 meters - nearly twice as far as you were shooting - and the foresight blade is also probably worn down a bit. I imagine you were aiming at the center of the red square, or on the bottom line.
The fix here is to get a high foresight blade for a Mauser K98 - they go up to 8 or 9 mm, and will be easier to find than RB spares. The original RB blade should be driven out (left to right, I think) with a brass drift, and kept safe. The Mauser blade can be fitted with maybe a touch of filing or peening of the dovetail. Do not, of course, file or peen the foresight block on the RB! But it might be a good idea to scribe a witness mark on the foresight block before removing the original blade, as that makes it easier to set the new blade in the correct position
This should provide you with a POI that is much better centered for height. Do not immediately file the new blade down so that the POI is dead on at 100 meters - it is very load-sensitive with BP ballistics, and you do not want to be restricted to only shooting at 100 meters and above. Remember, you can always file it off, but filing it back on again is a bit more awkward! It is sufficient that the sight slider is off the bottom of the ladder, so that you have room for adjustment.
6) Load.
As far as can be seen, looking at the grouping and pending the improvements suggested above, the load is OK. You have observed how the fouling shot is higher than following shots. As I wrote some while ago, only the first shot on a BPCR rifle is a clean-bore shot. Everything that follows is a "crud-riding" shot, unless you clean diligently after every shot, which is a) very tedious, and b) usually disallowed in military rifle competition.
Approximately, the lube in the bullet grooves lubricates the bullet, providing a kind of hydraulic seal as it moves down the barrel, which is why the bullet can ride over those worrying rust spots you saw some way down the barrel without a ballistic disaster.
The lube in the case is behind the bullet and can therefore not lubricate it, but it is the major factor in preventing the fouling from becoming hard-baked in the bore. If you were able to shoot all 20 shots without it becoming difficult to insert the case into the chamber, then it is adequate, as that would last out an entire competition target of 15 shots plus fouling shot plus sighters (if allowed). Too little lube would also show up as successive shots impacting lower and lower on the target.
You mentioned in a recent post, that it appeared feasible to seat the bullet out even longer than at present. Think carefully about that. You might then find that after a few shots the bullet comes up against fouling in the throat, making it difficult to load the cartridge, since a Rolling Block has no camming action when loading. You would also be exposing the second grease groove to possible dirt. And the bullet would only be held in the case by three thin bands at the back. So even if the throat permits it, you would not be able to go further than that, as two bands really would be inadequate for bullet seating and case expansion to seal the chamber. This would show up as combustion deposits around the neck of the case - not good for loading subsequent cartridges - or indeed, for the chamber.
7) Cleaning.
To what jmoore already wrote, I would merely like to add that you need a small stiff brush to scrub out the inside of the case when cleaning the cartridge cases. This is much more important than getting a nice shine on the outside in a tumbler. The tumbler will not do much, if anything, for the inside of the case. But the combustion deposits from inside the case will soon thoroughly contaminate the tumbler granulate!
BTW, if you would like to really appreciate why cleaning s so important, take a freshly fired case and leave it uncleaned for a week or two. Then look inside - you will be shocked at the bright-green verdigris that has appeared!
Please consider points 1) to 5) and write back - I am still waiting for a couple of good photos of the muzzle!
Patrick

P.S: in the meantime, I see that Claven2 has also dealt with the cleaning question very satisfactorily.
Last edited by Patrick Chadwick; 02-01-2011 at 10:53 AM.
Reason: P.S: added
-
-
Sorry for the omission! Brush for the inside of the case, yes.
I've found the white nylon brush and cleaning rod that came w/ Glock pistols (they might still do, haven't checked lately) ideal. Useless for the most part for cleaning Glocks anyway, but great for BP cleaning chores.
Mine have lasted near on twenty years.
Pipe cleaners seem to handle cleaning out the odd corners and flash hole, if needed.
-
-
FREE MEMBER
NO Posting or PM's Allowed
-
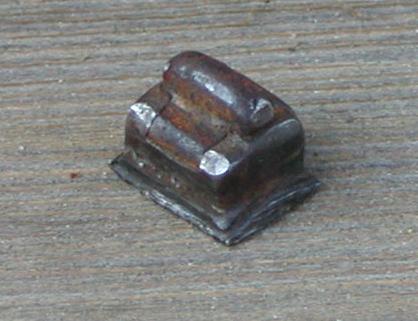
You've pretty much listed the options you have available for the front sight. You could also build it up with JB weld and then file it to shape to get you on target, but it's won't look as pretty.
If it were mine and I intended to shoot it regularly, I would get it machined for a dovetail and install a K98k sight blade. It's not ideal collection-wise but it's not a complete abomination, will retain an authentic look and will be the most versatile for shooting.
Союз нерушимый республик свободных Сплотила навеки Великая Русь. Да здравствует созданный волей народов Единый, могучий Советский Союз!
-
-
PS: Any decent smith can do this in no time at all, but go wit hthe sight you intend to use in-hand so he doesn't make the DT too big if you go that route.
Союз нерушимый республик свободных Сплотила навеки Великая Русь. Да здравствует созданный волей народов Единый, могучий Советский Союз!
-
-
Advisory Panel
REfurbishing an Agentine RB - Part 16 - the second firing
Having cleaned the once-fired cases, it’s time to think about the second load. What - you’ve already loaded. No matter, you neck-sized the cases - that is the most important thing. Since the cases have already been fire-formed in the chamber, they will have a better fit if they are only neck-sized. And they will last a long, long time in a BPCR if they are neck-sized and, of course, cleaned soon after firing.
Any system will give a bit under the stress of firing. In the case of the RB, any slight opening of the block under load, even though it may only be a couple of thou, will tend to form the base at a slight angle. It is generally a good idea if you mark the base of the case so that you can always insert it with the same orientation. Or always have the same letter of the name at the top, for instance. Keeping the case in the same orientation for each firing gives you the best fit and the least working of the brass.
The expansion of the case will not have provided much more volume, unless the chamber was very loose. Did any more powder go into the case, or did you keep the same load?
And you are right to avoid shooting in failing light. The sight picture, in particular that tricky judgement of the position of the top of the blade, will be affected by lighting conditions. Any halfway-usable aperture is worth a try, but that will make the sighting even more tricky in failing light. So let's hope it's a bright day for your next shoot!
As to the foresight, I have looked very closely at the photos. Maybe it is my fertile imagination, but I suspect that the sight could have a dovetail - but one running along the block, not across it! In the first picture of the block there appears to be a very slight protrusion at the rear, on the left side (towards the camera). In the second picture. there seems to be just the suggestion of a line extending down on the right side of the blade - or is that just a hair. And in the 3rd picture, I again think I see a slight protrusion on the left, towards the camera, together with a curious mark as if the blade had been filed to fit.
Please examine the blade + block with a watchmaker’s eyeglass. It could be that the blade is a kind of tríangular-cross-sectioned block set into a fore-and-aft dovetail. If so, it would be simple to drive out the old blade and file up a taller replacement oneself. Consider this as option 4), since you were asking for suggestions.
That sad object you found as option 1) looks so tatty, I would rather file up something myself.
Option 3) is making an irreversible alteration to the rifle. But some RBs did have cross-dovetailed foresight blades, so if you do as Claven2 suggests, no-one can claim “no RB was ever like that”. Not quite as that particular rifle was made, but not illegitimate for RBs in general.
Option 2) can be considered, but not as silver soldering - that requires far to high a temperature, and if the block was soldered on, it will fall off in the process!
Option 2) improved would be to cut a piece out of 1/16 or 3/32 brass or steel plate to make a blade extension. Make it with a little tang at the back, to go behind the existing blade (i.e. the tang on the breech side) and soft-solder it on. The shock on firing pushes the rifle, and thus the foresight, back against the extension piece, compressing the solder joint. It will be quite safe. In fact, on a friend's Chilean Mauser I fixed such an extension with epoxy “liquid metal” (is that what JB weld is?) and it is still there, 4 years later! And yes, he does actually use the rifle!
So there you have 2, possibly 3 options to choose from.
At the very least, you must get a flat top on that foresight blade. As it is, you are going to have more difficulty than normal with open sights in positioning that beaten-up top on any target.
And a final tip for today: One usually reads that open sights should be aimed so that the top of the blade is in line with the top of the backsight left and right of the V. That, Joel, is for beginners.
Some backsight Vs (like on the Martini-Henry) are so wide that if you try for this sight picture, the corners of the V are actually outside the target frame, making the whole exercise well-nigh impossible. But shooters at the British School of Musketry in the 19th century were taught to make height corrections by holding the blade deeper in the V, as required. If you hold the blade really deep in the V, until it is just about to disappear, you may find, as I have, that you can achieve a much more consistent POI, and, incidentally, at least partially correct for the excessively high POI that you get with the “Normal” sight picture. This is how 19th century shooters adjusted for the light and intermediate distances when only having sights crudely calibrated in 100 yards steps. And it automatically centers the blade better in the V. But it has been forgotten for so long, that it now counts as secret knowledge - so don’t tell anyone!
Good luck with the next trial! And don’t forget the pictures -including one of the muzzle (I will keep reminding you!)
Patrick
Last edited by Patrick Chadwick; 02-02-2011 at 06:59 PM.
-


 Register To Reply