-
So the nose cap won't seat back all the way on the forend? AND the top wood won't fit under its retention point?
-
-
08-09-2012 03:37 PM
# ADS
Friends and Sponsors

-
Legacy Member

So the nose cap won't seat back all the way on the forend? AND the top wood won't fit under its retention point?
The nose cap seats snugly rearward on the forend with the horizonal screw hole lining up perfectly. With the barrel in place the relationship of the barrel to the nose cap barrel hole seems close.
I have not yet fitted the inner band assembly (on order). After reading all the posts I am thinking trimming of the mating surfaces of the forend and upper hand guard is the answer. I do not think trimming just the upper hand guard will provide enough clearance as I did trim the wood flush with the upper hand guard metal nose. I will post more photos 8/10 in hopes of clarifying the issue.
-
-
-
Legacy Member
Here are a few more photos of the rifle nose cap in its present state. I hope this helps.
After reading your replys and examining the current configuration it seems as though trimming the mateing surfaces of the forend and upper hand guard is the best if not the only option. Is my accessment correct? If so would a planer table be the best way to ensure a uniform haircut in the forend? Thoughts?
-
-
I'd carefully use a hand plane and taper from the band to the muzzle. ie. 0 removed at the band to minimum required for fit at the muzzle. If you put it over a jointer the material will be removed evenly and that will mean the band won't fit and other problems. For me it would be a very sharp plane and the absolute minimal wood removal required for fit. Something does trouble me about putting the top of the forend out of plane, but where else will you get it?(the room for fit) As you mention it looks like your only other option is inletting the nose piece "higher" so the top wood will fit, but doing that will throw out the relationship of the barrel to the hole in the cap, ie presuming the rifle is bedded correctly now, and the nose cap slides over the barrel in its natural position, and you inlet it further so it sits higher (so the top wood will fit) the hole for the barrel will now be holding the barrel off the end of the forend where it was and should be sitting. So I think that's out.
If you're down to the steel returns on the top wood reinforcement, and the rifle is bedded right, and the nose cap fits properly on the forend and the barrel, I think you are down to fitting by relieving the top of the forend.
Please note this is only my opinion, and I am not an expert in this.
-
The Following 2 Members Say Thank You to tbonesmith For This Useful Post:
-
FREE MEMBER
NO Posting or PM's Allowed

Another way would be to take the end cover off the handguard, thats the little steel bit with the rivets in it, and form follow and take it down the amount needed. re fit the little metal cap after filing the bottom level with bottom of the handguard and assemble rifle. This is if the bedding is correct. The rivets can be found at maybe saddlery or leather place or someone might have a tin here.
Doing it this way will not affect the fitting of the handguard onto the fore end. If you take just the bottom off the handguard and going by your pics, you will have to take some of the steel of the little steel cap.
OR get another handguard and try it. Have you any others to compare to? I think the timber profile at the end is too thick.
Cheers
Ned
-
Legacy Member
Some good ideas here. I believe the wrist/draws portion to be bedded property. The area around the fromt action screw knox form not so sure. I am going to read back over Mr L's and some of the other bedding posts and check for proper bedding in those areas before moving on to hand guard/ forend trimming.If the bedding near the action is not correct the only way it is out would move the barrel down in relation to its current relationship with the nosecap. If it were possable to make modifications to the upper handguard only this would seem to be less costly if things do not go well (forend cost vs. handguard cost). Or I might check with Brian @ BDL amd see if he might be interested in doing the final fitting. This stuff is not for the faint of heart.
-
-
Advisory Panel


Place the front handguard on the fore-end, apply it's cap to the recess in the nose cap, and, if necessary, plane or file the upper surfaces of the fore-end until the cap fits and the handguard lies evenly on the fore-end.
That's straight from the C.O.C. Training Centre, A. 21 Lecture Precis No.46, Extracts From Instructions for Armourers, Revised February 1943. It's a real wealth of information for too many British and Commonwealth weapons to list and available here for $20 plus shipping. Get one while you can because I won't print anymore.
-
The Following 3 Members Say Thank You to Brian Dick For This Useful Post:
-

Originally Posted by
trooper554877

...end cover off the handguard, thats the little steel bit with the rivets in it...
Actually, they're likely (usually) tiny screws. Which is even better! The wood under the handguard cap does seem a bit thick.
But you will have to remove some metal from the cap's lower edges. Shouldn't be a big drama, but...
Last edited by jmoore; 08-11-2012 at 08:34 PM.
-
-
Legacy Member
Originally Posted by
jmoore
Actually, they're likely tiny screws. Which is even better! The wood under the handguard cap does seem a bit thick.
But you will have to remove some metal from the cap's lower edges. Shouldn't be a big drama, but...
Later coachwood caps were riveted. They look like rivets to me.
-
Thank You to Homer For This Useful Post:
-
Advisory Panel

Perhaps this will be helpful -
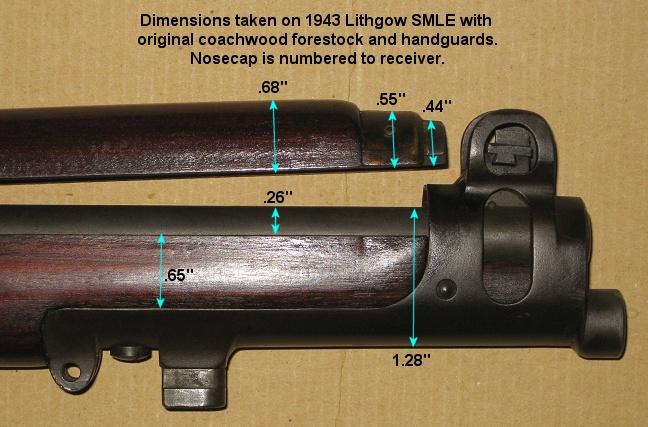
FWIW, the metal cap on this handguard is definitely riveted, not screwed.
-
The Following 3 Members Say Thank You to Parashooter For This Useful Post:


 PM
PM


