-
Legacy Member

Thanks Parashooter & Brian Dick . I will compare your mesurements to mine and post the results. I see I can trim a bit off the lower plane of the upper handguard bringing it flush with the lower edge of the nose piece engagement cap and then take Brian's advice and remove the rest of the material from the forend. The measurements will be very helpful in maping out a plan of attack.
-
-
08-12-2012 04:59 PM
# ADS
Friends and Sponsors

-
Contributing Member


Hey Para, that's a very useful and informative photo.
-
Thank You to muffett.2008 For This Useful Post:
-
-
Legacy Member

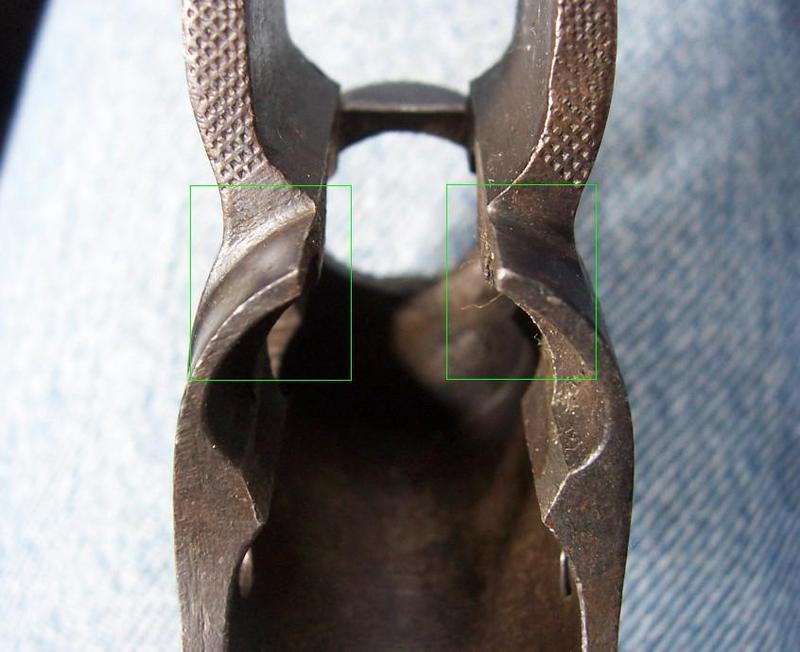
Before you remove any wood/metal, just check the area highlighted in my photo has not been bent down to tighten a previous loose fitting handguard.

-
Thank You to 5thBatt For This Useful Post:
-
Advisory Panel


Originally Posted by
HOOKED ON HISTORY

I see I can trim a bit off the lower plane of the upper handguard bringing it flush with the lower edge of the nose piece engagement cap and then take Brian's advice and remove the rest of the material from the forend.
Note that it's possible you'll need to file down the lower edges of the "engagement cap" - just remember to switch from plane to file before you hit steel. A touch of cold blue will dull the shine (hidden when assembled anyway) after any filing. Taking too much off the top of the forestock could leave a gap if the interior of the handguard bottoms out on the barrel, (as could cutting too much from the "lower plane of the upper handguard").
On my example, the joint between handguard and forestock was so well-done by the folks at Lithgow that it almost looks like a single piece of coachwood when assembled.
-
Thank You to Parashooter For This Useful Post:
-
Legacy Member

Here are the my measurements compaired to those of parashooter.
-
Thank You to HOOKED ON HISTORY For This Useful Post:
-
Legacy Member


Originally Posted by
muffett.2008

Hey Para, that's a very useful and informative photo.
Very useful indeed. Gives me a benchmark from a production rifle. Now if I can get up the courage to take the file to mine perhaps it could look somewere close to that Lithgow workmanship.
-
-
Legacy Member

Update. I first flushed the bottom rails of the upper handguard with the bottom of the nosepiece second I used Para's data to establish a bench mark for removal of material from the upper contact surfaces of the foreend marking them with painters tape. Then the fun began. I tried a hand plane but decided my tool and or my lack of skill made its use unadvisable so I removed all the material required with a flat bastard and a sanding block removing a small bit a a time and trial fitting the upper handguard. The results to date as pictured. The results are not perfect (a small bit of light visable at the seam with the forend and upper handguard assembled) which I may try to resolve. I did incorperate Bonesmith's suggestion to taper the removal if material from the forend to the front (nosecap end) which seems to have worked well as the fit between the upperhandguard,rear handgard and forend is pretty close for a novice. Some material will need to be removed from the barrel channel for a proper float so more fitting ahead.
I cannot thank all of you who contributed to my posting enough as I would not have attempted this without the guidance provided. I hope this post can help others with similar issues.
-
Thank You to HOOKED ON HISTORY For This Useful Post:
-
Legacy Member


-
Thank You to paulseamus For This Useful Post:
-
Legacy Member

Does anyone have an old woodworkers trick for marking the contact/void points between the upper handguard and forend horizonal surfaces? I would like to tru the surfaces up for a snug fit.
-
-
Advisory Panel


First, get the top of the forearm true. This takes a long-sole (10"+) plane set for the smallest cut possible - about .001" - operated by someone who knows how to sharpen, adjust, and use it. Lacking that, use a long hardwood sanding block with finest-grit garnet paper. Once done, rub soft artist-grade white chalk on the true surface and leave the handguard bare. Press and rub together in position, then use a very sharp cabinet scraper to work down the high spots where chalk has transferred. Repeat until chalk indicates full contact. (Same process as fitting the bass bar on a violin. See Derek Roberts Violins - Fitting the Bass Bar for photo tutorial.)
-
. I will compare your mesurements to mine and post the results. I see I can trim a bit off the lower plane of the upper handguard bringing it flush with the lower edge of the nose piece engagement cap and then take Brian's advice and remove the rest of the material from the forend. The measurements will be very helpful in maping out a plan of attack.


 PM
PM


