-
Legacy Member

On occasion I have injected glue into a crack by drilling a !/4 inch hole into the joint. The hole is completely filled with glue and a 1/4 inch dowel is pushed or tapped in after. The glue is under hydraulic pressure and will completly fill the joint. Let it squeeze out on all sides to be sure it is filled. Clamp and wipe off the excess. The hole can usually be drilled from a hidden starting point, say like the butt end of the stock which will be covered by the buttplate. I have also done this on a few stocks cracked just behind the rear tang screw. The hole is started in the pocket for the rear tang (won't be seen after assembly) and runs the depth of the crack. Some through cross bolts ( llike on a 1903 Springfield) will prevent a new crack. This may not be applicable in Cantgrowup's carbine project but it does work when a crack won't spread far enough to get the glue in. Works great Salt Flat
-
Thank You to Salt Flat For This Useful Post:
-
11-23-2015 07:29 PM
# ADS
Friends and Sponsors

-
Legacy Member

I have had very good success with Titebond wood glue.
Titebond - The Most Trusted Name in Adhesives
-
-
-
Legacy Member
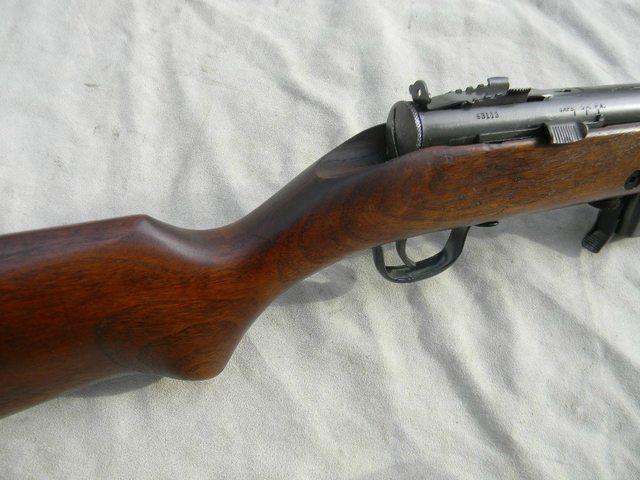
Wrist Crack Repair, With Epoxy/Dowel Method:
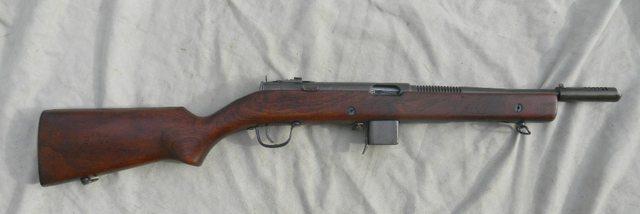
Disclaimer!!! Normally, I don't mess with restoration much. But I will be shooting this one when it is done, a Reising M50 submachine gun, once the final NFA approval arrives. Meanwhile, the registered owner has allowed me to take possession of the stock for the necessary repair work for a crack in the wrist.
My goal was to preserve the outward appearance of the stock (it's really quite nice), without utilizing crosspins, but performing a strong and permanent repair which would allow me to fire the gun without doing further damage.
I had never attempted a stock repair of this magnitude, but I was confident that I could gather the proper materials to have on hand for performing the time sensitive task.
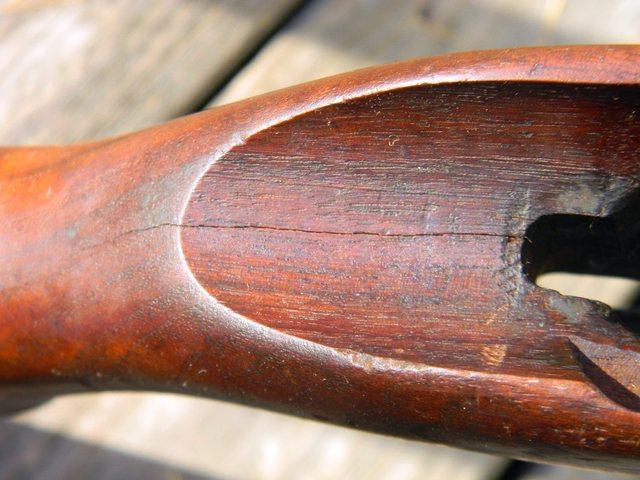
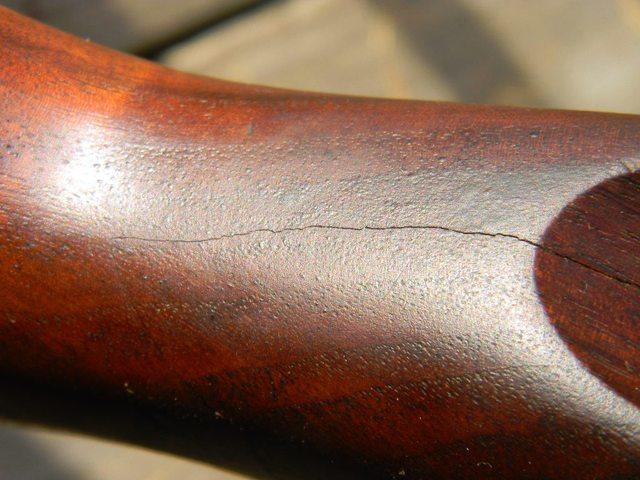
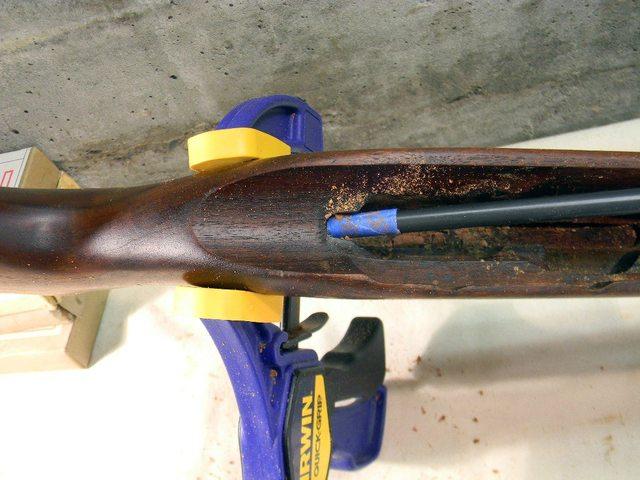
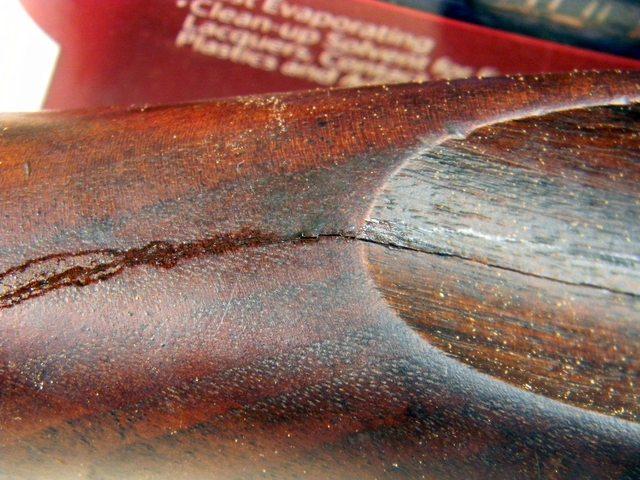
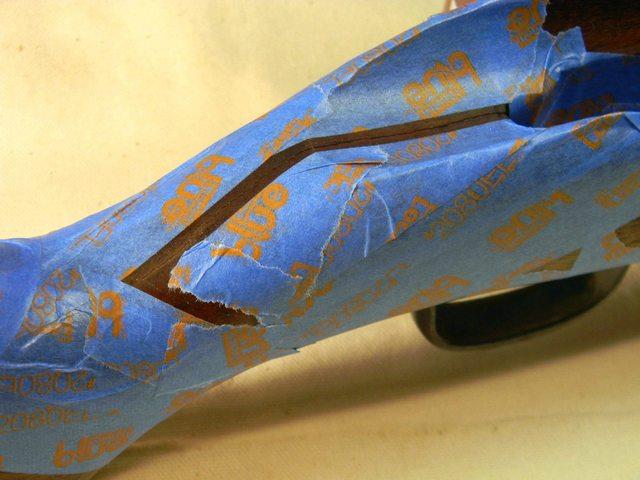
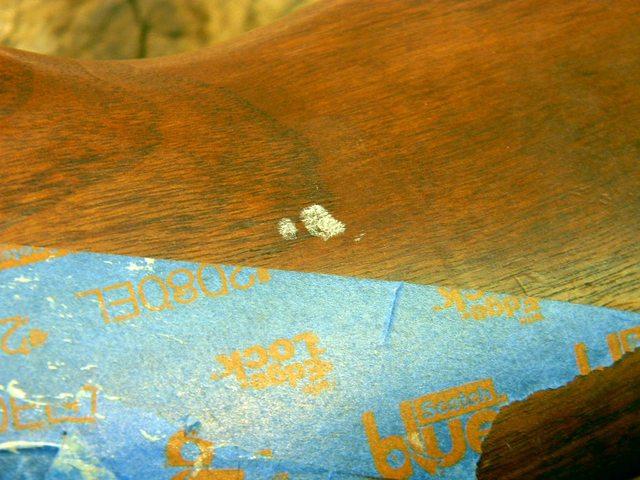
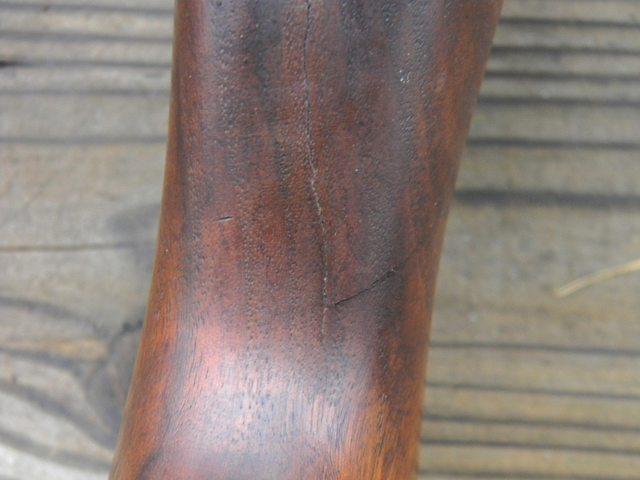
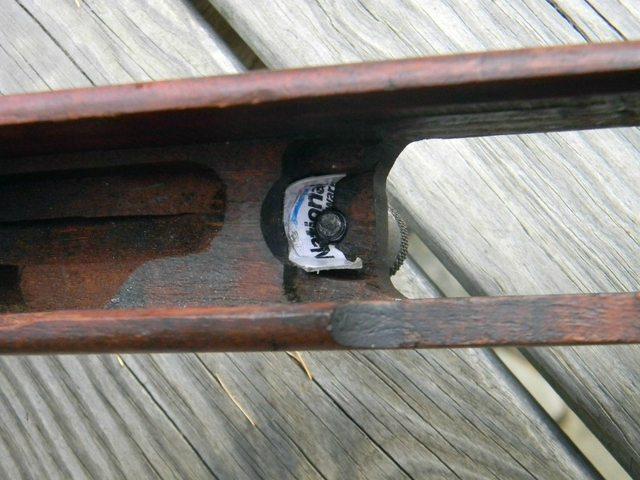
Following are a few pics of the stock/crack before repair. It appeared on top of the stock wrist only, about 3-3/4" in length. And although there is a shadow for the stock inletting picture, the crack protruded downward approximately 1" at the rearmost inletting.
The Repair
To begin, I went ahead with an epoxy/dowel repair, learning as I went along. I did make what will be a very serviceable repair, but also made a critical error which will be explained later.
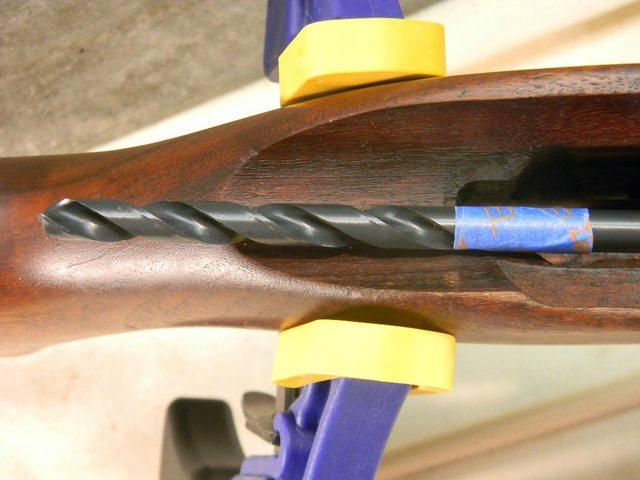
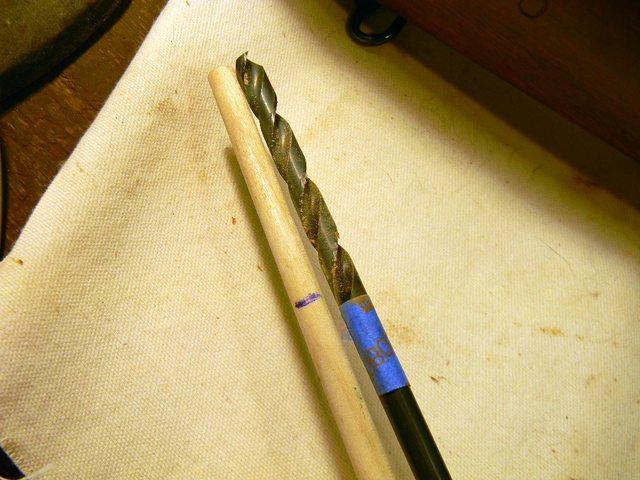
1. I selected a 5/16" dowel, and purchased a decent wood clamp and long shank 5/16" drill bit.
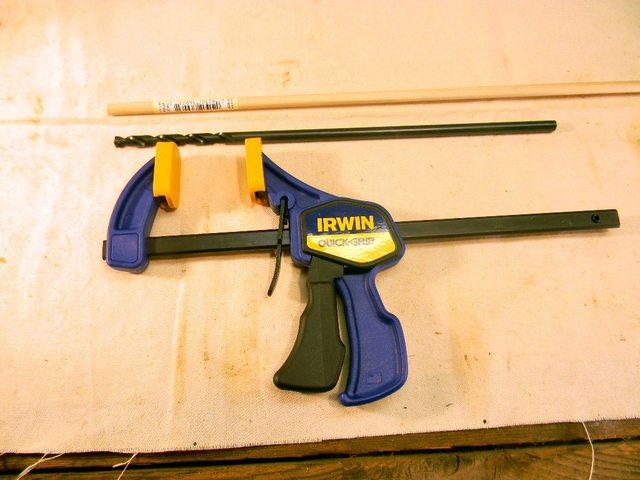
2. With the stock clamped to close the crack, I began with a smaller 3/16" bit which enabled me to better locate a starter hole for the larger bit.
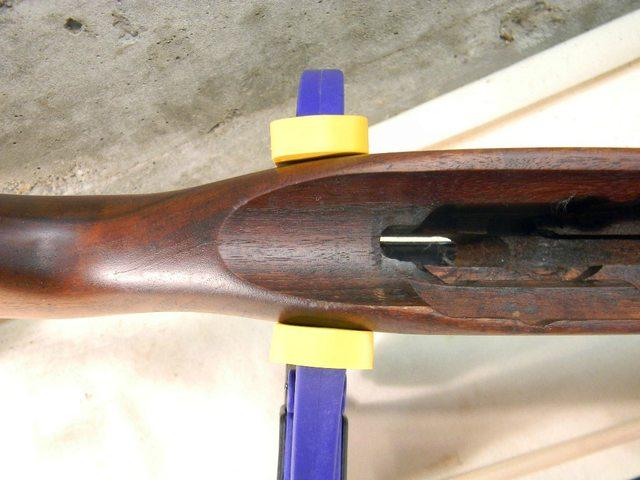
3. To ensure proper depth for drilling, the tool bit was placed along side for the length of the crack, and marked with a piece of tape. As the crack emanated from the center of the stock at the rearmost inletting, and traveled rearward and slightly to the right, I needed to use my best judgement when drilling to follow the wrist and crack angles, and without breaching the exterior of the stock. Drilling was performed with the clamp in place, and to the depth which was marked on the drill bit. Compressed air evacuated the sawdust from the hole.
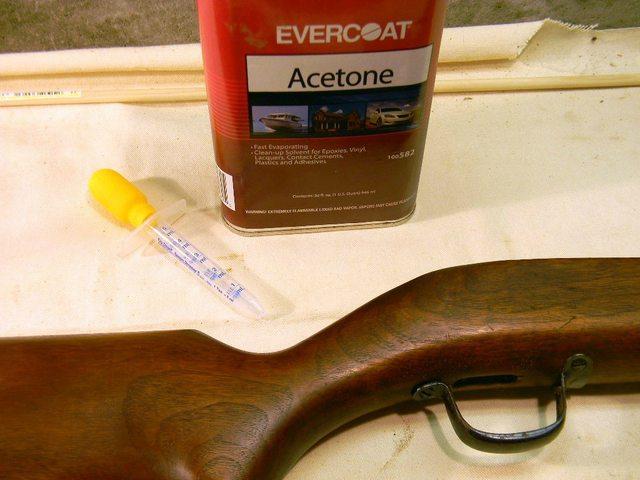
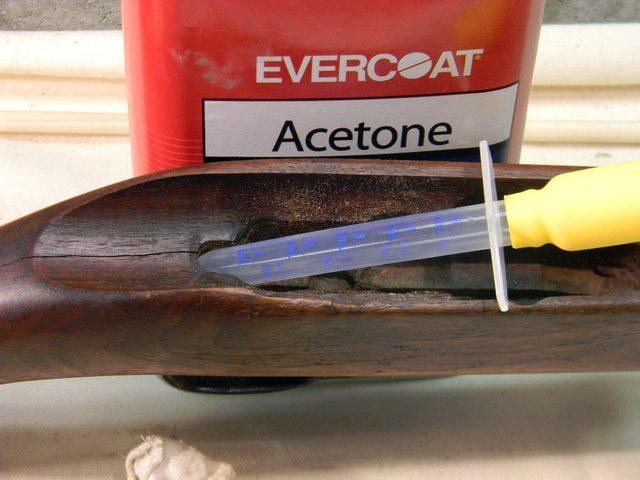
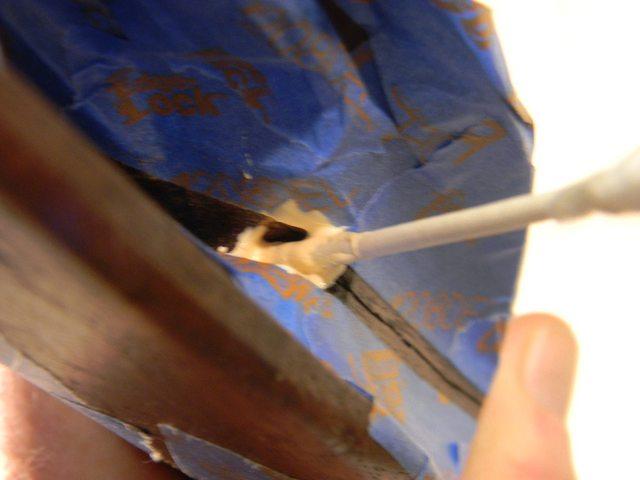
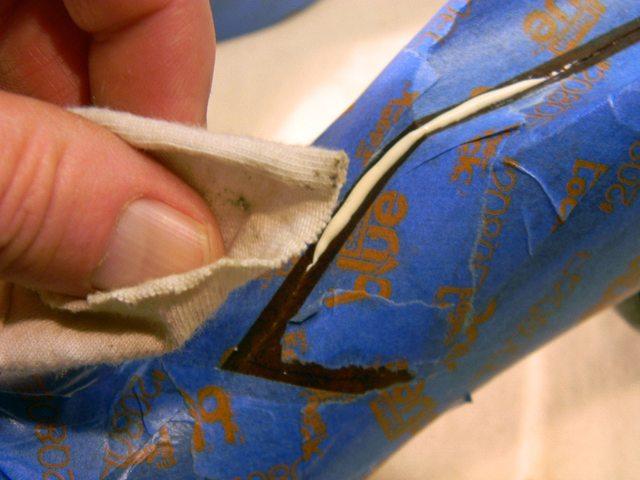
4. The crack could then be prepped for optimal adhesion of the epoxy by cleaning any interior oils/grime with acetone. With the clamp released, I used a medicine syringe for application, and then an empty syringe to force air into the crack for drying. The application of fast evaporating acetone revealed the full length of the crack, as it stayed wet for a little longer inside the crack.
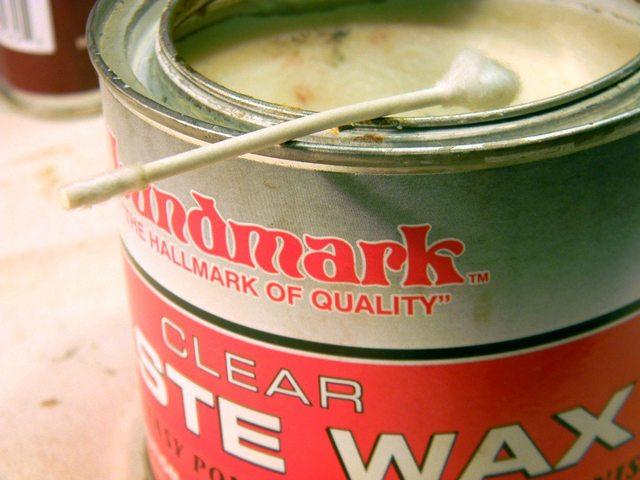
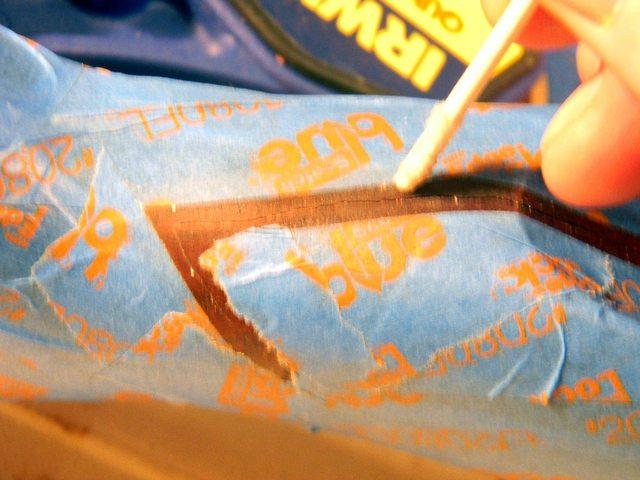
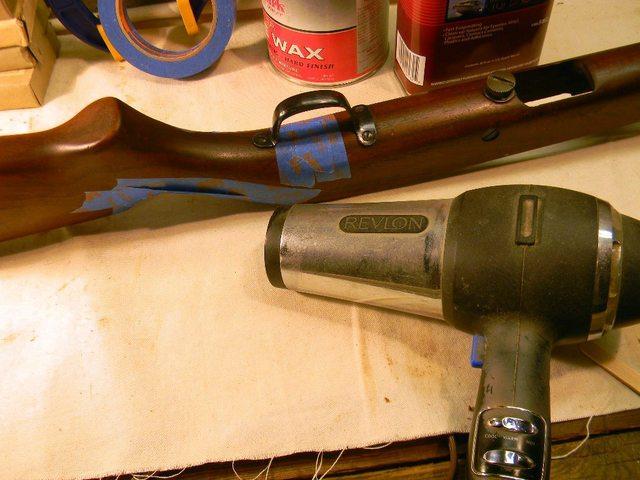
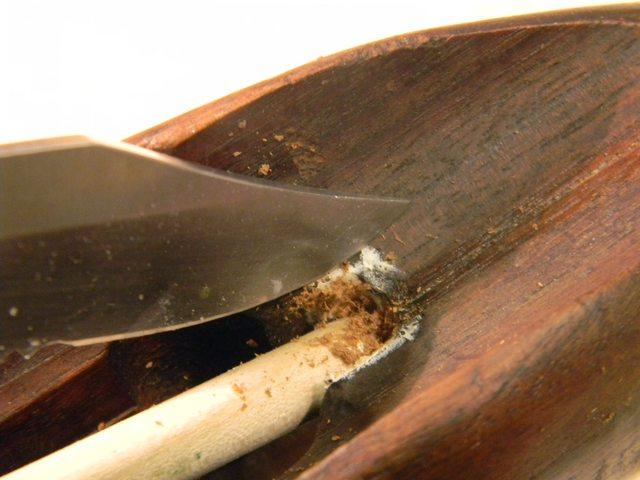
5. The stock could then be prepped to prevent a mess. I used general blue painter's tape to mask around the crack. I applied a coat of paste wax to the exposed area, using a q-tip with the cotton swab removed, so no excess paste wax would be forced into the crack. The dowel was inserted fully (dry), marked and removed to ensure the proper depth of insertion, and corresponded closely to the drill bit depth.
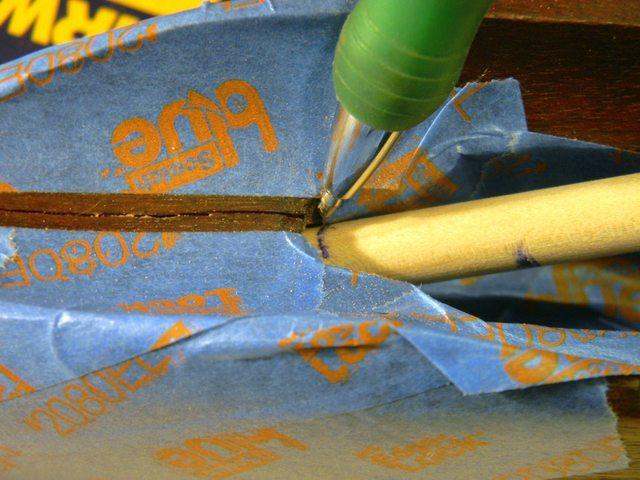
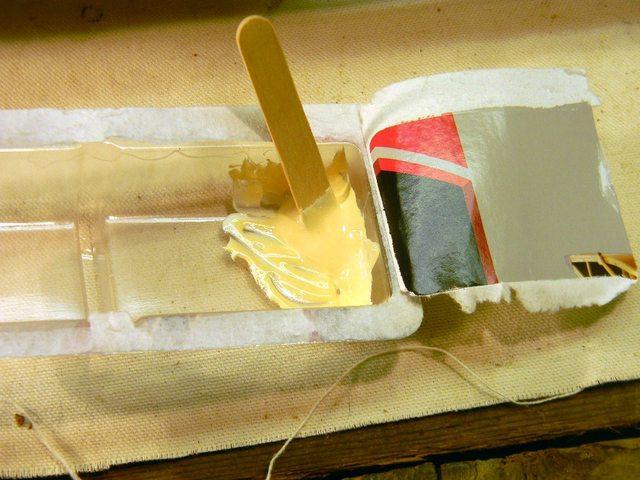
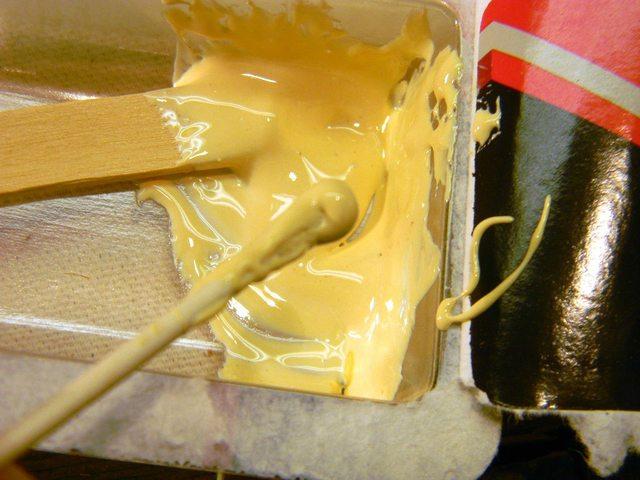
5. The epoxy was then mixed. I chose a marine epoxy with a 60 min. set up. This allowed for more working time and better flow when filling the crack. A longer curing time also produces a stronger compound. An epoxy with a short set up time will begin curing to quickly to properly flow. The stock was then 'warmed up' with a hair drier to also aid with the epoxy flow. I pulled the cotton swab off another q-tip to use as an applicator to fill into the hole.
The amount of epoxy which I used would be very difficult to measure, such as in milliliters. But suffice to say that the total glob was just about the size of a small grape.
Here is where I made a rookie mistake which affected aesthetics. I had drilled a 5/16" hole and used a 5/16" dowel. I neglected to account for the thin film of epoxy which would surround the dowel when inserted, and upon reapplying the clamp, the crack would not fully close. Next time, I will lightly sand the dowel to diminish the diameter - just enough so that clamping would close the crack more tightly.
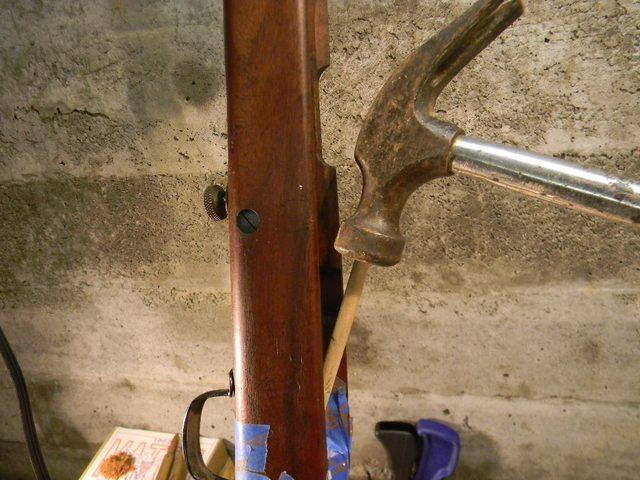
6. The dowel was then inserted, acting as a piston and forcing the epoxy to evacuate the drilled hole, and flow into the crack. As the epoxy is somewhat thick, it built up a hydraulic pressure, and the final 1/2" of dowel insertion needed some assistance with a hammer, stopping when it reached the depth mark on the dowel. The clamp was then reapplied.

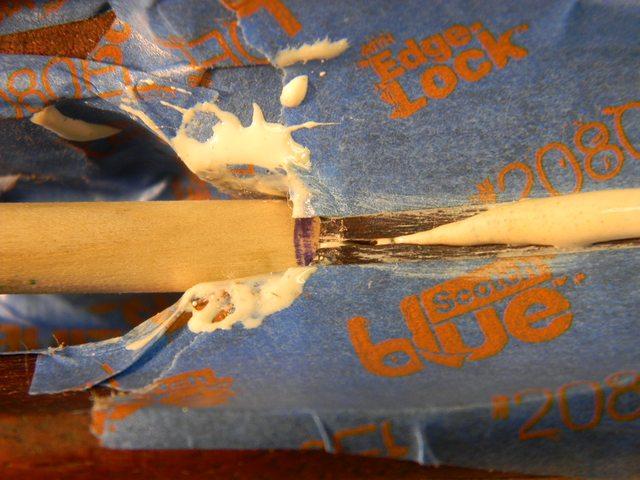
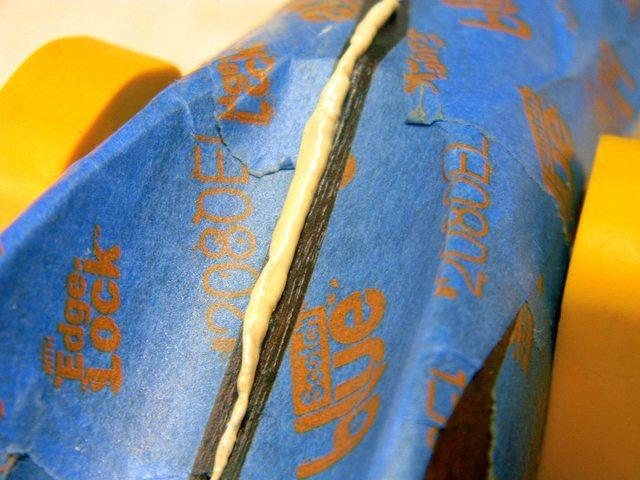
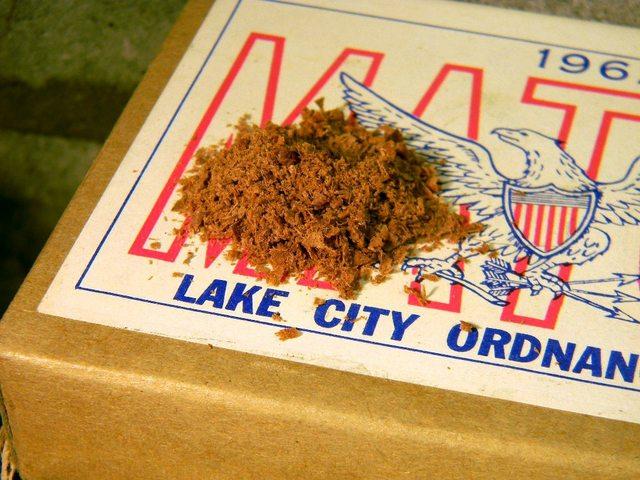
7. While the excess epoxy was oozing from the crack, I simply wiped it away with a cloth, and kept wiping for about twenty minutes, until it stopped oozing. Then, whether it made a difference or not, I just rubbed some of the sawdust over the crack, penetrating only the outermost exposed compound. The entire project was then allowed to rest for 2-3 hours
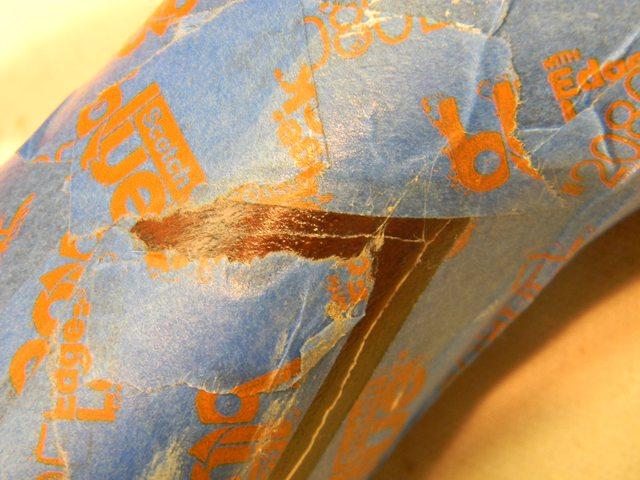
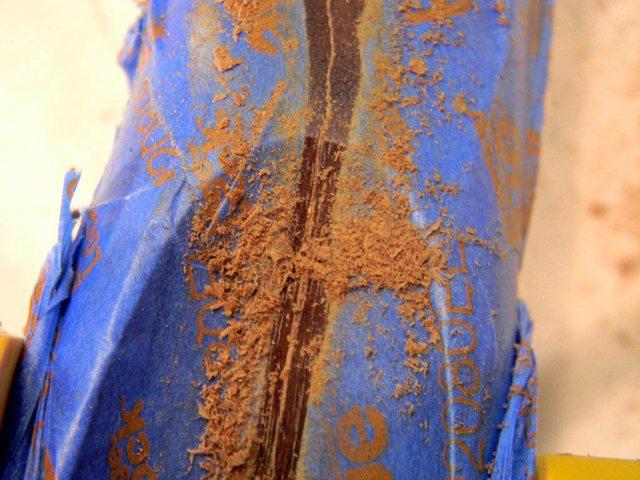
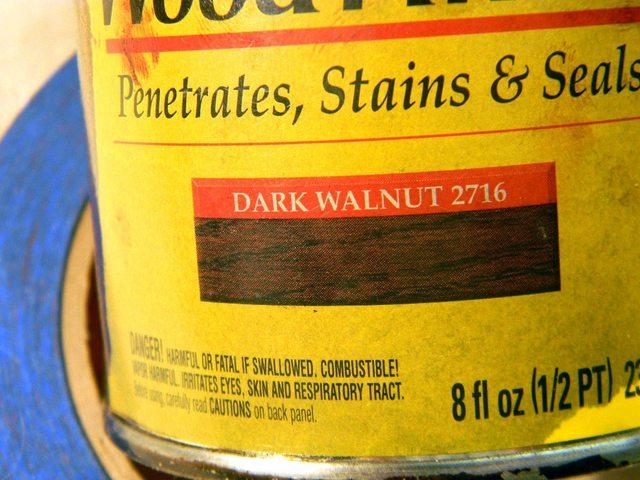
8. After allowing plenty of time for the epoxy to initially set, the masking tape was removed. The acetone came in handy again to soften and remove an epoxy finger print smudge which I didn't see earlier. A small amount of the epoxy which worked its way under the tape near the insertion point was CAREFULLY chipped away with the edge of my pocket knife. Walnut stain was then applied to the exposed epoxy/sawdust layer. And the then the project was allowed 24 hrs to fully cure, while still clamped.
Had I slightly diminished the diameter of the dowel before insertion, I would bet that the repair would be barely visible. But as it stands, the repair is done, and likely quite strong. I will need to mate the submachine gun action with the stock to perform enough relief by removing just enough wood at the rear stock inletting, so that the rear trigger housing lug will not contact the stock when firing and cause another crack.
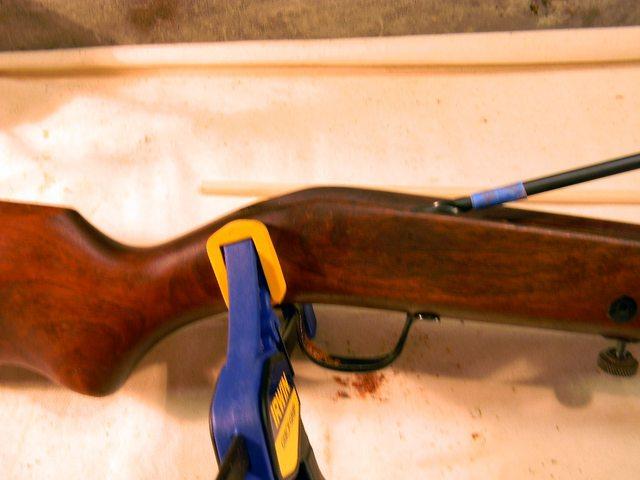
9. The clamp was removed, and the entire area buffed with a cloth. Again, not perfect, but plenty serviceable now.
Follow Up:
Shortly after the stock repair, the Form-4 was approved and I was able to continue with the complete firearm action in hand.
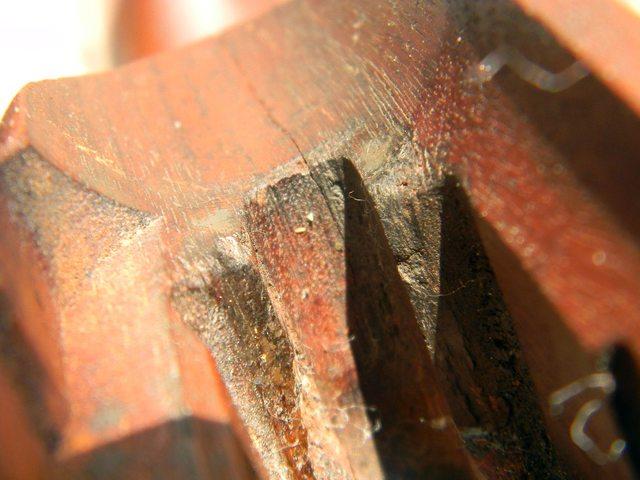
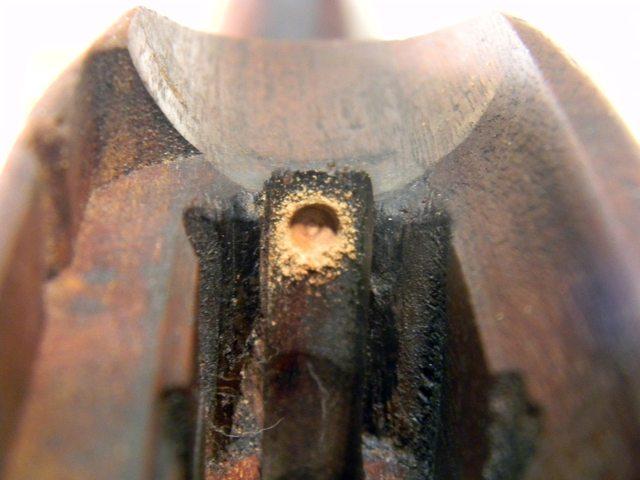
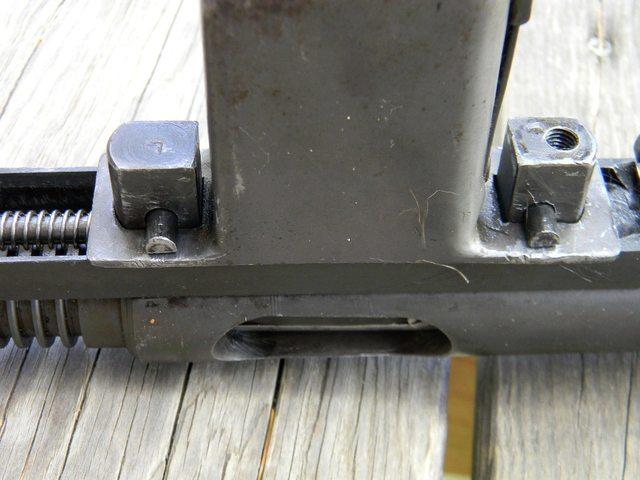
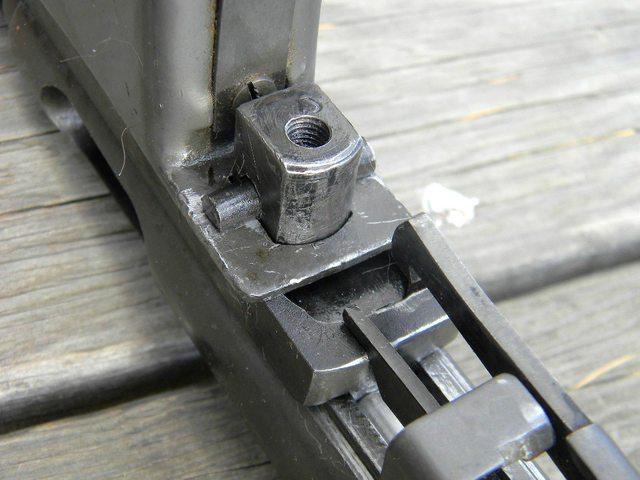
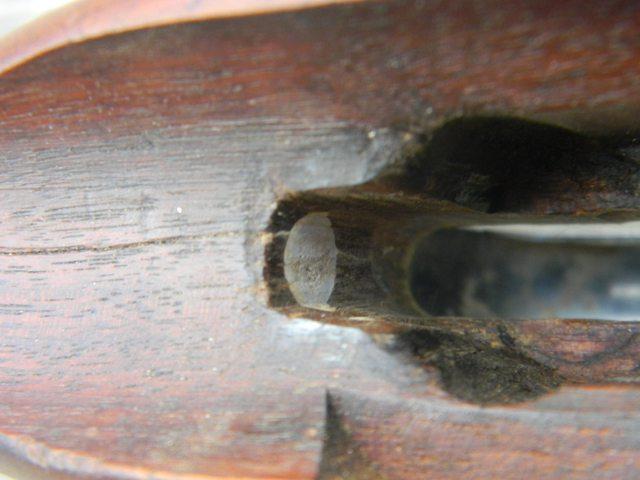
To complete the project, it was necessary to eliminate the conditions which caused the crack in the stock wrist. The main cause was movement or play in the stock lug region. To illustrate, the following pictures shows the two recoil lugs on the gun action. The main recoil lug is on the rear (right in first picture), and there is a rebound lug on the front of the action (left in first picture). The second picture shows the rear of the main recoil lug.
When the action was place inside the stock without tightening the action screw, the receiver of the gun could move approximately 1/16" forward and backward. This looseness allowed the rear trigger housing lug to be able to contact the stock inletting at the rear, and eventually precipitate the conditions for cracking.
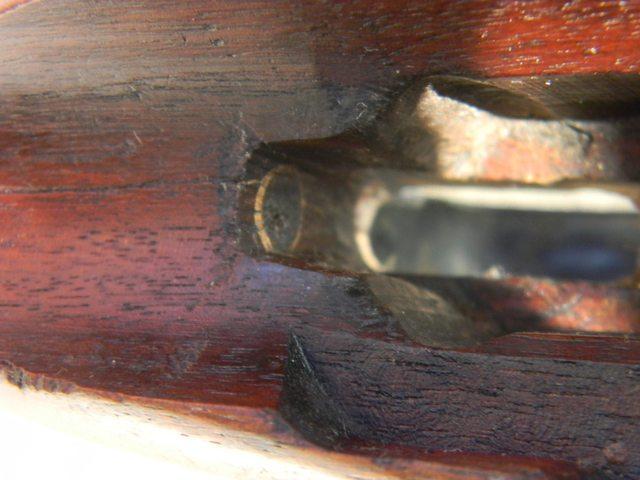
The next pictures illustrate the stock inletting areas for the rear and forward lugs. You will notice an extremely crude, temporary, but entirely effective fix which allowed me to take the gun to the range, and shoot without any concern for causing further damage to the wrist area.
I simply found a 1/16" thick piece of coated cardboard packaging and cut a shim to fit behind the rear lug. This shim entirely eliminated the back and forth play for the action inside the stock. I fired a total of 42 rounds with no issues. One day, I might address this shim issue with something more sophisticated, but for now, it works quite well.
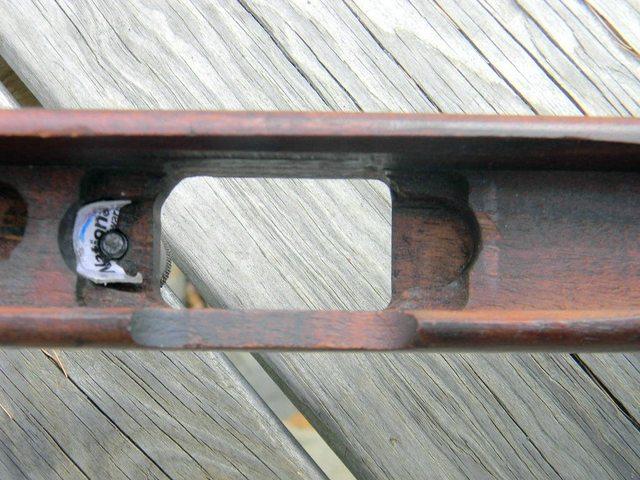
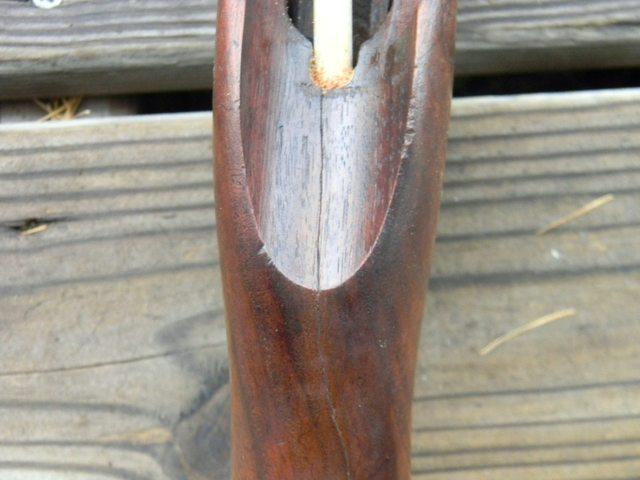
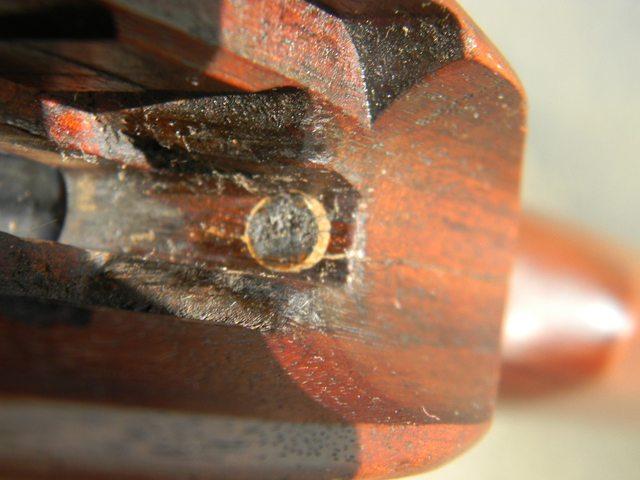
For a little insurance, I also lightly filed the rear inletting area, which now includes the end of the dowel which was inserted for the repair. Since the shim at the recoil lug had moved the entire action forward, I did not remove much material.
Just a note. After dressing the area, I did apply walnut stain. I noticed that the birch hardwood dowel accepted the stain quite well. But the epoxy which had dried for 72 hours was not as receptive to stain as it was in the first 2-3 hours of application. I may attempt the stain in this area again, and maybe not. It is not an area which is visible when the gun is assembled, and the visible epoxy is a good indicator that the wrist crack problem has been addressed. Potential future owners of this Reising M50 might appreciate the clue which is left for them inside the inletting.
Finally, with the masking tape, acetone application, wiping of the excess epoxy, and general clean up, the original stock finish did suffer and had become a little dull. Normally, I don't address finish issues just to make a gun pretty. But I did want the gun's finish to appear consistent at project's end.
Without getting carried away, I applied a small amount of the walnut stain, and blended into the dulled areas with a cloth, and finished the same areas with a light application of BLO , buffing with a dry cloth as it cured. Not too shiny, not too dull. And from a two foot distance, the repair is hardly visible at all.

Conclusion:
I think it is prudent to cover an important point, here. This was a Restoration project. The purpose was to reclaim the utility of an otherwise non-viable firearm - without any attempt to upgrade any of its functions, or to enhance its outward appearance. Restoration practices may incorporate conservative repairs of existing parts, or even the replacement of broken or non-serviceable parts with period correct and model specific parts - avoiding reproduction parts whenever possible, but understanding that most arsenals have discontinued production of our precious artifacts. Firearm restoration processes should not turn into into wholesale refinishing projects to make the gun pretty or better - but instead to correct deficiencies while preserving the historical essence.
There is a fine line between restoration and refinishing, and one should continually weigh the consequences of each step along the way by asking a simple question, "Is this necessary to the preservation of the firearm, or am I trying to enhance its function or appearance?" If the question may be answered satisfactorily, then it becomes much easier to keep from crossing that line.
I hope the above project might offer the step by step documentation of a restoration process, that others might benefit, and a broken warhorse or two might be returned to their former intended function and glory. Thank you.
-
The Following 5 Members Say Thank You to martin08 For This Useful Post:
-
Legacy Member

Nice job and write-up.
How did you upload the pictures? When I do it they always come out as !@*!ing little thumbnails. What you did looks so much better.
-
-
Legacy Member
These pictures are from the Imgur hosting site, with the large thumbnail size selected.
-
Thank You to martin08 For This Useful Post:
-
Legacy Member
They are hosted here, so I guess they were imported from Imgur?
-
-
I wonder if I might be so bold as to slightly disagree with Maryin 08's method of dealing with his crack - if you'll excuse the choice of phraseology! For this reason. By drilling down through the length of the crack Martin has immediately weakened it by removing material from the critical area. I appreciate that he's now going to fill the hole with a dowel and glue but however good a wood patch is, it ain't not the same wood and in doing so, it ain't doing what really NEEDS to be done. That is pull the two pieces of wood, separated by the crack, together.
What I would suggest doing is to do exactly what we did on the Thompson butt and the No1 and 4 rifle fore-ends which split in a similar way. However, I'd suggest doing it in a far tidier and neater way and in doing so, you'll eliminate the need to drill a small hole at the end of the crack to stress relieve it. So;
Without forcing things, spread the crack as far as you can possibly do so and squeeze as much aero spec wood adhesive into the crack as you can. A good way of getting a LOT of penetration is to blow the adhesive down (or up) into the crack using an air line. You'll be surprised just how much you can get in. Now cramp the parts together and leave for 24 hours before you do anything else. You'll see why in a minute..............
After 24 yours, remove the cramps. You will now need to reinforce this joint because without putting too fine a point on it, as things stand it is simply a side-on butt joint waiting to split again, JUST AS IT DID IN THE FIRST PLACE!. Now you drill 2x 5mm 3/16 or so holes transversely across the crack close to the centre line of the affected area. Because we have already glued and clamped the crack, there is no chance of wood chippings from the drilling process getting inbetween the crack and spoiling the perfect mechanical fit. If you want to be really clever you can now taper these holes using a taper reamer.
By hand or machine, turn up a couple of OAK taper plugs that are a good fit in the holes. Glue the holes and plugs and press in.......... Now knock the plugs into place using a wood mallet. Don't knock the shXX out of them....., just knock them until you hear the distinct change in tone as they tell you that they're xxxxing tight. Leave for a further 24 hours until you make good, stain to suit, then linseed/finish to suit. Leave for a further 24 years before re-inspecting. The butt or fore-end will still be intact
-
The Following 4 Members Say Thank You to Peter Laidler For This Useful Post:
-
Legacy Member
I wonder if I might be so bold as to slightly disagree with Maryin 08's method of dealing with his crack - if you'll excuse the choice of phraseology!
Permission to be bold graciously granted, Peter. There are different schools, and your application would provide for the greatest strength. Thank you.
In my application, a major goal was to preserve the outward appearance, hence no room for the transverse hole process. Had my firearm been of a high power caliber, I may have reconsidered the goal of preserving outward appearance in favor of utility. Of course, in any application of repair, the cause for the crack must also be addressed.
-
Thank You to martin08 For This Useful Post:
-
FREE MEMBER
NO Posting or PM's Allowed


Originally Posted by
martin08

In my application, a major goal was to preserve the outward appearance, hence no room for the transverse hole process.
There is actually a method of achieving the transverse repair and maintaining aesthetics which is used in cabinetry and wooden boat repair. After setting the dowel, use a "Forstner bit" (which cuts a flat, shallow hole, choose a bit slightly larger than the dowel) to incise a hole at the head of the dowel. Drill about 1/8-3/16" deep.
Then, using a "Plug Cutter" the same size as the Forstner bit, cut a plug from the side grain of a matching piece of wood as the stock. Partially fill the hole with glue, then tap the plug into the hole, (it should be a tight fit) wipe away any excess glue, leaving a protruding stub, then let the glue set. The next day, gently carve away the stub to the surface, then stain and blend to match the surrounding wood. I've had good luck with this and often the repair is barely perceptible.
This approach can also be used to plug a deep gouge that cannot be steamed out.
Last edited by Seaspriter; 11-26-2015 at 09:28 PM.
-
Legacy Member
-
Thank You to tr63 For This Useful Post:


 PM
PM


