-
FREE MEMBER
NO Posting or PM's Allowed

Garand Surgery
Snow and more snow. School cancelled today and tomorrow. Gave up on trying to clear the walk; about 30" on the ground here in south Plymouth. Spent three hours clearing the driveway at 20'x40' with my little rinky-dink electric snow blower and drifts as high as my chest.
Got a full Orion 98a spring replacement kit for the Garand . I steeled myself to perform my first full surgery on a Garand, having only done bolts before. I needed to reference three different sources in order to strip it down and put Humpty-Dumpty together again. All SA parts save the milled WRA trigger guard; frame 12-SA, hammer 3-SA, and safety 6-SA. Rifle is a CMP field grade, 358K, 10/41 receiver with a 3+/4 11/46 SA barrel. SA op-rod, with correct GHS/SA stock. When I picked it out at CMP South in June, another shopper looked at it and said the op-rod catch that connected to the follower was HRA, but I found no marks on it save a '12' on the bottom. I forgot to look at the follower arm for a mark.
Took a couple hours for the job, cleaning and re-greasing as needed. Got lucky on the bolt. As I don't have a takedown tool save the M3A1 combo, my thumb pressure on the extractor weakened enough against the stiff new plunger spring, and the new ejector and spring went ballistic, 15 feet up, through the ceiling fan, bounced off the cathedral ceiling, through the ceiling fan again, went between my legs and under the desk (my den is an old in-law apartment over the garage). Fun.
Curious as to how it will shoot with the new springs, but probably a couple of weeks for the range to clear!
T
Information
 |
Warning: This is a relatively older thread
This discussion is older than 360 days. Some information contained in it may no longer be current. |
|
-
01-27-2015 08:47 PM
# ADS
Friends and Sponsors

-
FREE MEMBER
NO Posting or PM's Allowed


Originally Posted by
majspud

Snow and more snow. School cancelled today and tomorrow. Gave up on trying to clear the walk; about 30" on the ground here in south Plymouth. Spent three hours clearing the driveway at 20'x40' with my little rinky-dink electric snow blower and drifts as high as my chest.
Got a full Orion 98a spring replacement kit for the Garand. I steeled myself to perform my first full surgery on a Garand, having only done bolts before. I needed to reference three different sources in order to strip it down and put Humpty-Dumpty together again. All SA parts save the milled WRA trigger guard; frame 12-SA, hammer 3-SA, and safety 6-SA. Rifle is a
CMP field grade, 358K, 10/41 receiver with a 3+/4 11/46 SA barrel. SA op-rod, with correct GHS/SA stock. When I picked it out at CMP South in June, another shopper looked at it and said the op-rod catch that connected to the follower was HRA, but I found no marks on it save a '12' on the bottom. I forgot to look at the follower arm for a mark.
Took a couple hours for the job, cleaning and re-greasing as needed. Got lucky on the bolt. As I don't have a takedown tool save the M3A1 combo, my thumb pressure on the extractor weakened enough against the stiff new plunger spring, and the new ejector and spring went ballistic, 15 feet up, through the ceiling fan, bounced off the cathedral ceiling, through the ceiling fan again, went between my legs and under the desk (my den is an old in-law apartment over the garage). Fun.
Curious as to how it will shoot with the new springs, but probably a couple of weeks for the range to clear!
T
Use a one (1) Gallon Zip lock bag next time you disassemble a bolt (Any M1 Garand/Carbine).. saves you from doing 

-
-
Advisory Panel

Get the M10 cleaning rod and handle and you can avoid that too. Never had any problems because there's nothing to shoot out and no where for it to go.
-
The Following 3 Members Say Thank You to browningautorifle For This Useful Post:
-
FREE MEMBER
NO Posting or PM's Allowed
Now that I know how to take the action apart, I decided to swap out the WRA milled TG with a correct 3-SA (8/41-12/41) one. Finish doesn't quite match, but I'm hard put to see it as I'm color blind. The WRA TG was in a little better shape with the lugs perfectly rounded. The SA had some wear on it, but locks up so tight that I needed my punch to pull it out again.
Photo got cat-bombed. This one seeks out any new source of heat, I think as she's so small; 6.5 lbs. and 10 years old.
T
Edited per OP request
Last edited by Bill Hollinger; 02-04-2015 at 09:53 PM.
-
Advisory Panel
As far as I can see from the angle, the trigger guard/trigger housing seem to be close enough to match. The little calico... well she just wants company. Try not to get oil on her.
-
-
FREE MEMBER
NO Posting or PM's Allowed
-
Advisory Panel
-
Thank You to browningautorifle For This Useful Post:
-
Senior Moderator
(Milsurp Forums)


T, it happens to the best of us buddy 
Bill Hollinger
"We're surrounded, that simplifies our problem!"
-
-
Contributing Member
Glad to see your resident armourer was there to oversee and lend a paw
-
Thank You to CINDERS For This Useful Post:
-
Legacy Member

Originally Posted by
majspud
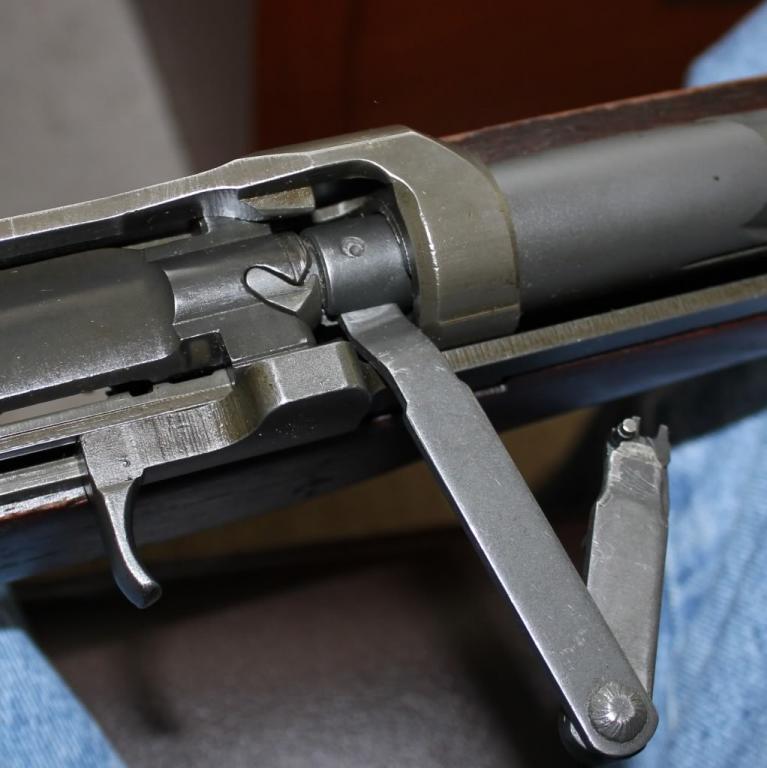
As I don't have a takedown tool save the M3A1 combo,
The M3A1 tool is designed to perform take down of the bolt. Use as shown in the pic. Push forward on the op rod to fully engage the tool and then lift the handle of the tool.
When reassembling, you can use the tool the same way to compress the ejector spring. Putting a dab of grease on the extractor detent will ease installation. A plastic faced hammer is handy to tap the ejector into place.
-
The Following 5 Members Say Thank You to no4mk1t For This Useful Post:


 Register To Reply


