


Thought it may be of interest to some, regarding a repair to a prism from a recent purchase, the first thing I do is look through the the wrong way, this can give an indication of a breakdown in the balsam or anything major in the inside.
These were ok apart from one side were the view was similar to looking through yellow frosted glass, a clue to the breakdown of the balsam.
I,m not going to teach anyone to suck eggs but a repair is very simple, just time and the correct jig or set up, here I,ve used what I,ve used on two other occasions so I know it works, if it was the ocular lens then its a bit more technical as this one (right hand side) is the one with the graticle , luckily this was in tact and no signs of any breakdown in the balsam.
First off a decent small screw driver set or a multi bit set is needed, without it its like ****ing in the wind...
First off is to remove the cover 3 screws and lift off gently (I say gently it may require some force) but there lies a copper plate underneath.
Remove the plate (sometimes this may be damaged due to a previous owner having a peak inside and not placing back correctly)
when removed the view is the prism itself with ocular lens and the securing bar, two screws and this is removed.
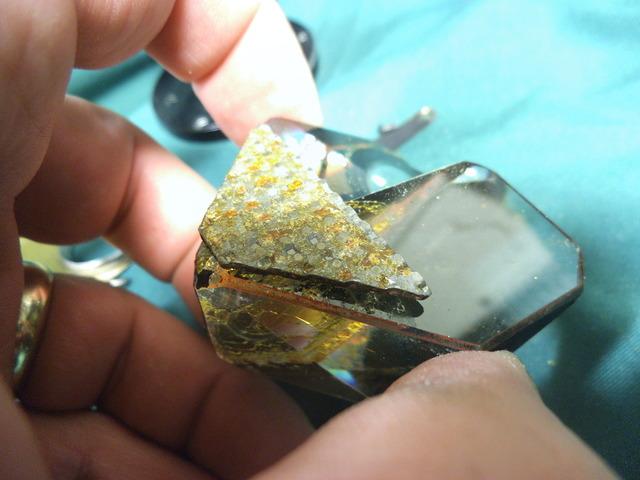
its a case of gently lifting the whole assembly out (this is in two parts due to the breakdown of the balsam.
Pic below is the two together with the spacer or securing plate? I gather this just gives more support, acts as spacer and enables the prism to moved in place or part of the original process of cementing the two parts together?
Next step is is straight forward, the two joining faces need to be cleaned and clear of any of the previous balsam, acetone or pure acetone nail varnish remover is the only stuff I know of, it will take some time but a warning here be sure to keep it away from the ocular lens.
Once cleaned, and clear it needs to be spotless the last clean of the two sides should be with a lint free cloth, also pays dividends to be in a relative dust free area (not possible were these were done) still specs of dust visible but its photo purpose only they were as clean as could be before cemented together.
The cement, there are modern cements that with a small amount of UV they will bond in seconds, but they don't allow for any mishaps and was told once there together they aint coming apart ? so use the tried and tested method and done correct will last our life time.
So the choice is simple Canadianbalsam (it smells nice too, in fact the old crystallised balsam smelt as fresh the new stuff)
The next part is trying out the jig, don't even try without something basic as this, (I,ll come back regarding small ocular lens etc)
Its as basic as can be it positions the two together and the clamp secures the two and keeps the sides even, you need multi hands for this I can only say try before you use the cement, the actual pics show the two parts cemented and secured, the plate is below the two sides and in front of this (just visible) is two craft knife blades as spacers.
Its hard to apply and show the steps in pics of the cementing process, to get the idea there are a few clips on You tube IIRC, you only need two or more drops and put the two together and your pushing them together to form an even clear layer between the two, careful with excess also as you can end up cementing everything together, I will try and find a drawing of the the other jig I have and also show the correct position needed for the prism.
One thing is patience, as it can take over a few weeks and leave in a warm environment (but no direct sunlight), so avoid your favourite work or hobby bench.
I will post the rest in part two. Any of the experts please chime in to correct any mistakes.Information

Warning: This is a relatively older thread
This discussion is older than 360 days. Some information contained in it may no longer be current.
- Knowledge Library

- MKL Entry of the Month
- Australia
- Austro-Hungarian Empire
- Canada
- Czechoslovakia
- Denmark
- Finland
- France/Belgium
- Germany
- Italy
- Japan
- Norway
- Russia
- South America
- Sweden
- Switzerland
- Turkey
- United Kingdom
- United States
- Yugoslavia
- Is my rifle authentic or a fake?
- Jay Currah's Lee Enfield Web Site
- On-line Service Records (Canada)
- Technical Articles/Research
- Forum
- Classifieds
- What's New?
-
Photo Gallery
- Photo Gallery Options
- Photo Gallery Home
- Search Photo Gallery List
-
Photo Gallery Search
- Video Club
- iTrader


 PM
PM