-
Legacy Member

does anyone make a reproduction trade pattern style mount?
-
-
02-17-2016 06:07 AM
# ADS
Friends and Sponsors

-
Legacy Member


Originally Posted by
CINDERS

I watched Harry Potterfields from Midway
USA
vid on that way of filling holes and it worked very well.
That is actually where I learned the technique from as well.
- Darren
1 PL West Nova Scotia Regiment 2000-2003
1 BN Princess Patricia's Canadian Light Infantry 2003-2013
-
-
-
Legacy Member
-
-
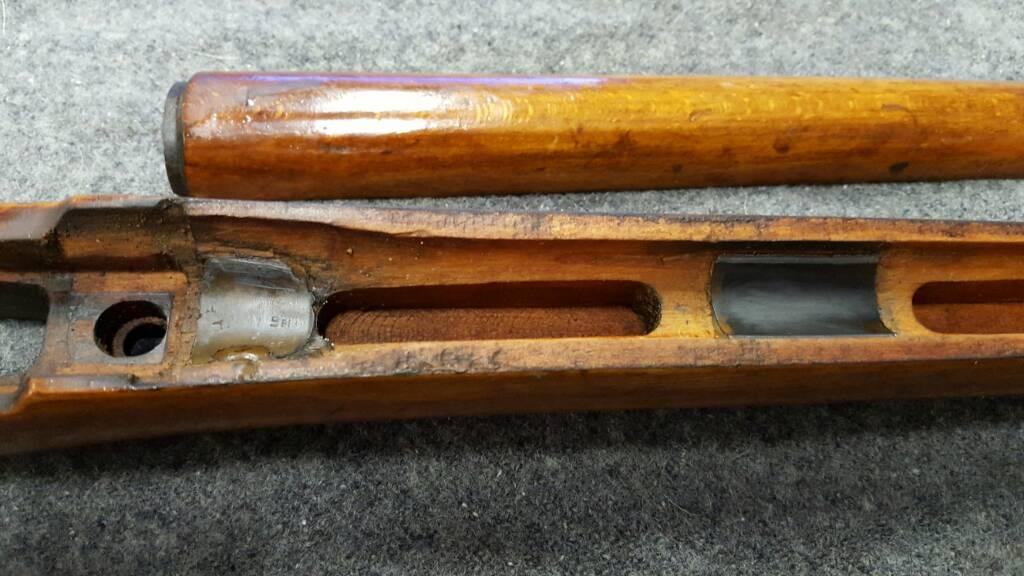
I wouldn't worry unduly about the small crack at the rear of the fore-end if the fore-end fits well. The rivetted tie plate will ensure that it ain't going no further. Mind you, there something odd about the breeching-up ring part of the fore-end..... Has it been machined out for some mysterious reason known only to these out-of-this-world orbiting target shooters? The breech area of the fore-ends can be cut out, patched and re-cut. We had a special dovetail cutter and a whole section in the EMER's of how-to...., but never really necessary as it's saveable if pushed.
If the fore-end isn't warped downwards you can build up the muzzle to get a decent bearing too. Where do they get all this varnish from? Can you imagine a mere mortal holding a varnish daubed fore-end like that in the monsoon - or even on a damp day. He'd be slipping around like a used xxxxxx in a xxxxx's xxxxx*.
(* Army technical phrase used by the junior ranks when encountering slippery roads). A good project Darren. Enjoy it.....
-
Thank You to Peter Laidler For This Useful Post:
-
Legacy Member
If the fore-end isn't warped downwards you can build up the muzzle to get a decent bearing too. Where do they get all this varnish from? Can you imagine a mere mortal holding a varnish daubed fore-end like that in the monsoon - or even on a damp day. He'd be slipping around like a used xxxxxx in a xxxxx's xxxxx*.
(* Army technical phrase used by the junior ranks when encountering slippery roads). A good project Darren. Enjoy it.....
Someone certainly slobbered it on, it covers parts of the metal fittings and foresight, clearly the rifle was not stripped before it was applied, and it is slick stuff indeed.
Talking about bedding this stock and action, I will have to ask the advice of you and Brian, before dis-assembly the action and breech fitment was not tight. While manipulating the trigger, either cocked or uncocked, the rear of the action would lift vertically 1-2mm, suggesting it was not sitting into the draws securely. While removing the stock, it was a fairly tight fit and seemed serviceable, but I clearly have a fitment issue somewhere.
Looking at the bedding blocks installed, I assess that the are too high and are acting as a pivot point against the rear of the action, like a playground teeter-totter. This could possibly allowed the action enough slack to recoil downwards causing this crack in the first place. I would think the trigger pull would have been somewhat inconsistent as well.
Do you fellows think this is a correct assessment, and if so, am I best served to remove this bedding and start fresh, or should I look to building up the draws (with bits of Coke cans and credit card obviously  ...kidding) to re-establish proper retention of the rear portion of the action?
Other options and opinions are of course welcome.
- Darren
1 PL West Nova Scotia Regiment 2000-2003
1 BN Princess Patricia's Canadian Light Infantry 2003-2013
-
-
Legacy Member
-
Thank You to Sentryduty For This Useful Post:
-
Legacy Member
End of round 2, about 95% of the varnish has been removed, another round will be required to get the last stubborn globs.
- Darren
1 PL West Nova Scotia Regiment 2000-2003
1 BN Princess Patricia's Canadian Light Infantry 2003-2013
-
Thank You to Sentryduty For This Useful Post:
-
You could take the end cap off the fore-end. Just pull the two pins out. Notice that they have a flat at each end. This flat is to locate the band, upper. These pins are also the same dia as 4BA screws and the trigger, sear and mag catch pin
-
Thank You to Peter Laidler For This Useful Post:
-
Legacy Member
Thank you peter, I will certainly try that. I had some reservations about tampering with the pins for fear of damaging the wood, however on a project rifle it is probably the best time to learn.
- Darren
1 PL West Nova Scotia Regiment 2000-2003
1 BN Princess Patricia's Canadian Light Infantry 2003-2013
-
-
Advisory Panel

I'm surprised the liquid strip didn't take it all off...I use 1850 furniture stripper. It can't be MUCH different from that stuff. Apply lots and use a stiff hard nylon brush to scrub. Steel wool at worst...
-


 PM
PM