-
FREE MEMBER
NO Posting or PM's Allowed

Removing dent in L-E No4 magazine ?
One of my magazines in working ok with 5 rounds but when loaded with 10, the follower sticks inside at the height of a small dent in the magazine side. No doubt this subject already came up in the past and I wonder if somebody could direct me to the repair solution ? Thanks in advance.
Information
 |
Warning: This is a relatively older thread
This discussion is older than 360 days. Some information contained in it may no longer be current. |
|
-
03-06-2017 11:53 AM
# ADS
Friends and Sponsors

-
Advisory Panel


Well, a couple of photos would have helped, as the feasibility of the following solution depends on exactly where the dent is, but here goes...
Unless you have a very strong trained mouse with a small sledgehammer to get inside the case and hammer the dent OUT from INSIDE, the basic method is to hammer the surroundings DOWN from the OUTSIDE. I appreciate that this may not appear to be what one might call intuitive, but it usually works.
You need a piece of rectangular bar material that can be forced into the dented case, so that the affected face is bulged outwards. You then need an adequate brass or bronze hammer (such as those made for use in situations with an explosion hazard) to hammer the surroundings of the dent flat. This reduces the depth of the dent. if the dent is a deep one, you will not remove it in one session, but may have to pack up the flat bar again so that the side is bulged out again, but with a now somewhat reduced dent. Hammer the surroundings flat again and repeat if necessary until the dent is removed or at least so reduced that the case is usable. I am lucky enough to have a pair of bronze wedges to adjust the thickness of the bar assembly.
I have used a similar method on round items, such as a French horn, the barrel tube on a German Gew. 88 and the magazine tube of a Winchester LAR. In the particular case of an Enfield magazine you will need to adjust the internal flat bar assembly and the external support on which you lay the magazine to be hammered so that the pressed ribs on the sides are not flattened!
Takes time, but it works!
Last edited by Patrick Chadwick; 03-06-2017 at 12:38 PM.
-
The Following 5 Members Say Thank You to Patrick Chadwick For This Useful Post:
-
-
Now I know what to do with my dented L42 mag!
-
-
Patrick has said exactly how we used to do them - and others - at the sharp end. We weren't too fussy about the outward appearance afterwards but would try to get it as good as possible. So long as it functioned flawlessly and looked reasonable after the beadblast and paint treatment, that was all that mattered to us
-
-
Legacy Member

here's one way to do it if you are not worried about cosmetics and function is your goal. On the other side of the mag. drill a 1/4" hole directly opposite of the dent.
Lay the Mag. dent side down on a piece of flat steel then go thru the 1/4" hole with a suitable punch and flatten out the dent. Won't be pretty but will give you a usable Mag.
-
-
FREE MEMBER
NO Posting or PM's Allowed
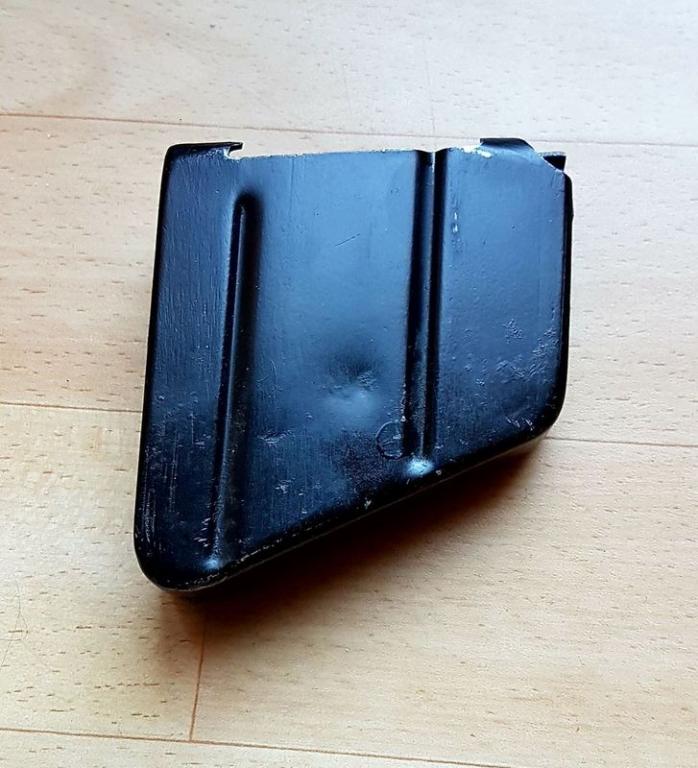
Thanks, I used to repair my dented Colt Govt. magazines via the "opposite" hole technique but then, the magazine remained hidden in the pistol grip. Here, the subject remains in plain view, so I'd prefer to resort to less apparent scars. Here's a pic of the victim, small dent but in an annoying place...
-
That would take me about 30 seconds to put right...........
-
-
Advisory Panel
Take your pick:
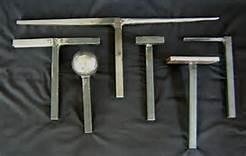
You no doubt have some very skilled metal smiths in Belgium for whom this would be child's play.
“There are invisible rulers who control the destinies of millions. It is not generally realized to what extent the words and actions of our most influential public men are dictated by shrewd persons operating behind the scenes.”
Edward Bernays, 1928
Much changes, much remains the same. 
-
Thank You to Surpmil For This Useful Post:
-
Advisory Panel
That would take me about 30 seconds to put right
Agreed, nothing to that one.
-
-
Contributing Member


Originally Posted by
Patrick Chadwick

the basic method is to hammer the surroundings DOWN from the OUTSIDE. I appreciate that this may not appear to be what one might call intuitive, but it usually works.
It's exactly the same method used to "panel beat" a dent out on car bodywork. In effect, you start off by making the dent larger but at the same time making the edges of the dent less pronounced. If you do it right the dent should (hopefully) "pop out".
I did use a similar method recently to what Patrick describes in post 2 to salvage a K98 bayonet scabbard which looked like it had been run over by a steam roller. I managed to recover it and to get it back to it's original shape, although not perfect, I'm pleased with the result.
-


 Register To Reply


