-
FREE MEMBER
NO Posting or PM's Allowed


Originally Posted by
jsne

First you need to measure out how mutch you need to lower the
Spigot on the front pad:
Put the rifle or barel/action to exat straight level
Using a Spirit Level (buble thing) on the front barrel over the bayonet
Lugs.
Put your scope in the bracked and mount it tight in the front Pad.
Now with the rear thumpscrew removed insert the rear pad between
The bracket an action body
Now place the Spirit Level on the front tube of the scope.
Use a set of feeler gauges in the gab under the rear pad
Until the scope is lewel with the rifle.
The thicknes of the numbers of your feeler gauges is what you need to lower the Spigot on the front pad.
Lk
In Peter Laidlers book about the story of thr no.4 t
He explain how do repair a worrn out Spigot
It is exactly the same I doo but with an exentric bushing with the center
Iowered to what you need.
I have the book and can scan the side to you.&
But I think wee need Peters permission to copy anything
From his book
So Peter if you read this? Will it be Ok?
jsne
The rest will folow in s cuppel og days
I have the book, no worries, I will check. thank you jsne
-
01-18-2018 03:28 PM
# ADS
Friends and Sponsors

-
Contributing Member


Bottom of page 94 then pages 96 - 97 give you the information required
-
Thank You to CINDERS For This Useful Post:
-
-
Advisory Panel

At the risk of speaking out of turn, I am just wondering how you aligned the barrel on your point of aim? Surely 250 yards is a little excessive? Though in theory farther is better, at Holland & Holland it was all done indoors if I remember my reading correctly.
Are you using a new cartridge case with a small hole drilled through the center of the base, or perhaps a headspace gauge with a centered hole through which you sight by eye? (if so, be sure is snug in the chamber and well centered; a little cello tape perhaps to make it snug?) The easiest thing is to set up the barreled receiver "rock-solid", sight down the barrel and have an assistant move the sheet of paper or cardboard with the alignment marks until it is centered exactly on the barrel and then secure it to the wall. Then if everything is level at both paper and rifle ends, you will have the exact point of aim for the telescope - assuming you have the correct distance between the two alignment points for the distance you are using...
If you want a "back up" check on the alignment of your scope, buy one of the No.22 sights which are for sale very cheaply as they are no use for much else, and fit that into your bracket. The reticule on the No.22 is permanently centered, and as it was an artillery sight, and there was no way to move the reticule even if you wanted to, we can be pretty confident that the reticule is not only well centered, but STILL centered. Rotate the scope in the mounts to test it. They also have very little parallax having no magnification.
“There are invisible rulers who control the destinies of millions. It is not generally realized to what extent the words and actions of our most influential public men are dictated by shrewd persons operating behind the scenes.”
Edward Bernays, 1928
Much changes, much remains the same. 
-
The Following 3 Members Say Thank You to Surpmil For This Useful Post:
-
Legacy Member
What you need is the optic axis to be paralel with the bore.
If you have colimatet the scope correct the axis bore run paralel with the tube.
So what you have too do first is to make sure your Accomount pad
Have the correct hight.
When you have done that you have to start all over again to fit the pads in the correct positions.
And remember the front Pad is for vertical position and the horizontal position is the rear Pad.
jsne
-
Thank You to Jsne For This Useful Post:
-
Legacy Member
Some advice with the front Pad:
It is good you have the book.
It will explain the princip werry well.
But you have too make a costimate Spigot inlet.
Start with remove the Old Spigot and drill out the hole
After Peters advice.
Then with a small file. File the hole oval downward as much you need
You may have too make your new Spigot inlet oval as well in order too not remove more material from tne Pad than needed
Put in your new costimate spigot and make sure it id positioned right and square.
Then braze it on.
I start to make the Spigot with cutting the threat
If you have acces to a lathe you can make it a little oversized
And turn in shape afterwards. The same with the aerier under the Spigot that neet to bee lowered the same distance as your Spigot.
It is easy too fix the bracket in the lathe.
Just use a bolt and screw it in the spigot from behind
Then turn it with a small steel werry little at the time.
If you dont have acces too a latte you need too make the new spigot
To exact dimensions first.
And it will then be easyest to remove the material under the new spigot
Before you braze it.
You can use a dremmel for that. But take your time and bee patios
Atter your done file the top of the Pad in shape.
Refit the pad on the rifle and start all ower to make sure to colimate it right.
Stick straight to Peter Laidlers advice through the rest of the job and all will be fine.
You can use Surpmils advice to make a bettet boresight.
When all done I use to coldblue the Pad because it will color the braze as well and make your work almost invisible.
Feel free to ask if you have any questions
Or if I is hard to understand 😀
I will follow the tred
Jsne
-
The Following 3 Members Say Thank You to Jsne For This Useful Post:
-
FREE MEMBER
NO Posting or PM's Allowed
Originally Posted by
Surpmil
At the risk of speaking out of turn, I am just wondering how you aligned the barrel on your point of aim? Surely 250 yards is a little excessive? Though in theory farther is better, at Holland & Holland it was all done indoors if I remember my reading correctly.
Are you using a new cartridge case with a small hole drilled through the center of the base, or perhaps a headspace gauge with a centered hole through which you sight by eye? (if so, be sure is snug in the chamber and well centered; a little cello tape perhaps to make it snug?) The easiest thing is to set up the barreled receiver "rock-solid", sight down the barrel and have an assistant move the sheet of paper or cardboard with the alignment marks until it is centered exactly on the barrel and then secure it to the wall. Then if everything is level at both paper and rifle ends, you will have the exact point of aim for the telescope - assuming you have the correct distance between the two alignment points for the distance you are using...
If you want a "back up" check on the alignment of your scope, buy one of the No.22 sights which are for sale very cheaply as they are no use for much else, and fit that into your bracket. The reticule on the No.22 is permanently centered, and as it was an artillery sight, and there was no way to move the reticule even if you wanted to, we can be pretty confident that the reticule is not only well centered, but STILL centered. Rotate the scope in the mounts to test it. They also have very little parallax having no magnification.
The distance of 250 yards is the distance recommended by Mr Laidler in the "make up a usable n°4 sniper" thread, and I'm sticking to it.
I'm using a partially recalibrated brass, that was fired in the rifle, it fits nicely.
---------- Post added at 09:26 AM ---------- Previous post was at 09:18 AM ----------
Thank you Jsne,
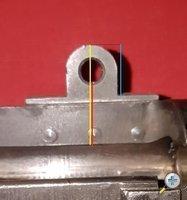
Before starting any modification, I want to be sure that the frond pad is the cause of the problem, could anybody measure the following lengthes on his front pad? the yellow, red and blue drawn on the picture, thank you
Last edited by Lou Cypher; 01-19-2018 at 03:30 AM.
-
Contributing Member
These are about as accurate as I can get them from my BSA 1944 T which is featured in Peters Book in Pad Trials when they had issues with the front pads working loose both scope & rifle are still together after 73 years and will remain so until I am wheels up. The measurements will be different "T" to "T" but these give you something I guess;
Yellow - 0.9105"
Red - 0.5540"
Blue - 0.4440"
-
Thank You to CINDERS For This Useful Post:
-
FREE MEMBER
NO Posting or PM's Allowed
Originally Posted by
CINDERS
These are about as accurate as I can get them from my BSA 1944 T which is featured in Peters Book in Pad Trials when they had issues with the front pads working loose both scope & rifle are still together after 73 years and will remain so until I am wheels up. The measurements will be different "T" to "T" but these give you something I guess;
Yellow - 0.9105"
Red - 0.5540"
Blue - 0.4440"
For me, I get :
Yellow 0.948"...0.038 of discrepancy
Red 0.548"...0.006 "
Blue 0.455"...0.011 "
Is it possible that these discrepancies can lead to a 0.236" at the rear?, I guess no.
-
Legacy Member
Hmm
As I see it it is only the red line there is important
Are you sure 0.548 is Right?
Mine is about same as Cinders.
When I made my repro T I made a front pad 1,6 mm
Lower.
I still have a 0,8 mm shim at the bottom of my rear pad
And a little removed on top after I soldered it.
If your measurements are right something is wrong
And maby you should not follow my advice.
Jsne
-
-
Legacy Member
Hi again
As mentioned I have made a new front pad when I made mine.
I just find the one I have left over from Accumount.
And I don’t think the point you measure is a good one.
Ny Rifle is a 1944 Long branch in 75L series.
i have an Other Long Branch from 1944 in 61L series
And the distance from the top edge of the resiever til where you red line stop is not exactly the same.
I will measure both precisely in the week end.
Cinders ? Could you if your front pad is s guinie one
Measure the fistance from the Center hole to the
top edge of the reseiver.?
Jsne
Last edited by Jsne; 01-19-2018 at 11:38 AM.
-


 Register To Reply


