


Hello all,
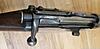
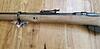
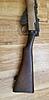
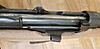
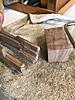
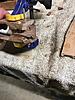
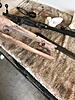
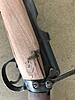
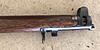
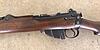
Its true when they say "the devil will find work for idle hands to do." I picked up this SMLE Mk I*** back in february/march of this year. I spent three months fitting and shaping to get this back into military configuration. While this not the "devils work," I keep telling myself, "no more projects!" I have plenty of work to do on my house, and project guns should not even be on my to-do list. But temptation bit me when I saw this rifle on GB for $550. The stock was someone's attempt to make a SMLE Mk I stock. I also remembered I had an SMLE Mk I* sliding charger for the bolt head, a rear sight, a Mk I* sling swivel, and and LES marked volley sight. Temptation won over as I hit the "bid" button. I won, and the rifle was delivered a few days later. Here it is as it I received it. They didn't do a bad, job, they just left a lot of course fitting/fine fitting to do, and their router took some big chunks out of critical areas. The area of the draws was horribly shaped, and the recess for the long range volley arm was cut way too big.
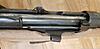

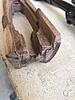
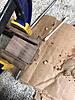
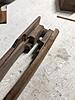
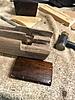
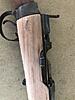
As you all can see, the machining was pretty course. First repair was fitting up the draws. I had a block of American walnut lying about, so that provided a donor portion which would become the draws. After fitting and gluing, I cross-dilled a hole, and screwed in a length of threaded rod, to act as a tie. I did not have a recoil plate, so I left it as flat-faced wood. Once the glue dried, I removed the two small bolts that held it together, then ground it all down to profile.
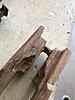
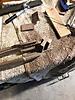
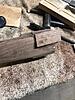
Once the draws were completed, I set about fitting in a new patch for what would become the recess for the volley arm. This patch was a butt-joint. The wood was from a No4 sportered stock, and pegged through the top with 1/8" wooden dowel stock.
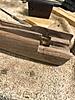
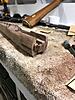
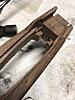
Once that was done, it was hours and hours and hours of fitting the barreled action to the stock, chiseling and sanding the high spots. The draws took the longest to fit. I was literally shaving thousandths off the draws until the stock fit tight against the draws and butt socket. Next item was repairing the recess for the dial sight plate. The profile was too shallow, and the plate would fit very proud from the wood. So once again, I cut a patch from the donor No4 stock, ground the stock flat to receive the patch, set it in and waited for it to dry. In this area, I used wood glue mixed with fine sawdust. I do this as it closely matches the color of the walnut. Unfortunately, I used too dark of a wood dust, and it came out darker than the surrounding stock. And it took up more stain than the stock, and the patch seam stands out more. Next, I added a small sliver of wood above the cut-off recess, so get the profile as correct as I could to an original Mk I stock.
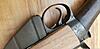
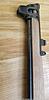
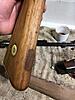
Last thing I did was strip the buttstock of all its grease and finish and patched in some wood to cover the oval hole. I stepped drilled this out to fit the earlier Mk I swivel post.

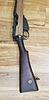
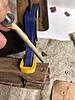
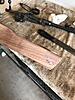
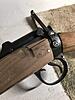
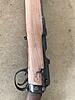
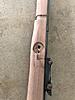
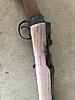
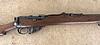
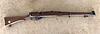
The very last work was the fine fitting of the nosecap, lower band, etc. Prestigious wood stocks provided me with repro Mk I handguards, and I fitted the reproduction rear sight protector. This final fit took even more and more hours. Once it fit tight, I final sanded with 150 grit. I stained it all with dark walnut stain, and applied several coats of hand rubbed RLO to get the color as period correct as possible. The stock feels smooth, but not too smooth like one finds in a sporting rifle or shotgun. Here is the end result:
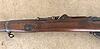
A very satisfying project! I dare not call this a restoration, as this was more of an assembling of parts to represent what it used to be. I did take some shortcuts, and deleted a few things that were beyond my skill (the recoil plate recess, for example). All told, I have close to 300 hours in this project. This took three months to complete. My chisels had to go back to the cutlery shop for sharpening twice. I went through five sanding belts, and unknown amounts of sand paper. All told, I probably have $800 dollars into this rifle (not including my own labor). This rifle may never bring close to that amount, but the therapeutic side of this is priceless. I enjoy turning my brain off from the rest of the world, and just lose myself in the wood-working process.
Hope you enjoy.
*some pictures loaded out of sequenceInformation

Warning: This is a relatively older thread
This discussion is older than 360 days. Some information contained in it may no longer be current.
- Knowledge Library

- MKL Entry of the Month
- Australia
- Austro-Hungarian Empire
- Canada
- Czechoslovakia
- Denmark
- Finland
- France/Belgium
- Germany
- Italy
- Japan
- Norway
- Russia
- South America
- Sweden
- Switzerland
- Turkey
- United Kingdom
- United States
- Yugoslavia
- Is my rifle authentic or a fake?
- Jay Currah's Lee Enfield Web Site
- On-line Service Records (Canada)
- Technical Articles/Research
- Forum
- Classifieds
- What's New?
-
Photo Gallery
- Photo Gallery Options
- Photo Gallery Home
- Search Photo Gallery List
-
Photo Gallery Search
- Video Club
- iTrader

 PM
PM