


Note: After you click on images to ENLARGE them, you may find they automatically size smaller in your browser's window making them hard to read. The auto sizing is your browser's way of keeping images entirely within the screen size you have set. If this happens, you will see a small box in the bottom right hand corner of the pic with four arrows point outwards. Click this box and the pic will EXPAND and open up to its normal size, so you should now be able to read any text and make out small details.
Fultons of Bisley; Enfield accuracy secrets revealed.
By RJW NZ
 (Click PIC To Enlarge)
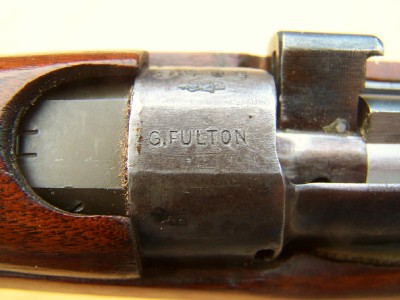
Fultons Enfield No.1 Mk3 Rifle

(98 picture virtual tour)
Prestigious shooting contests held in the UK from the 1860’s were designed raise the standard of accuracy in the shooting fraternity and by assimilation, in the army. As the 1890's gave way to the 20th century one name began to stand out as an extraordinary shooter and as an insightful gunsmith; Fulton. An historic anecdote states that G E Fulton's alterations to Enfield rifles improved their accuracy so much that the official bulls eyes on targets had to be reduced in size, twice. Would that we were all such good shots and could make a claim to fame like that!
His ideas and skills were so much in demand he established a business ‘Fultons of Bisley’ in 1895, which is still there, over a hundred years later; http://www.fultonsofbisley.com. (See pics 97)
In their early years, as well as being gunsmiths to royalty and well heeled customers, Fultons were often consulted by the military establishment for the suitability of prospective weapons.
Initially Fulton was opposed to the army’s acceptance of the Short Enfield no1, markedly so. The principle complaint was that shortening the barrel to a carbine length would affect the accuracy. While embarrassing to Fultons that the Enfield no1 went on to such wartime success, the perceived short comings were probably precisely what led Fulton's to develop the no1 into a such a capable target rifle.
In trying to save weight the designers of the no1 Enfield had created a barrel that was comparatively thin and flexy. Enfield designers added two tensioning springs along the barrel to dampen vibrations and create upward pressure, an idea that definitely improved accuracy. The military stopped there, but improving the barrel further became a focus for civilian shooters.
During the 1920’s new competition rules restricted rifle barrels to 25 inches, and what we now know as the ‘range rifle pattern’ was created. In doing so a most unexpected thing happened. Older Enfields, Long Toms and others pre No1, were now too long in the barrel to compete, so they were simply shortened. They ended up with a barrel that was the same length, but without the original length they had a much stubbier taper. The stockier barrel was a little heavier, fatter and most importantly, stiffer.
Other than attention to the receiver, which was also thought to have flexibility issues, barrel accurizing methods now went in two directions. One was the reproducing of this 'stubby' barrel as an optional, new shaped, heavy barrel for the smle. They were made by several manufacturers in the UK such as BSA and Parker hale, and in Australia by Lithgow. They often had the designation ‘H’ barrel, stamped on the barrel flat in an umissable letter almost a ½ inch high. (See pic 2,17,26,97)They are also quickly recognized at the barrel tip by a step down in diameter right behind the front sight.
The other accurizing method/s revolved around stiffening the standard issue 'flexible' barrel, and to this end varying tricks of the trade all vied for popularity. Spring tensioning to dampen vibrations, stiffening of the fore end and hand guards with heavier wood types or packing them tightly, fully floating or fully bedding the barrel, bedding the loose nose cap, packing the mid band tightly, and then partially bedding, upward pressure at the tip (pic 30), small bearing spots along the barrel length at specific harmonics were all tried with a variety of success.(See pics 18,19,20, 21, 22, 28, 29,31, 62,63,64,72, 98)
Accuracies on the order of 1 MOA, or a one inch circle at 100 yards are on record with 'standard' smle barrels. Their shortcoming was that these rifles could be temperamental and even changes in humidity would affect accuracy. H barrels on the other hand seemed more reliable, and could even be augmented by a few tweaks too, but for decades neither ruled the range conclusively.
These days most target enfields down under still have H barrels, but with H barrels no longer being made, and an increasing interest world wide in improving accuracy with stock enfields, all of the traditional methods tried out over decades are once again being evaluated.
A modern handyman/enfield enthusiast can successfully make changes that will produce good results and an excellent book investigating enfield accurizing in depth is James Sweets 1954 book ‘Competitive Rifle Shooting’. Reprints are available in their bookstore at; Queensland Rifle Association - QRA Fullbore Target Rifle Shooting at Belmont Rifle Range.
Areas other than the barrel that are responsive to tuning are the receiver, the two piece stock, and wrist.
Careful receiver bedding produces good results. In the receiver front area getting a firm anchor in the fore end for the knox form and barrel shoulder is key to preventing left/right rocking and dampening shock waves.(See pics 15,16,17,23,24,26,40,41,42,43,74,75,76,77)
At the rear, near the safety area, is a yawing or left/right tendency. Fultons anchored this by limiting tolerances with bedding compound on the vertical sides, or used dowels to pin the receiver dead center.(See pics 37,38,69,78,79,80,83)
The receiver is bedded along its length to stop it sliding microscopically back and forward under firing, although when done many rifles only accept the bedding material in a few places, indicating a fairly good fit to begin with. This bedding should always be done, but gains can be limited.(See pics 23,24,87)
A poorly fitting trigger guard can force the fore end left or right, making shots fly in the opposite direction. Fitted properly the trigger guard sits flat in position without screws, and although clearance can be very close, it is should have no side contact with the fore end.(Pics 48,54)
Some Fultons rifles have two extra screws each side to attach the fore end wood firmly to the receiver, and sometimes patterns were created in the receiver steel to hold fast to the bedding.(See pics 25,27,39,44,45,46,47)
Also at play is the upward pressure of the rear section of the trigger guard against the fore end. The packing of shims either on top of the rear of the fore end and the packing of shims on both sides of the trigger in the trigger guard channel, all control how parallel the fore end is to the barrel center line. In fact Enfields seem to benefit from upwards pressure of a few pounds at the tip of the barrel, and this is achieved and controlled by the shims applied to the rear of the receiver.(See pics 49,50,73,86)
Within the receiver channels firm contact of the recoil blocks with the lugs of the receiver is paramount, and to protect the wood from the impacts they were often capped with small brass or copper squares. In Australia soft wood types proved to be a problem during WW2 and these caps were commonly installed on Lithgow made rifles from 1942 onwards. Competition shooters often adopted this modification. An excellent benefit is that shim material can easily be installed underneath them to tighten the recoil lug tolerances. (See pics 33, 44)
At the front of the trigger guard the front trigger guard screw, the spacer, and the fore end have to be carefully set up within tolerances. The main screw has to be really tight and plenty of pressure is required to hold the fore end firm, but too much will crush the wood and quickly loosen up the wood fit. This leads to big problems as any looseness of the fore end around the front trigger guard screw will split the fore end, often irrepairably, through recoil forces. The enfield L42 made good accuracy gains by installing a one inch square 1/16th plate here to put the same amount of pressure over a wider area, trapping the fore end more securely. (See pics 51,52,53,66,67,68)
Yet another area that yields results is the wrist. The perceived problem here is that with the thrust line of the barrel being above the center line of the butt stock, it’s thought that the wrist/receiver angle can compress slightly under the firing load of 45,000 lbs per square inch and then a moment later decompress and send a flicking shock wave and motion to the barrel tip.
To control this, as well as resist the fore end splitting issue, a fore end has to have firm contact between the back of the fore end and the wrist face. A feeler gauge or thin paper should not enter. (See pics, 32)
Canadian shooting teams even gained advantages by installing a pair of 3 inch bolts from the magazine well, through the wrist and tightened from the butt socket. All of this makes the fore end much stiffer, with the fore end tight into the angle of the wrist, very effectively resisting the firing compression.(see pics, 35,55,56,57 )
The triggers of these Fultons rifles are both two stage, with a long light first pull, the second pressure is a light, quick, switch like action. (See pics 92,93)
Enfield trigger modification is well described in various publications, and an online search will bring ample information. Modifications require some caution before proceeding to change the profiles of the trigger components. Humidity and age can change the shape and clearances of the fore end, and because the trigger pivots on the handguard, which rests on the fore end, the fore end issues must be settled first before any profiles on the trigger are changed. The two bumps on the trigger can be altered to make either a single stage or two pull trigger, the end of the sear that engages the bolt can be smoothed and polished, and the face on the bolt can be smooth and its angle softened to lighten the final pull.
All alterations made here need to be slight and any heavy handed changes will not create the mods you’d like and could easily make the trigger dangerous to use.
Summary
The no4 mk1 rifle had a significantly stiffer barrel than the no1mk3, and eventually mounting the trigger unit from the wrist also improved accuracy, but otherwise in principle all of these accurizing methods that work so well on the no1 mk3 also apply equally well to the no4 mk1 rifle.
If one was to set out to design a competition rifle without flaws, then there’d be much of an Enfield that would not be used, but out of a combat rifle where an accuracy of 4MOA is acceptable came a rifle that also topped most at the range at the magic 1MOA for decades.
Comparison of the Enfields featured here shows repeated accurizing techniques that not only Fultons have favored, and were also popular across the Commonwealth shooting community. Most can be copied by a patient shooter with a few handyman skills in the basement workshop.
Judging by enquires, interest in accurizing enfields is at an all time high, and a resurgence in vintage competition is flourishing in several countries, UK, Italy, France, New Zealand and Australia, Canada and the US.
Note; A DVD showing and explaining how to accurize your Enfield with 25 different methods is being prepared as a stock no1 enfield is modified into a competitive rifle. Also included will be an examination of methods to accurize a stock no1 mk3 enfield and keep it unmodified.
If you’d like to be contacted when the DVD is available, just send an email to oryx888@yahoo.com with the subject line Enfield DVD, no other text required.
Note: The opinions expressed herein or statements made in this article are solely those of the author, and do not necessarily reflect the views of the Military Surplus Collectors Forums, or the ownership and moderation group of this site. MILSURPS.COM accepts no legal liability or responsibility for any claims made or opinions expressed herein. Also, please note that neither the author nor MILSURPS.COM recommends that any member of these forums, or a reader of this article, try this type of experimentation without the proper knowledge, equipment and training.
 Countries
 Categories