


Before we get started, I would like to be clear about the direction this is going to take.
The methods I will describe are not those that would be used for a museum restoration. I have talked with museum restorers (Kunsthistorisches Museum Vienna, Veste Coburg, Royal Armouries Museum, Leeds), and their exquisite work is not intended to be handled by grubby fingers on a shooting range at temperatures ranging from the plus thirties down to the minus tens. The "don't touch it, it's antique" attitude is contra-productive if you want to achieve a shooting rifle as the final result.
We (if you are going along with this) are going to refurbish rather than restore - to get the rifle performing as well as it can (for its age and condition). To do what a conscientious user would have done over the last 120 years to keep the rifle in working order, not as a showcase item. This does not cost much money, but it does take time. Think of it as a century of maintenance packed into one operation, and it will be clear that this is not going to be a 5-minute job.
Every now and again I also discover a better way to do something. Someone may well chip in with alternative suggestions and better methods. So much the better, and the old saying that the man who never made a mistake never made anything also applies here.
And the first major mistake I made, early on, was to over-restore a rifle. Encourage by the brilliant examples of "as new" restoration I had seen on the forums, I gave one of my early projects the full treatment - metal stripped, polished and reblued. Wood stripped, dings steamed out - all the tricks. It looked almost like new.
And then the doubts started. I gradually became unhappy - somehow, it did not look quite right. It took me a long time to work out why. In the end, I recognized that, visually, it was an old artefact pretending to be new. I had not restored it, I had falsified it.
A word of caution: once your friends and acquaintances know that you are working on an old rifle, you will receive advice on how to do it from well-meaning people who, quite frankly, do not know what they are talking about. Please check here before trying out anything someone tells you.
And now to the first list. I find it very difficult to make an accurate list, as I have accumulated the tools and materials over years. I have to stop and reflect that you are, presumably, starting pretty much from zero. So the list will not be perfect.
These are some things that are vital to make a start on the metalwork:
A set of the best quality hollow-ground screwdrivers (or hex socket handle plus screwdriver bits) that you can find. Just one ruined system screw in an obsolete thread will make you regret using a cheap, badly fitting screwdriver. I have done that, and it is an expensive way to learn.
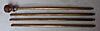
A brass (NOT steel) cleaning rod that is long enough to pass right through the barrel from end to end. I have never found one long enough, and made my own from a length of 8mm brass rod drilled and tapped to take a knob at one end and a wire brush or cleaning jag at the other.
Or you can put together shorter sections, as used for muzzle-loader rifles.
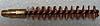
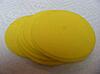
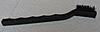
Several bronze (much better then brass) bore cleaning brushes for cal.45.
They look like this:
But by the time you are finished, a couple may look like this:
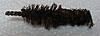
Which is why you need more than one!
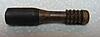
A jag to take cleaning patches for cal.45.
A fistful of patches. Square or round - that does not matter.
A spray can of penetrating oil.
Hard-bristle (nylon or brass) brush in "toothbrush" form - or even old toothbrushes - good for cleaning the action.
Plastic boxes to hold the rifle components.
To this end, I strongly suggest that, if you have not already done so, you join a club where there are experienced black-powder or muzzle-loader shooters, as they have know-how that you will need, and can help you get the materials.
As soon as you can, spray penetrating oil down the barrel, if you have not already done so.
To do a good cleaning job, you will have to disassemble the rifle. The exploded diagram that you posted is going to be very helpful.
Another caution: if you make a good job of this rifle, you are likely to become addicted (like me) to turning hopeless-looking wall-hangers into properly functioning rifles again. It is so much more satisfying than just handing over wads of cash for an expensive showpiece.
So order the following two books:
"Military Rifle Disassembly and Reassembly"
by Stuart C. Mowbray & Joe Puleo
ISBN 1-931464-32-4
and
"Remington Rolling Block Military Rifles of the World"
by George Layman
ISBN 1-931464-45-6
And for this and the sections that are to follow - please post progress reports with pics!
End of Part 1
- Knowledge Library

- MKL Entry of the Month
- Australia
- Austro-Hungarian Empire
- Canada
- Czechoslovakia
- Denmark
- Finland
- France/Belgium
- Germany
- Italy
- Japan
- Norway
- Russia
- South America
- Sweden
- Switzerland
- Turkey
- United Kingdom
- United States
- Yugoslavia
- Is my rifle authentic or a fake?
- Jay Currah's Lee Enfield Web Site
- On-line Service Records (Canada)
- Technical Articles/Research
- Forum
- Classifieds
- What's New?
-
Photo Gallery
- Photo Gallery Options
- Photo Gallery Home
- Search Photo Gallery List
-
Photo Gallery Search
- Video Club
- iTrader

 PM
PM