ACCURIZING THE ENFIELD
STOCK BEDDING
I will break down the issue of stock bedding into two parts, for the curious and the serious. Essentially the two parts are standard bedding and for the competitor, center bearing stocking. It is important that the steps be followed in the correct order so that the completed rifle will have the correct pressures at the correct places.
After reading this page, check Stock Bedding Page 2. This page offers actual range target results of the effects on accuracy the stock bedding and center bedding has on a Lee Enfield No4 Mk2. See for yourself the changes.
Standard Stock Bedding - Military Specs
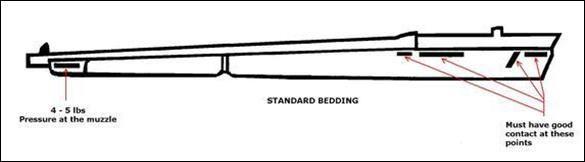
The fore-end must fit tightly at the rear end, between the sear lugs and the buttsocket of the body. See figures 1A, (a) and (b). A good bearing must be obtained on the body surfaces, around the hole for the front trigger guard screw and along the narrow ledge on each side of the magazine opening. Extending for a distance of no less than 1-1/2 inches to the rear of the front trigger guard screw hole. It is important that this bearing is even throughout its surface and that the fore-end is clear on either side of the barrel socket of the body. See figure 1B. There must be a good bearing of the reinforce, extending for it's entire length and not less than one third of the reinforce seating in width. It is important that this bearing is in the center of the reinforce, the sides being entirely clear of the barrel. See figure 1C. If a fore-end is encountered that is low at the reinforce and difficulty is experienced obtaining a bearing, two remedies are at hand to float out the reinforce. Wood Patch Method Chisel out the existing reinforce, level with the body seating with a minimum width of 3/4 inch. Under cut the sides of the recess with a slightly decreasing taper towards the front, to form a dovetail seating for a patch. Fashion a patch from similar wood with the grain running front to rear and shape it to give a snug drive fit in the dovetail recess. Ensure the patch is of sufficient thickness to permit floating it out to give the bearing described above. Glue the patch into position and allow to set. Once set, file and sand the patch to form the new correct reinforce seating. Fiberglass Method (modern) As with the wood patch method, chisel out the existing reinforce level with the body seating. Rough the surface sufficiently to provide for good adhesion of the fiberglass. Using body dummy (plasticine) build a dam at the front and rear of the reinforce area and fill this area with an appropriate fiberglass mixture. Seat the rifle action and barrel back into the fore end and secure as normal. Let the glass set. It is important to remember to coat the metal surfaces with a release agent so that it may be removed once the glass has set without disturbing it. Once set, remove the barrel and action and sand down the sides of the new fiberglass reinforce to form the correct seating. The muzzle end of the barrel must bear for the full length, and be in the center of the raised seating at the front end of the fore-end. If off center, adjust the fit of the rear lugs, either left or right to correct the muzzle position to center. See figure 1(a) & (b). There must be a clearance between the barrel and the fore end on either side of not less than 0.02-inches. See figure 1D. The weight required to raise the barrel from this seating should be between 3 and 10 lbs. To test this pressure, use a 0.003-inch feeler gauge. Set it between the barrel and fore end and using a fish scale gently lift the barrel until the gauge will pull out, read the scale. If the weight is below 3 lbs., the bearing at the reinforce seating should be lowered slightly and the collar for the front trigger guard screw shortened as necessary. The barrel must be entirely free from influence of the fore end except at the points specified. The clearance between the fore end and the barrel, from reinforce bearing to muzzle bearing, should be a little more than 0.05-inches. The hand guards must also be clear of the barrel by the same amount, except at the muzzle where the clearance may be less provided the barrel is free. Care must be taken that the rivets and metal strengthening pieces in the hand guards are well clear of the barrel.
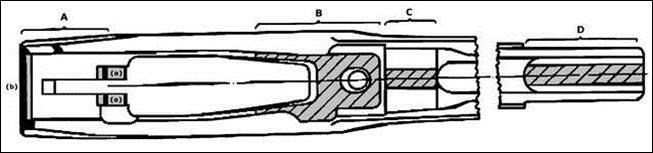
Figure 1
Competition Stock Bedding - Center Bearing Note: Because the following procedures involves alterations to the rifles fore-end that are NOT reversible, I would suggest anyone trying these bedding procedures acquire a second fore-end, so as not to alter or destroy the originality of the rifle. The details in this section are laid out in two stages and it is important to follow the procedures in order of sequence so that the finished job will have the correct pressure at the center bearing. Stage One - Stock Bedding To begin, make sure the rifle is bedded as per the military standard, having 3-10 lbs. downward pressure at the muzzle. To get this pressure, the rear surface of the fore-end and sear lugs have to be shimmed up with arborite, use shim stock of .025-inch thickness, or any similar hard fiber material of this thickness. With this shim stock in place, fitting of the reinforce and under the body is necessary to get the body level and the muzzle pressure correct. Check to ensure the barrel is centered in the fore-end. If necessary file the shims to move the barrel left or right. See figure 1(a) & (b). When this has been completed, the body and action tight, the barrel true in the center of the fore-end, stage one is finished. Stage Two - Center Bedding Stage two is the fitting of the center bearing at the middle band. See figure 2. This center bearing can be fitted, either with a hardwood wood block or with fiberglass. The hardwood block can be difficult to make without the proper equipment, but it can be attempted by hand cutting. For the shape and size, see figure 3. The groove in the block is hand-fitted to the barrel; it will bear at the 10-1/2 inch point. Get this fit by putting sandpaper on the barrel, towards the muzzle, where the barrel will be a bit smaller. By selecting the correct point, the block will get a good radius fit at the center-bearing point. Check the fit with lamp black and oil and keep sanding until a 100% fit is achieved at the center-bearing point. With the fore-end, a 1/8-inch recess is cut into the fore-end at the center band. See figure 4. Adjust the center-bearing block until it fits freely into the recess. Height is not a concern yet. Put lamp black at the barrel bearing point; assemble the rifle with the block in its bearing recess (unglued). With the action screw tight, check the height of the barrel and its alignment in the center of the fore-end. To get the barrel lower, and level, take the wood from the base of the block; don't touch the radius fit of the groove. To center the barrel a small amount may have to come off the side of the block. With the barrel at the correct height, and true in the fore-end, the block 100% in contact with the barrel, glue the block in place, assemble the rifle and tighten up the main body screw. The center bearing can also be made out of fiberglass with excellent results. With this method, the barrel must be held up from the fore end for the required barrel clearance. Place a shim ahead of the center-bearing point, to raise the barrel about 1/8-inch. Free the fore-end and hold the barrel true in the center of the fore end. With this in place, the required amount of fiberglass is put in at the center band. When the glass is set, the temporary shim is removed. With both types of bearings, the pressure should be from 12 to 14 lbs. This can be checked by putting a thin metal test shim (.003-inch) under the barrel at the bearing point. Raise the muzzle with a fish scale and note its reading when the shim can be slid out with a gentle pull. From here the rifle should be test fired to determine its group size before proceeding to the next stage.
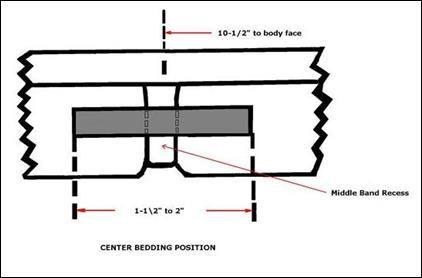
Figure 2
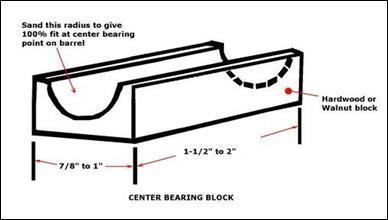
Figure 3
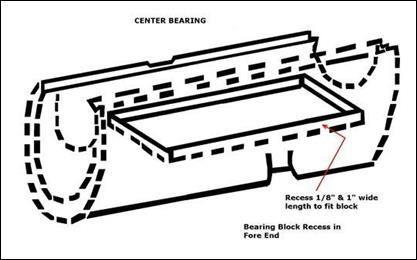
Figure 4
Stage 3 - Muzzle Shimming (Barrel Packing) This stage may or may not be needed; I have used this procedure for my own barrel packing experiment and have found it successful. This method requires that the muzzle be shimmed up with cork, about .010-inch higher than it's free position. To do this, remove both the front and rear hand guards only and measure the free position of the barrel muzzle. See figure 5. The measurements given in the figure are for example only, as the readings on all rifles will differ. To calculate how much shimming is needed to raise the muzzle .010-inch, press the barrel down to the wood and take a second measurement. As an example - if the free muzzle reading was 1.350-inch and when pressed down to the wood it was 1.290-inch, you would know that the space under the barrel muzzle is .060-inch. To this add the .010-inch lift needed, so the overall shim thickness needed will be .070-inch. If the space is excessive under the muzzle, it is a good idea to build up the front with fiberglass. This can be done by putting a metal shim about .012-inch thinner than the cork shim around the barrel, at the bearing point, before filling up the muzzle bearing with fiberglass. When the tin shim is removed you will have the correct clearance for the cork shim. See figure 6. When the muzzle shimming is complete and the rifle is assembled with the main body screw tight. The muzzle will read about .010-inch higher than it did in the free position. In the example it would now read 1.360-inch. At this same time the muzzle pressure is checked and should require 4-6 lbs. effort to lift it from the front bearing. This pressure will not be sufficient to change the center bearing pressure, which was set at 12-14 lbs. With all this completed it is now time to fit the hand guards. First the rear hand guard is fitted with a piece of rubber gasket (I prefer neoprene rubber because of its resistance to heat and its resilience to crushing over time) about 1x1-inch square. This is placed in the hand guard just over the center bearing. Its thickness adjusted so that there will be about .010-inch gap between the hand guard and the fore end to be pressed down by the outer metal center band. If there is too much packing the outer band will not close or the band screw will not meet. See figure 7. Next comes the front hand guard. In the front hand guard, a piece of cork or rubber is placed in line with the lower bearing. Have about .005 to .008-inch space between the hand guard and fore end before the front metal band is screwed in place. Once again if too much packing is used, the front metal band is hard to fit. The final hand guard fitting involves checking that the metal band grooves at the center are even, otherwise, when the band is tightened it will pull the hand guards to one side. See figure 8. Notes This stocking procedure should improve the Lee's grouping at the 100 to 600-700 yard ranges. It was originally designed for the 7.62mm NATO converted Enfield's but I experimented with it using the standard .303 British chambering with excellent results. One cannot begin to fathom the past conditions that a particular rifle has seen, was it soaked in the marshes of Holland or baked in the sun at Al Alemein? Either way it will have had adverse effects on the wood. For this, it is suggested that they be at least checked and corrected for the standard bedding specifications. This will greatly compound the owner's enjoyment of the rifle when shooting, as the rifle will group and shoot with more predictability and with greater consistency.
Figure 5
Figure 6
Figure 7
Figure 8


