-
Contributing Member


-
The Following 4 Members Say Thank You to ssgross For This Useful Post:
-
01-26-2025 02:53 PM
# ADS
Friends and Sponsors

-
Contributing Member

I made a checkering cradle out of a 2x4 and some steel brackets with a 90 on one end too many years ago to remember exactly when.
Not unlike yours, it uses the same system for affixing the butt-stock with a piece of all thread tapered to point into the rear of the stock and some wing nuts.
For the barrel channel, I use a seasoned hardwood dowel affixed to the barrel channel with surgical tubing. The end of of which is reduced to fit into a hole bored through one of the brackets.
Another way to make a nice cradle, (belt and suspenders type)is to use a piece of pipe and repurpose two connecting rods which can be clamped and slid along the pipe to adjust for length.
The small end of the rod, gets fitted with a tapered pin to secure the butt-stock on one end and a fork welded to the end of the other which can be lashed to the stock with surgical tubing or strips of bicycle inner tube trimmed into narrow pieces of particular length to secure the piece.
The advantage to this, is when you turn the stock over you can let the big ends of the rods rotate around the pipe to break an angle so to speak for when your work right from left or vise versa for difficult patterns or particularly challenging pieces.
Soon Ill have the first type I described out to checker a project I'm working on this winter. It's worked well enough that I never took the time to construct the second type I described because I never did enough checkering to actually need it consistently. Probably a mistake considering anything worth doing and all that......but anyway.
I think your post is timely (at least for myself) and the effort worthy because the industry is suffering from what it once was for product offerings in terms of smithing for vintage weapons and I never saw a checkering cradle offered, hence building one for myself that long ago.
-
Thank You to Doco overboard For This Useful Post:
-
Contributing Member
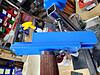
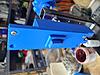
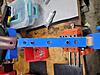
My base (in the first set of pics) is a 1 in square steel tube - easy enough to get at the big box whatever length I need. I have a 6 foot piece for when I checkered a full-stocked long rifle a guy built. My ends are made of 1+1/8 square tube which, after cleaning up the inside weld, slides smooth and tight over the main beam. Tapped for a pair of set screws to lock it in place once set. Originally, I had steel brackets welded to these bases, then used wood to make the faces to attach stocks. The brackets had enough flex to make the whole thing sloppy...So I welded square tube to the base to make new uprights, and 3d-printed the faces. It's easy to contemplate and make ends to lock everything in place for checkering - the two commercial offerings basically use the same generic idea. But for finishing, sanding, scraping, etc. I wanted access both my hands along with some room at the end of the stock. I dare not show too many pictures, lest my very ugly stick welding skills become a focal point 
I did that side-by-side stock I posted about in my original setup, making an adapter that screwed into the buttplate screw holes. The problem is that unless the butt stays square to face of the cradle as you rotate, it all becomes sloppy and loose. That's when I made the dovetail for the front side end to easily dial in alignment. Easy enough to design in FreeCAD and print, which of course got my confidence up to do far more.
-
-
Legacy Member
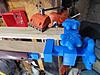
much fancier than the oak ones students were required to make.
-


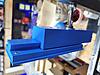
Garand stocks. The front fits the stock ferrule, the rear is tapered to snuggly fit the cleaning kit holes. The faces slide on a dovetail so there is no wobble when rotating the stock, so everything stays nice and tight.

 PM
PM


