-
Legacy Member

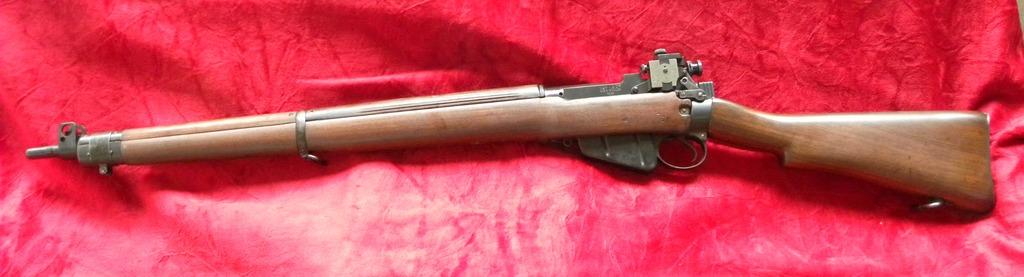
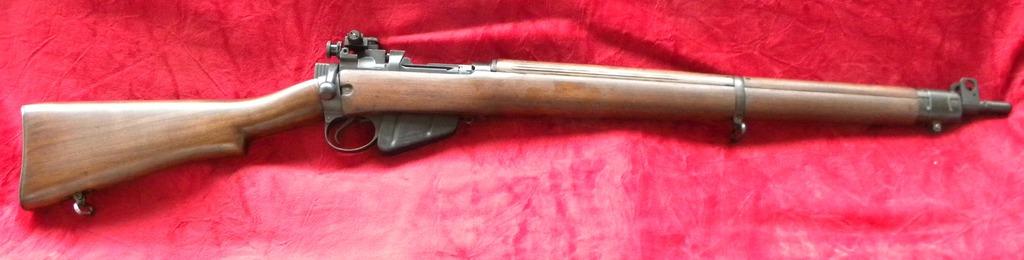
Restoring a '43 Long Branch.
Here's a heartbreaker! I picked up a beautiful Long Branch in lovely shape. By that I mean that it had probably never seen combat use. The bore is 5 groove rifling in lovely shape. There's very little indication of rounds being fired from it and even the bayonet lugs don't show any sign of bayonet on/off wear and the crown is beautiful.
Someone had the receiver drilled for glass, so it had the 2 holes in the nox form and one in the charger bridge. It had a POF lower forestock, English upper stocks, but all the metal work was "LB" marked as was the butt stock and sling swivels. I assume it was a poor attempt to "de-sporterize" the rifle.
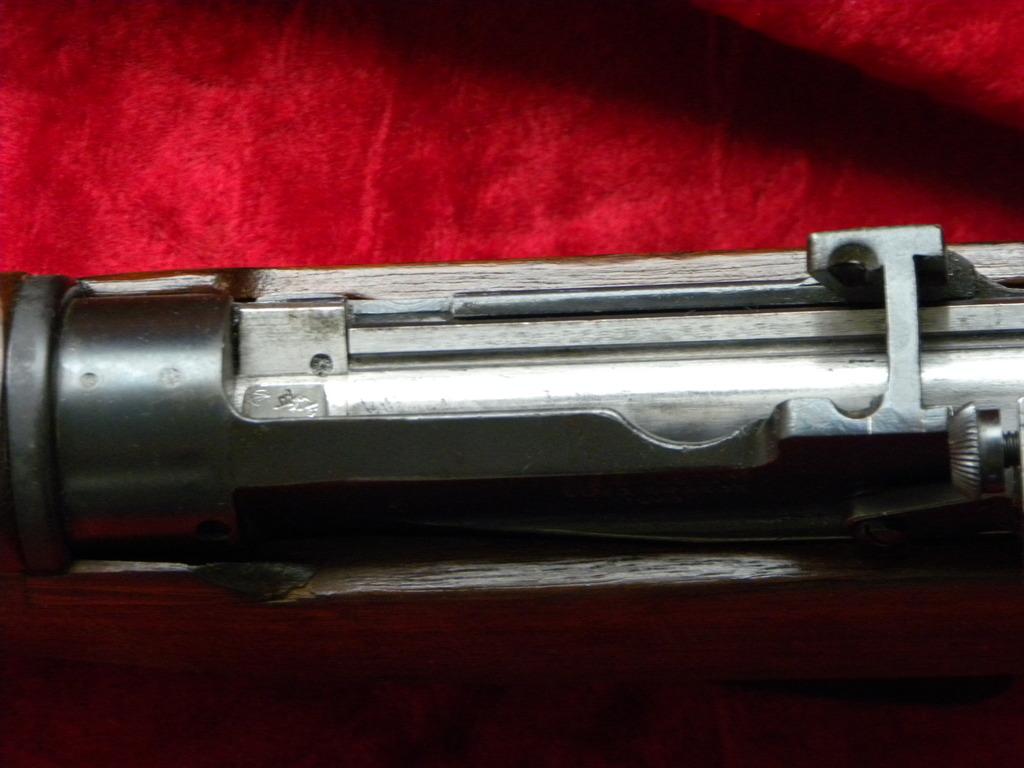
Step one was to determine the spacing of the holes on the receiver and drill 2 holes into a piece of brass shim stock that aligned with the holes. I bent the shim stock around the receiver and put 2 small hex head screws through the shim into the receiver with some Lock Tite. My intent was to file down the screws until I hit the shim stock and then use great care and fine files to finish taking the screws flush to the receiver. HOW THE HELL WAS I SUPPOSED TO KNOW THE DAMNED HEX HOLE WENT ALL THE WAY DOWN INTO THE BODY OF THE SCREW!!! As you can imagine, I was some ticked off when, after I'd filed the screws all the way down, I still had 2 holes in the receiver. Much smaller holes, but still there nonetheless. The screw I had for the charger bridge was a slot head and that method of hole filling worked just fine. I filled the 2 small holes with some metal compound, but you can easily make out the repair. Note: if you're doing what I did, check the depth of the hex hole into the receiver and put a small dab of metal compound into the hole to make the screws more proud prior to lock tite and filing or use a slot head screw.
Step 2. Some bright spark had tried to remove the sight blade retaining screw without the correct tooling, and buggered up the hole. Fortunately the metal was thin there so a few gentle taps with a hammer had the hole back to round.
Step 3. I was given nice LB walnut fore stock and I had 2 walnut upper hand guards from an earlier restoration. As I'd mentioned, all the metal parts (ie: sight block, sight protector, sling swivels, barrel bands, etc.) were LB marked. I refinished the stocks to match up for colour. After the oil set up, I reassembled the rifle. It had a British micrometer sight on it, so I took that off and mounted a PH5C target sight on it.
So, here's the finished product. Comments, pro or contra, are welcome.
 [/URL]
Information
 |
Warning: This is a relatively older thread
This discussion is older than 360 days. Some information contained in it may no longer be current. |
|
-
The Following 3 Members Say Thank You to lawrence_n For This Useful Post:
-
07-04-2015 02:02 PM
# ADS
Friends and Sponsors

-
Legacy Member
Lawrence, Nice job! I really like that Parker Hale sight-- they are getting hard to find. Salt Flat
-
-
Just a very small point, but it LOOKS as though the knurled screw head of the spring loaded quick release plunger for the range arm (Pic 3, right side) is protruding too far and touching the edge of the charger bridge. It must be clear for obvious reasons. Mechanically speaking the plain base of the knurled top should ground out against the sight base as soon as the vertical range arm is free to move.
-
-
Legacy Member
Just a very small point, but it LOOKS as though the knurled screw head of the spring loaded quick release plunger for the range arm (Pic 3, right side) is protruding too far and touching the edge of the charger bridge. It must be clear for obvious reasons. Mechanically speaking the plain base of the knurled top should ground out against the sight base as soon as the vertical range arm is free to move.
Thank you Peter. It's the angle of the shot. The knurled knob doesn't touch the charger bridge when it's extended. It's close mind you with about 1/16" clearance. All of the adjustment points are clear of contact with any fixed points on the rifle. With your knowledge maybe you can clarify a bit of information I was given. The eyepiece is a threaded 2 part item with the adjustable iris in the forward part. I was told that it was so constructed to allow the insertion of a prescription lens to compensate for any astigmatism. I'm familiar with the plain flat eyepiece with the iris, but this one was new to me and the explanation made sense. Fact or fiction?
-
-
Phew....... Don't really know anything about them or that - except that P-H were VERY reluctant to disclose any info about their sights, even supply screws, let alone thread sizes! I suppose you COULD insert an optical lens in the eyepiece but think that if you did it'd contravene some of the target shooting rules regarding separate optical aid and all that stuff!
-
-
Legacy Member
A big "DUH" on my part!!! I looked up the Parker Hale sights on Google and "TA-DA" there it was. There was an illustration of the eyepiece on the PH5 sight showing the insertion of a prescription ground lens to compensate for vision problems. Oddly, it says "for Australian conditions".
-
Thank You to lawrence_n For This Useful Post:


 PM
PM


