-
 Making Up a Useable No.4 Sniper - Part 4 (by Peter Laidler)
-
The Following 2 Members Say Thank You to Badger For This Useful Post:
-
01-28-2010 07:31 AM
# ADS
Friends and Sponsors

-
FREE MEMBER
NO Posting or PM's Allowed

Sorry - didn't read the instructions and posted my question under the "1945 Enfield No.4 Mk1*(T) Long Branch Sniper Rifle" thread instead.
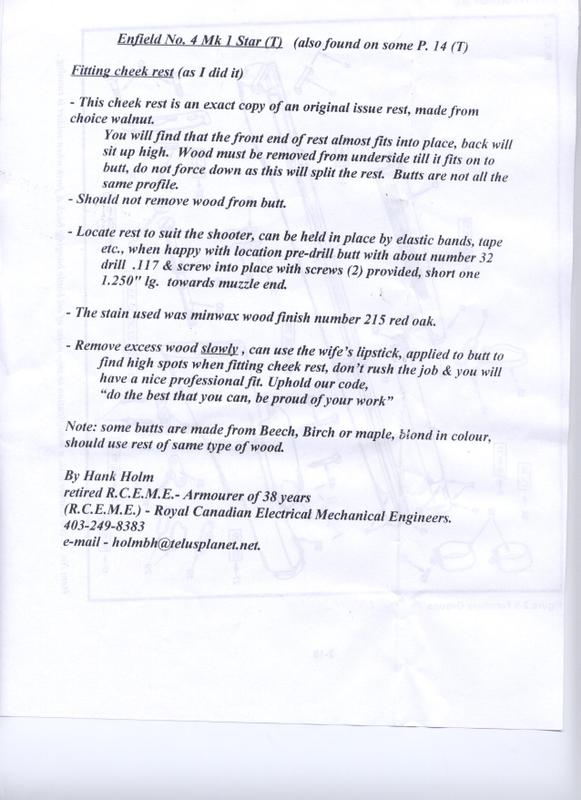
So to ask it in the right place, and since it is only mentioned briefly at the end of Part 4, how was the cheek piece positioned? Was a jig used, or specific measurements to locate it on the buttstock, or was it truly a individual fitting every time by the armourer? I have looked at all the photos I can find in the Forum, and while all the No4(T) (or L42) cheek pieces are very nearly in the same position, I can't really identify a set location on the buttstock. Also, the mention of a slight cant to the right (as indicated by the fixing screws) is interesting. I'd be grateful for any info.
-
-
-
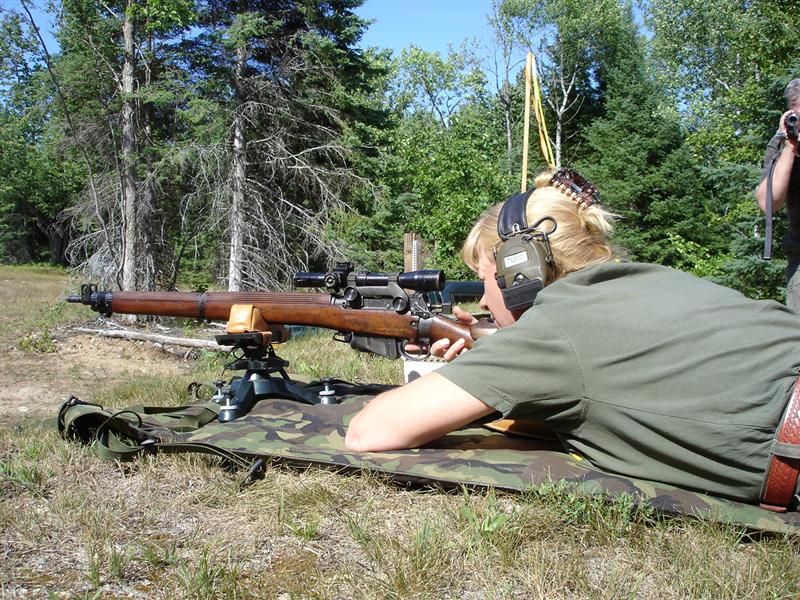
Just as a matter of interest, has anyone followed this series of articles and made a good, passable job of making a replica No4 sniper?
-
-
FREE MEMBER
NO Posting or PM's Allowed
Doug,
As you can tell, I'm new to the site and still stumbling about, so very much appreciate your suggestions. I did check the search box as you suggested - seems I will have a few evenings of reading!
-
Legacy Member

Just as a matter of interest, has anyone followed this series of articles and made a good, passable job of making a replica No4 sniper?
I have everything ready to go, I just want to get a drill press so I can actually drill straight holes. Unemployment... the hours are great but the pay sucks !
-
Thank You to xa-coupe For This Useful Post:
-
Legacy Member


Peter, I built a T clone back in 2009, before I even owned a computer or knew the Milsurps Forum and your article existed. When I became a member here and saw the article I read through it to see if I'd done things in a reasonably correct manner, even sent you a PM or two for an opinion. Personally, I think your article is very informative and well written with simple, easy to understand instructions. Thanks for taking the time to write it and make it available so everyone interested in such a project will at least know the proper way to go about it.. -VH
-
Thank You to vintage hunter For This Useful Post:
-
Legacy Member
I'm using it as a basis for my No1MkIII HT build
-
Thank You to newbieDAN For This Useful Post:
-
FREE MEMBER
NO Posting or PM's Allowed
Thanks Captain for this useful work. I'm planning to build my No.4 T replica. Found scope and mounts plus wooden cheeckpiece now i must fully understand your articles. Where could i find the tools to tap the receiver? Could i make them using a conventional iron milling cutter?
-
FREE MEMBER
NO Posting or PM's Allowed
Thanks for a Great Article! But I need help
Hello,
I've just joined the forum and have a No 32 Mk II scope and repro mounts. I just missed out on a 4T with pads and cheeck piece but nothing else a couple of months ago and was on the point of selling the scope. However I have now been offered a rifle with pads so want to get started. I've managed the V frame but have hit a problem.
Are the lead screw locking nuts the ones in the centre of the turrets or are they the collars with the slots in them? ?
In either case where do I get the tools to move them?
Thanks
Robert
UPDATE. Have found the tool on NUMRICH so have ordered kit with some other parts for my broken Winchester 94AE. Hopefully they'll arrive soon and I can start on the scope.
Last edited by Robert303; 06-17-2012 at 08:25 PM.
Reason: Update


member Peter Laidler
(Click PIC to Enlarge)
(Click PIC to Enlarge)


 PM
PM