-
Legacy Member

C&R Storage Rack
My C&R collection keeps growing, and once again, I'm out of room. Since I've got some time over the holidays, it's time to build another wood rifle rack.
I was lucky to find some nice cherry wood for sale this weekend, so I've got the wood purchased and ready to go. Previous versions have been using curly maple, so we'll see how this new material turns out.
Attachment 113641 Attachment 113642
As I go along, I'm just going to drop a few posts here on my progress. I've made a couple of these, and each one turns out great. Nothing fancy, no mad skills required; just some shop tools, glue, a few screws and a couple of coats of shellac to finish.
As an aspiring wood worker, I try to keep the number screws to a minimum, using other techniques as much as possible. Since glue is involved, this usually this takes a few days, with shellac as a finish, it takes a few more days.
Stay tuned...
Information
 |
Warning: This is a relatively older thread
This discussion is older than 360 days. Some information contained in it may no longer be current. |
|
Last edited by mrandig; 12-29-2020 at 11:56 PM.
-
The Following 5 Members Say Thank You to mrandig For This Useful Post:
-
12-29-2020 11:36 PM
# ADS
Friends and Sponsors

-
-
The Following 5 Members Say Thank You to Sarge1998 For This Useful Post:
-
Legacy Member
Getting Started
I was able to get the cherry wood from Rockler for $4.99 bd./ft. which is a great price. Rockler is one of my favorite places to shop, but can be expensive at times. In total, I ended up with about 12 bd./ft. total, so my total investment comes to around $60.00 plus tax.
Attachment 113665
The only downside here is that these pieces are "shorts" (scraps/leftovers), which means I will have some constraints to work through as I go. The lengths of these pieces can run between 5' and 7', and the width between 3-1/4" and 8". Wood knots and cracks can also be an issue. The thickness of these pieces however, is a uniform 13/16", so that at least makes my life easier.
Shorts aren't necessarily a bad thing, and the quality of this wood is way better than anything the big-box stores have for sale. Also, this wood is surfaced S3S, which means that 3 of the four sides have been surfaced/finished. While I own both a jointer and a planer, I won't need them for this exercise.
For the sake of simplicity, I'm going to build this as 3'x1'x3' rack. With a 4" spacing between rifles, this is wide enough for even the straight-handle bolt action Mausers. At 3' tall, it is also short enough for my little Carcano and few other cavalry rifles. This will hold eight rifles easily.
Last edited by mrandig; 12-30-2020 at 01:46 PM.
-
-
Legacy Member

Originally Posted by
Sarge1998

ine is/was very similar. When I finished the basement a few years ago I included a 11'x6' secure storage. We had a new home built and moved in a few weeks ago, I have the building permit ready to drop off and the new secure storage will be 3 times the square footage, we moved from a 2 story to a ranch as we are getting on in age.
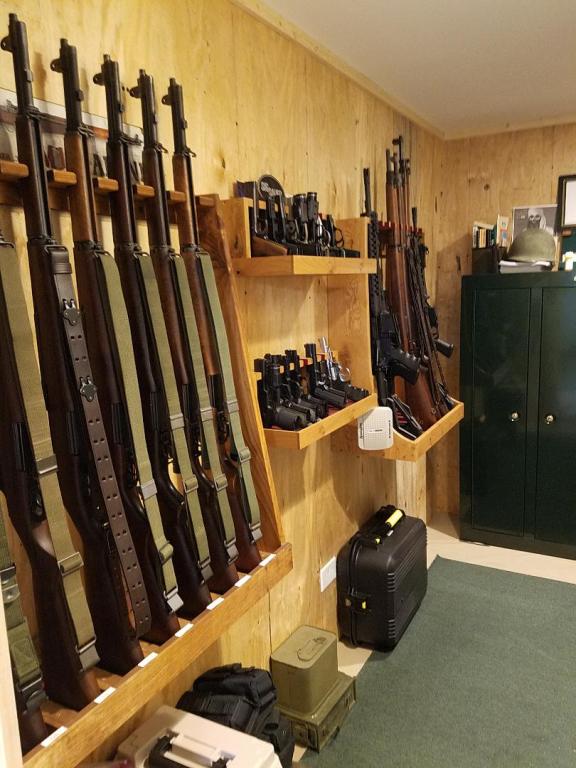
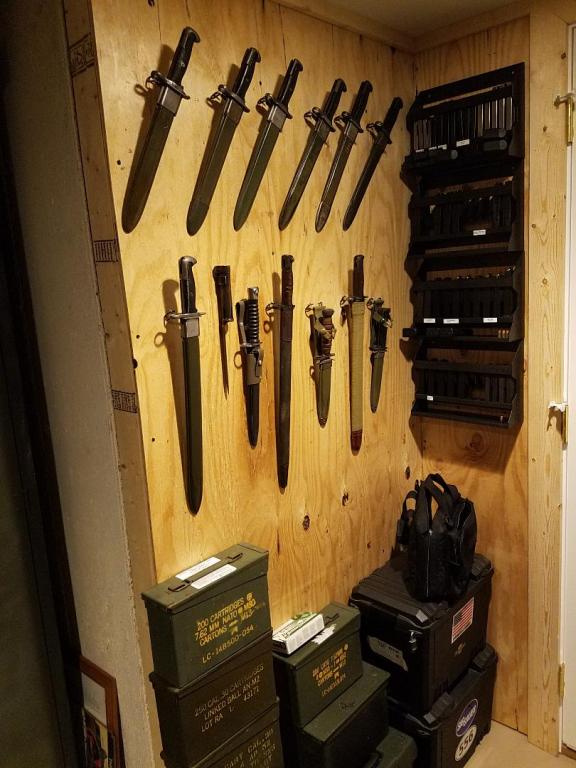
OOOOH... That is a really nice room. I may have to up my game here in the future. We built a one story also, for the same reason as yours.
We have two large bedroom walk-in closets, so I may be taking one over to build something similar. I've got multiple gun safes already, but I just keep running out of space. C&Rs can be an addictive hobby, and I've got a few more coming this week.
-
Thank You to mrandig For This Useful Post:
-
Legacy Member
First Cuts
I usually draw the layout, dimensions, etc. for pieces like this out directly on the top of my workbench, which is why it's covered in butcher paper. I'm going to try to use sketch up today to make a proper drawing, but that might be beyond my current skill level. We'll see. I'll post it here if it works out.
That said, here's my cut list. Since the cherry comes in "shorts" of various lengths and widths, rather than being dimensional lumber, I tried to pick and purchase those pieces that were closest to the dimensions below. Since the cut pieces are all 3' long, I can get two pieces from a 6'-7' short.
13/16" cherry
4 pcs. - 3' x 5-1/2" (top, sides, side wings)
2 pcs. - 3' x 3-1/2" (rear braces)
1 pcs. - 3' x 4" (front kick)
I did decide last minute to use 3/4" plywood as the bottom. In the past I've glued two pieces of 5-1/2" together to make the floor, but that just seems to be too much trouble. This is cheapo "red oak" from HD stores, but you won't ever be able to see it when this is finished.
3/4" plywood
1 pcs. - 3' x 11" (bottom)
Attachment 113666Attachment 113667Attachment 113668
Any leftovers will be used to create the lower frame that will keep the rifles in their correct position. Make sure to cut cherry quickly, or it will burn. Any knots can be filled at this time - I was lucky that I don't have too many.
Attachment 113669Attachment 113670Attachment 113671
Last edited by mrandig; 12-30-2020 at 01:51 PM.
-
-
Advisory Panel

Nice gunpile Sarge1998...I'm partial to US issue of course. Love to come over and go through a pot of coffee and discussion...
My first gunrack was almost exactly like this, used a .303 rack I found in an indoor range. It held about ten or twelve and was allowed until we came into safe storage rules here. My kids had come and grown to the point that I'd handed it off before that though.
-
The Following 2 Members Say Thank You to browningautorifle For This Useful Post:
-
Legacy Member
Software is not my friend
So I tried sketch up and promptly lost that battle. I may try again later, but the learning curve is pretty steep, and I'm pretty simple. Hopefully, this at least gets the general point across…
Original (real) pic:
Attachment 113674
My rendition as a sketch up file. It's clearly not to scale, but that's the least of my worries. Also, there's two rear braces that aren't shown, as I was having enough problems already.
Attachment 113673
As a final note, I'm actually going to use a dado to hold the bottom shelf in place, so the 36" inches shown will actually be closer to 35-1/4" when finished. I'll detail this step better as I go along.
Last edited by mrandig; 12-30-2020 at 03:16 PM.
-
-
Contributing Member


-
The Following 5 Members Say Thank You to Aragorn243 For This Useful Post:
-
Legacy Member
Biscuits
I'm having biscuits for dinner tonight.
It's just a coincidence, but I'm also using biscuits to assemble the side panels of this C&R rack. Obviously these aren't the same biscuits; these are little wood footballs that work similar to dowels when joining wood together.
Two 5-1/2" boards will give me the 11" I'm looking for. I call the side pieces "wings", as they only go up about 14-18" from the bottom, mostly to provide an attachment for the bottom and to keep the rack from being top heavy. I'll put a biscuit about every 3"-4" inches and then glue everything together.
Attachment 113679Attachment 113680Attachment 113681
It's both a funny and sad true story, but they couldn't figure out what I was asking for when I asked for "biscuits" at the local HD store. It was like going into a bar and asking for a sarsaparilla. Am I that old?
Anyways, here's a pic of the worlds most expensive biscuit maker, both in its natural habitat and in action. It would be better if this thing was about $150 cheaper, but it's a pretty cool tool. Also makes great sawdust, to mix with glue for touchups or epoxy (I have a collection of different woods).
Attachment 113682Attachment 113683Attachment 113684Attachment 113685
Last edited by mrandig; 12-30-2020 at 10:36 PM.
-
-
Legacy Member
Glue Up
It's kind of hard to glue and photograph, so I didn't really get a good photo of this step of the process. Once the glue hits, things begin to swell, and time is critical. It's also important to make sure everything is lined up, top and bottom, left and right, side to side, etc. and things can be a bit fussy. I keep a bowl of water and wet towel close to wipe up any excess.
Lots of glue, lots of clamps. If you're not sure, you're not using enough. Then use lots of more glue, just in case.
I'm using pipe clamps to keep the pieces pressed together. The thin pieces that run across the wood are cauls, and they keep the height of the pieces even. The better these are fit up, the less work has to be done later.
We'll see how this all looks after sitting overnight.
Attachment 113686Attachment 113687Attachment 113688
Last edited by mrandig; 12-30-2020 at 09:52 PM.
-


 PM
PM