-
Whilst Patrick Chadwick is resting in his far away land, I would suggest reading a previous thread of his that relates fairly closely to your future reloading endeavours for this rifle. Whilst the actual cartridge and rifle are a little differernt, the theory is the same. (In fact, the nature of the lock up in a rolling block is probably MORE suseptable to "off-axis loading" induced barrel whip but in a more vertical plane than the M1871.)
So, to jump ahead a bit, and to hopefully save Patrick from having to re-invent the procedure again, here's the thread:
https://www.milsurps.com/showthread.php?t=4777
"To carry on where we left off...Smokeless (powder) in a Mauser M1871 or 71/84..."
Last edited by jmoore; 12-02-2010 at 07:29 PM.
-
Thank You to jmoore For This Useful Post:
-
12-02-2010 07:21 PM
# ADS
Friends and Sponsors

-
FREE MEMBER
NO Posting or PM's Allowed

-
-
Advisory Panel


Originally Posted by
jmoore

So, to jump ahead a bit, and to hopefully save Patrick from having to re-invent the procedure again, here's the thread:
Thank you jmoore for an excellent suggestion in the spirit of "creative laziness"!
Joel, read right through that thread, as jmoore recommends. In a posting on (I think) the 3rd page you will see a very good pic of the Mauser 1871 cartridge. The 43 Spanish looks very similar, and the method to be followed for loading will be exactly the same. So I will save my energy for the specific measurements and work to be done on your RB.
More later.

Last edited by Patrick Chadwick; 12-03-2010 at 10:51 AM.
Reason: typos
-
-
Advisory Panel
Refurbishing an Argentine RB - Part 8
Slugging the barrel
As jmoore has kindly reminded us of the extensive thread about BP loading for the M1871 on the Mauser forum, I shall not repeat all of the considerations discussed there, but carry on with the specific actions required for your RB.
At each stage I shall require feedback from you so that I can make a good "guestimate" for the next stage. You obviously have an engineering background, so I shall assume that you have access to whatever is required for what follows and know how to use it.
Slugging the barrel is a necessary first step before ordering bullets or bullet moulds. After well over a century, BPCRs can be so variable in the actual bore and groove dimensions that to do anything else can be an expensive waste of material.
First, get a piece of 10mm or 3/8" BRASS rod. You need a length of around 3'3" or 1 meter, so that the rod can reach right through from breech to muzzle while still leaving enough for you to hold. Make sure that the ends of the rod are faced off square, with deburred or rounded. edges.
Clamp the rifle vertically in an overhanging bench vice, well padded with cloth or rubber, so that the muzzle is resting on a hard wood block on the floor. Oil the barrel liberally.
Take a well-greased .45 SOFT LEAD round ball, as used for muzzle-loading rifles and revolvers.
Tip the ball into the chamber - it will stop when it reaches the end of the neck section.
Now hold the brass rod vertically between finger and thumb above the ball.
Drop the rod onto the ball.
Repeat, using a flicking movement of the wrist to drive the rod down.
Do NOT grasp the rod and HAMMER with it, as it will not move vertically and this is not as effective as flicking it down. The impetus of the rod does the work, not your arm muscles.
The bullet will be engraved in the rifling. When it is fully engraved, you will notice that it starts to move more freely down the barrel.
If the rifling were perfect from end to end, you would expect the resistance to remain pretty much constant all the way down. In the real world you are likely to notice variations, caused by tight spots or loose spots in the barrel. In particular, watch out when the bullet is about a hand's width away from the muzzle. If the muzzle end of the rifling is loose, the rod will suddenly shoot down and hammer the ball against the wooden block, and you will have to start again.
So when you are getting close to the end, lift the rifle up in its padded clamp a couple of inches and go very carefully with the rod, until the ball pops out.
You now have a soft lead ball that has been engraved by the rifling, so you can measure the maximum diameter (matching the groove diameter) and the minimum (matching the bore of land diameter).
If the ball got noticeably lose towards the muzzle, you need to make another check.
This time, reverse the rifle so that it is muzzle up. Use a plastic hammer and the brass drift you had for the action pins as a "starter" to drive in another ball from the muzzle end until it is just fully in the muzzle (about 1/4" will do). Then use the rod from the other end to pop it out again.
You now have an engraving from the muzzle end of the rifling, which you can also measure.
Please send me both pairs of measurements, and I will advise you as to the next step.
In the meantime - get the Layman book and order a 20-pack of 43 Spanish cartridge cases and the Lee die set. I assume that you have checked the chamber as suggested. Unless you have a lot of money to spend on your hobby, do not bother getting ready-made ammo - you do not know exactly how it is loaded, so after firing it you are no wiser than before. It is just an expensive way of producing fire-formed cases.
Last edited by Patrick Chadwick; 12-03-2010 at 10:46 AM.
-
-
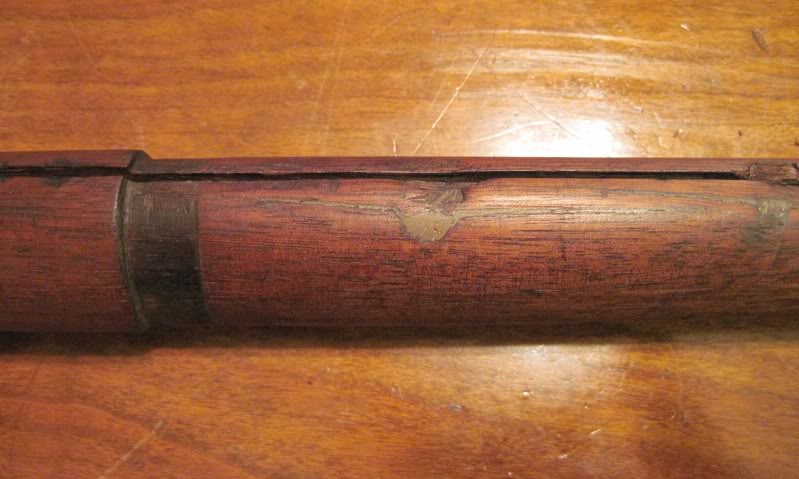
OK, that epoxy/sanding dust patch clearly hasn't darkened as much as the rifle stock. Check your local listings for a leather working shop and phone them to see if they have Fiebings oil baser leather dye. They sell a color called "walnut". Get some (it's cheap) and using a small artist's brush apply it to JUST the epoxy patch. Epoxy does not absorb stain, but the sanding dust in it will. You might need several applications to get the color close enough.
Союз нерушимый республик свободных Сплотила навеки Великая Русь. Да здравствует созданный волей народов Единый, могучий Советский Союз!
-
Thank You to Claven2 For This Useful Post:
-
Advisory Panel
Joel, I have been taking another look at the entire thread.
The surface of the rifle looks better in pics where you used paper as a background.
So next time you take pics of the rifle, do not place it directly on that very shiny table top, but lay a white tablecloth or something similar on the table first.
Patrick
-
-
Advisory Panel
Originally Posted by
Claven2
You might need several applications to get the color close enough.
A tip from model railroading:
If the object is going to be looked at mostly in daylight, then make the color match in daylight.
If the object is going to be looked at mostly in artificial light, then make the color match in that light.
Your eyes fool you in such matters. You can see it in the way the surface of the rifle appears slightly different according to whether you place it on the highly reflective brown table top, or on matt white paper. You think it looks the same in both cases, but the camera shows up the difference.
Furthermore, a slightly darker streak on a medium color wood surface is less obtrusive than a lighter streak on the same surface. But it will be very fiddly to darken just those fillings. The oiled wood may take up an oil or spirit based stain much easier than the epoxy-sealed filling. If you let the stain flow onto the surrounding wood, you may therefore exaggerate the color difference, instead of blending it out. Go very, very carefully!
Good luck!
Last edited by Patrick Chadwick; 12-03-2010 at 06:28 PM.
-
-
FREE MEMBER
NO Posting or PM's Allowed
Patrick,
I’ve been having a terrible time with the white balance on my daughter’s camera.
I tried to take assembled rifle pictures over a white background and using bright lights but the pictures came out terrible. I had to make major white balance changes using an editor and they still looked bad to my eye. I just couldn’t get them right.
The coffee table pictures were a last ditch, after midnight attempt to get some pictures up that night after the first try failed.
Taking good looking pictures is important to me and I will need to work on that.
I do have a good friend that is very camera savvy. He will be coming home from college over the Christmas holiday and will help me get some better pictures up. After many good years of service, my old camera that I was so used to finally died this year. I try to make due with my Daughters “cheapy” but my friend’s is far better than both of ours put together.
Originally Posted by
Patrick Chadwick
Your eyes fool you in such matters. You can see it in the way the surface of the rifle appears slightly different according to whether you place it on the highly reflective brown table top, or on matt white paper. You think it looks the same in both cases, but the camera shows up the difference.
The camera really does see more than the eye. I often go back through the pictures to pick up fine details that my tired eyes miss. One of the reasons that I take so many pictures is because I have such a lousy memory and it helps to have a well documented history of where I’ve been.
Originally Posted by
Patrick Chadwick
Go very, very carefully!
You can bet that I’ll be VERY careful with any dye near that stock. I will probably swipe one of my wife’s very fine art brushes and snip most of the hairs out of it. All of that will have to wait till though till I purchase the dye. The dye that Claven2 recommends is sold locally (about 25 miles north of me) but the store is in downtown Portland. I DON’T DRIVE DOWNTOWN!!! There is no intelligent life in downtown Portland. I would rather drive crooked blunt sticks into my eyes than drive downtown. I’m most certain that would be less painful. Sorry about the rant but I just won’t do traffic jams, parking meters or mass transit. Fortunately for me, for a few bucks more I can just mail order it ($10 US delivered from a few states over) and avoid all of the insanity.
The Leather Guy leather hides supplies - Product Info
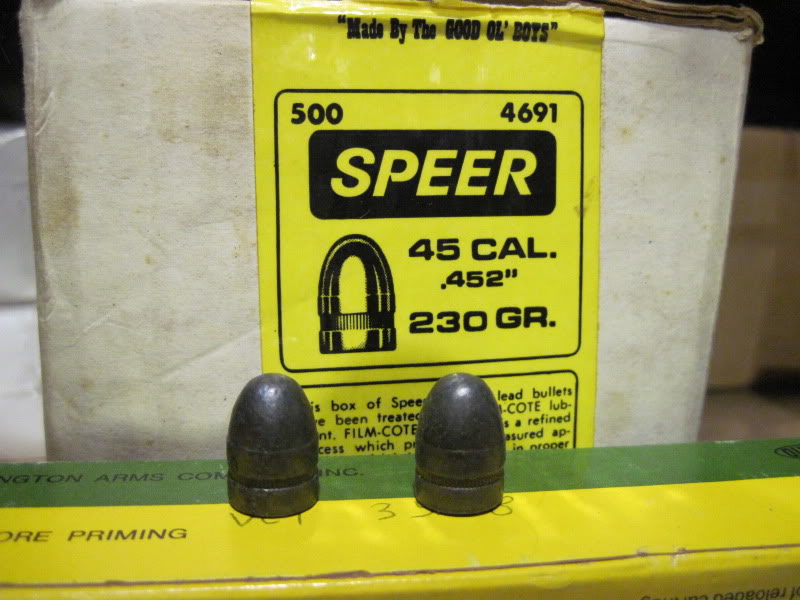
Will my .45cal lead bullets work ok instead of round ball? Obviously the round ball would be easier to drive through but it comes down to being what I have on hand.
The brass rod will also need to be ordered. Everything on this side of the pond is cut to 1 yard (3 feet). 1 meter sure would be nice considering that the barrel is 34” long.
I found some Jamison .43 Spanish brass but will hold off until I have confirmed the chamber dimensions.
.43 Spanish
I’m too cheap to buy Cerro-safe and am working on a home brew solution using sulfur and graphite to cast the chamber with.
Mix 4 parts Sulfur with 1 part graphite
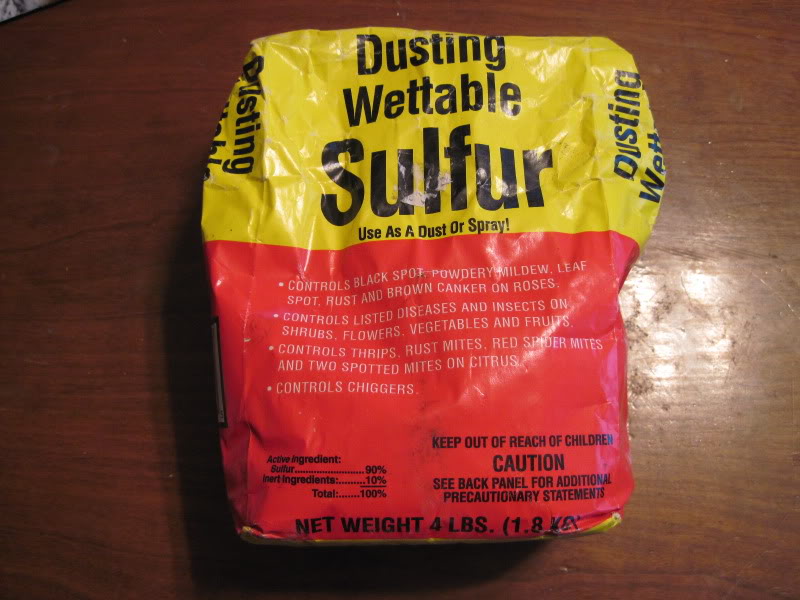
I couldn’t find a local cheap source for graphite so I crushed up a bunch of pencils and ground them into a fine powder using a coffee grinder.

My only obstacle now is coming up with a safe way to melt the sulfur in the house without putting my Wife into orbit. This stuff stinks BAAAD!!!, especially if it scorches or even worse yet if it spills on the burner and catches fire! I could set up a camp stove outside but that uses an open flame. Not safe with sulur in my opinion.
If I make any meaningful progress, pictures will follow.
Joel.
-
Advisory Panel
452 in 43 Spanish barrel - NO
Originally Posted by
killforfood
will my .45cal lead bullets work ok instead of round ball? Obviously the round ball would be easier to drive through but it comes down to being what i have on hand.
DON'T TRY IT
I have not yet succeeded in finding anything resembling standards for the .43 Spanish chambering. Any drawings that may exist could only be taken as guidelines.
The bore should be somewhere in the region 0.410" to 0.430" mm, and although the grooves are much deeper than for modern calibers, you have to recognize that this is nearer to a 44 than a 45. You would not try to drive a 45 bullet through a 44 barrel.
The groove diameter will be somewhere around 0.440" - 0.450". Modern handgun bullets are far too hard to be driven through a bore by hand, unless you use the kind of force that is going to be hazardous for your barrel. It will not be feasible to get the degree of upset/obturation/bump-up - call it what you will - that is required to fill those deep grooves.
YOU MUST USE A SOFT LEAD BALL OR BULLET if you want to get the groove depth.
A 429-430 lead bullet might go, but that would only give you the bore diameter, not the groove diameter. OK - that would be better than zero information, which is our present state of knowledge! But if a 429 bullet will not go down with the brass rod method, give it up and knock the bullet out again.
-
Thank You to Patrick Chadwick For This Useful Post:
-
Advisory Panel
Sulfur or sulphur? It all stinks
Originally Posted by
killforfood
My only obstacle now is coming up with a safe way to melt the sulfur in the house
Sulphur melts at about 115 degrees C. Lead melts at 327 degrees C. So one way would be to use a suitable small crucible-like object (like the pourers used for casting lead bullets) floated on top of the melt in a lead melting pot. But hold it in there just long enough to be really fluid - do not overheat, or you will be generating some very unpleasant fumes.
As you can see Joel, you are going to wind up with all the stuff you need to do your own bullet casting and black-powder reloading.
Resign yourself to the fact that all this is going to cost more than the rifle. But...
... for the next rifle, it's already there
-
Thank You to Patrick Chadwick For This Useful Post:


 PM
PM