-
Advisory Panel


Originally Posted by
Claven2

Patrick will likely cover that later.
Yup, it's coming. But I want to see some pics from Joel first!
Originally Posted by
Claven2
I'm not sure if .43 Mauser is one of those rounds that requires filler or not.
All my BPCR cases are full. Either grease cookie or grease + filler.
Originally Posted by
Claven2
I shoot a lot of .577-450 and you DEFINITELY need a filler.
100% agreement there!

Last edited by Patrick Chadwick; 12-22-2010 at 06:51 AM.
-
-
12-22-2010 06:41 AM
# ADS
Friends and Sponsors

-
FREE MEMBER
NO Posting or PM's Allowed

Hi all,
Patrick was kind enough to shake me from the doldrums with a PM yesterday.
It’s been quite awhile since we’ve made any progress on the ole Rolling Block but since work has somewhat released its death grip on me, maybe we can answer the final question; Will this rifle shoot? More to the point, will it shoot accurately?
First I need to bring our progress up to date update.
I’ve continued to apply the occasional coat of BLO to the stock and not only does it look pretty good but I am also curiously beginning to like the smell. I also applied some stain to the repaired area under the forearm and it no longer stands out so badly.
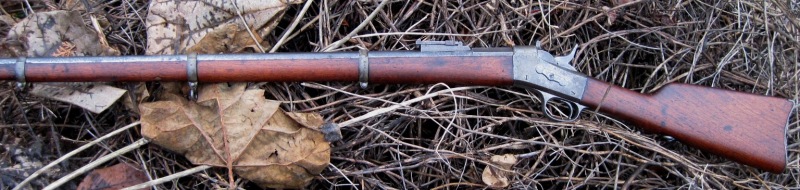
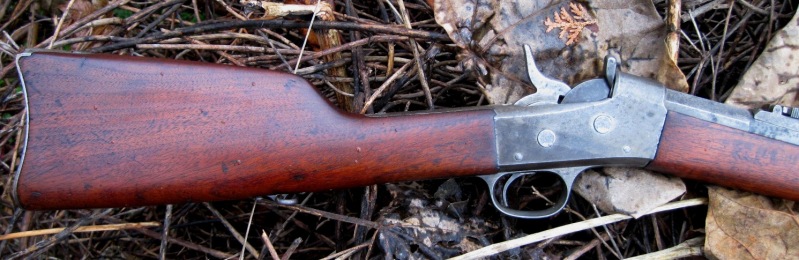
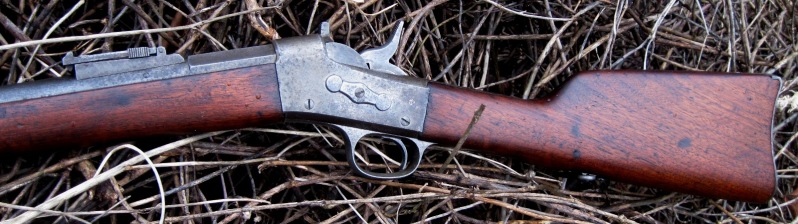
All of my latest attempts to take indoor pictures with artificial lighting have been less than presentable. I’ve wanted to use outdoor lighting but the weather has been bad and lately I’m rarely home during daylight hours. I did manage one short opportunity between sprinkles and I’ll post a couple of those shots tonight. Nothing fancy though. I literally ran outside between showers and leaned it up against a tree trunk and snapped some shots. I also tossed it on the burn pile and snapped a couple more. Even with overcast and sprinkles, natural light far exceeds anything I can do inside.
Patrick wrote a nice tutorial on how to determine proper “cartridge overall length”. His method was quick simple and surprisingly accurate. I do have some concerns though with the variability of how deep my selection of bullets seated in the lands. I used the first five bullets from the end of the box and found up to .050” difference in how deeply they would seat into the lands with light pressure using a ballpoint pen as the pusher. My results varied from 3.010” to 3.060”. This was repeatable. Erring on the safe side requires that I use the smaller value and to reduce it by an additional .040” (per Patrick’s tutorial).
The final C.O.L. will then be 2.970”, which is still .125” longer than the C.O.L. listed as maximum on the Lee reloading die instructions (2.845”). I believe with more consistent bullets the C.O.L. could safely be increased to 3.000”. To obtain this level of bullet quality, I may need to mold my own.
One last item that I would like to complete is slugging the bore. I pushed a couple 45cal balls through but they did not fully deform enough to fill the grooves. I pushed through a couple 44cal pistol bullets and they did fully deform into the grooves. I’ve yet to accurately measure them. Curiously the last 8” or 10” near the muzzle was the tightest section of the barrel. This may be nothing more than increased friction due to rust pitting or it may actually be smaller there, I’m not sure. My idea is to cast the muzzle end of the barrel just like I did the chamber with my sulfur graphite mix and compare the dimensions.
Regardless the results from slugging the bore or does the barrel need re-crowned; what I really need to do is load some cartridges and see how it shoots as is.
Patrick, I believe I have all of the hard goods you previously listed to load cartridges. I’ll review the list but I think I’m ready to go. In addition I ordered a neck only sizing die that also doubles as a compressed load die, if needed.
As always I patiently await your instructions.
Thanks, Joel.
-
-
Advisory Panel
Refurbishing an Argentine RB - Part12
Glad to see you back Joel!
Now for some interim comments and a check before loading:
You have already seen the "before" picture of a muzzle in a dire state.

This is the front end of a Mauser 1871 that Has Seen Better Days. However, the bore looks several grades better than that, and I thought "this is an ideal object on which to try out some muzzle recrowning." I won't tell you just yet how that was done on a lathe that is too short to take the barrel - sensitive mechanical engineers unaccustomed to backwoods methods might have a shock. Anyway, it now looks like this:
- A first approximation, of course - the smoothing out and rounding of the crown on the outside would have been cosmetic, with no effect on performance, and I was keen to try it out. In fact, I rather like the pattern created by my juddering cutter (if I had deliberately wanted to get it to look like that, you can be sure I would not have succeeded) and may well leave it as it is! And the beast gets all shots on the paper without keyholing, so it's not dead yet!
Looking at the above - if that can work, then the Argentine Rolling Block ought to be a piece of cake!
-------------------
Joel, I am glad to hear you now have the reloading gear. I hope you got the other curious items as well, because you are going to need them any day now!
You will recall that they were ...
"... some empty and washed out milk cartons (if you have them where you reside). They are made from a kind of waxed card that is ideal for wads. Or the card used for six-packs of bottled beer (glazed on one side). And a wad cutter for .451, for muzzle-loading rifles. That is spot-on. Otherwise, 12mm will work. 1/2" is far too large. 7/16 is too small. And I don't suppose 29/64" exists!"
"And an empty 30M1 Carbine case (357 or 38 special will work, but the carbine case is easier to use)".
"And a couple of 5cc (5ml) one-way plastic syringes (without the needles of course) from the apothecary or (pack-ratting again) scrounged from your doctor or dentist."
You have made the preliminary "maximum feasible OAL" measurement as described in Part 11, and commented quite correctly on the fact that this appears to be considerably longer than that given in the leaflet that comes with the Lee die set.
The answer to this puzzle is already illustrated in Part 11, where an HPBT was compared with a flat-based Spitzer - the maximum possible cartridge length depends on the profile of the bullet nose. With magazine-loading rifles the OAL is often, in practice, limited by the longest cartridge that will fit into the magazine. Single-shot BPCRs are much simpler in this respect - you can load just about whatever fits, with a suitable reserve to allow for combustion deposits in the throat and variations in the bullets - as you have just discovered. A manufacturer on the other hand, such as Lee, has no option but to quote a figure that is reliable for the bluntest bullet in the shortest throat.
However, the major advantage of reloading for one specific rifle is the ability to match the ammo to the gun. In the Mauser 1871 I use a 460 gn round-nose bullet. The maximum possible cartridge OAL - where the bullet would just touch the lands - is with the second grease groove barely covered. The Lee diagram is 1:1, so by placing the bullet on the diagram one can see that this would be an OAL of about 80 mm - a solid 1/8" longer than for the blunt-nosed bullet in the diagram.
That is rather similar to what you measured with the Argentine RB, isn't it?
No great surprise there - these are two cartridges of a very similar vintage, which used similarly shaped bullets in cases with similar profiles. And they will even take similar quantities of powder. Just for laughs, I will stick my neck out and, although I do not have any .43 Spanish cases, predict that if you follow my loading recipe, you will be using about 60 gns of uncompressed black powder in that case, a bit more if you reduce the grease cookie (but I would advise against that).
And that will be quite enough to use the rifle up to 300 meters. Don't listen to the machos who claim that more powder is better, even if you have to compress it. It ain't necessarily so! Your first loading will anyway be a feasibility test plus fire-forming of the cases, not a testing of the limits.
But before we do that, it would be a good idea to check if the rifle will actually fire the cartridges. We are going to make a check on the head clearance! No need to run around looking for headspace gauges for .43 Spanish - if you could find any, they would cost more than the rifle. And we are not interested in comparing the rifle with a standards diagram - we just want a practical check to see if it will work.
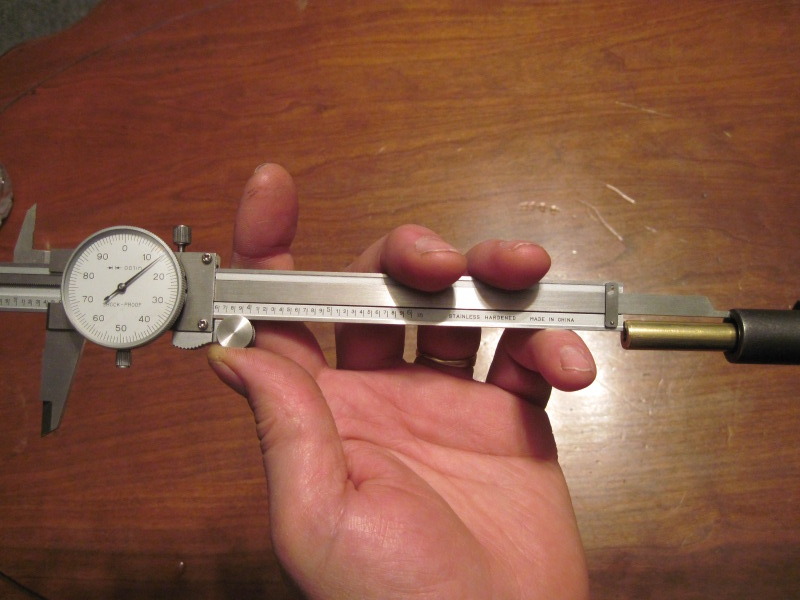
So get out the long threaded rod you used for measuring the maximum (theoretical) cartridge length.
Open the block and insert an empty, unprimed cartridge case. Close the block. Cock the rifle, so that the firing pin is not protruding. If your RB has a half-cock position, then you only need to pull the hammer back to this position, not full-cock.
Insert the threaded rod right up to the base of the cartridge face. Run down the nuts until they touch the muzzle, like you did for the cartridge length measurement.
Open the block and push the case right forwards with a finger or pencil or whatever (like you did with the bullet in the throat) as far as it will go. This will have pushed the threaded rod out a little way. Without disturbing the second nut, run up the first nut until it touches the muzzle, just like you did for the bullet in the throat when making the cartridge length measurement.
Measure the difference. This is the head clearance. Similar to but not quite the same as head space. It is the practical measurement of the clearance when that type of cartridge case is used in that particular rifle. Not a theoretical check with madly expensive headspace gauges that is only useful if you want to fire headspace gauges!
For a rifle of this vintage, less than 20 thou is good enough. Up to 40 thou will probably work. More than that could cause uncertain ignition, because the firing pin might merely push the cartridge forwards and not have enough length left over to ignite the primer. The threaded rod method is quite adequate for this simple go/maybe go/no go judgement. With practice, you will find that you can make repeatable measurements with a spread of about 4 thou or better, and will in future be able to use this method to make a plausibility check on any rifle that interests you without ever needing to buy a set of headspace gauges. (That ought to provoke a comment from the theoreticians)
That was a check. Now for a test. I expect you inspected the tip of the firing pin at the dismantling stage, and that it is OK. If not, inspect it now. The tip must be rounded, with no sharp edges. Take a couple of primed cartridges and fire them. Assuming they go bang, take a look at the indentation in the primers after firing. They should be, if not central, at least well clear of the edge of the primers, and smooth, without showing sharp edges that might turn into punctured primers with a real load.
If that all went OK, please report back, and we will finally load some cartridges!
Enough for tonight!
Patrick
Last edited by Patrick Chadwick; 12-29-2021 at 11:10 AM.
Reason: Writing gibberish
-
-
FREE MEMBER
NO Posting or PM's Allowed
-
Advisory Panel
-
-
Advisory Panel
I see your bullets are round-nosed. So the explanation in Part 12 fits. As they are 370 gn bullets (if I am reading the box correctly) you will be able to get something more like 65gn of powder in the case WITH a grease cookie. That should actually produce usable results up to 1000 yards. Part 13 will take a day or two, as I want to make some pics.
On studying your last pic closely, I see that you have already punched out some wads! I really must stop waffling and get to work...
Patrick
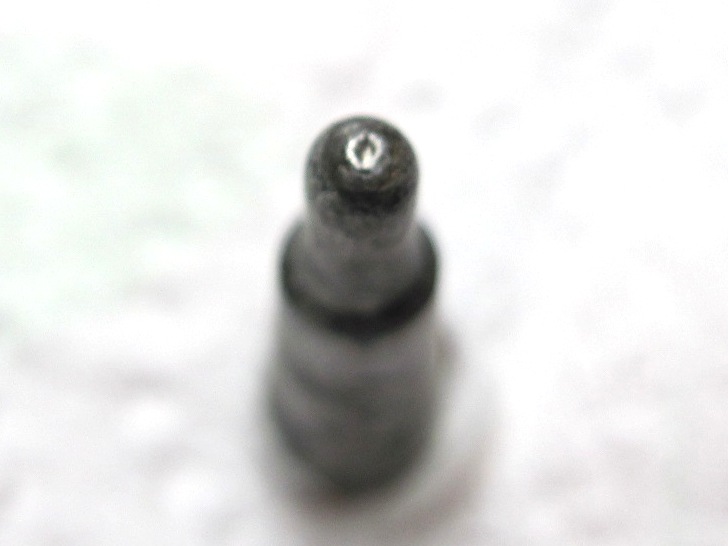
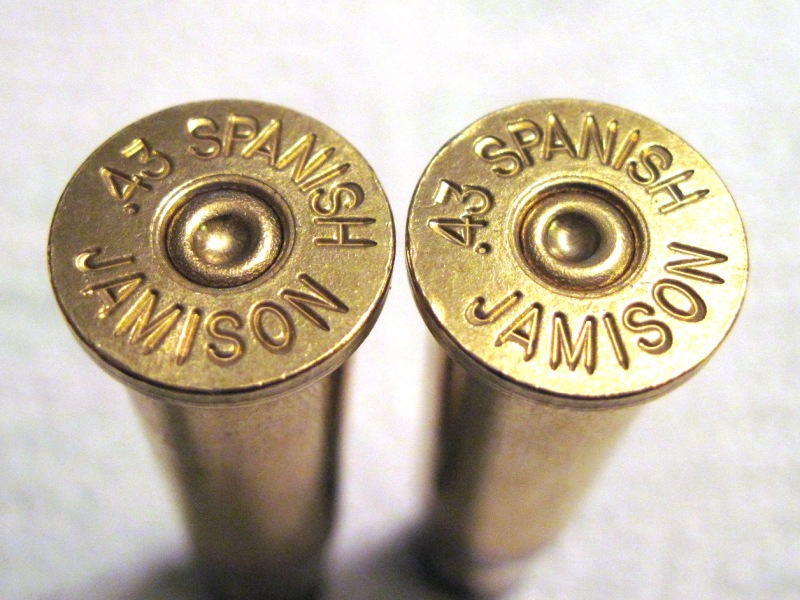
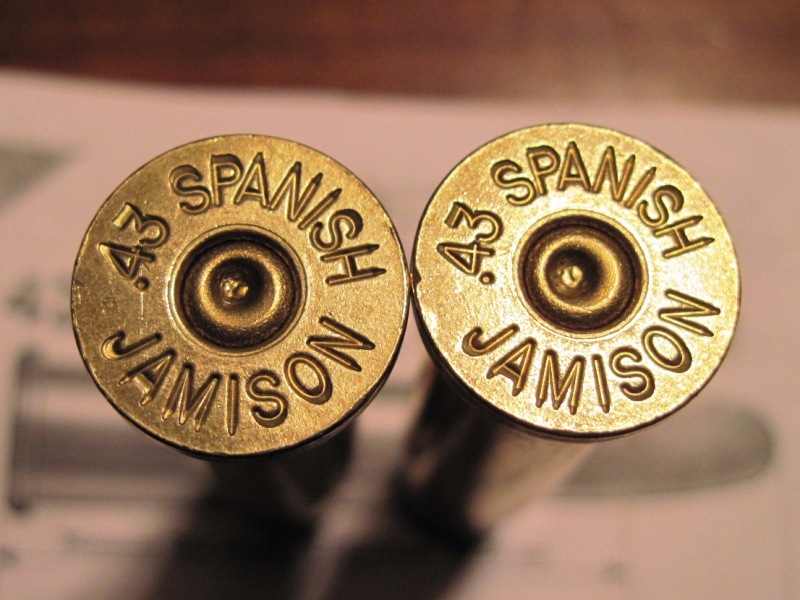
P.S. Looking at the indentations of the primers, the almost indentical patterning in the indentations (there is a pimple in the second primer below the A of Spanish , that seems to match another below the N in the first case) lead me to suspect that the tip of the firing pin may have some slight pitting. Take a look at the tip under a watchmaker's eyeglass.
Last edited by Patrick Chadwick; 01-26-2011 at 06:20 AM.
Reason: P.S. added
-
-
FREE MEMBER
NO Posting or PM's Allowed
Originally Posted by
Patrick Chadwick
P.S. Looking at the indentations of the primers, the almost indentical patterning in the indentations (there is a pimple in the second primer below the A of Spanish , that seems to match another below the N in the first case) lead me to suspect that the tip of the firing pin may have some slight pitting. Take a look at the tip under a watchmaker's eyeglass.
Yep, I see that.
My gut feeling is that hard hammer strikes are deforming the cup against the anvil inside the primer.
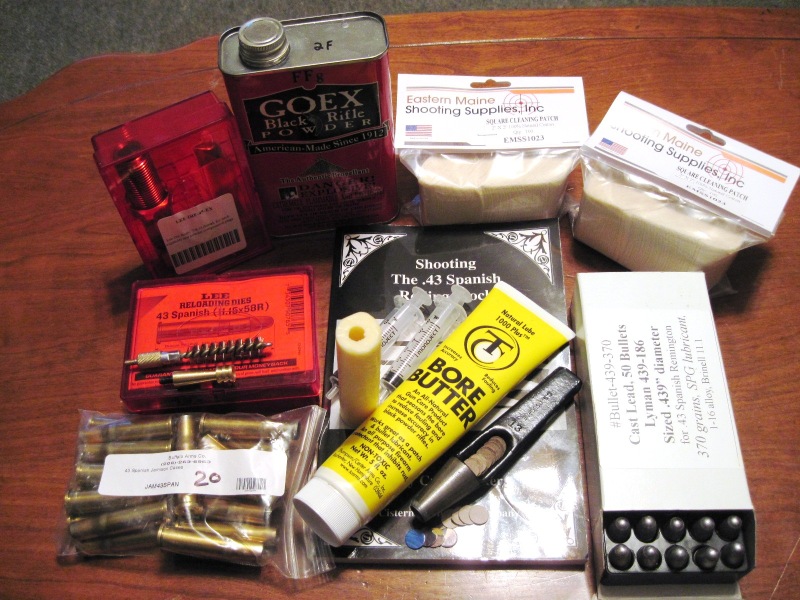
This close-up of the firing pin indicates that all is well but it’s just a side shot. Tonight I’ll take a straight-on close-up of the firing pins end to confirm its condition.
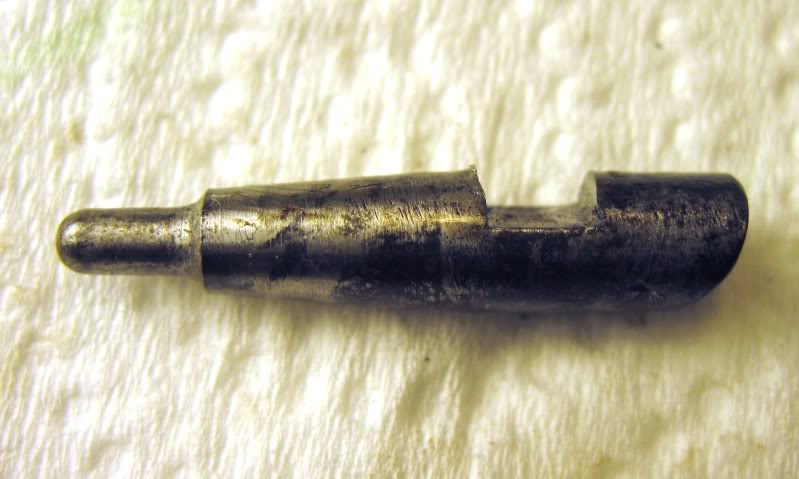
One thing I am sure of is that I won’t suffer any light hammer strikes; it falls with a great deal of authority, leaving deep craters.
-
Advisory Panel
Originally Posted by
killforfood
One thing I am sure of is that I won’t suffer any light hammer strikes; it falls with a great deal of authority, leaving deep craters.
Yeah, those primers are going to stay ignited!
Patrick
-
-
FREE MEMBER
NO Posting or PM's Allowed
-
Advisory Panel
Another quick fix on the way to perfection!
Congratulations Joel
I seriously think that the muzzle question is all that remains. And that will be answered by the test firing.
You mentioned a muscle-building trigger pull - that is an aspect of tuning which we can look at after the test firing. I will see if I can get Part 13 done today, so that you can have some ammo prepared for the weekend.
Did you get a couple of plastic syringes? They will be for dosing the grease under the bullet.
Patrick
-


 PM
PM