-
Legacy Member

inside photo
photo shows the mechanism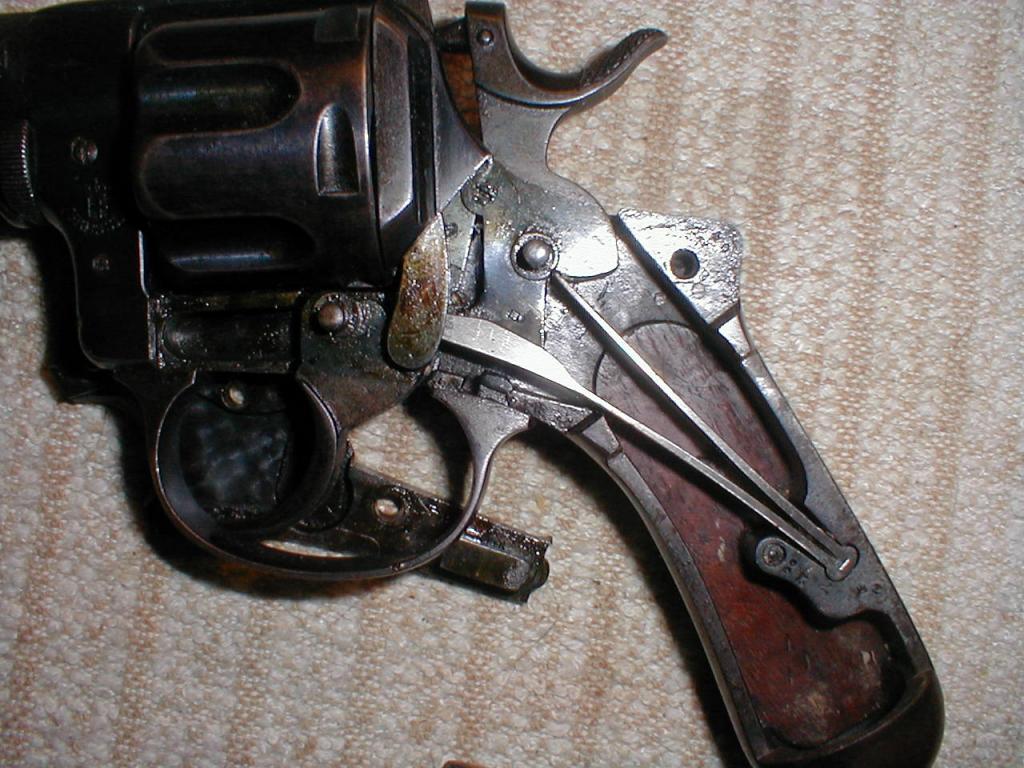
-
The Following 2 Members Say Thank You to RCS For This Useful Post:
-
04-17-2016 08:17 AM
# ADS
Friends and Sponsors

-
Legacy Member

 You are doing a very nice job, Tom. Something tells me this is not your first rodeo.
-
Thank You to Vincent For This Useful Post:
-
-
Advisory Panel


 Very impressive!
Man, you are lucky with that bore! That alone should make your perseverance worth-while.
Keep up the good work - and keep us informed.
-
Thank You to Patrick Chadwick For This Useful Post:
-
Legacy Member
Thanks for the kind comments gentlemen. The reminiscence about the .50 cal Brownings as a display reminded me that it seemed every EM Club I entered while in the Army had a montage of captured foreign arms as a display but I never saw anything as impressive as dual 50s.
As I alluded to in my last post, the conical shaped hole for the firing pin presented some tedious problems. My lathe is a little 6" Atlas so it doesn't have enough swing over the bed to turn the revolver frame even if it could be affixed somehow with a lathe dog. So, I clamped a flat machine vice to the drill press and positioned the frame in the vice. The inside of the frame was marked using a punch through the primer hole of a .38WCF case temporarily installed with the cylinder. The firing pin was removed from the hammer and the resulting hole was used to mark the outside of the frame. I then drilled a small hole, mark to mark to serve as a pilot and used a standard lathe center drill to hog out the biggest portion of the coned hole and then the Dremel to finish contour and polish. Often I have read that the firing pin on these is pinned to the hammer. They either don't know, or neglect to say that it is also threaded and screws into the hammer. Frustrating to remove if you don't know that little tidbit. The threads are visible in pic 2. The cylinder hand was too short and required some careful peening to lengthen and stoning back to get the timing spot on and the little hammer block piece that fits in the hand needed some massaging with needle files to fit and operate properly. Then the relatively straight forward lanyard ring and a walnut plug for the grip. Next post the final assembly. Tom
Last edited by oldpaul; 04-24-2016 at 03:52 PM.
-
The Following 3 Members Say Thank You to oldpaul For This Useful Post:
-
Legacy Member
Here it is all assembled, side cover off and on. In the first picture the light colored walnut plug can be seen on the lower part of the left grip. In the picture of the right side of the gun you can see a shiny weld spot on the rear of the cylinder that wouldn't take the spot bluing. I suspect there was something alloyed into the welding rod, maybe nickel. This rivoltella has a few interesting design features including the feature Vincent noted in that when the loading gate is opened the trigger can rotate the cylinder without cocking and dropping the hammer. This greatly facilitates the speed of loading the gun and removing spent cartridges. On the enlisted man model 'A' the trigger folds forward and fits into a retaining slot when the hammer is pulled slightly back. When it is cocked the trigger falls free for use. Robert's post previously, shows the officers model 'B' with the trigger guard and non folding trigger. Disassembly of the complete firing mechanism may be done without any tools. First, on the side plate, the piece that looks like it could be a safety lever is actually the screw that retains the side cover. Once removed there is a tang built into the side cover that when the hammer is cocked allows easy removal of the mainspring. The remaining pieces may then be easily taken out. This firearm is often described as "robust" ;I think that is an apt description. All seemed correct and smooth and I will report on loading and shooting the beast next. Tom
-
The Following 4 Members Say Thank You to oldpaul For This Useful Post:
-
Advisory Panel
-
The Following 2 Members Say Thank You to Patrick Chadwick For This Useful Post:
-
FREE MEMBER
NO Posting or PM's Allowed

loooks a bit like the russian nagant to me , interesting revolver
-
Legacy Member
The cartridge for the Model 1889 is the same as used in the earlier Model 1874. The original black powder round had a bullet weight of 11.6 grams (179gr.), a case length of 22.6mm and contained 1.6 grams (25gr) of fine grained black powder that produced a velocity of 735 fps. Beginning in 1890 the cartridge was loaded with smokeless powder, the case length reduced to 22mm and a cotton ball placed between the powder and bullet. The bullet weight was reduced to 11.3 grams (174r.) with a velocity of 810fps. The advice given in a Robert's previous post on fabricating suitable ammunition is how it is usually done and likely the prudent way for most. I possess and shoot my Grandfathers Model 73 Winchester in .38WCF (38-40) and also an Uberti Colt revolver copy in the same caliber so I opted to use this brass as a base for the 10.35 Italian since I already have a lot of brass on hand. A bullet mold in the original heeled design and weight was purchased from Buffalo Arms for nearly as much money as I have into the revolver but I like the originality aspect and was curious how well it would shoot with an 1870s design idea. The mold is beautifully machined and turns out perfectly round 177gr bullets that measure exactly 0.425" at the band just forward of the heel. My only complaint with it is that it has far too much metal for a single cavity mold and so it takes an excessive amount of time to heat up to casting temperature. Since these bullets have a heel I couldn't use a Lyman sizer/ luber and instead outside lubed with Lee Alox tumble lube. As luck would have it, a sized .38-40 Win case has the correct inside neck diameter for the heeled part of the bullet but the cases trimmed back to 22mm are too short to be sized in in a normal length die. A used .38 WCF size die was bought on ebay and was cut back enough to properly size my 'new' 10.4 cases. I use mostly Alliant (the old Hercules) pistol powders but with Unique, Bullseye and all the Dot powders I couldn't come up with a load that had consistent velocities although I am sure with more experimentation some or all would be fine. By happenstance I was given bottle of Titegroup and it proved up well for this caliber. With the usual precautions and disclaimers; With this gun, these cases, these bullets, this process and 4.6gr of Titegroup I shot under three inch groups at thirty feet from a rest, single action, at very consistent 800fps velocities. Not bad for an old pot. So, was it worth it? Everyone has their own reasons for collecting and I would never disparage any that are not my own but I have no safe queens. I shoot them all and load for everything except the rim fires. I mostly like Great War weapons and this one fits into my Italian handgun section nicely. This gun is likely less valuable than a matching number un-repaired similar revolver but with just over 200 rounds down range, it has become one of my favorites probably because, as my Grandfather would have said "you have some blood in it". Thanks for all the interest and comments. Tom
-
The Following 5 Members Say Thank You to oldpaul For This Useful Post:
-
Legacy Member
an amazing resurrection.
i take my hat off to you sir.
-
Thank You to henry r For This Useful Post:
-
Contributing Member


Very nice, kind of makes me regret I didn't pull the trigger on the one I found. It was not tampered with nearly as bad as yours but the bore was shot. Price was a lot higher also.
-
Thank You to Aragorn243 For This Useful Post:


 PM
PM


