It appears that you are you're enjoying our Military Surplus Collectors Forums, but haven't created an account yet. As an unregistered guest, your are unable to post and are limited to the amount of viewing time you will receive, so why not take a minute to Register for your own free account now? As a member you get free access to our forums and knowledge libraries, plus the ability to post your own messages and communicate directly with other members. So, if you'd like to join our community, please CLICK HERE to Register !
Already a member? Login at the top right corner of this page to stop seeing this message.
Lots of good ideas, there are more than one ways to skin a cat.
I'll add my tuppence worth.
Hot tank blue can be beautiful, but it is not correct for use on a military arm and will still stand out as being a different finish even if some artificial wear is added. Different colour, different surface.
My suggestion would be to strip off the existing blue completely and refinish the surface to remove the high polish, adding some texture by hand with sand paper to simulate the original linished surface.
Polish the high points and sharp edges shoe shine style with a cotton rag and Brasso, then oil blacken.
Add some wear to the blackening with a scotch brite pad, very fine steel wool or shoe shine rag again until it matches the rest of the furniture.
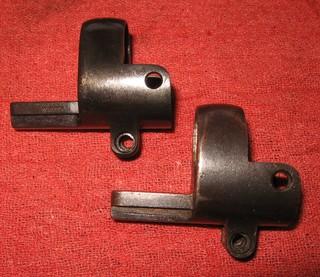
Bottom nose cap is an untouched original, the top nose cap is a new made unit that has been oil blackened.
Hmmm, step by step instructions. My method is very unscientific and comes with a lot of practice.
But the basic technique is so simple, you wont believe it. Heat the part then drop it in motor oil (once upon a time, whale oil was used).
Preparation is key. Surface prep and finish the part as you would for any other type of blueing.
Everything has to be oil and grease free. Otherwise a streaky and blotchy finish might occur.
I simply heat the part in an iron box (bread loaf tin with a scrap piece of 1/4 plate sitting on the bottom and a metal lid) on a Coleman camp stove for a timed five minutes. I am guessing the temp is around 475F judging by the colour. i.e. polished in the white steel turns a straw colour to light brown.
To adjust the temp of the part, I adjust the time it is left in the heat box.
Beforehand, I twist a loop of iron wire on the part to be able to pick it up with pliers.
When good and hot, I drop the part into a coffee can of used motor oil. (stand back!)
When it has finished bubbling and sizzling like a pan of french fries, I pull it out and wash it with dish soap and water.
Often one pass is good enough, but if not, I dry the part and put it back into the heat box and do it again and again until the required black is obtained.
Heating to 475F is way below the critical heat point and will not disturb the heat treatment or temper.
If not hot enough, the finish will be a light brown like the outside of a chip pan. It can be washed and redone.
If too hot, the finish will be black but will have a slightly purple colour.
The blackened finish is as tough as nails and is impervious to solvents.
Rob, sorry I'm a bit late in the day, but I've been 'over there' again for this last week! Hessian sacking (what sand bags are made from) works (& also on getting that old 'well handled' look on SMLE walnut). Another way to speed up natural wear on corners & edges on smaller parts is simply to leave them in your trouser pockets for a couple of weeks - but don't forget to swap the bits over between pairs of trousers as they need washing!
What Warren advised in post #8 above, but to repeat and emphasize: don't forget the oil! It will aid greatly in blending the more-treated areas from the untouched or less-treated.
In all the original specifucations, the surface finishing of most small Lee Enfield parts is referred to as "Blazing off".
This seems to be a process in which the heated components, almost always "malleable cast iron" (or a variant thereof) are quickly quenched in oil and then withdrawn to let the residual oil burn, i.e., "blaze off".
I have not tried this process personally, but it seems like it should be done outdoors, on a paved surface, away from the family residence and "man-cave".
Bigger components were "BROWNED", i.e. SLOW rusted. Somewhere along the line, someone discovered that extending the process and lightly removing the surface "red" rust, a dark blue / black surface developed.
Originally, "slow blueing" really meant SLOW! Days for letting things develop a fine red-rust "skin", then "carding" back to the desired black-ish oxide below; rinse and repeat, literally. Then in another one of those fascinating leaps of technology some clever lad invented the "steam box". Done correctly on a properly prepared and polished surface, the blue is so deep you can almost drown in it.
Fascinating stuff; I oil black ('blaze off') some No32 brackets as an alternative to suncoriting, & it works a treat, so long as you remember to use old used up oil, not nice clean new stuff. I guess it's the burned off hydrocarbon impurities that deposit on the surface of the metal. However, what I think Rob really wants to know is how to wear off the 'presentation grade factory new S&W' appearance of the reblued parts to match the rest of his well used but honest rifle. Repeated but very gentle abrasion from very fine wire wool, leather, hessian, or similar is probably what's needed. If the surface of the rest of the rifle is lightly pitted/appreciably patinated you can speed up natural surface oxidation (rusting) some thousandfold by setting up the electrolytic cleaning gear that we have discussed on a number of occasions here previously, but remembering to use the part as the sacrificial anode, not the cathode. And it must be checked after an hour or two or there'll be nothing left of it! Once surface corroded to the required degree, swill thoroughly, dry & oil. Bob's your auntie!
Last edited by Roger Payne; 05-02-2019 at 02:15 PM.
Reason: grammatical
Citric acid is what's in vinegar. It'll strip any bluing to bare metal quickly. 0000 steel wool without any oil, maybe. Rubbing with a hunk of leather might work better though. Leather being what makes handgun lose their finish along the edges.
"...done in a blueing(SIC) tank..." That's a different process/chemical from cold bluing. Cold bluing is more colouring than protection.
Those parts are very likely new replacement parts. There's really no way to 'age' it to match 120 years of life.
Acetic acid is the active ingredient in vinegar.
“There are invisible rulers who control the destinies of millions. It is not generally realized to what extent the words and actions of our most influential public men are dictated by shrewd persons operating behind the scenes.”
I have an LEC 1 which is lovely in every respect except that some of the parts [magazine, nosecap, barrel band] have for no obvious reason been polished and deeply re-blued. Nicely done in a blueing tank... but all the other metal parts show the usual aged appearance of a well-used 120 yr old rifle, and the wood has a lived-in appearance, too.
The re-blued parts look, frankly, like balls on a bulldog.
So, my question is whether there is some chemical I could dab on a piece of flannel and gently rub away at the high spots and/or edges of the re-blued parts so they look slightly more worn-in? Would phosphoric acid [coca-cola], vinegar, barrel browning solution, etc do the trick?
I look fw to suggestions.
Rob
I would suggest the reason is obvious: a sporter restored using reproduction parts.
“There are invisible rulers who control the destinies of millions. It is not generally realized to what extent the words and actions of our most influential public men are dictated by shrewd persons operating behind the scenes.”


 Register To Reply


