


Here's a heartbreaker! I picked up a beautiful Long Branch in lovely shape. By that I mean that it had probably never seen combat use. The bore is 5 groove rifling in lovely shape. There's very little indication of rounds being fired from it and even the bayonet lugs don't show any sign of bayonet on/off wear and the crown is beautiful.
Someone had the receiver drilled for glass, so it had the 2 holes in the nox form and one in the charger bridge. It had a POFlower forestock, English upper stocks, but all the metal work was "LB" marked as was the butt stock and sling swivels. I assume it was a poor attempt to "de-sporterize" the rifle.
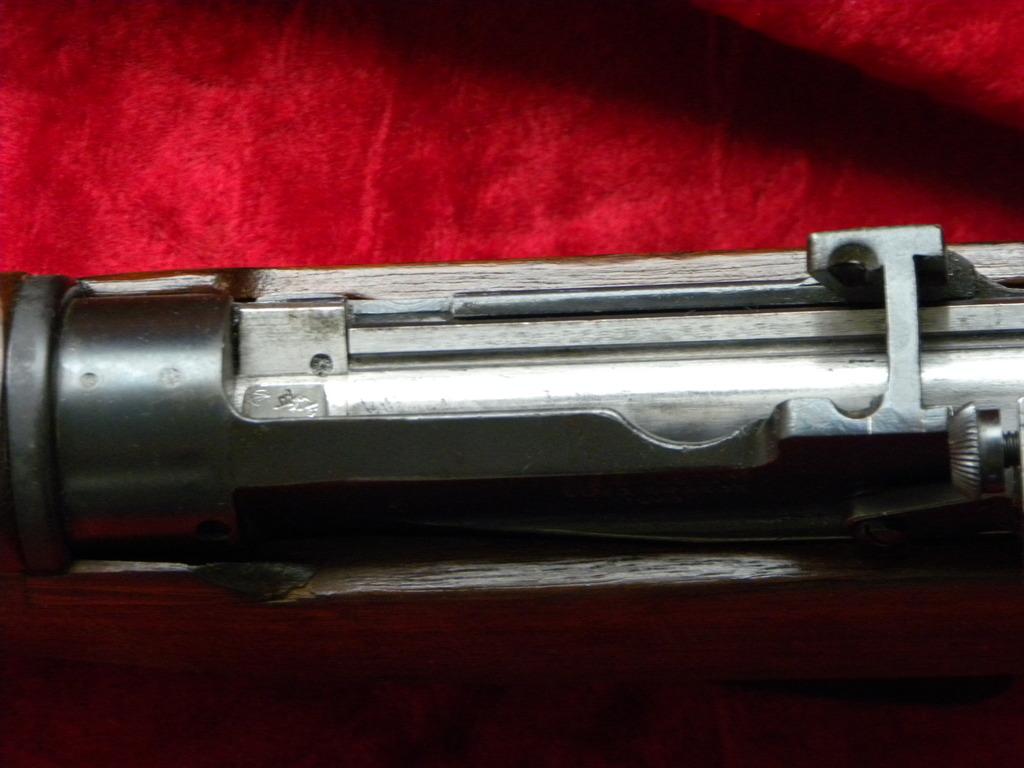
Step one was to determine the spacing of the holes on the receiver and drill 2 holes into a piece of brass shim stock that aligned with the holes. I bent the shim stock around the receiver and put 2 small hex head screws through the shim into the receiver with some Lock Tite. My intent was to file down the screws until I hit the shim stock and then use great care and fine files to finish taking the screws flush to the receiver. HOW THE HELL WAS I SUPPOSED TO KNOW THE DAMNED HEX HOLE WENT ALL THE WAY DOWN INTO THE BODY OF THE SCREW!!! As you can imagine, I was some ticked off when, after I'd filed the screws all the way down, I still had 2 holes in the receiver. Much smaller holes, but still there nonetheless. The screw I had for the charger bridge was a slot head and that method of hole filling worked just fine. I filled the 2 small holes with some metal compound, but you can easily make out the repair. Note: if you're doing what I did, check the depth of the hex hole into the receiver and put a small dab of metal compound into the hole to make the screws more proud prior to lock tite and filing or use a slot head screw.
Step 2. Some bright spark had tried to remove the sight blade retaining screw without the correct tooling, and buggered up the hole. Fortunately the metal was thin there so a few gentle taps with a hammer had the hole back to round.
Step 3. I was given nice LB walnut fore stock and I had 2 walnut upper hand guards from an earlier restoration. As I'd mentioned, all the metal parts (ie: sight block, sight protector, sling swivels, barrel bands, etc.) were LB marked. I refinished the stocks to match up for colour. After the oil set up, I reassembled the rifle. It had a British
So, here's the finished product. Comments, pro or contra, are welcome.
[/URL]
 Information

Warning: This is a relatively older thread
This discussion is older than 360 days. Some information contained in it may no longer be current.
- Knowledge Library

- MKL Entry of the Month
- Australia
- Austro-Hungarian Empire
- Canada
- Czechoslovakia
- Denmark
- Finland
- France/Belgium
- Germany
- Italy
- Japan
- Norway
- Russia
- South America
- Sweden
- Switzerland
- Turkey
- United Kingdom
- United States
- Yugoslavia
- Is my rifle authentic or a fake?
- Jay Currah's Lee Enfield Web Site
- On-line Service Records (Canada)
- Technical Articles/Research
- Forum
- Classifieds
- What's New?
-
Photo Gallery
- Photo Gallery Options
- Photo Gallery Home
- Search Photo Gallery List
-
Photo Gallery Search
- Video Club
- iTrader


 PM
PM