-
Advisory Panel


-
Thank You to Patrick Chadwick For This Useful Post:
-
11-22-2010 04:10 PM
# ADS
Friends and Sponsors

-
FREE MEMBER
NO Posting or PM's Allowed

Patrick,
Thanks for the encouraging words.
The white substance inside the stock was not mold. I had to remove it with a rather stiff nylon brush. It came off as a dry white powder. The dust wasn’t offensive to the nose so I suspect it wasn’t caustic in nature.
I’ve done nothing with the wood and will wait for your instructions.
I have plenty of old 3.5” diskettes but can’t imagine what those might be used for.
All of the refinishing supplies that you listed have also been obtained.
I am fully equipped for and have loaded many thousands of metallic cartridges but never black powder. I have a couple friends that belong to local rifle clubs. They may be able to introduce me to the right person.
I see that .43 Spanish dies are available from Lee for a very reasonable price.
Also Buffalo Arms has brass and bullets in stock.
I will purchase these as the budget allows.
Good luck with the lecture.
Joel.
-
Advisory Panel

Originally Posted by
killforfood

I have plenty of old 3.5” diskettes but can’t imagine what those might be used for.
All of the refinishing supplies that you listed have also been obtained.
Excellent. You are going to like Part 5 
-
-
Advisory Panel
-
-
Advisory Panel
Refurbishing an Argentine RB - Part 5
Just to remind you where we are going:
The wood on the Mahdi is a very fine, hard walnut (look at the rounded metal, and look how well the wood has stood up to the same environment).
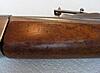
The wood on the your RB is probably the same. But how are we going to get it looking good, without Bubbaring?
First of all, another little diversion...
Wood stripping
I remember you queried the gel-type paint stripper on the shopping list. You mentioned oven cleaner, and something about destroying the surface. You were right to think that there is some kind of hazard in this wood-stripping business.
I have expressed, on another forum and quite drastically enough, my horror at the thought of soaking old wood when refurbishing old rifles. Quite apart from the danger of warping, the use of a chemical such as caustic soda, and closely related chemical mixes, such as oven cleaners, destroys the surface of the wood.
I do not just mean that they raise the grain and make the surface a bit hairy. They are truly destructive.
You can verify this through a little experiment.
1) Place another natural hair brush and toothbrush in a container with a small quantity of the gel paint stripper.
2) Place the tips of a natural hair brush and an old plastic/nylon toothbrush in a container with a small quantity of a strong caustic soda solution.
In 1) in a couple of minutes you will see the toothbrush going to pieces in the gel paint stripper, while the natural hair brush is unaffected.
In 2) it takes a bit longer, but while the toothbrush is quite happy in caustic soda, the natural hair brush will start to rot. Take it out and try brushing, and the bristles will disappear before your eyes. But it would be a pity to waste the brushes. Just trust me.
Now you know why we are using gel paint stripper with natural hair brushes, and NOT caustic soda. Caustic soda destroys organic materials (wood, hair), which is why it is good for oven cleaners and clearing blocked sinks, but is death for any high-quality wood surface.
Surprise time!
Penny-pinching for packrats
"It might come in handy one day." If that is a typical phrase for you (as for me) then we are both packrats, with a cellar full of junk that we are reluctant to bin. But once in a while we are proven right (and we forget the other 99%).
So wasn't it a good idea to keep those old 3.5" diskettes!
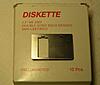
If you bend the disk cover open slightly you can pop it off.
A small wire spring with a loop will fly out and land somewhere where it is invisible. Good packrats will catch these springs and keep them in a little box for the famous "...one day".
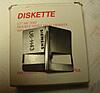
What intererest us at present is the metal cover. This is made of a material that appears to be a kind of stainless steel. It is only weakly attracted by a magnet, and presumably has very little remanent magnetism - otherwise it would tend to wipe the disk!
Be warned! The edges of these things can be very sharp!
Now open up the cover plate and use a plastic hammer to flatten it right out on something that serves as an anvil.
The bit with the holes is no use for what we are going to do. Use tin snips to remove it. You now have a rectangle with some very sharp corners.
You MUST round off those corners.

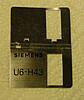
Even the two pre-existing ones. And the edges MUST also be bluntened around those corners.You can use a Swiss file, but if you make a habit of this kind of work, you will one day get one of these:

An Eazi-Lap - they are wonderful for very fine resurfacing and edge correction on lock parts etc.
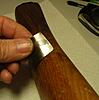
What you now have is a home-made one of these:
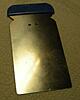
Even if you use a commercial paint scraper you will also have to round off the corners (as I did to this one). If you do not, it is very easy (and I have done it) to gouge a line in the woodwork that is too deep to be removed by gentle methods.
So why not just buy commercial scrapers and round the corners off? Am I such a penny-pincher?
- Hmmm, could be, but the real reason is that you now have a scraper that has just the right amount of flexiblity for cleaning up gunstocks. And I have not yet found a commercial scraper that is so thin and flexible.
On as-good-as-flat surfaces you can apply just a bit of curvature by flexing it in your fingers so that it follows any slight dips in the wood. On curved surfaces you can pre-bend it for a rought fit, and tune that with finger pressure.

Just one further point - we are not actually going to scrape the wood.
We are going to burnish it!
Wood burnishing
I discovered this method while using one of these things to scrape a wood surface. Please forgive me if I repeat myself, but for this kind of work you do NOT need sandpaper. Scrapers are used by cabinet makers to give hardwood surfaces a highly smooth, close finish before applying shellac etc. If you hold the scraper nearly at right angles to the wood and pull it sideways, but ALWAYS along the grain, it will scrape off a microscopic amount. While bending the scraper between my fingers - to follow the curve of a butt, I realised that I was still getting a smoothing action, although the scraper was not cutting at all. The scraper could be dragged along the grain and smooth down the wood without cutting it.
As an illustration, here is an old Enfield butt (not part of a complete rifle) that was badly stained. So badly, that I actually had to use aqueous chemicals (hydrogen peroxide and oxalic acid) to bleach it out. But, nevetherless, I washed it - I did NOT soak it. Patted it dry and left it for two days. And then I applied a light coat of BLO (for beginners: boiled linseed oil and left if for weeks. Until yesterday in fact, when I got it out to make this demonstration.
Look at the raw side. Most people would be tempted to use sandpaper on this.
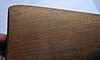
Look at the burnished side.
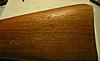
I have done nothing more than draw the home-made flexible burnisher (now no longer a scraper) along the grain, from the toe of the butt to the wrist (to go with the diagonal cut across the grain on the top of the butt). The portion from the butt socket is done in the other direction from the front backto the wrist. Always pick the direction so as not to go against the grain and the cut of the surface. Think of a bird preening its feathers!
You can see how the burnished portion has not only been smoothed out, but appears darker, because light is no longer being scattered by a "hairy" surface.
That is how I got the surface on The Mahdi, and that is how you should treat your stock. No tricks, just BLO, burnishers from 3.5" diskettes, and slow, careful work.
But first of all, we have to get the muck off. Remember the sergeant? This is not patina, this is not part of its history, it is muck. In the case of the Argentine RB, it looks as if it was kept in a room with painting materials. The drip marks on one side of the butt look like they were caused by some kind of solvent dripping onto the wood. In the case of the Norwegian Jaeger (I hope you are reading this, DaveN) the whole rifle was painted with varnish by Bubba to create a "treacle" rifle.
Both can be treated in the same way.
You need:
the gel-type stripper,
acetone,
methylated spirits (alcohol),
chemically resistant rubber gloves,
a surface that is not at risk (in practice, I put down a good layer of old newspapers on the workbench),
the scrapers
a palette knife with blunted edges, to remove the muck-and-stripper mix
a couple of rolls of paper kitchen towelling
a bucket or other container to dump the muck-and-stripper covered towelling as you work,
a large metal tray, so that you can "wash" (we are not using water) down the woodwork without making a horrible mess of the workbench, the floor, and yourself,
natural terpentine,
boiled linseed oil (BLO).
Most importantly, you need:
a place to work that is well ventilated. At this time of year, working on the terrace is not feasible, so I work in the cellar in short sessions, with an open window.
and
NO INTERRUPTIONS during the session. If you stop work for longer than a few minutes with stripper on the wood it will (maybe) penetrate too deeply and (definitely) dry off and you will have to redo the affected area.
and TIME.
Stripping
You do not have to do the whole stock in one go. You brush the stripper onto an area of the wood. I always start with the flat side of the butt, as this is simple to clean and gives you a quick feeling of success so that you gain courage to plod on and do the fiddly bits. Wiggle the brush a bit to rub the stripper into the muck. Do not think that you can now go away and come back later. Varnish, in particular, will soften very quickly, and then harden up again. After a couple of minutes, you will be able to scrape off the stripper-muck with the palette knife (you scrape the muck, not the wood!). Depending on the type of gel stripper (the chemicals appear to have been altered in recent years, probably because of ROHS) you "wash" it off with methylated spirits alcohol or turpentine while standing it on end in the tray. You should now have a patch that is clean enough to identify the wood (for DaveN). The palette knife gets off the bulk of the muck. Kitchen towelling dampened with meths or turpentine will take off the rest. Make sure the window really is open. One of the occupational hazards of old-time furniture finishers was getting high on meths fumes!
If this patch is looking OK, carry on piece by piece until you have done the entire stock. The piecewise progress (which you cannot use if you dunk the stock in a bath) is the reason why Claven2 wrote that you could do this without dismantliing the rifle. But if you have already dismanted the rifle, it is less fiddly.
When you have done the entire stock INCLUDING THE BARREL CHANNEL, sit back and take a look. There will probably be bits you have missed out and bits of stripper-muck that have gone hard. No problem. This is not any all-or nothing process (which is a good reason for using it). Simply go back and redo the unsatisfactory patches. Use the diskette scrapers for tight corners and curves.
When you are satified that the entire stock has been "de-gunged", give it a good brushing down with natural turpentine in all corners. You will now see how the wood will look when finished. Probably a damn sight better than before.
Joel: In your case, it is quite possible that the drip stains from the (presumed) solvent are still vislble after the gel-stripping. For these, and any other marks still remaining, we have to fight fire with fire and wash off the butt with acetone, as this will dissolve just about any solvent-based material that you will find outside a chemical laboratory. It will also wreck any polished finish on table tops etc. So use the brush very carefully, with the wood in the tray.
I would be grateful if both of you would publish a progress report after this - with pics - as once we start with the BLO on the stripped stock, we are starting to seal in anything that is still left in the wood.
That is enough for today
Wood refinishing will be in Part 6
End of Part 5
Last edited by Patrick Chadwick; 12-28-2021 at 04:17 PM.
Reason: Typo corrections
-
The Following 2 Members Say Thank You to Patrick Chadwick For This Useful Post:
-
Advisory Panel
Detailed Help on Posting Pics
Originally Posted by
jmoore
as you do not have the private messaging feature turned on
OK jmoore, I woke up!
Thanks for the nudge with the fence post. I needed that - I am so tired with this late-night composing of tricky instructions to lead beginners along the True Path without them falling into some of the holes I fell into. I am delighted to see that you are getting to grips with the Arisaka sticky now.
As to posting pics, I'll see if I can demonstrate it with this posting, right now. If it seems long-winded, that is because instructions usually just tell you how do do it right, and if anything goes wrong, you are snookered. I am going to show a bit of how it can go wrong, and how you can correct it, so please bear with me as I a spend an hour or so composing this
I suggest you print this out and use it to practise. In fact, you MUST print it out, because the extra screens will cover this text and you will not be able to carry on reading these instructions!
First few times, I kept on forgetting it all myself. It drove me crackers working it out again and again!
1) First of all, you MUST press the "Go Advanced" button. After the screen has hopped about a bit you will see that the white message box now has a menu bar at the top, with a lot of icons in two rows.
2) About 2/3 along the top row you will see a paper clip icon. Let the mouse hover over that, and the word "Attachments" should appear.
3) Click on the paper clip.
4) A box will open. In the blue title line it will say "Manage Attachments - Military Surplus Collectors Forums ...."
Below that: File Upload Manager - Manage all files that you have uploaded
5) From left to right you will see sections with Folders (if you have any) Home (which will show any files you have already uploaded - in your case, probably empty)
and, floating somewhere upper right,
a little box with a white cross on green background and the text Add Files.
6) Click on that box.
7) Yet another box opens, with title on a blue background "Upload Files from your Computer / Website".
At the bottom is a button "Select Files".
8) Click on that.
9) This takes you into the directory structure on your computer, landing by default in wherever you last quit the program. Any pictures will appear as thumbnails. If not, you need a computer guru.
10) When you have found out where you hid the pictures, click on each one you want to upload, and press the "Open" button at bottom right in the picture selection box. I am now going to do this with two pictures of the "treacle rifle" mentioned elsewhere. Each time I do that, a link is generate which appears in the "Upload Files" box. The "Select Files" box disappears and I have to press the Select Files button again to get it back, but maybe that's just my computer. Repeat this until you have links for all the pics you want to use listed in the "Upload Files..." box.
TIP: Make sure that your pictures have been given meaningful names. Otherwise you just have al list of designations from the camera (like I am looking at now), and when it comes to inserting the pics in your posting, you have no idea what's what, and end up re-editing over and over until all the pics are in the right places.
11) OK, back to the "Upload Files..." box.
Take a look at the list. If any of the pics have an exclamation mark on a red background at the right, under "Size", take a look at the size. It is too large to be accepted by the forum upload system.
That is just what I have now!
12) So now you have to press "Clear list" in the "Upload Files..." box. You do not have to crash out of the Forum site, just leave the whole "Upload Files..." box etc in the background.
13) Go back to your picture editing program (PhotoPaint or whatever). Save each file as a JPEG, so that it is compressed, and take the opportunity to give each one a meaningful name. And you can also crop the pic to cut out unnecessary background while you're at it. That means that the important part of your pic will appear larger in the final posting.
14) Back to Select Files. Redo from 8) above.
I now have the same two pics, much smaller in size, and the exclamation marks have disappeared. I.e. the files are small enough to be uploaded.
15) Press the "Upload Files" button. The files are now being uploaded. Sometimes the blue progress bar hangs for long enough that you begin to think it has gone wrong. Patience!
16) When the upload is finished, the box will disappear, and you are now back to the "File Upload Manager Box".
But there is a difference. The files you just uploaded are now visible in the "Home" box, for future use. Please note the warning at the bottom on the bottom line that "Uploads not ulitlized within one hour will be deleted! If you spend too long writing an epic work (like the Argentine RB series) you can fall into that trap, and discover that you have to upload the pics again!
At the bottom, there is now a section titled "Attachments" that shows thumbnail pics of the picture files you have just uploaded. Note that they are all preselected for attachment with the little tick boxes at bottom right of each thumbnail pic. So you can alter the selection here, if you so wish.
17) Now go to bottom right and pres the "Attach Pics" button.
Like this

and this

BTW. Notice that Bubba had hard-soldered the foresight block onto the barrel sleeve. Crudely and crooked. Yeuch! It took me a long time to fix that.
18) Press the paper clip again - Voila Bingo and Abracadabra! A list of the pics which are attached (and you are glad that you gave them meaningful names).
19) All you need to do now is to FIRST go to the point in the text of your posting where you want to insert the pic and THEN open the attachment list, scroll down (if you have so many pics) to the one you want and press to select it. A link now appears in the text. You have to go to "Preview Post" to see the actual picture.
20) And now for a DIRE WARNING !!! While doing the Argentine RB parts, I ended up hopping backwards and forwards between this message composition box and the preview. And every time I do that I see something that could be improved, want to change the order of text, which means shunting the pics around. In short, I have experienced a) that the "time-out" really does removes the not-yet used pics after an hour and b) you can get so confused that you lose the whole posting. When this happens around midnight (Murphy's law) it is very, very, depressing. Too tired even to be angry, I redid it all and was finally finished towards 1 am.
I have not discovered how to save a draught posting on this forum software , if the function exists. This posting has therefore been backed up on my word processor as I go. And I have been composing the Argy RB series on the word processor first, only pasting the text into the Go Advanced message box and adding the pics when I have it all together.
All these tips are in the hope that it will help you with that excellent sticky, with lots of pictures, about the Arisaka, which I know you are composing even as I write....
And why do I not have the private messaging feature turned on?
- Because I very quickly found I was being pestered by people who thought I was running a 24/7 free advisory service on Mauserology. And I remember how the old board became infested with spams and worse, until it became useless. The information we provide on these forums is supposed to help forum members at large, and I see no need to provide a private service as well.
Furthermore, I am foolish enough to use my own name. I have to stick up a fence somewhere, so I blocked the private messaging feature. Messages that are not intended for the general public could surely be posted in the "team" forum and removed after a while?
Well, that was a good start to the day. Let's see if it worked.
It did. Please let me know if it works for you.
No more now. I hope I have left Joel and DaveN happily slaving away over their bits of wood for a day or two. Off to the range for a test run with my cheapo Artillery 08 Luger, but that is another story...

Last edited by Patrick Chadwick; 12-28-2021 at 04:02 PM.
-
-
I've not had a problem w/ PM's at all, but I try not to look too competent. Which isn't hard, because I'm not. I just make this stuff up as I go!
At any rate, would you rather do the existing blog, or should I copy it to a new thread on the "team" forum? Realistically, I think the blogs get less traffic! Plus, I'm not worried about privacy, just wanted a quiet space to work it out.
No grand worry, or hurry. I wouldn't be here now, except the wind got to be too much to expect much deer movement, and the prostatitis was giving me fits. Hard to be a "tree" when you've got to go...
BTW, don't delete your photo tutorial just yet! I "broke" the printer, and I'm not about to attempt a fix w/o the owner's supervision. Besides, it's buried under a mountain of paperwork that's also not mine. Nope, not gonna spring that mousetrap!
-
-
Advisory Panel
Originally Posted by
jmoore
At any rate, would you rather do the existing blog, or should I copy it to a new thread on the "team" forum?
I could hardly read that in the original lurid color. I find it easiest and safest to work the whole thing up on a word processor until you are really happy about the content, and then paste it into the forum and add the pics.
I wasn't going to delete that last posting anyway - it cost me about 2 hours to get it right! I leave it up to the moderators to decide whether it should be left, moved, or binned.
Patrick
-
-
FREE MEMBER
NO Posting or PM's Allowed
Hi guys,
I'm stripping the stock today and just stopped by to print and re-read part 5.
Patrick you were correct about the stains not being completely removed by stripper alone. I'll probably need to finish with acetone but wanted to re-read the instructions first. I'll post pictures later tonight.
Sorry about your late nights typing instructions, I'll do my best to make your work worth the effort.
Joel.
-
Advisory Panel
-


 PM
PM


