")

")


 killforfood


Just to remind you where we are going:
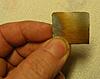
The wood on the Mahdi is a very fine, hard walnut (look at the rounded metal, and look how well the wood has stood up to the same environment).
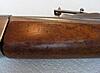
The wood on the your RB is probably the same. But how are we going to get it looking good, without Bubbaring?
First of all, another little diversion...
Wood stripping
I remember you queried the gel-type paint stripper on the shopping list. You mentioned oven cleaner, and something about destroying the surface. You were right to think that there is some kind of hazard in this wood-stripping business.
I have expressed, on another forum and quite drastically enough, my horror at the thought of soaking old wood when refurbishing old rifles. Quite apart from the danger of warping, the use of a chemical such as caustic soda, and closely related chemical mixes, such as oven cleaners, destroys the surface of the wood.
I do not just mean that they raise the grain and make the surface a bit hairy. They are truly destructive.
You can verify this through a little experiment.
1) Place another natural hair brush and toothbrush in a container with a small quantity of the gel paint stripper.
2) Place the tips of a natural hair brush and an old plastic/nylon toothbrush in a container with a small quantity of a strong caustic soda solution.
In 1) in a couple of minutes you will see the toothbrush going to pieces in the gel paint stripper, while the natural hair brush is unaffected.
In 2) it takes a bit longer, but while the toothbrush is quite happy in caustic soda, the natural hair brush will start to rot. Take it out and try brushing, and the bristles will disappear before your eyes. But it would be a pity to waste the brushes. Just trust me.
Now you know why we are using gel paint stripper with natural hair brushes, and NOT caustic soda. Caustic soda destroys organic materials (wood, hair), which is why it is good for oven cleaners and clearing blocked sinks, but is death for any high-quality wood surface.
Surprise time!
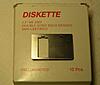
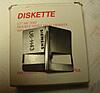
Penny-pinching for packrats
"It might come in handy one day." If that is a typical phrase for you (as for me) then we are both packrats, with a cellar full of junk that we are reluctant to bin. But once in a while we are proven right (and we forget the other 99%).
So wasn't it a good idea to keep those old 3.5" diskettes!
If you bend the disk cover open slightly you can pop it off.
A small wire spring with a loop will fly out and land somewhere where it is invisible. Good packrats will catch these springs and keep them in a little box for the famous "...one day".
What intererest us at present is the metal cover. This is made of a material that appears to be a kind of stainless steel. It is only weakly attracted by a magnet, and presumably has very little remanent magnetism - otherwise it would tend to wipe the disk!
Be warned! The edges of these things can be very sharp!
Now open up the cover plate and use a plastic hammer to flatten it right out on something that serves as an anvil.
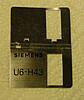
The bit with the holes is no use for what we are going to do. Use tin snips to remove it. You now have a rectangle with some very sharp corners.
You MUST round off those corners.

Even the two pre-existing ones. And the edges MUST also be bluntened around those corners.You can use a Swissfile, but if you make a habit of this kind of work, you will one day get one of these:

An Eazi-Lap - they are wonderful for very fine resurfacing and edge correction on lock parts etc.
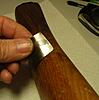
What you now have is a home-made one of these:
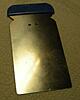
Even if you use a commercial paint scraper you will also have to round off the corners (as I did to this one). If you do not, it is very easy (and I have done it) to gouge a line in the woodwork that is too deep to be removed by gentle methods.
So why not just buy commercial scrapers and round the corners off? Am I such a penny-pincher?
- Hmmm, could be, but the real reason is that you now have a scraper that has just the right amount of flexiblity for cleaning up gunstocks. And I have not yet found a commercial scraper that is so thin and flexible.
On as-good-as-flat surfaces you can apply just a bit of curvature by flexing it in your fingers so that it follows any slight dips in the wood. On curved surfaces you can pre-bend it for a rought fit, and tune that with finger pressure.

Just one further point - we are not actually going to scrape the wood.
We are going to burnish it!
Wood burnishing
I discovered this method while using one of these things to scrape a wood surface. Please forgive me if I repeat myself, but for this kind of work you do NOT need sandpaper. Scrapers are used by cabinet makers to give hardwood surfaces a highly smooth, close finish before applying shellac etc. If you hold the scraper nearly at right angles to the wood and pull it sideways, but ALWAYS along the grain, it will scrape off a microscopic amount. While bending the scraper between my fingers - to follow the curve of a butt, I realised that I was still getting a smoothing action, although the scraper was not cutting at all. The scraper could be dragged along the grain and smooth down the wood without cutting it.
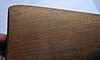
As an illustration, here is an old Enfield butt (not part of a complete rifle) that was badly stained. So badly, that I actually had to use aqueous chemicals (hydrogen peroxide and oxalic acid) to bleach it out. But, nevetherless, I washed it - I did NOT soak it. Patted it dry and left it for two days. And then I applied a light coat of BLO
Look at the raw side. Most people would be tempted to use sandpaper on this.
Look at the burnished side.
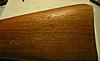
I have done nothing more than draw the home-made flexible burnisher (now no longer a scraper) along the grain, from the toe of the butt to the wrist (to go with the diagonal cut across the grain on the top of the butt). The portion from the butt socket is done in the other direction from the front backto the wrist. Always pick the direction so as not to go against the grain and the cut of the surface. Think of a bird preening its feathers!
You can see how the burnished portion has not only been smoothed out, but appears darker, because light is no longer being scattered by a "hairy" surface.
That is how I got the surface on The Mahdi, and that is how you should treat your stock. No tricks, just BLO
But first of all, we have to get the muck off. Remember the sergeant? This is not patina, this is not part of its history, it is muck. In the case of the Argentine
Both can be treated in the same way.
You need:
the gel-type stripper,
acetone,
methylated spirits (alcohol),
chemically resistant rubber gloves,
a surface that is not at risk (in practice, I put down a good layer of old newspapers on the workbench),
the scrapers
a palette knife with blunted edges, to remove the muck-and-stripper mix
a couple of rolls of paper kitchen towelling
a bucket or other container to dump the muck-and-stripper covered towelling as you work,
a large metal tray, so that you can "wash" (we are not using water) down the woodwork without making a horrible mess of the workbench, the floor, and yourself,
natural terpentine,
boiled linseed oil (BLO).
Most importantly, you need:
a place to work that is well ventilated. At this time of year, working on the terrace is not feasible, so I work in the cellar in short sessions, with an open window.
and
NO INTERRUPTIONS during the session. If you stop work for longer than a few minutes with stripper on the wood it will (maybe) penetrate too deeply and (definitely) dry off and you will have to redo the affected area.
and TIME.
Stripping
You do not have to do the whole stock in one go. You brush the stripper onto an area of the wood. I always start with the flat side of the butt, as this is simple to clean and gives you a quick feeling of success so that you gain courage to plod on and do the fiddly bits. Wiggle the brush a bit to rub the stripper into the muck. Do not think that you can now go away and come back later. Varnish, in particular, will soften very quickly, and then harden up again. After a couple of minutes, you will be able to scrape off the stripper-muck with the palette knife (you scrape the muck, not the wood!). Depending on the type of gel stripper (the chemicals appear to have been altered in recent years, probably because of ROHS) you "wash" it off with methylated spirits alcohol or turpentine while standing it on end in the tray. You should now have a patch that is clean enough to identify the wood (for DaveN). The palette knife gets off the bulk of the muck. Kitchen towelling dampened with meths or turpentine will take off the rest. Make sure the window really is open. One of the occupational hazards of old-time furniture finishers was getting high on meths fumes!
If this patch is looking OK, carry on piece by piece until you have done the entire stock. The piecewise progress (which you cannot use if you dunk the stock in a bath) is the reason why Claven2 wrote that you could do this without dismantliing the rifle. But if you have already dismanted the rifle, it is less fiddly.
When you have done the entire stock INCLUDING THE BARREL CHANNEL, sit back and take a look. There will probably be bits you have missed out and bits of stripper-muck that have gone hard. No problem. This is not any all-or nothing process (which is a good reason for using it). Simply go back and redo the unsatisfactory patches. Use the diskette scrapers for tight corners and curves.
When you are satified that the entire stock has been "de-gunged", give it a good brushing down with natural turpentine in all corners. You will now see how the wood will look when finished. Probably a damn sight better than before.
Joel: In your case, it is quite possible that the drip stains from the (presumed) solvent are still vislble after the gel-stripping. For these, and any other marks still remaining, we have to fight fire with fire and wash off the butt with acetone, as this will dissolve just about any solvent-based material that you will find outside a chemical laboratory. It will also wreck any polished finish on table tops etc. So use the brush very carefully, with the wood in the tray.
I would be grateful if both of you would publish a progress report after this - with pics - as once we start with the BLO on the stripped stock, we are starting to seal in anything that is still left in the wood.
That is enough for today
Wood refinishing will be in Part 6
End of Part 5
- Knowledge Library

- MKL Entry of the Month
- Australia
- Austro-Hungarian Empire
- Canada
- Czechoslovakia
- Denmark
- Finland
- France/Belgium
- Germany
- Italy
- Japan
- Norway
- Russia
- South America
- Sweden
- Switzerland
- Turkey
- United Kingdom
- United States
- Yugoslavia
- Is my rifle authentic or a fake?
- Jay Currah's Lee Enfield Web Site
- On-line Service Records (Canada)
- Technical Articles/Research
- Forum
- Classifieds
- What's New?
-
Photo Gallery
- Photo Gallery Options
- Photo Gallery Home
- Search Photo Gallery List
-
Photo Gallery Search
- Video Club
- iTrader

 PM
PM
 Milsurps Voice Mail