-
FREE MEMBER
NO Posting or PM's Allowed

Bolt work, please tell if I got it right?
I had two no4 rifles. One is a savage and the other I'm not sure but it is a no4. Neither would headspace. I had picked up a spare bolt at a show some time ago,The only marking I can read on it is an (L 1) inside the slot on the long bolt lug, so I thought I would tinker a little. On the savage just trading out the bolt head brought it back into headspace. On the other I traded out the bolt body and this brought this rifle back into headspace. I guess my questions are on the savage is it ok to use this bolt head and on the other rifle is it ok to swap the bolt body. P.S. Does anyone know what the L1 stands for. Thanks
Information
 |
Warning: This is a relatively older thread
This discussion is older than 360 days. Some information contained in it may no longer be current. |
|
-
10-20-2012 09:07 PM
# ADS
Friends and Sponsors

-
Legacy Member

No problem with changing the bolt head - thats how it was done. Just ensure that you do not have overturn on the bolt head compared to the bolt body.
Changing the complete bolt body is a little more involved you cannot just 'plug in' another one- see Peter Laidlers article
http://photos.imageevent.com/badgerd...0boltheads.pdf
Mine are not the best, but they are not too bad. I can think of lots of Enfields I'd rather have but instead of constantly striving for more, sometimes it's good to be satisfied with what one has...
-
-
-
Advisory Panel


But before you throw away your old parts, what gauge did you check the headspace with? A Milspec No-Go gauge or a SAAMI spec "throw away all your old enfields because we don't make any money off them or the milsurp ammo they use" gauge
-
-
Dave.......... Just changing the bolt head might bring your CHS back into the official .064 GO - .074" NO-GO criteria but it's not that simple I'm afraid. That's because changing a bolt head can affect loads of other aspects of the bolt. It might not of course, but on the other hand it' can affect striker protrusion, overturn, lift and.......and.........
Best read a short article about bolt fitting
-
The Following 4 Members Say Thank You to Peter Laidler For This Useful Post:
-
FREE MEMBER
NO Posting or PM's Allowed
Thanks for the replys. I will go back and fit the bolt as the article says doesn't seem to be to difficult. A little background on why I even got into checking headspace is that I was shooting one of these and kept getting firing pin protrusion into the primer. Changed the spring and check protrusion as someone suggested. Went out shooting and the last shot I guess bled enough gas to blow the cocking piece back and slapped the knuckle of my thumb, Thought it was broke for about a week. Needless to say I figured my issues were a little deeper than a spring, bought the gauges and I'm going to fix it because although it is pretty to look at its more fun to shoot.
-
And while you're there, forget about all these alice-in-wonderland gauge specs that you've read about. All you need are TWO headspace gauges. .064" GO and .074" NO-GO plus a .040" LOW .050" HIGH gauge for the striker protrusion. Make sure that you check the CHS gauges with a micrometer
-
-
Advisory Panel


Originally Posted by
dave5496

. . . why I even got into checking headspace is that I was shooting one of these and kept getting firing pin protrusion into the primer. . .
The idea that pierced primers are a symptom of headspace problems seems to have become popular on the internet. I wonder how this myth got started.
Pierced primers ordinarily have somewhere between very little and absolutely nothing to do with headspace. They usually come from one of three causes -
- High pressure (enough to push the pin back into the bolt face and "blank" a piece of the cup matching the pin hole in the bolt face). This is rare.
- Weak, brittle, corroded, or defective primer cup. Uncommon with new ammo or primers.
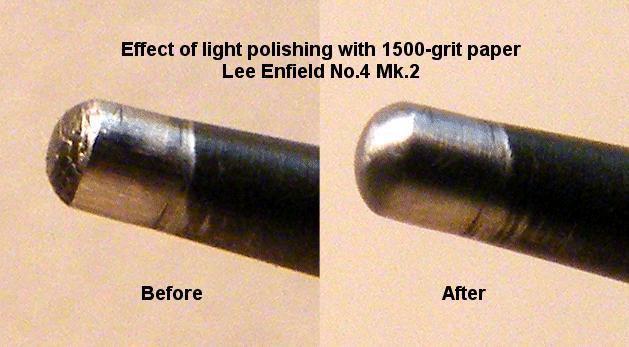
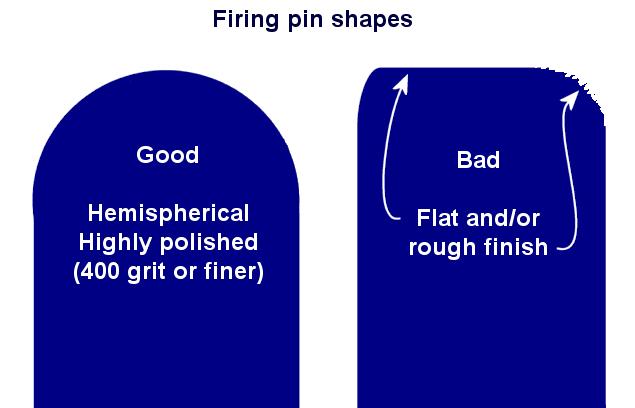
- Rough or poorly-shaped firing pin tip. Happens all the time. A rough or angular tip surface "grabs" the primer cup while it is attempting to stretch under firing pressure, often tearing it. (Imagine poking a toy balloon with your elbow and then with your fingernail. Same idea.)
The first step after encountering a bunch of pierced primers is to examine the firing pin tip under magnification. If it's not very smooth and hemispherical, it often doesn't take much work to correct it. (Altering the rifle's headspace won't do a thing to fix a rough tip.)
If the firing pin tip is properly shaped and polished, even grossly excessive headspace doesn't produce pierced primers. Symptoms of excess headspace include inconsistent ignition, case stretching forward of the solid web, and sometimes complete head separation.
For a realistic understanding of Lee-Enfield headspace, see Milsurps - Headspace 101 for .303's
-
The Following 11 Members Say Thank You to Parashooter For This Useful Post:
Amatikulu,
Brian Dick,
Detroit-1,
HOOKED ON HISTORY,
jmoore,
jrhead75,
paulseamus,
Peter Laidler,
Ridolpho,
RobD,
Son
-
Contributing Member

Last year my wife bought me a No4 Longbranch. Someone had 'tuned' the firing pin tip with an angle grinder. It looked like a sharp nail head. I guess that's why a guy should always strip a new rifle right down before shooting it!
-
-
As apprentices, I seem to recall that we spent some 3 weeks just setting up bolts and trigger mechanisms from scratch. We used to strip rifles and put all the bolt and trigger parts in an old pillow case/bag and the affable but strict Mr 'Stan' Ayley would shake the bag and you'd come up and select the parts you needed and then set about geting it right. Because the rifles and parts and rifles had been used for ages and ages by generations of apprentices, you'd occasionally find that you couldn't set up a bolt or trigger mechanism correctly so you'd have to identify the unserviceable part, explain it to him using a skeleton action and he MIGHT give you a new part - so you'd bloody start all over again. You'd also find defective parts in the bag that you'd select inadvertantly such as a bolt with no cam stud or cocking piece with too great an angled sear face. Everything had to be correct. Bolt bearing surfaces, CHS, lift FPP, overturn and............
No8 rifles were even worse as the untouchable factory-set overdraw pull-off screw would be tampered with and there were different pull-offs to contend with. I was lucky because my 'class' rifle (Rifle and tool kit number 20 as I recall.....) was a F-53 Mk1/2 whereas most were clapped out Mk1's and 1*'s
So you can understand why I cringe a little when I read of those who just swop this that and the other with no regard to anything else or just follow the advice of some enthusiastic amateur
Last edited by Peter Laidler; 10-23-2012 at 11:53 AM.
-
The Following 2 Members Say Thank You to Peter Laidler For This Useful Post:


 Register To Reply


