-
Legacy Member

In the day when these rifles were used on the range the trigger weight had to be military spec or you were DQd . That included two stage trigger as well. 5lb first pull 6lb second pull no ifs no buts.
My go to work rifle is a No5 still with its milspec trigger.
-
Thank You to Bindi2 For This Useful Post:
-
02-25-2018 02:43 AM
# ADS
Friends and Sponsors

-
Advisory Panel


To anyone who feels like filing about (call it f-ing about) on a trigger/sear interaction.
Read up on safety-off fires and slam-fires first. Then, unless you are really, really able to carry out the job in the meticulous fashion described elsewhere by Peter Laidler , LEAVE IT ALONE!
And, judging by the groups shown in the photos, that rifle just needs the sights centering - nothing else!
-
-
Legacy Member


Originally Posted by
Patrick Chadwick

And, judging by the groups shown in the photos, that rifle just needs the sights centering - nothing else!
And the breathing sorted out 
-
-
FREE MEMBER
NO Posting or PM's Allowed
Originally Posted by
Bindi2
In the day when these rifles were used on the range the trigger weight had to be military spec or you were DQd . That included two stage trigger as well. 5lb first pull 6lb second pull no ifs no buts.
My go to work rifle is a No5 still with its milspec trigger.
I think you missed the part where I said I'd love a 6# milspec trigger. But mine's a bit closer to 8#. And that's too high of a wall to climb. Especially on a scoped rifle. I was just hoping to bring the trigger down to the nominal 6# region, same as my #1's. I was hoping to get lucky with swapping in some new parts. But that didn't pan out.
-
FREE MEMBER
NO Posting or PM's Allowed
Originally Posted by
Patrick Chadwick
To anyone who feels like filing about (call it f-ing about) on a trigger/sear interaction.
Read up on safety-off fires and slam-fires first. Then, unless you are really, really able to carry out the job in the meticulous fashion described elsewhere by
Peter Laidler, LEAVE IT ALONE!
And, judging by the groups shown in the photos, that rifle just needs the sights centering - nothing else!
Noted. These operations can be risky. I've always limited my mods to polishing of surfaces. Never changing any shapes or contours. Above I'd said that I would like to stone the surface of the cocking piece (or have a professional do the job) to smooth it without changing the angle. This is the first thing to try, in my opinion. Under magnification (10x) even that polished surface is pretty ripply with the tool marks left behind from the mass production process. A proper stoning would take that away. I figure it might be worth a try some day, on my spare cocking piece. Then, obviously, testing it rigorously before introducing live ammo into the equation. Like I've been trying to say, I have no current plan to pursue this.
And yeah, the scope wasn't perfectly adjusted. LOL I was testing some loads that day and only needed to hit the paper. The rifle does seem to like Reloader 15. Good enough anyway.
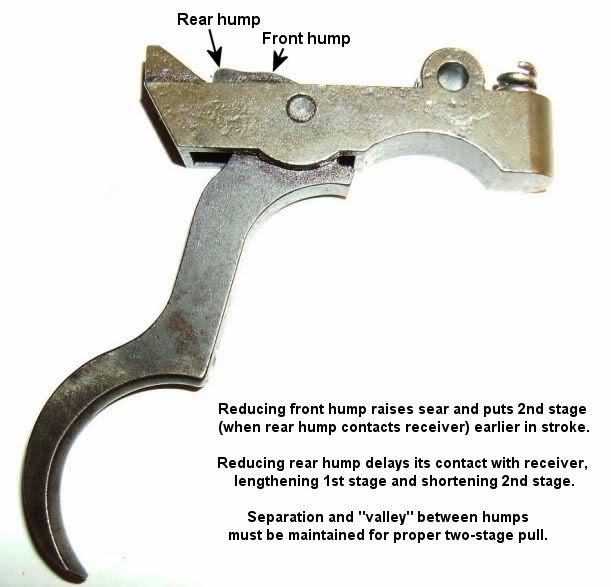
FWIW, years ago I saw this below, I think on this forum. it's what got me wondering about the cocking piece angle, etc.
-
FREE MEMBER
NO Posting or PM's Allowed
Here's an interesting older thread on the topic. I'm still in the process of reading it.
http://www.milsurps.com/showthread.php?t=21580
-
FREE MEMBER
NO Posting or PM's Allowed
Originally Posted by
Bindi2
In the day when these rifles were used on the range the trigger weight had to be military spec or you were DQd . That included two stage trigger as well. 5lb first pull 6lb second pull no ifs no buts.
My go to work rifle is a No5 still with its milspec trigger.
BTW, big sorry Bindi. Dawned on me later that you were literally answering my question about how a 6# trigger is a range trigger. I took it a different way. Then thought about more it while on my morning bike ride.
-
Contributing Member


I have modified the trigger pull on my No1 rifle that I use in modified Service Rifle competitions. The second pull was around 7 lbs prior to modifying.
I wanted to keep the two stage trigger and a proper level of safety. I measured the angle of the cocking piece face on No1 rifle and compared it the No4 and L39.
The L39 is a lighter two stage pull; the cocking piece angle is different to the others. I measured the angle and decided to modify a spare cocking piece to an angle between the standard No1 rifle and the L39.
I made a rig to ensure the face would remain at the correct angle while stoning. See photos. I used an Arkansas stone set into a channel in a piece of old work top.
Then made a slot in another piece of wood so that the cocking piece was a snug fit. Fitted a screw in the slot to adjust the angle of the cocking piece. carefully checked the set angle then gently stoned the face.
The result was a big improvement. 3,5lbs first pull and 5 lbs second pull. If the trigger is released at first pull the cocking piece moves forward to it's original position; which is essential for safety.
I'm sure some people will disagree with tampering with these part's; I respect their point of view. But with careful attention to detail it can be done. Just make sure it's safe!
Attachment 91038Attachment 91037Attachment 91039Attachment 91040Attachment 91041
-
The Following 4 Members Say Thank You to 30Three For This Useful Post:
-
FREE MEMBER
NO Posting or PM's Allowed
Thanks 30Three. That's pretty much the same as I'm talking about. The metal jig I linked is a perfect tool for such a project. It employs an Arkansas stone on a surface that's clamped securely against the vertical 'wall'. It allows very fine adjustment of angles. Only problem is that it's a bit pricey: about $170US or more, delivered to my house. I like that you thought to make your own from wood. You probably saved a lot of money that way.
Getting back on Hypothetical Street, as I was saying earlier Plan A would be to simply keep the same angle and see what stoning and polishing the C-piece would do. If no real improvement then maybe measure my #1's C-piece angle. Possibly try to match that.
And of course, test test test before introducing live ammo at a range. After installing my Huber trigger and getting it adjusted to my satisfaction, I cocked the rifle (empty of course) and gave it some drop tests onto a folded piece of rawhide I placed on my garage floor, from about a foot high. Then I smacked it a few times from the right and left side to ensure that nothing bad would happen. Then I dry fired it, re-cocked, and repeated the tests.
I might even make up a dummy round from a 'retired' brass case in the bin and make sure everything's still okay with a round in the chamber.
Not to get too off-topic, but man, if you guys want to see an UNSAFE trigger, you could check out my dad's old Winchester Model 54. He gave it to me a few years ago. His dad bought it for hunting in TX ca. 1930. It's a beautiful hunting .30-'06, but someone messed with the sear and sear stop somewhere along the way. These M54s, the predecessor to the M70 by the way, were known for heavy triggers. But for various reasons, mine breaks at just 2#. And it sometimes goes off when just lifting the bolt handle slightly! It's a mess. I need to find a professional who knows about these old rifles.
-
-


 PM
PM