-
Advisory Panel


Originally Posted by
nijalninja

. . . I could gouge/chisel out a small square around threaded rod/screw wire on one side of the fore-end enough to grab it with a pair or pliers and twist it out . . .
Unfortunately, the divot you'll make to grab the "wire" will likely create a considerably larger exterior blemish than a thin-wall hollow drill would leave. (The drill can be made by filing teeth on the end of a steel tube with I.D. matching the O.D. of the "wire".)
-
The Following 2 Members Say Thank You to Parashooter For This Useful Post:
-
10-15-2018 01:21 AM
# ADS
Friends and Sponsors

-
Legacy Member

Now that I think of it you are right Para. I also never thought to do that to make one. What angle do you put on the teeth may I ask?
-
-
I'd agree with trying Para's method. I think you might also find, having gauged a hole big enough to grab hold of the brass wire with pliers, that once you started twisting it it would probably just shear off, leaving you with an even worse problem to sort out.
-
Thank You to Roger Payne For This Useful Post:
-
Advisory Panel
Originally Posted by
nijalninja
. . . What angle do you put on the teeth . . . ?
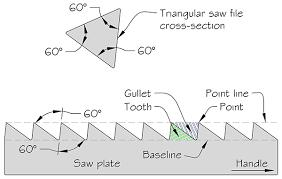
Anything that works. A triangular needle file is what I used for filing them "sawtooth" style. Drilling is a slow process since you have to back out and clear the sawdust frequently.
Last edited by Parashooter; 10-15-2018 at 03:22 PM.
Reason: Add image
-
-
Legacy Member
I would keep the hollow drill just a little longer than needed to pass completely through the stock. You will want to use a drill press and mount the stock securely. That drill will want to skate around - especially when starting the hole.
-
-
Legacy Member

Originally Posted by
Bluenoser
I would keep the hollow drill just a little longer than needed to pass completely through the stock.
Wouldn't it be better to drill from both sides as when that drill bit comes out the other side it''ll chew up wood as it exits causing more damage?
-
-
Advisory Panel
Originally Posted by
Kiwi
Wouldn't it be better to drill from both sides as when that drill bit comes out the other side it''ll chew up wood as it exits causing more damage?
Yes. Also, better to use a hand-held drill and let the bit "follow" the "wire". If using a drill press, use the old center-on-the-offside trick to ensure alignment.
Start the cut gently by hand to avoid "skating" - after all, we're machining wood, not metal.
Last edited by Parashooter; 10-15-2018 at 05:43 PM.
-
-
Legacy Member
Originally Posted by
Kiwi
Wouldn't it be better to drill from both sides as when that drill bit comes out the other side it''ll chew up wood as it exits causing more damage?
Kiwi is absolutely correct. However, to address Parashooter's comment, There is no way I would attempt to use that cutter in a hand held drill without some kind of serious stabilizing jig. It would want to skate all over the place. Try removing the pilot drill from a hole saw and using that in a hand held drill. Been there, done that, bought the tee shirt and ain't pretty 
-
-
Advisory Panel
'Noser forgets that we're drilling around a metal rod, which serves as a pilot for the hollow drill. This isn't a 3" hole saw, but rather a ~3/16" tube - very easy to start cutting wood with that little toothed tube held with only fingers. Once it's about 1/8" in, we chuck it up and proceed slowly under power - withdrawing frequently to clear sawdust.
-
-
Legacy Member
The threaded brass "wire" that we used to repair the L1A1 butts was different from the examples shown in previous posts. I have it in my notes as: 9525-66-014-4653 Wire, Non-electrical, Brass, screwed No.2 standard. (if that helps). It came in continuous rolls of several metres and was cut as required. You just had to straighten it out before use. The recommended drill size was No. 49 (0,073").
The application of "Adhesive, Glue, Marine", (NSN 8084-66-018-3647) was recommended for general splits, patches and splices.The process using the wire was to clamp the split shut as tightly as possible. This is where a friend in the vehicle workshop is handy. We used, and I still use, long strips of old inner-tube rubber. This is wrapped around the area being glued or "wired". As you wrap the rubber strip, you keep it as taut as possible and then simply tuck in the "running" end. After several turns, the compression on the wood gets to be quite high. Do this wrapping BEFORE drilling and wiring or AFTER the application of the "good' glue to a crack or chip.
With the wire, it was usually wound in using a hand-drill or a simple tapping tool. The brass was left protruding at both ends. Finally, the excess nipped off and the stubs carefully filed flush with the woodwork.The use of this brass threaded wire is common even in factory-new Australian Coachwood SMLE fore-ends etc. because Coachwood is, to put it bluntly, crap timber and is VERY prone to splitting if you just look at it funny.
-
The Following 2 Members Say Thank You to Bruce_in_Oz For This Useful Post:


 PM
PM


